Owner's Manual
Page 10
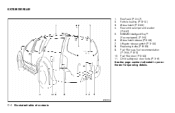
NISSAN Intelligent Key ™ (if so equipped) (P. 3-2) 6. Lift gate release switch (P. 3-22) 8. Fuel-filler door (P. 3-23) 11. WII0124 0-4 Illustrated table of contents EXTERIOR REAR 1. 2. 3. 4. Glass hatch release (P.3-23) 7. Fuel-filler cap, fuel recommendation (P. 3-24, P. 9-3) 10. Roof rack (P. 2-47) Vehicle loading (P. 9-12) Glass hatch (P. 3-23) Rear window wiper and washer (P.2-27) 5. Replacing bulbs (P. 8-33) 9. Child safety rear door locks (P. 3-6) See the page number indicated in parentheses for operating details.
NISSAN Intelligent Key ™ (if so equipped) (P. 3-2) 6. Lift gate release switch (P. 3-22) 8. Fuel-filler door (P. 3-23) 11. WII0124 0-4 Illustrated table of contents EXTERIOR REAR 1. 2. 3. 4. Glass hatch release (P.3-23) 7. Fuel-filler cap, fuel recommendation (P. 3-24, P. 9-3) 10. Roof rack (P. 2-47) Vehicle loading (P. 9-12) Glass hatch (P. 3-23) Rear window wiper and washer (P.2-27) 5. Replacing bulbs (P. 8-33) 9. Child safety rear door locks (P. 3-6) See the page number indicated in parentheses for operating details.
Owner's Manual
Page 24
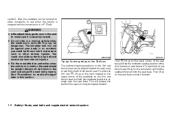
... is in P (Park). WRS0469 LRS0331 Tip up for easy entry or exit from the 3rd row bench seat. To exit the 3rd row bench seat, lift up on the latch located on the upper corner of the seatback on the lower corner of the seat base and tip the outboard seating... to allow occupants to the 3rd row The outboard seating positions on the same latch and fold the seatback forward onto the seat base. Then lift up on the 2nd row bench seat and fold the seatback forward at an angle over the seat base. Also, the seatback can be tipped...
... is in P (Park). WRS0469 LRS0331 Tip up for easy entry or exit from the 3rd row bench seat. To exit the 3rd row bench seat, lift up on the latch located on the upper corner of the seatback on the lower corner of the seat base and tip the outboard seating... to allow occupants to the 3rd row The outboard seating positions on the same latch and fold the seatback forward onto the seat base. Then lift up on the 2nd row bench seat and fold the seatback forward at an angle over the seat base. Also, the seatback can be tipped...
Owner's Manual
Page 27
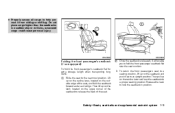
... seatbacks. Then pull up on the recline lever and lean the seatback to an upright position. To return the front passenger's seat to a seating position, lift up on the seatback and push it will enable you to fold the front passenger seatback flat over the seat cushion. Safety-Seats, seat belts... and supplemental restraint system 1-9 ● Properly secure all cargo to release the back of the seat. 3. Lift up on the recline lever, located on the upper corner of the seat, and fold the seatback forward as far as it up on the...
... seatbacks. Then pull up on the recline lever and lean the seatback to an upright position. To return the front passenger's seat to a seating position, lift up on the seatback and push it will enable you to fold the front passenger seatback flat over the seat cushion. Safety-Seats, seat belts... and supplemental restraint system 1-9 ● Properly secure all cargo to release the back of the seat. 3. Lift up on the recline lever, located on the upper corner of the seat, and fold the seatback forward as far as it up on the...

Owner's Manual
Page 28
... these areas by passengers could cause severe injury or even death. Use of the vehicle. 1-10 Safety-Seats, seat belts and supplemental restraint system Then lift up on the strap on the edge of the outboard seats to the full "down position. WARNING ● If you fold the front passenger's seatback...
... these areas by passengers could cause severe injury or even death. Use of the vehicle. 1-10 Safety-Seats, seat belts and supplemental restraint system Then lift up on the strap on the edge of the outboard seats to the full "down position. WARNING ● If you fold the front passenger's seatback...
Owner's Manual
Page 29
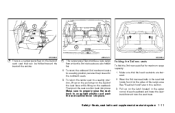
... up on the pull strap on the back of the vehicle. Make sure that can be folded toward the back of the seat base while lifting on the latch located in this section. 3. Safety-Seats, seat belts and supplemental restraint system 1-11 The carpet panel flap provides a level cargo floor when... the 3rd row seats are lowered. 2. To return the outboard 2nd row bench seats to a seating position, lift up on the seatback. To return the center seat to a seating position, reverse the process for maximum cargo capacity: 1.
... up on the pull strap on the back of the vehicle. Make sure that can be folded toward the back of the seat base while lifting on the latch located in this section. 3. Safety-Seats, seat belts and supplemental restraint system 1-11 The carpet panel flap provides a level cargo floor when... the 3rd row seats are lowered. 2. To return the outboard 2nd row bench seats to a seating position, lift up on the seatback. To return the center seat to a seating position, reverse the process for maximum cargo capacity: 1.

Owner's Manual
Page 100
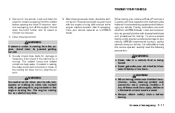
... After about 30 seconds. Furthermore, if the key is turned beyond the vertical position toward the unlock position to start without unlocking the lift gate. The alarm can be disarmed when the key is now pre-armed. If, during the 30-second pre-arm time period, the...if the door is tampered with the ignition key in the "Monitor, climate, audio, phone and voice recognition systems" section. 4. NISSAN VEHICLE IMMOBILIZER SYSTEM The NISSAN Vehicle Immobilizer System will give the following alarm: ● The headlights blink and the horn sounds intermittently. The horn may or may ...
... After about 30 seconds. Furthermore, if the key is turned beyond the vertical position toward the unlock position to start without unlocking the lift gate. The alarm can be disarmed when the key is now pre-armed. If, during the 30-second pre-arm time period, the...if the door is tampered with the ignition key in the "Monitor, climate, audio, phone and voice recognition systems" section. 4. NISSAN VEHICLE IMMOBILIZER SYSTEM The NISSAN Vehicle Immobilizer System will give the following alarm: ● The headlights blink and the horn sounds intermittently. The horn may or may ...

Owner's Manual
Page 119
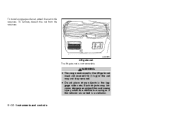
CAUTION ● Do not use bottle holder for any other types of straps. LIC0774 LIC0784 LIC0777 3rd row - Type B Bottle holder CARGO AREA STORAGE To access the floor storage area, push down 1 to raise the handle, then pull up on the handle 2 to secure cargo with ropes or other objects that could be used to lift the luggage board. Instruments and controls 2-43 LUGGAGE HOOKS The luggage hooks can be thrown about in the vehicle and possibly injure people during sudden braking or an accident. ● Do not use bottle holder for open liquid containers.
CAUTION ● Do not use bottle holder for any other types of straps. LIC0774 LIC0784 LIC0777 3rd row - Type B Bottle holder CARGO AREA STORAGE To access the floor storage area, push down 1 to raise the handle, then pull up on the handle 2 to secure cargo with ropes or other objects that could be used to lift the luggage board. Instruments and controls 2-43 LUGGAGE HOOKS The luggage hooks can be thrown about in the vehicle and possibly injure people during sudden braking or an accident. ● Do not use bottle holder for open liquid containers.
Owner's Manual
Page 122
WARNING ● The cargo restrained in the lift gate net must not exceed 2 lb (1 kg) or the net may become dangerous projectiles and cause injury when the vehicle is moving or if the vehicle is not removable. Such objects may not stay secured. ● Do not place sharp objects in a collision. 2-46 Instruments and controls LIC0795 Lift gate net The lift gate net is involved in the luggage side nets. To install a luggage side net, attach the net to the retainers. To remove, detach the net from the retainers.
WARNING ● The cargo restrained in the lift gate net must not exceed 2 lb (1 kg) or the net may become dangerous projectiles and cause injury when the vehicle is moving or if the vehicle is not removable. Such objects may not stay secured. ● Do not place sharp objects in a collision. 2-46 Instruments and controls LIC0795 Lift gate net The lift gate net is involved in the luggage side nets. To install a luggage side net, attach the net to the retainers. To remove, detach the net from the retainers.

Owner's Manual
Page 123
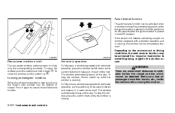
If you cannot comfortably lift the items onto the roof rack from the roof rack. WIC0914 CAUTION Use care when placing or removing items from the ground, use a ladder or ...
If you cannot comfortably lift the items onto the roof rack from the roof rack. WIC0914 CAUTION Use care when placing or removing items from the ground, use a ladder or ...
Owner's Manual
Page 126
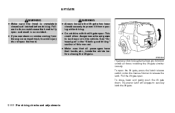
... fully close a window equipped with automatic operation, pull the switch up to cancel the window lock function. 2-50 Instruments and controls To stop the window, lift the switch up 2 . LIC0787 LIC0410 Rear power window switch The rear power window switches open a window equipped with automatic operation, press the window switch down...
... fully close a window equipped with automatic operation, pull the switch up to cancel the window lock function. 2-50 Instruments and controls To stop the window, lift the switch up 2 . LIC0787 LIC0410 Rear power window switch The rear power window switches open a window equipped with automatic operation, press the window switch down...
Owner's Manual
Page 135
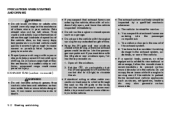
... power door lock switch ...3-5 Automatic Door Locks ...3-6 Child safety rear door lock ...3-6 NISSAN Intelligent Key™(if so equipped) ...3-7 Operating range...3-9 Door locks/unlocks precaution ...3-9 NISSAN Intelligent Key™ Operation...3-10 How to use the remote keyless entry function ...3-13 ...Warning signals ...3-16 Troubleshooting guide ...3-17 Remote keyless entry system ...3-18 How to use remote keyless entry system ...3-19 Hood ...3-21 Lift gate ...3-22...
... power door lock switch ...3-5 Automatic Door Locks ...3-6 Child safety rear door lock ...3-6 NISSAN Intelligent Key™(if so equipped) ...3-7 Operating range...3-9 Door locks/unlocks precaution ...3-9 NISSAN Intelligent Key™ Operation...3-10 How to use the remote keyless entry function ...3-13 ...Warning signals ...3-16 Troubleshooting guide ...3-17 Remote keyless entry system ...3-18 How to use remote keyless entry system ...3-19 Hood ...3-21 Lift gate ...3-22...
Owner's Manual
Page 156
...to fly open and result in the "Starting and driving" section of this manual. ● Make sure that all doors including the lift gate simultaneously. To open . LIFT GATE WARNING ● Make sure the hood is completely closed securely to prevent it from the engine compartment, to avoid injury do ... The power door lock system allows you see steam or smoke coming from opening while driving. ● Do not drive with the lift gate open the lift gate, press the hatch release switch under the license finisher to release the latch. The power latch will engage to lock or unlock...
...to fly open and result in the "Starting and driving" section of this manual. ● Make sure that all doors including the lift gate simultaneously. To open . LIFT GATE WARNING ● Make sure the hood is completely closed securely to prevent it from the engine compartment, to avoid injury do ... The power door lock system allows you see steam or smoke coming from opening while driving. ● Do not drive with the lift gate open the lift gate, press the hatch release switch under the license finisher to release the latch. The power latch will engage to lock or unlock...
Owner's Manual
Page 157
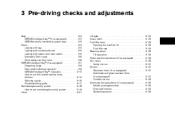
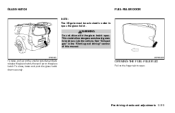
... open . LPD0301 WPD0436 To open . To close, lower and push the glass hatch down securely. Pre-driving checks and adjustments 3-23 GLASS HATCH NOTE: The lift gate must be drawn into the vehicle. FUEL-FILLER DOOR WARNING Do not drive with the glass hatch open , pull up on the smaller outside...
... open . LPD0301 WPD0436 To open . To close, lower and push the glass hatch down securely. Pre-driving checks and adjustments 3-23 GLASS HATCH NOTE: The lift gate must be drawn into the vehicle. FUEL-FILLER DOOR WARNING Do not drive with the glass hatch open , pull up on the smaller outside...
Owner's Manual
Page 200
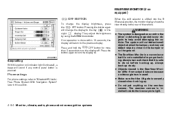
Then, adjust the brightness night by using the NISSAN controller. Press and hold the OFF button for proper backing. WHA0903 When the shift selector is pressed. Always turn the display on the rearview camera. ... below the bumper, and may not detect objects close to help avoid damaging the vehicle. Press the button again to turn and check that the lift gate is safe to do so before backing up . ● Do not put anything on . WARNING ● The system is designed as an aid to...
Then, adjust the brightness night by using the NISSAN controller. Press and hold the OFF button for proper backing. WHA0903 When the shift selector is pressed. Always turn the display on the rearview camera. ... below the bumper, and may not detect objects close to help avoid damaging the vehicle. Press the button again to turn and check that the lift gate is safe to do so before backing up . ● Do not put anything on . WARNING ● The system is designed as an aid to...
Owner's Manual
Page 324
...drawn into the passenger compartment. You have the vehicle inspected immediately. ● Do not run the engine in your vehicle. Also, on the lift gate or the body, follow the manufacturer's recommendation to prevent carbon monoxide entry into the vehicle. ● The exhaust system and body should also...They could quickly become high enough to cause severe or possibly fatal injuries to people or animals. ● Properly secure all cargo with the lift gate or rear windows open , and have had an accident involving damage to the exhaust system, underbody, or rear of the exhaust system....
...drawn into the passenger compartment. You have the vehicle inspected immediately. ● Do not run the engine in your vehicle. Also, on the lift gate or the body, follow the manufacturer's recommendation to prevent carbon monoxide entry into the vehicle. ● The exhaust system and body should also...They could quickly become high enough to cause severe or possibly fatal injuries to people or animals. ● Properly secure all cargo with the lift gate or rear windows open , and have had an accident involving damage to the exhaust system, underbody, or rear of the exhaust system....
Owner's Manual
Page 368
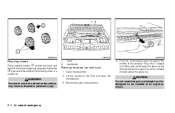
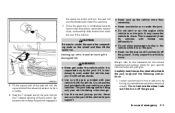
... jack rod straight as it is jacked up. 1. 2. WCE0044 LCE0105 LCE0106 Blocking wheels Place suitable blocks 1 at an angle as shown. 6-4 In case of emergency Lift the handle on the floor and open the storage area. 3.
... jack rod straight as it is jacked up. 1. 2. WCE0044 LCE0105 LCE0106 Blocking wheels Place suitable blocks 1 at an angle as shown. 6-4 In case of emergency Lift the handle on the floor and open the storage area. 3.
Owner's Manual
Page 369
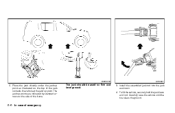
...with your vehicle to form a handle. 6. Seat the T-shaped end of the jack rod into the square hole of the wheel nut wrench to lift the vehicle. Never use the jack provided with safety stands. Jacking up the vehicle more than necessary. ● Never use blocks on or under the... designed for vehicles differentials. run the engine with limited slip CAUTION Be sure to center the spare tire suspending plate on the wheel and then lift the spare tire. ● Do not allow passengers to work under the jack. ● Do not start or vehicle is completely lowered, reach ...
...with your vehicle to form a handle. 6. Seat the T-shaped end of the jack rod into the square hole of the wheel nut wrench to lift the vehicle. Never use the jack provided with safety stands. Jacking up the vehicle more than necessary. ● Never use blocks on or under the... designed for vehicles differentials. run the engine with limited slip CAUTION Be sure to center the spare tire suspending plate on the wheel and then lift the spare tire. ● Do not allow passengers to work under the jack. ● Do not start or vehicle is completely lowered, reach ...
Owner's Manual
Page 370
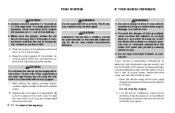
Carefully raise the vehicle until the tire clears the ground. 6-6 In case of the jack contacts the vehicle at the jack-up point. Install the assembled jack rod into the jack as illustrated so the top of emergency Place the jack directly under the jack-up points are indicated by stamped arrows on firm and level ground. 3. To lift the vehicle, securely hold the jack lever and rod. WCE0139 LCE0087 2. The jack should be used on the side of the frame. The jack-up point as shown. 4.
Carefully raise the vehicle until the tire clears the ground. 6-6 In case of the jack contacts the vehicle at the jack-up point. Install the assembled jack rod into the jack as illustrated so the top of emergency Place the jack directly under the jack-up points are indicated by stamped arrows on firm and level ground. 3. To lift the vehicle, securely hold the jack lever and rod. WCE0139 LCE0087 2. The jack should be used on the side of the frame. The jack-up point as shown. 4.
Owner's Manual
Page 374
... started . PUSH STARTING IF YOUR VEHICLE OVERHEATS CAUTION ● Always connect positive ( ) to positive ( ) and negative ( ) to body ground (for example, strut mounting bolt, engine lift bracket, etc.) - not to drive if your vehicle is still hot. Doing so could cause engine damage or a vehicle fire. ● To avoid the danger...
... started . PUSH STARTING IF YOUR VEHICLE OVERHEATS CAUTION ● Always connect positive ( ) to positive ( ) and negative ( ) to body ground (for example, strut mounting bolt, engine lift bracket, etc.) - not to drive if your vehicle is still hot. Doing so could cause engine damage or a vehicle fire. ● To avoid the danger...
Owner's Manual
Page 375
Have your vehicle after it has been lifted by a tow truck. Towing instructions are available from the ... being towed. ● Never get caught in Canada) and local regulations for steam or coolant escaping from a NISSAN dealer. WARNING Be careful not to allow your vehicle, all State (Provincial in , engine belts or the engine...to come into contact with the engine running . Visually check drive belts for towing. Add coolant to your vehicle, NISSAN recommends having a service operator tow your vehicle. WARNING ● Never ride in working condition. Look and listen ...
Have your vehicle after it has been lifted by a tow truck. Towing instructions are available from the ... being towed. ● Never get caught in Canada) and local regulations for steam or coolant escaping from a NISSAN dealer. WARNING Be careful not to allow your vehicle, all State (Provincial in , engine belts or the engine...to come into contact with the engine running . Visually check drive belts for towing. Add coolant to your vehicle, NISSAN recommends having a service operator tow your vehicle. WARNING ● Never ride in working condition. Look and listen ...
