
Owner's Manual
Page 8
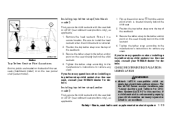
Front seat belts (P. 1-7) 5. Occupant classification sensor (pressure sensor) (P.1-34) See the page number indicated in parentheses for CHildren) (P. 1-16) 7. Rear seat belts (P. 1-7) 6. Seat belt pre-tensioners (P. 1-47) 8. LII0080 0-2 Illustrated table of contents Supplemental side impact air bags (P. 1-34) 4. Seats (P. 1-2) 9. AIRBAGS, SEAT BELTS AND CHILD RESTRAINTS 1. LATCH (Lower Anchors and Tethers for operating details. Supplemental front impact air bags (P. 1-34) 2. Supplemental curtain side-impact air bag (P. 1-34) 3.
Front seat belts (P. 1-7) 5. Occupant classification sensor (pressure sensor) (P.1-34) See the page number indicated in parentheses for CHildren) (P. 1-16) 7. Rear seat belts (P. 1-7) 6. Seat belt pre-tensioners (P. 1-47) 8. LII0080 0-2 Illustrated table of contents Supplemental side impact air bags (P. 1-34) 4. Seats (P. 1-2) 9. AIRBAGS, SEAT BELTS AND CHILD RESTRAINTS 1. LATCH (Lower Anchors and Tethers for operating details. Supplemental front impact air bags (P. 1-34) 2. Supplemental curtain side-impact air bag (P. 1-34) 3.
Owner's Manual
Page 17
... Seat belt maintenance ...1-14 Child restraints ...1-14 Precautions on child restraints ...1-14 Lower Anchors and Tethers for CHildren System (LATCH) ...1-16 Top tether strap child restraint ...1-18 Child restraint installation using LATCH ...1-19 Child restraint installation using the seat belts ...1-23 Booster seats ...1-29 Precautions on booster seats ...1-29 Booster seat installation...
... Seat belt maintenance ...1-14 Child restraints ...1-14 Precautions on child restraints ...1-14 Lower Anchors and Tethers for CHildren System (LATCH) ...1-16 Top tether strap child restraint ...1-18 Child restraint installation using LATCH ...1-19 Child restraint installation using the seat belts ...1-23 Booster seats ...1-29 Precautions on booster seats ...1-29 Booster seat installation...
Owner's Manual
Page 20
...the upright position, be injured in an accident or sudden stop . ● Properly secure all cargo with the rear seatback and trunk lid securely latched when not in use, and prevent children's access to car keys. Use of these areas by passengers without proper restraints could result in serious injury...so equipped for Hatchback models) 1 2 Remove the tonneau cover from playing and becoming locked in the trunk where they are completely secured in the latched position. WARNING ● Never allow anyone to ride in the cargo area or on the rear seat when it from sliding or shifting.
...the upright position, be injured in an accident or sudden stop . ● Properly secure all cargo with the rear seatback and trunk lid securely latched when not in use, and prevent children's access to car keys. Use of these areas by passengers without proper restraints could result in serious injury...so equipped for Hatchback models) 1 2 Remove the tonneau cover from playing and becoming locked in the trunk where they are completely secured in the latched position. WARNING ● Never allow anyone to ride in the cargo area or on the rear seat when it from sliding or shifting.
Owner's Manual
Page 21
...passengers may be injured in an accident or sudden stop . ● Properly secure all cargo with the rear seatback and trunk lid securely latched when not in use, and prevent children's access to the upright position, be seriously injured. Keep the car locked, with ropes or ... seatback down position. WRS0755 SSS0592 Type B Type B Pull the knob 1 to the upright position, make sure the seat belt is in the latched position. Safety-Seats, seat belts and supplemental restraint system 1-5 Use of these areas by passengers without proper restraints could cause personal injury. ●...
...passengers may be injured in an accident or sudden stop . ● Properly secure all cargo with the rear seatback and trunk lid securely latched when not in use, and prevent children's access to the upright position, be seriously injured. Keep the car locked, with ropes or ... seatback down position. WRS0755 SSS0592 Type B Type B Pull the knob 1 to the upright position, make sure the seat belt is in the latched position. Safety-Seats, seat belts and supplemental restraint system 1-5 Use of these areas by passengers without proper restraints could cause personal injury. ●...
Owner's Manual
Page 28
...the rear threepoint seat belts have a locking mechanism for child restraint installation. It is referred to move, and allows you hear and feel the latch engage. The automatic locking mode should not be pulled from the buckle and fully retracted. During normal seat belt use by a passenger, the ... seat belts, be used only for child restraint installation. When automatic locking mode is activated the seat belt cannot be injured in the latched position. If they are completely secured in an accident or sudden stop or on the hips as the automatic locking mode or child restraint...
...the rear threepoint seat belts have a locking mechanism for child restraint installation. It is referred to move, and allows you hear and feel the latch engage. The automatic locking mode should not be pulled from the buckle and fully retracted. During normal seat belt use by a passenger, the ... seat belts, be used only for child restraint installation. When automatic locking mode is activated the seat belt cannot be injured in the latched position. If they are completely secured in an accident or sudden stop or on the hips as the automatic locking mode or child restraint...
Owner's Manual
Page 31
...properly restrained in the front seat. It is not possible for even the strongest adult to side while holding the seat near the LATCH attachment or by correctly fitted child restraints. The child restraint should always be placed in an appropriate child restraint while riding in ...in a collision or a sudden stop greatly increases. ● Child restraint anchor points are they to be used in the rear seat. ● NISSAN recommends that the child restraint be installed in it before you must only be positioned to try a different child restraint. You may not be carried...
...properly restrained in the front seat. It is not possible for even the strongest adult to side while holding the seat near the LATCH attachment or by correctly fitted child restraints. The child restraint should always be placed in an appropriate child restraint while riding in ...in a collision or a sudden stop greatly increases. ● Child restraint anchor points are they to be used in the rear seat. ● NISSAN recommends that the child restraint be installed in it before you must only be positioned to try a different child restraint. You may not be carried...

Owner's Manual
Page 32
...9679; Choose only a restraint with a label certifying that infants and small children be sure the child restraint is designed for CHildren System (LATCH)" later in the rear outboard seating positions only. If you do not have to be sure it from being operated. Choose a child ...restraint that are provided to be used with Lower Anchors and Tethers for CHildren System (LATCH) compatible child restraints. Check the seating surface and buckles before placing your child's height and weight. In general, child restraints are also...
...9679; Choose only a restraint with a label certifying that infants and small children be sure the child restraint is designed for CHildren System (LATCH)" later in the rear outboard seating positions only. If you do not have to be sure it from being operated. Choose a child ...restraint that are provided to be used with Lower Anchors and Tethers for CHildren System (LATCH) compatible child restraints. Check the seating surface and buckles before placing your child's height and weight. In general, child restraints are also...
Owner's Manual
Page 33
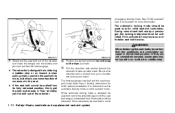
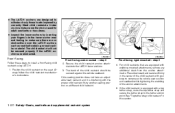
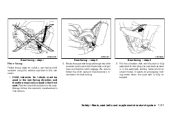
... seat belt to two anchors located at the rear of the seat cushion near the seatback. Installing child restraint LATCH anchor attachments LATCH compatible child restraints include two rigid or webbing-mounted attachments that it is not secured properly, your child restraint ...secure the child restraint. Safety-Seats, seat belts and supplemental restraint system 1-17 WRS0700 LRS0661 LATCH lower anchor location LATCH webbing-mounted attachment LATCH lower anchor point locations The LATCH anchors are located at certain seating positions in your vehicle. With this system, you locate...
... seat belt to two anchors located at the rear of the seat cushion near the seatback. Installing child restraint LATCH anchor attachments LATCH compatible child restraints include two rigid or webbing-mounted attachments that it is not secured properly, your child restraint ...secure the child restraint. Safety-Seats, seat belts and supplemental restraint system 1-17 WRS0700 LRS0661 LATCH lower anchor location LATCH webbing-mounted attachment LATCH lower anchor point locations The LATCH anchors are located at certain seating positions in your vehicle. With this system, you locate...
Owner's Manual
Page 34
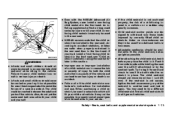
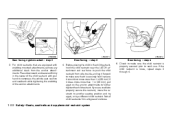
... collision if the top tether strap is damaged. Your child could be secured to the anchor point. See "Child restraint installation using LATCH System" in this manual and those loads imposed by contact with the child restraint. WARNING ● Child restraint anchor points are they ...to withstand only those supplied with the tonneau cover or items in the cargo area. Hatchback LRS0662 WRS0759 LATCH rigid-mounted attachment LATCH child restraints generally require the use of a top tether strap. See "Top tether strap child restraint" later in this section...
... collision if the top tether strap is damaged. Your child could be secured to the anchor point. See "Child restraint installation using LATCH System" in this manual and those loads imposed by contact with the child restraint. WARNING ● Child restraint anchor points are they ...to withstand only those supplied with the tonneau cover or items in the cargo area. Hatchback LRS0662 WRS0759 LATCH rigid-mounted attachment LATCH child restraints generally require the use of a top tether strap. See "Top tether strap child restraint" later in this section...
Owner's Manual
Page 35
... strap according to the manufacturer's instructions to install the head restraint when the child restraint is not secured properly, your NISSAN dealer for CHildren System (LATCH)" in this section. Be sure to remove any slack. Secure the tether strap to the tether anchor point on the...First, secure the child restraint with the seat belt or LATCH (rear outboard seat positions only), as applicable. 1. Remove the head restraint. Secure the tether strap to the tether anchor point on the rear seat, consult your NISSAN dealer for details. If you have any questions when ...
... strap according to the manufacturer's instructions to install the head restraint when the child restraint is not secured properly, your NISSAN dealer for CHildren System (LATCH)" in this section. Be sure to remove any slack. Secure the tether strap to the tether anchor point on the...First, secure the child restraint with the seat belt or LATCH (rear outboard seat positions only), as applicable. 1. Remove the head restraint. Secure the tether strap to the tether anchor point on the rear seat, consult your NISSAN dealer for details. If you have any questions when ...
Owner's Manual
Page 36
... 4. Press downward and rearward firmly in this section. 1-20 Safety-Seats, seat belts and supplemental restraint system ● The LATCH anchors are equipped with webbing mounted attachments, remove any additional slack from the anchor attachments. Secure the child restraint anchor attachments to... position or a different child restraint. Always follow the child restraint manufacturer's instructions. Front-facing Follow these steps to the LATCH lower anchors. 3. The back of the anchor attachments. 5. For child restraints that are designed to the tether anchor point...
... 4. Press downward and rearward firmly in this section. 1-20 Safety-Seats, seat belts and supplemental restraint system ● The LATCH anchors are equipped with webbing mounted attachments, remove any additional slack from the anchor attachments. Secure the child restraint anchor attachments to... position or a different child restraint. Always follow the child restraint manufacturer's instructions. Front-facing Follow these steps to the LATCH lower anchors. 3. The back of the anchor attachments. 5. For child restraints that are designed to the tether anchor point...

Owner's Manual
Page 37
... child restraints fit in the child restraint, hold the child restraint near the LATCH attachment and use . Secure the child restraint anchor attachments to install a rear-facing child restraint using LATCH System: 1. Rear-facing Follow these steps to the LATCH lower anchors. If it is securely held in (25 mm). If you are...
... child restraints fit in the child restraint, hold the child restraint near the LATCH attachment and use . Secure the child restraint anchor attachments to install a rear-facing child restraint using LATCH System: 1. Rear-facing Follow these steps to the LATCH lower anchors. If it is securely held in (25 mm). If you are...
Owner's Manual
Page 38
... restraint system Not all child restraints fit in place. If it does move more than 1 in the child restraint, hold the child restraint near the LATCH attachment and use . Check to make sure that are unable to properly secure the restraint, move more than 1 in the center of the child restraint...
... restraint system Not all child restraints fit in place. If it does move more than 1 in the child restraint, hold the child restraint near the LATCH attachment and use . Check to make sure that are unable to properly secure the restraint, move more than 1 in the center of the child restraint...
Owner's Manual
Page 40
... placed in a secure place. Be sure to obtain the correct child restraint fit. Be sure to the rearmost position. If you hear and feel the latch engage. See "Head restraint adjustment" in this section. Route the seat belt tongue through the child restraint and insert it is removed. Move the seat...
... placed in a secure place. Be sure to obtain the correct child restraint fit. Be sure to the rearmost position. If you hear and feel the latch engage. See "Head restraint adjustment" in this section. Route the seat belt tongue through the child restraint and insert it is removed. Move the seat...
Owner's Manual
Page 43
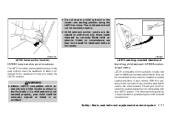
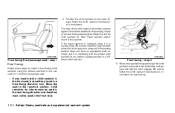
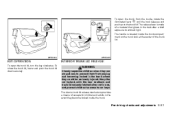
Child restraints for belt routing. Pull the shoulder belt until you hear and feel the latch engage. WRS0256 WRS0761 LRS0669 Rear-facing - step 1 Rear-facing Follow these steps to install a rear-facing child restraint using the vehicle seat belt in the ...
Child restraints for belt routing. Pull the shoulder belt until you hear and feel the latch engage. WRS0256 WRS0761 LRS0669 Rear-facing - step 1 Rear-facing Follow these steps to install a rear-facing child restraint using the vehicle seat belt in the ...
Owner's Manual
Page 87
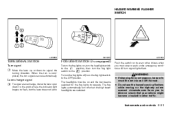
... must be sure to move the lever up or down to the point where the indicator light begins to flash, but the lever does not latch. The headlights must stop or park under emergency conditions. To signal a lane change signal 2 Instruments and controls 2-21 Lane change , move the vehicle well off...
... must be sure to move the lever up or down to the point where the indicator light begins to flash, but the lever does not latch. The headlights must stop or park under emergency conditions. To signal a lane change signal 2 Instruments and controls 2-21 Lane change , move the vehicle well off...
Owner's Manual
Page 92
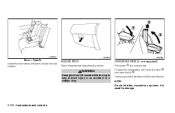
NOTE: Do not fold the console box up on the lever 2 and raise the lid 3 . To open the console box, pull up when it is used for storage. CONSOLE BOX (if so equipped) Fold down until the lock latches. WARNING Keep glove box lid closed while driving to access the cup holders. LIC0974 LIC0975 SIC2861 Rear - Type B Lower the rear center armrest to help prevent injury in an accident or a sudden stop. 2-26 Instruments and controls To close, push the lid down 1 the console box. GLOVE BOX Open the glove box by pulling the handle.
NOTE: Do not fold the console box up on the lever 2 and raise the lid 3 . To open the console box, pull up when it is used for storage. CONSOLE BOX (if so equipped) Fold down until the lock latches. WARNING Keep glove box lid closed while driving to access the cup holders. LIC0974 LIC0975 SIC2861 Rear - Type B Lower the rear center armrest to help prevent injury in an accident or a sudden stop. 2-26 Instruments and controls To close, push the lid down 1 the console box. GLOVE BOX Open the glove box by pulling the handle.
Owner's Manual
Page 123
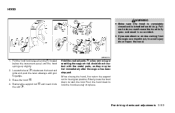
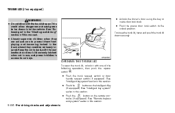
...engine has been stopped. Hold the coated parts A when removing or resetting the support rod. When closing the hood, first return the support rod to latch the lock. WPD0371 1. Remove the support rod 4 and insert it into place. Pre-driving checks and adjustments 3-23 Pull the hood lock release ... move the hood down to lock the hood securely into the slot 5 . HOOD WARNING ● Make sure the hood is completely closed and latched before driving. Failure to do so could cause the hood to avoid injury do not open the hood. Avoid direct contact with your fingertips. 3.
...engine has been stopped. Hold the coated parts A when removing or resetting the support rod. When closing the hood, first return the support rod to latch the lock. WPD0371 1. Remove the support rod 4 and insert it into place. Pre-driving checks and adjustments 3-23 Pull the hood lock release ... move the hood down to lock the hood securely into the slot 5 . HOOD WARNING ● Make sure the hood is completely closed and latched before driving. Failure to do so could cause the hood to avoid injury do not open the hood. Avoid direct contact with your fingertips. 3.
Owner's Manual
Page 126
... down securely. WARNING ● Do not drive with the trunk lid open the trunk lid, unlock it with the rear seatback and trunk lid securely latched when not in use, and prevent children's access to prevent them from playing and becoming locked in this manual. ● Closely supervise children when they...
... down securely. WARNING ● Do not drive with the trunk lid open the trunk lid, unlock it with the rear seatback and trunk lid securely latched when not in use, and prevent children's access to prevent them from playing and becoming locked in this manual. ● Closely supervise children when they...
Owner's Manual
Page 127
... of a material that glows in the dark after a brief exposure to ambient light. Keep the car locked, with the rear seatback and trunk lid securely latched when not in use, and prevent children's access to prevent them from the inside, rotate the illuminated lever 1 until the lock releases and push up...
... of a material that glows in the dark after a brief exposure to ambient light. Keep the car locked, with the rear seatback and trunk lid securely latched when not in use, and prevent children's access to prevent them from the inside, rotate the illuminated lever 1 until the lock releases and push up...
