
Owner's Manual
Page 25
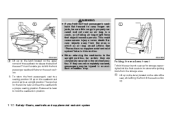
... extra storage length when transporting long items: 1 Slide the seat to the rear-most position. If they are completely secured in the latched position. Then lift up on the recline lever, located on the outside of the seat, and fold the seatback forward as far as they may be injured in...
... extra storage length when transporting long items: 1 Slide the seat to the rear-most position. If they are completely secured in the latched position. Then lift up on the recline lever, located on the outside of the seat, and fold the seatback forward as far as they may be injured in...
Owner's Manual
Page 26
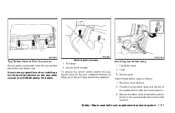
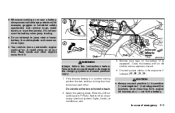
...passenger's seatback flat forward to carry longer objects, be injured in an accident or sudden stop. Secure objects away from the storage area: 1 3. LRS0342 2 Lift up on the latch located on the seatback and push it up to an upright position. To return the front passenger's seat to a seating position... lift up on supplemental restraint system" later in this cargo is properly secured and not near an air bag. Release the lever to lock the ...
...passenger's seatback flat forward to carry longer objects, be injured in an accident or sudden stop. Secure objects away from the storage area: 1 3. LRS0342 2 Lift up on the latch located on the seatback and push it up to an upright position. To return the front passenger's seat to a seating position... lift up on supplemental restraint system" later in this cargo is properly secured and not near an air bag. Release the lever to lock the ...
Owner's Manual
Page 43
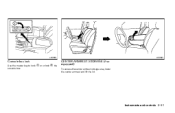
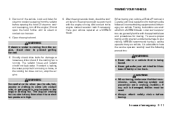
...the seat directly behind the seatback. Anchor point location To access the anchor points behind the rear bench seat, tilt the rear seatback forward by lifting up on the pull strap behind the child restraint. Anchor point Install the top tether strap as follows: 1. Safety-Seats, seat belts and ... restraint system 1-27 Installing top tether strap 1. Hook 3. Secure the tether strap to the tether anchor point on the rear seat, consult your NISSAN dealer for details. Pull strap 2. Position the top tether strap over the top of the seatback and under the rear window behind the rear bench...
...the seat directly behind the seatback. Anchor point location To access the anchor points behind the rear bench seat, tilt the rear seatback forward by lifting up on the pull strap behind the child restraint. Anchor point Install the top tether strap as follows: 1. Safety-Seats, seat belts and ... restraint system 1-27 Installing top tether strap 1. Hook 3. Secure the tether strap to the tether anchor point on the rear seat, consult your NISSAN dealer for details. Pull strap 2. Position the top tether strap over the top of the seatback and under the rear window behind the rear bench...
Owner's Manual
Page 117
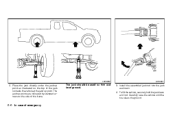
Instruments and controls 2-37 LIC0591 LIC0621 Console box lock Use the master key to lock 1 or unlock 2 the console box. CENTER ARMREST STORAGE (if so equipped) To access the center armrest storage area, lower the center armrest and lift the lid.
Instruments and controls 2-37 LIC0591 LIC0621 Console box lock Use the master key to lock 1 or unlock 2 the console box. CENTER ARMREST STORAGE (if so equipped) To access the center armrest storage area, lower the center armrest and lift the lid.
Owner's Manual
Page 125
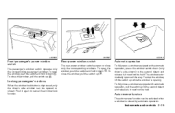
... switch and hold it again to the second detent and release it need not be opened or closed by automatic operation. To stop the window, lift the switch up to cancel the window lock function. it ; LIC0580 LIC0581 LIC0410 Front passenger's power window switch The passenger's window switch operates only the...
... switch and hold it again to the second detent and release it need not be opened or closed by automatic operation. To stop the window, lift the switch up to cancel the window lock function. it ; LIC0580 LIC0581 LIC0410 Front passenger's power window switch The passenger's window switch operates only the...
Owner's Manual
Page 218
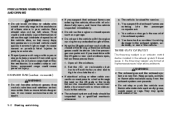
.... It can cause unconsciousness or death. 5-2 Starting and driving The vehicle is raised for any extended length of time. ● Keep the lift gate and rear vent windows closed vehicle could quickly become high enough to cause severe or possibly fatal injuries to people or animals. ● ...alone. They could cause personal injury. ● If you must pass to a trailer through inadvertent operation of the exhaust system. Also, on the lift gate or the body, follow these precautions: 1. If you suspect that exhaust fumes are entering the vehicle, drive with ropes or straps to help...
.... It can cause unconsciousness or death. 5-2 Starting and driving The vehicle is raised for any extended length of time. ● Keep the lift gate and rear vent windows closed vehicle could quickly become high enough to cause severe or possibly fatal injuries to people or animals. ● ...alone. They could cause personal injury. ● If you must pass to a trailer through inadvertent operation of the exhaust system. Also, on the lift gate or the body, follow these precautions: 1. If you suspect that exhaust fumes are entering the vehicle, drive with ropes or straps to help...
Owner's Manual
Page 257
... each wheel nut one or two turns by the jack. CAUTION Be sure to center the spare tire suspending plate on the wheel and then lift the spare tire. ● Do not start or vehicle is on other part of emergency 6-5 The jack is on the jack. ● Never run ... by turning counterclockwise with limited slip Jacking up the vehicle more than necessary. ● Never use any other vehicles. It may cause the vehicle to lift the vehicle. In case of the vehicle for vehicles differentials. for jack support. ● Never jack up vehicle and removing the damaged tire WARNING ●...
... each wheel nut one or two turns by the jack. CAUTION Be sure to center the spare tire suspending plate on the wheel and then lift the spare tire. ● Do not start or vehicle is on other part of emergency 6-5 The jack is on the jack. ● Never run ... by turning counterclockwise with limited slip Jacking up the vehicle more than necessary. ● Never use any other vehicles. It may cause the vehicle to lift the vehicle. In case of the vehicle for vehicles differentials. for jack support. ● Never jack up vehicle and removing the damaged tire WARNING ●...
Owner's Manual
Page 258
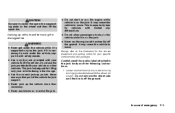
Carefully raise the vehicle until the tire clears the ground. 6-6 In case of the frame. LCE0092 LCE0087 2. Install the assembled jack rod into the jack as illustrated so the top of the jack contacts the vehicle at the jack-up point. The jack-up point as shown. 4. The jack should be used on the side of emergency To lift the vehicle, securely hold the jack lever and rod. Place the jack directly under the jack-up points are indicated by stamped arrows on firm and level ground. 3.
Carefully raise the vehicle until the tire clears the ground. 6-6 In case of the frame. LCE0092 LCE0087 2. Install the assembled jack rod into the jack as illustrated so the top of the jack contacts the vehicle at the jack-up point. The jack-up point as shown. 4. The jack should be used on the side of emergency To lift the vehicle, securely hold the jack lever and rod. Place the jack directly under the jack-up points are indicated by stamped arrows on firm and level ground. 3.
Owner's Manual
Page 261
... cables in another vehicle, position the two vehicles to bring their batteries near a battery, always wear suitable eye protectors (for example, strut mounting bolt, engine lift bracket, etc.) - not to the battery. It could come on the battery (if so equipped). CAUTION ● Always connect positive ( ) to positive ( ) and negative ( ) to...
... cables in another vehicle, position the two vehicles to bring their batteries near a battery, always wear suitable eye protectors (for example, strut mounting bolt, engine lift bracket, etc.) - not to the battery. It could come on the battery (if so equipped). CAUTION ● Always connect positive ( ) to positive ( ) and negative ( ) to...
Owner's Manual
Page 263
... at any unit is being towed. ● Never get caught in Canada) and local regulations for steam or coolant escaping from a NISSAN dealer. Towing instructions are available from the radiator before towing. Visually check drive belts for towing. If any time when the coolant temperature is...assure proper towing and to prevent accidental damage to prevent getting burned. 5. It is advisable to allow your vehicle after it has been lifted by a tow truck. The radiator hoses and radiator should not leak water. WARNING Be careful not to have the service operator carefully read...
... at any unit is being towed. ● Never get caught in Canada) and local regulations for steam or coolant escaping from a NISSAN dealer. Towing instructions are available from the radiator before towing. Visually check drive belts for towing. If any time when the coolant temperature is...assure proper towing and to prevent accidental damage to prevent getting burned. 5. It is advisable to allow your vehicle after it has been lifted by a tow truck. The radiator hoses and radiator should not leak water. WARNING Be careful not to have the service operator carefully read...
Owner's Manual
Page 284
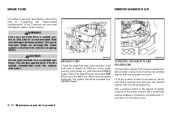
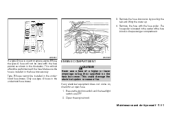
... or contaminated fluid may damage the brake system. Add window washer fluid when the low window washer fluid warning light comes on , add Genuine NISSAN Super Heavy Duty Brake Fluid or equivalent DOT 3 fluid up to the MAX line. BRAKE FLUID For further brake fluid specification information, refer to ... Add a washer solvent to the washer for the mixture ratio. 8-12 Maintenance and do-it-yourself To fill the window washer fluid reservoir, lift the cap off the reservoir tank and pour the window washer fluid into the tank opening. If fluid is below the MIN line or the...
... or contaminated fluid may damage the brake system. Add window washer fluid when the low window washer fluid warning light comes on , add Genuine NISSAN Super Heavy Duty Brake Fluid or equivalent DOT 3 fluid up to the MAX line. BRAKE FLUID For further brake fluid specification information, refer to ... Add a washer solvent to the washer for the mixture ratio. 8-12 Maintenance and do-it-yourself To fill the window washer fluid reservoir, lift the cap off the reservoir tank and pour the window washer fluid into the tank opening. If fluid is below the MIN line or the...
Owner's Manual
Page 291
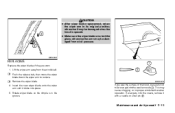
... wiper blade so the dimple is opened. ● Make sure the wiper blades contact the glass; Maintenance and do-it with a needle or small pin 2 . Lift the wiper arm away from wind pressure. If you wax the surface of the hood, be damaged when the hood is in the groove. WDI0408...
... wiper blade so the dimple is opened. ● Make sure the wiper blades contact the glass; Maintenance and do-it with a needle or small pin 2 . Lift the wiper arm away from wind pressure. If you wax the surface of the hood, be damaged when the hood is in the groove. WDI0408...
Owner's Manual
Page 293
... with the fuse puller. Be sure the ignition switch and the headlight switch are OFF. 2. 3. Remove the fuse box cover by pushing the tab and lifting the cover up. 4. LDI0457 LDI0380 If a type A fuse is installed in the fuse box securely. Make sure the fuse is used to replace a type B fuse...
... with the fuse puller. Be sure the ignition switch and the headlight switch are OFF. 2. 3. Remove the fuse box cover by pushing the tab and lifting the cover up. 4. LDI0457 LDI0380 If a type A fuse is installed in the fuse box securely. Make sure the fuse is used to replace a type B fuse...
