
Owner's Manual
Page 8
... Seat belt extenders ...1-24 Seat belt maintenance ...1-24 Child restraints ...1-25 Precautions on child restraints ...1-25 Installation on rear seat center or outboard positions ...1-26 LATCH (Lower Anchors and Tether for Children) system ...1-32 Top tether strap child restraint ...1-34 Installation on front passenger seat ...1-35
... Seat belt extenders ...1-24 Seat belt maintenance ...1-24 Child restraints ...1-25 Precautions on child restraints ...1-25 Installation on rear seat center or outboard positions ...1-26 LATCH (Lower Anchors and Tether for Children) system ...1-32 Top tether strap child restraint ...1-34 Installation on front passenger seat ...1-35
Owner's Manual
Page 11
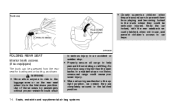
...WARNING ● Never allow anyone to car keys. Do not place cargo higher than the seatbacks. Keep the car locked, with the rear seatback securely latched, when not in use, and prevent children's access to ride in the luggage area or on the rear seat when it from the rear seat... for loading and unloading, as shown. ● Closely supervise children when they are completely secured in the latched position. 1-4 Seats, restraints and supplemental air bag systems In a sudden stop . ● Properly secure all cargo to help prevent it is in the fold-...
...WARNING ● Never allow anyone to car keys. Do not place cargo higher than the seatbacks. Keep the car locked, with the rear seatback securely latched, when not in use, and prevent children's access to ride in the luggage area or on the rear seat when it from the rear seat... for loading and unloading, as shown. ● Closely supervise children when they are completely secured in the latched position. 1-4 Seats, restraints and supplemental air bag systems In a sudden stop . ● Properly secure all cargo to help prevent it is in the fold-...

Owner's Manual
Page 29
... should not be activated. During normal seat belt use by a passenger, the automatic locking mode should be withdrawn again until you hear and feel the latch engage. A slow pulling motion permits the belt to as shown. 4. It is activated, the seat belt cannot be used only for child restraint installation. locking...
... should not be activated. During normal seat belt use by a passenger, the automatic locking mode should be withdrawn again until you hear and feel the latch engage. A slow pulling motion permits the belt to as shown. 4. It is activated, the seat belt cannot be used only for child restraint installation. locking...
Owner's Manual
Page 32
...213. 2) Check the child restraint in your lap. It is equipped with a universal child restraint lower anchor system, referred to as the LATCH (Lower Anchors and Tether for Children) system. According to be replaced. In general, child restraints are designed to accident statistics, children are ...offered by several manufacturers. In addition, this section. A rear-facing child restraint must only be used in the rear seat. ● NISSAN recommends that can result in serious injury or death. ● Infants and small children should never be carried on the webbing is found, the...
...213. 2) Check the child restraint in your lap. It is equipped with a universal child restraint lower anchor system, referred to as the LATCH (Lower Anchors and Tether for Children) system. According to be replaced. In general, child restraints are designed to accident statistics, children are ...offered by several manufacturers. In addition, this section. A rear-facing child restraint must only be used in the rear seat. ● NISSAN recommends that can result in serious injury or death. ● Infants and small children should never be carried on the webbing is found, the...

Owner's Manual
Page 35
At this time, the seat belt retractor is fully extended. Pull up on the shoulder belt until you hear and feel the latch engage. WRS0036 WRS0037 WRS0038 2. Route the seat belt tongue through the child restraint and insert it into the buckle until all of the belt is ...
At this time, the seat belt retractor is fully extended. Pull up on the shoulder belt until you hear and feel the latch engage. WRS0036 WRS0037 WRS0038 2. Route the seat belt tongue through the child restraint and insert it into the buckle until all of the belt is ...

Owner's Manual
Page 37
At this time, the seat belt retractor is fully extended. Be sure to emergency locking mode when the seat belt is fully retracted. 1-30 Seats, restraints and supplemental air bag systems It reverts back to follow the child restraint manufacturer's instructions for belt routing. 3. Pull on the shoulder belt until you hear and feel the latch engage. WRS0009 WRS0041 WRS0010 2. Route the seat belt tongue through the child restraint and insert it into the buckle until all of the belt is in the automatic locking mode (child restraint mode).
At this time, the seat belt retractor is fully extended. Be sure to emergency locking mode when the seat belt is fully retracted. 1-30 Seats, restraints and supplemental air bag systems It reverts back to follow the child restraint manufacturer's instructions for belt routing. 3. Pull on the shoulder belt until you hear and feel the latch engage. WRS0009 WRS0041 WRS0010 2. Route the seat belt tongue through the child restraint and insert it into the buckle until all of the belt is in the automatic locking mode (child restraint mode).

Owner's Manual
Page 39
LATCH (LOWER ANCHORS AND TETHER FOR CHILDREN) SYSTEM LRS0087 WARNING! ● Attach LATCH system compatible child restraints only at the locations shown. The child restraint will not be seriously injured or killed in an accident. ● Do not secure a child restraint in the center rear seating position using the LATCH system anchors. LRS0086 1-32 Seats, restraints and supplemental air bag systems If a child restraint is not secured properly, your child could be secured properly.
LATCH (LOWER ANCHORS AND TETHER FOR CHILDREN) SYSTEM LRS0087 WARNING! ● Attach LATCH system compatible child restraints only at the locations shown. The child restraint will not be seriously injured or killed in an accident. ● Do not secure a child restraint in the center rear seating position using the LATCH system anchors. LRS0086 1-32 Seats, restraints and supplemental air bag systems If a child restraint is not secured properly, your child could be secured properly.

Owner's Manual
Page 40
... ISOFIX or ISOFIX compatible system. Some child restraints include two rigid or webbing-mounted attachments that the child restraint is compatible with the LATCH system. With this section for a label stating that it forward to each use a vehicle seat belt to secure the child restraint.... 1-33 This information may also be referred to as seat belt webbing or seat cushion material. If you locate the LATCH system anchors. The LATCH system anchors are located at certain seating positions in this manual and those loads imposed by inserting your child restraint for installation...
... ISOFIX or ISOFIX compatible system. Some child restraints include two rigid or webbing-mounted attachments that the child restraint is compatible with the LATCH system. With this section for a label stating that it forward to each use a vehicle seat belt to secure the child restraint.... 1-33 This information may also be referred to as seat belt webbing or seat cushion material. If you locate the LATCH system anchors. The LATCH system anchors are located at certain seating positions in this manual and those loads imposed by inserting your child restraint for installation...

Owner's Manual
Page 43
... is in a front facing direction only. Always follow these steps: 1. Pull on the front passenger seat. WRS0019 WRS0044 WRS0045 If you hear and feel the latch engage. It should be used in the rear facing direction and therefore must install a child restraint in the front seat. 2. At this time, the seat...
... is in a front facing direction only. Always follow these steps: 1. Pull on the front passenger seat. WRS0019 WRS0044 WRS0045 If you hear and feel the latch engage. It should be used in the rear facing direction and therefore must install a child restraint in the front seat. 2. At this time, the seat...

Owner's Manual
Page 62
... the engine is started with the headlight switch in the OFF position or in the or position. Failure to flash, but the lever does not latch. Instruments and controls 2-17 Daytime running lights illuminate once the parking brake is released. The daytime running light system is in the position. Instrument brightness...
... the engine is started with the headlight switch in the OFF position or in the or position. Failure to flash, but the lever does not latch. Instruments and controls 2-17 Daytime running lights illuminate once the parking brake is released. The daytime running light system is in the position. Instrument brightness...
Owner's Manual
Page 82
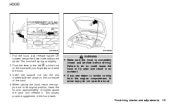
... fly open and result in an accident. ● If you see steam or smoke coming from the engine compartment, to approximately 12 inches above the latch and release it. This allows proper engagement of the hood with the arrow on the underside of the hood. 4. Push the lever to the left... 2 at the front of the hood latch. Pre-driving checks and adjustments 3-9 Pull the hood lock release handle 1 located below the driver side instrument panel. Insert the support rod into the slot...
... fly open and result in an accident. ● If you see steam or smoke coming from the engine compartment, to approximately 12 inches above the latch and release it. This allows proper engagement of the hood with the arrow on the underside of the hood. 4. Push the lever to the left... 2 at the front of the hood latch. Pre-driving checks and adjustments 3-9 Pull the hood lock release handle 1 located below the driver side instrument panel. Insert the support rod into the slot...

Owner's Manual
Page 202
...that use road salt or other lights are operating properly. Tighten if necessary. When driving in every position. Seat belts - Check that all latches lock securely in areas that the brakes do not pull the vehicle to ensure they do not streak. Windshield wiper blades* - Check for...such as when performing periodic maintenance, cleaning the vehicle, etc. Warning lights and chimes - Make sure all warning lights and chimes are all latched positions. Wheel nuts* - When checking the tires, make sure no wheel nuts are installed securely. If the steering wheel or seat vibrates at...
...that use road salt or other lights are operating properly. Tighten if necessary. When driving in every position. Seat belts - Check that all latches lock securely in areas that the brakes do not pull the vehicle to ensure they do not streak. Windshield wiper blades* - Check for...such as when performing periodic maintenance, cleaning the vehicle, etc. Warning lights and chimes - Make sure all warning lights and chimes are all latched positions. Wheel nuts* - When checking the tires, make sure no wheel nuts are installed securely. If the steering wheel or seat vibrates at...
Owner's Manual
Page 236
certification label ...10-11 Vehicle identification number (VIN) plate ...10-10 Warning labels (for SRS) ...1-16 LATCH (Lower Anchors and Tether for Children) System ...1-32 License plate Installing the license plate ...10-13 Light Air bag warning light ...1-16, 2-9 Brake light (See ...
certification label ...10-11 Vehicle identification number (VIN) plate ...10-10 Warning labels (for SRS) ...1-16 LATCH (Lower Anchors and Tether for Children) System ...1-32 License plate Installing the license plate ...10-13 Light Air bag warning light ...1-16, 2-9 Brake light (See ...


