Owner's Manual
Page 44
... Fuel gauge ...2-5 Warning/indicator lights and chimes ...2-7 Checking bulbs...2-7 Warning lights...2-7 Indicator lights ...2-9 Chimes ...2-11 Security systems ...2-11 Nissan vehicle immobilizer system (NVIS) (if so equipped) ...2-11 Theft warning (if so equipped) ...2-12 Windshield wiper and washer switch ......2-15 Switch operation...2-15 Rear window defogger switch ...2-16 Headlight and turn signal switch ...2-16 Instrument brightness control...2-17 Daytime running light system (Canada only)...2-17 Turn signal switch ...2-...
... Fuel gauge ...2-5 Warning/indicator lights and chimes ...2-7 Checking bulbs...2-7 Warning lights...2-7 Indicator lights ...2-9 Chimes ...2-11 Security systems ...2-11 Nissan vehicle immobilizer system (NVIS) (if so equipped) ...2-11 Theft warning (if so equipped) ...2-12 Windshield wiper and washer switch ......2-15 Switch operation...2-15 Rear window defogger switch ...2-16 Headlight and turn signal switch ...2-16 Instrument brightness control...2-17 Daytime running light system (Canada only)...2-17 Turn signal switch ...2-...

Owner's Manual
Page 52
...brake fluid level may not be a small reserve of the brake system. High beam indicator light (Blue) This blue light comes on when the headlight high beam is activated. Low fuel warning light This warning light comes on when the passing signal is on . 1. Otherwise, have your vehicle... fuel gauge reaches E (Empty). INDICATOR LIGHTS Overdrive off the engine, and start it is correct, have the system checked by an authorized NISSAN dealer. Turn off indicator light (automatic transmission only) This light comes on when there is getting low. If the light comes on . ...
...brake fluid level may not be a small reserve of the brake system. High beam indicator light (Blue) This blue light comes on when the headlight high beam is activated. Low fuel warning light This warning light comes on when the passing signal is on . 1. Otherwise, have your vehicle... fuel gauge reaches E (Empty). INDICATOR LIGHTS Overdrive off the engine, and start it is correct, have the system checked by an authorized NISSAN dealer. Turn off indicator light (automatic transmission only) This light comes on when there is getting low. If the light comes on . ...

Owner's Manual
Page 54
... of the FCC Rules and RSS-210 of FCC rules for Nissan Vehicle Immobilizer System (CONT ASSY - SECURITY SYSTEMS CHIMES Key reminder chime A chime sounds if the driver's side door is opened if the headlights or parking lights are on. Remove the key and take it...of security systems: ● Nissan Vehicle Immobilizer System- If the no start condition re-occurs, Nissan recommends placing the registered NVIS key on the key ring), restart the engine using a registered NVIS key (for approximately 5 seconds. 2. Repeat step 1 and 2. Turn the headlight control switch off before leaving...
... of the FCC Rules and RSS-210 of FCC rules for Nissan Vehicle Immobilizer System (CONT ASSY - SECURITY SYSTEMS CHIMES Key reminder chime A chime sounds if the driver's side door is opened if the headlights or parking lights are on. Remove the key and take it...of security systems: ● Nissan Vehicle Immobilizer System- If the no start condition re-occurs, Nissan recommends placing the registered NVIS key on the key ring), restart the engine using a registered NVIS key (for approximately 5 seconds. 2. Repeat step 1 and 2. Turn the headlight control switch off before leaving...
Owner's Manual
Page 57
... closed and locked with again. The alarm is tampered with the ignition key in the vehicle, the system will give the following alarm: ● The headlights blink and the horn sounds intermittently. 2-14 Instruments and controls After about 50 seconds.
... closed and locked with again. The alarm is tampered with the ignition key in the vehicle, the system will give the following alarm: ● The headlights blink and the horn sounds intermittently. 2-14 Instruments and controls After about 50 seconds.

Owner's Manual
Page 59
Pull the lever back to the The headlights come on and all the other lights remain on. position: Turn the switch to select the low beam. 2-16 Instruments and controls The high beam ... careful not to the position: The front parking, tail, license plate and instrument panel lights come on and the light illuminates. REAR WINDOW DEFOGGER SWITCH HEADLIGHT AND TURN SIGNAL SWITCH LIC0026 To defog the rear window glass, start the engine and push the rear window defogger switch on. (The indicator light...
Pull the lever back to the The headlights come on and all the other lights remain on. position: Turn the switch to select the low beam. 2-16 Instruments and controls The high beam ... careful not to the position: The front parking, tail, license plate and instrument panel lights come on and the light illuminates. REAR WINDOW DEFOGGER SWITCH HEADLIGHT AND TURN SIGNAL SWITCH LIC0026 To defog the rear window glass, start the engine and push the rear window defogger switch on. (The indicator light...

Owner's Manual
Page 60
... automatically. Turn the control to the position for full illumination when driving at night. DAYTIME RUNNING LIGHT SYSTEM (Canada only) The headlights automatically illuminate at dusk to do not illuminate. AIC0608 TURN SIGNAL SWITCH Turn signal Move the lever up or down to flash, ...light begins to signal the turning direction. It is necessary at a reduced intensity when the engine is turned off . Turn the headlight switch to adjust the brightness of instrument panel lights. If the parking brake is applied before the engine is started Instruments and controls ...
... automatically. Turn the control to the position for full illumination when driving at night. DAYTIME RUNNING LIGHT SYSTEM (Canada only) The headlights automatically illuminate at dusk to do not illuminate. AIC0608 TURN SIGNAL SWITCH Turn signal Move the lever up or down to flash, ...light begins to signal the turning direction. It is necessary at a reduced intensity when the engine is turned off . Turn the headlight switch to adjust the brightness of instrument panel lights. If the parking brake is applied before the engine is started Instruments and controls ...

Owner's Manual
Page 61
... hazard warning flasher lights are on the highway unless unusual circumstances force you must be actuated with the ignition switch in the position (low beam headlights on) for an emergency, be sure to move the vehicle well off the road. ● Do not use of the hazard warning flasher ... off, rotate the switch to other drivers when you to drive so slowly that your vehicle might become a hazard to the OFF position. The headlight switch must stop or park under emergency conditions. To turn the front fog lights on, rotate the switch to warn other traffic. 2-18 Instruments ...
... hazard warning flasher lights are on the highway unless unusual circumstances force you must be actuated with the ignition switch in the position (low beam headlights on) for an emergency, be sure to move the vehicle well off the road. ● Do not use of the hazard warning flasher ... off, rotate the switch to other drivers when you to drive so slowly that your vehicle might become a hazard to the OFF position. The headlight switch must stop or park under emergency conditions. To turn the front fog lights on, rotate the switch to warn other traffic. 2-18 Instruments ...

Owner's Manual
Page 62
... this power socket with the engine running. (If the engine is stopped, this could result in a discharged battery.) ● Avoid using when the air conditioner, headlights or rear window defogger is not designed for powering electrical accessories such as the socket and plug may be hot during or immediately after use...
... this power socket with the engine running. (If the engine is stopped, this could result in a discharged battery.) ● Avoid using when the air conditioner, headlights or rear window defogger is not designed for powering electrical accessories such as the socket and plug may be hot during or immediately after use...
Owner's Manual
Page 79
... button on the multi- The interior light can be turned off without 3-6 Pre-driving checks and adjustments The trunk lid opens. The panic alarm and headlights stay on for approximately 30 seconds. Only the driver side door unlocks. 2. The interior light illuminates for 25 seconds. 3. remote controller again within 5 seconds. Push...
... button on the multi- The interior light can be turned off without 3-6 Pre-driving checks and adjustments The trunk lid opens. The panic alarm and headlights stay on for approximately 30 seconds. Only the driver side door unlocks. 2. The interior light illuminates for 25 seconds. 3. remote controller again within 5 seconds. Push...

Owner's Manual
Page 87
WARNING Use the night position only when necessary, because it to its original position. VANITY MIRROR To access a vanity mirror, pull the sun visor down and lift the mirror cover. INSIDE MIRROR The night position reduces glare from the headlights of vehicles behind you at night. Some vanity mirrors are illuminated and turn on when the mirror cover is opened. SUN VISORS MIRRORS LPD0022 APD1076 APD0612 CAUTION Do not store the sun visor before returning it reduces rear view clarity. 3-14 Pre-driving checks and adjustments
WARNING Use the night position only when necessary, because it to its original position. VANITY MIRROR To access a vanity mirror, pull the sun visor down and lift the mirror cover. INSIDE MIRROR The night position reduces glare from the headlights of vehicles behind you at night. Some vanity mirrors are illuminated and turn on when the mirror cover is opened. SUN VISORS MIRRORS LPD0022 APD1076 APD0612 CAUTION Do not store the sun visor before returning it reduces rear view clarity. 3-14 Pre-driving checks and adjustments
Owner's Manual
Page 157
... booster ...8-24 Clutch pedal ...8-25 Checking clutch pedal ...8-25 Fuses...8-25 Engine compartment ...8-25 Passenger compartment ...8-27 Multi-remote controller battery replacement ...8-28 Lights ...8-29 Headlights ...8-29 Fog lights (if so equipped) ...8-32 Exterior and interior lights ...8-33 Wheels and tires ...8-36 Tire pressure ...8-36 Types of tires...8-37
... booster ...8-24 Clutch pedal ...8-25 Checking clutch pedal ...8-25 Fuses...8-25 Engine compartment ...8-25 Passenger compartment ...8-27 Multi-remote controller battery replacement ...8-28 Lights ...8-29 Headlights ...8-29 Fog lights (if so equipped) ...8-32 Exterior and interior lights ...8-33 Wheels and tires ...8-36 Tire pressure ...8-36 Types of tires...8-37

Owner's Manual
Page 182
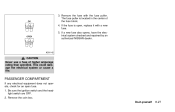
Be sure the ignition switch and the headlight switch are melted, replace with only genuine NISSAN parts. CLUTCH PEDAL FUSES 3. Remove the fuse with a new...open , replace it -yourself 8-25 If free travel is within the limits shown above , see an authorized NISSAN dealer. The fuse puller is out of the fuse block in the center of the range shown above . ...in the passenger compartment. 5. Fusible links WDI0045 LDI0034 CHECKING CLUTCH PEDAL Press the pedal by an authorized NISSAN dealer. CAUTION Never use a fuse of these fusible links are OFF. 2. If any electrical equipment ...
Be sure the ignition switch and the headlight switch are melted, replace with only genuine NISSAN parts. CLUTCH PEDAL FUSES 3. Remove the fuse with a new...open , replace it -yourself 8-25 If free travel is within the limits shown above , see an authorized NISSAN dealer. The fuse puller is out of the fuse block in the center of the range shown above . ...in the passenger compartment. 5. Fusible links WDI0045 LDI0034 CHECKING CLUTCH PEDAL Press the pedal by an authorized NISSAN dealer. CAUTION Never use a fuse of these fusible links are OFF. 2. If any electrical equipment ...
Owner's Manual
Page 184
Remove the coin box. 3. If a new fuse also opens, have the electrical system checked and repaired by an authorized NISSAN dealer. Remove the fuse with a new fuse. 5. ADI1142 CAUTION Never use a fuse of the fuse block. 4. PASSENGER COMPARTMENT If any electrical equipment does not operate, ... with the fuse puller. If the fuse is located in the center of higher amperage rating than specified. Be sure the ignition switch and the headlight switch are OFF. 2.
Remove the coin box. 3. If a new fuse also opens, have the electrical system checked and repaired by an authorized NISSAN dealer. Remove the fuse with a new fuse. 5. ADI1142 CAUTION Never use a fuse of the fuse block. 4. PASSENGER COMPARTMENT If any electrical equipment does not operate, ... with the fuse puller. If the fuse is located in the center of higher amperage rating than specified. Be sure the ignition switch and the headlight switch are OFF. 2.

Owner's Manual
Page 186
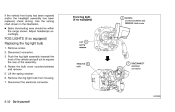
... bulb. The bulb may break if the glass envelope is scratched or the bulb is a semi-sealed beam type which uses a replaceable headlight (halogen) bulb. LIGHTS HEADLIGHTS The headlight is dropped. ● When handling the bulb, do not touch the glass envelope. ● DO NOT TOUCH THE BULB ● ...Use the same number and wattage as originally installed: Wattage 65/55 Bulb no. 9007 (HB5) ● Do not leave the bulb out of the headlight reflector for a long period of time as an assembly. Open the hood. 2. Disconnect the negative (-) battery cable. 3. Do not shake or rotate ...
... bulb. The bulb may break if the glass envelope is scratched or the bulb is a semi-sealed beam type which uses a replaceable headlight (halogen) bulb. LIGHTS HEADLIGHTS The headlight is dropped. ● When handling the bulb, do not touch the glass envelope. ● DO NOT TOUCH THE BULB ● ...Use the same number and wattage as originally installed: Wattage 65/55 Bulb no. 9007 (HB5) ● Do not leave the bulb out of the headlight reflector for a long period of time as an assembly. Open the hood. 2. Disconnect the negative (-) battery cable. 3. Do not shake or rotate ...

Owner's Manual
Page 187
LDI0027 Adjusting the headlight aim Before performing aiming adjustment, make sure of the tires inflated to the correct pressure. Use an aiming wall screen. Place the vehicle and screen ...
LDI0027 Adjusting the headlight aim Before performing aiming adjustment, make sure of the tires inflated to the correct pressure. Use an aiming wall screen. Place the vehicle and screen ...
Owner's Manual
Page 189
... equipped) Replacing the fog light bulb 1. Disconnect connector. 3. Disconnect the electrical connector. Remove screw. 2. If the vehicle front body has been repaired and/or the headlight assembly has been replaced, check aiming.
... equipped) Replacing the fog light bulb 1. Disconnect connector. 3. Disconnect the electrical connector. Remove screw. 2. If the vehicle front body has been repaired and/or the headlight assembly has been replaced, check aiming.

Owner's Manual
Page 196
...), or tread patterns can adversely affect the ride, braking, handling, ground clearance, body-to-tire clearance, tire chain clearance, speedometer calibration, headlight aim and bumper height. When the wear indicator is recommended that wheel nuts be tightened to repair the spare tire, contact an authorized... NISSAN dealer. Do-it is necessary to specification at all times. Tire wear and damage WARNING ● Tires should be periodically inspected...
...), or tread patterns can adversely affect the ride, braking, handling, ground clearance, body-to-tire clearance, tire chain clearance, speedometer calibration, headlight aim and bumper height. When the wear indicator is recommended that wheel nuts be tightened to repair the spare tire, contact an authorized... NISSAN dealer. Do-it is necessary to specification at all times. Tire wear and damage WARNING ● Tires should be periodically inspected...
Owner's Manual
Page 236
H Hazard warning flasher switch ...2-18 Head restraints ...1-5 Headlight aiming adjustment ...8-30 Headlight and turn signal switch ...2-16 Headlights...8-29 Interior light...2-28 Light bulbs ...8-29 Low washer fluid warning light ...2-8 ...light) ...8-33 Bulb check/instrument panel ...2-7 Bulb replacement...8-33 Charge warning light ...2-8 Front fog light switch ...2-18 Headlight aiming adjustment ...8-30 Headlight and turn signal switch ...2-16 Headlights ...8-29 Heater Heater and air conditioner controls ...4-3 Heater operation...4-4 Hood release ...3-9 Horn ...2-19 I Ignition switch ...5-4...
H Hazard warning flasher switch ...2-18 Head restraints ...1-5 Headlight aiming adjustment ...8-30 Headlight and turn signal switch ...2-16 Headlights...8-29 Interior light...2-28 Light bulbs ...8-29 Low washer fluid warning light ...2-8 ...light) ...8-33 Bulb check/instrument panel ...2-7 Bulb replacement...8-33 Charge warning light ...2-8 Front fog light switch ...2-18 Headlight aiming adjustment ...8-30 Headlight and turn signal switch ...2-16 Headlights ...8-29 Heater Heater and air conditioner controls ...4-3 Heater operation...4-4 Hood release ...3-9 Horn ...2-19 I Ignition switch ...5-4...
Owner's Manual
Page 238
... Sunroof ...2-27 Supplemental restraint system (Supplemental air bag system)...1-6 Switch Automatic power window switch ...2-26 Front fog light switch ...2-18 Hazard warning flasher switch ...2-18 Headlight and turn signal switch ...2-16 Ignition switch ...5-4 Overdrive switch ...5-10 Rear window defogger switch ...2-16 Turn signal switch...2-17 Windshield wiper and washer switch ...2-15...
... Sunroof ...2-27 Supplemental restraint system (Supplemental air bag system)...1-6 Switch Automatic power window switch ...2-26 Front fog light switch ...2-18 Hazard warning flasher switch ...2-18 Headlight and turn signal switch ...2-16 Ignition switch ...5-4 Overdrive switch ...5-10 Rear window defogger switch ...2-16 Turn signal switch...2-17 Windshield wiper and washer switch ...2-15...


