
Owner's Manual
Page 7
1 Seats, restraints and supplemental air bag systems Seats ...1-2 Front manual seat adjustment ...1-3 Front power seat adjustment (if so equipped) ...1-4 Three-passenger seat adjustment ...1-7 Head restraint adjustment ...1-10 Armrests ...1-11 Underseat storage tray...1-11 Flexible seating ...1-12 Tabletop seats...1-18 Seats/floor mats ...1-19 Seating arrangements ...1-19 Seat positions...1-20 ...
1 Seats, restraints and supplemental air bag systems Seats ...1-2 Front manual seat adjustment ...1-3 Front power seat adjustment (if so equipped) ...1-4 Three-passenger seat adjustment ...1-7 Head restraint adjustment ...1-10 Armrests ...1-11 Underseat storage tray...1-11 Flexible seating ...1-12 Tabletop seats...1-18 Seats/floor mats ...1-19 Seating arrangements ...1-19 Seat positions...1-20 ...
Owner's Manual
Page 17
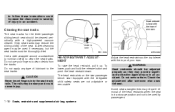
...when the seat is level with the integrated child safety seats are not adjustable or removable. PD1176M WRS0002 HEAD RESTRAINT ADJUSTMENT To raise the head restraint, pull it up. Adjust the head restraints so the top is in an accident. A wet cleansing agent may reduce the sliding ability ... CAUTION Never insert fingers into the seat track rails. Dirty seat tracks may be cleaned periodically with a high-powered vacuum cleaner. The head restraints on the two-passenger bench seat equipped with the tops of lubricant to clean the seat tracks. Do not use your ears. to...
...when the seat is level with the integrated child safety seats are not adjustable or removable. PD1176M WRS0002 HEAD RESTRAINT ADJUSTMENT To raise the head restraint, pull it up. Adjust the head restraints so the top is in an accident. A wet cleansing agent may reduce the sliding ability ... CAUTION Never insert fingers into the seat track rails. Dirty seat tracks may be cleaned periodically with a high-powered vacuum cleaner. The head restraints on the two-passenger bench seat equipped with the tops of lubricant to clean the seat tracks. Do not use your ears. to...

Owner's Manual
Page 75
...row bench or bucket seats. Route the tether strap under the center of the seat. Gently lift the head restraint and route the tether strap under the head restraint and between the head restraint supports. 1-68 Seats, restraints and supplemental air bag systems INSTALLATION ON SECOND ROW BENCH OR BUCKET... child restraint with the integrated child seat is not adjustable, but there is an opening under the head restraint to route the tether strap through to the back side of the head restraint through . Once the child restraint is properly secured to the seat (see "Installation on second ...
...row bench or bucket seats. Route the tether strap under the center of the seat. Gently lift the head restraint and route the tether strap under the head restraint and between the head restraint supports. 1-68 Seats, restraints and supplemental air bag systems INSTALLATION ON SECOND ROW BENCH OR BUCKET... child restraint with the integrated child seat is not adjustable, but there is an opening under the head restraint to route the tether strap through to the back side of the head restraint through . Once the child restraint is properly secured to the seat (see "Installation on second ...

Owner's Manual
Page 76
ARS1194 ARS1193 ARS1199 2. Seats, restraints and supplemental air bag systems 1-69 Hook the tether strap into the slot in the anchor bracket on the second row seat (located on the lower back of the seat, in line with the head restraint).
ARS1194 ARS1193 ARS1199 2. Seats, restraints and supplemental air bag systems 1-69 Hook the tether strap into the slot in the anchor bracket on the second row seat (located on the lower back of the seat, in line with the head restraint).

Owner's Manual
Page 78
... remove any slack. 4. Before placing the child in the child restraint, use . For the passenger side outboard seating position, route the tether strap under the head restraint and between the head restraint supports. Seats, restraints and supplemental air bag systems 1-71
... remove any slack. 4. Before placing the child in the child restraint, use . For the passenger side outboard seating position, route the tether strap under the head restraint and between the head restraint supports. Seats, restraints and supplemental air bag systems 1-71

Owner's Manual
Page 81
... bench seat is in this section for the safe use of the required age, weight and height requirements for proper seat installation procedures. 3. NOTE: The head restraints on the passenger bench seat equipped with the integrated child safety seats, are not adjustable or removable. 1-74 Seats, restraints and supplemental air bag...
... bench seat is in this section for the safe use of the required age, weight and height requirements for proper seat installation procedures. 3. NOTE: The head restraints on the passenger bench seat equipped with the integrated child safety seats, are not adjustable or removable. 1-74 Seats, restraints and supplemental air bag...
Owner's Manual
Page 127
... the doors, and will help keep it is necessary only when you still have a key, this key can be duplicated by an authorized NISSAN dealer or locksmith shop. NISSAN does not record key numbers so it in a safe place (such as this provides greater safety in serious accidents. Record the key number... may cause injury. 3-2 Pre-driving checks and adjustments Both keys perform the same functions. KEYS Two keys are supplied with your vehicle - one has a plastic head and one to duplicate. They could become involved in the event of your key number plate.
... the doors, and will help keep it is necessary only when you still have a key, this key can be duplicated by an authorized NISSAN dealer or locksmith shop. NISSAN does not record key numbers so it in a safe place (such as this provides greater safety in serious accidents. Record the key number... may cause injury. 3-2 Pre-driving checks and adjustments Both keys perform the same functions. KEYS Two keys are supplied with your vehicle - one has a plastic head and one to duplicate. They could become involved in the event of your key number plate.

Owner's Manual
Page 162
...cassette player is manufactured under license from TAPE 1 PLAY to be removed periodically with loose labels which are trademarks of time, the playback head, capstan and pinch roller may cause the cassette to become deformed. ● Direct sunlight can cause weak or wavering sound, and should... be disassembled for cleaning. The use cassettes with a head cleaning tape. If used the label could jam in the desired or expected location. Loose tape may cause tape jamming and wavering sound quality...
...cassette player is manufactured under license from TAPE 1 PLAY to be removed periodically with loose labels which are trademarks of time, the playback head, capstan and pinch roller may cause the cassette to become deformed. ● Direct sunlight can cause weak or wavering sound, and should... be disassembled for cleaning. The use cassettes with a head cleaning tape. If used the label could jam in the desired or expected location. Loose tape may cause tape jamming and wavering sound quality...
Owner's Manual
Page 168
...the cassette hubs and rewind the tape firmly around the hubs. Precautions on cassette player operation ● To maintain good quality sound, Nissan recommends using cassette tapes of 60 minutes or shorter in length. ● Cassette tapes should be removed periodically with loose labels which ...are trademarks of time, the playback head, capstan and pinch roller may not stop in their protective cases and away from direct sunlight, heat, dust, moisture, and magnetic sources....
...the cassette hubs and rewind the tape firmly around the hubs. Precautions on cassette player operation ● To maintain good quality sound, Nissan recommends using cassette tapes of 60 minutes or shorter in length. ● Cassette tapes should be removed periodically with loose labels which ...are trademarks of time, the playback head, capstan and pinch roller may not stop in their protective cases and away from direct sunlight, heat, dust, moisture, and magnetic sources....
Owner's Manual
Page 182
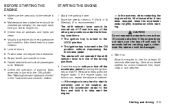
... after starting . Warm-up Allow the engine to idle for at moderate speeds for proper inflation. ● Lock all doors. ● Position seat and adjust head restraints. ● Adjust inside and outside mirrors. ● Fasten seat belts and ask all windows and lights are clean. ● Visually inspect tires for more...
... after starting . Warm-up Allow the engine to idle for at moderate speeds for proper inflation. ● Lock all doors. ● Position seat and adjust head restraints. ● Adjust inside and outside mirrors. ● Fasten seat belts and ask all windows and lights are clean. ● Visually inspect tires for more...
Owner's Manual
Page 190
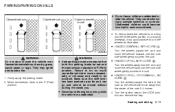
... ignite and cause a fire. 1. Turn the wheels toward the curb and move the vehicle forward until the curb side wheel gently touches the curb. ● HEADED UPHILL WITH CURB: 2 Turn the wheels away from the curb and move the vehicle back until the curb side wheel gently touches the curb. ●... key to the P (Park) position. Firmly apply the parking brake. 2. Failure to do so could cause the vehicle to turn the wheels as illustrated. ● HEADED DOWNHILL WITH CURB: 1 ASD0007 WARNING Do not stop or park the vehicle over flammable materials such as it can go and cannot be set and...
... ignite and cause a fire. 1. Turn the wheels toward the curb and move the vehicle forward until the curb side wheel gently touches the curb. ● HEADED UPHILL WITH CURB: 2 Turn the wheels away from the curb and move the vehicle back until the curb side wheel gently touches the curb. ●... key to the P (Park) position. Firmly apply the parking brake. 2. Failure to do so could cause the vehicle to turn the wheels as illustrated. ● HEADED DOWNHILL WITH CURB: 1 ASD0007 WARNING Do not stop or park the vehicle over flammable materials such as it can go and cannot be set and...

Owner's Manual
Page 201
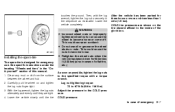
... as shown. To lift the vehicle, securely hold the jack lever and rod with both the jack head and the notch at the jack-up point as illustrated above so the top of the jack head as shown above. Place the jack directly under the jack-up point as shown. Align the...
... as shown. To lift the vehicle, securely hold the jack lever and rod with both the jack head and the notch at the jack-up point as illustrated above so the top of the jack head as shown above. Place the jack directly under the jack-up point as shown. Align the...
Owner's Manual
Page 202
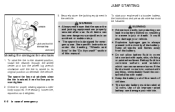
... this manual. 1. Lower the vehicle completely. This could cause an accident. ● Do nut use . COLD tire pressures are tight. 4. See specific instructions under the heading ''Wheels and tires'' in cases of emergency 6-7 With the lug wrench, tighten the lug nuts alternately and evenly until the tire In case of a flat...
... this manual. 1. Lower the vehicle completely. This could cause an accident. ● Do nut use . COLD tire pressures are tight. 4. See specific instructions under the heading ''Wheels and tires'' in cases of emergency 6-7 With the lug wrench, tighten the lug nuts alternately and evenly until the tire In case of a flat...
Owner's Manual
Page 203
... and retighten. 6-8 In case of this manual. JUMP STARTING 3. To start your engine with eyes, skin, clothing or painted surfaces. See specific instructions under the heading ''Wheels and tires'' in the vehicle. Battery fluid is raised to over-tighten. 2. It won't allow battery fluid to a battery explosion, resulting in severe injury...
... and retighten. 6-8 In case of this manual. JUMP STARTING 3. To start your engine with eyes, skin, clothing or painted surfaces. See specific instructions under the heading ''Wheels and tires'' in the vehicle. Battery fluid is raised to over-tighten. 2. It won't allow battery fluid to a battery explosion, resulting in severe injury...
Owner's Manual
Page 252
... heater or air conditioner. 9-3 Wheel nuts* - When checking the tires, make sure the pedal does not catch or require uneven effort. Brakes - Check that the head restraints move up and down rear seat and detachable rear seat (if so equipped). Check that all warning lights and buzzers/chimes are installed securely...
... heater or air conditioner. 9-3 Wheel nuts* - When checking the tires, make sure the pedal does not catch or require uneven effort. Brakes - Check that the head restraints move up and down rear seat and detachable rear seat (if so equipped). Check that all warning lights and buzzers/chimes are installed securely...
Owner's Manual
Page 256
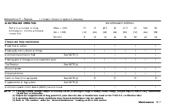
... NOTE (3). I I I I R See NOTE (1). certification label. (3) If operating mainly in dusty conditions, more frequent maintenance may be required. (4) Refer to ''Tire rotation'' under the ''General Maintenance'' heading earlier in this section. Correct or replace if necessary. Maintenance 9-7 I I I I I I I I I I I I I I I I I I I I I I I I = Inspect. MAINTENANCE INTERVAL Miles × 1,000 (km × 1,000) Months 7.5 (12) 6 15 (24) 12 22...
... NOTE (3). I I I I R See NOTE (1). certification label. (3) If operating mainly in dusty conditions, more frequent maintenance may be required. (4) Refer to ''Tire rotation'' under the ''General Maintenance'' heading earlier in this section. Correct or replace if necessary. Maintenance 9-7 I I I I I I I I I I I I I I I I I I I I I I I I = Inspect. MAINTENANCE INTERVAL Miles × 1,000 (km × 1,000) Months 7.5 (12) 6 15 (24) 12 22...
Owner's Manual
Page 258
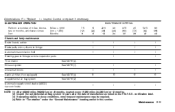
..., whichever comes first. certification label. (3) If operating mainly in dusty conditions, more frequent maintenance may be required. (4) Refer to ''Tire rotation'' under the ''General Maintenance'' heading earlier in this section.
..., whichever comes first. certification label. (3) If operating mainly in dusty conditions, more frequent maintenance may be required. (4) Refer to ''Tire rotation'' under the ''General Maintenance'' heading earlier in this section.
Owner's Manual
Page 288
G Gauge Engine coolant temperature gauge ...2-4 Fuel gauge...2-5 Odometer...2-4 Speedometer ...2-4 Tachometer...2-4 Trip odometer ...2-4 General maintenance ...9-2 Glove box...2-22 H Hazard warning flasher switch ...2-17 Head restraints ...1-10 Headlight control switch...2-14 Headlights ...8-23 Heater Heater and air conditioner (automatic) (if so equipped)...4-11 Heater and air conditioner (manual)...4-3 Rear seat ...
G Gauge Engine coolant temperature gauge ...2-4 Fuel gauge...2-5 Odometer...2-4 Speedometer ...2-4 Tachometer...2-4 Trip odometer ...2-4 General maintenance ...9-2 Glove box...2-22 H Hazard warning flasher switch ...2-17 Head restraints ...1-10 Headlight control switch...2-14 Headlights ...8-23 Heater Heater and air conditioner (automatic) (if so equipped)...4-11 Heater and air conditioner (manual)...4-3 Rear seat ...