Owner's Manual
Page 87
... ...2-10 Theft warning (if so equipped) ...2-10 Windshield wiper and washer switch ...2-12 Rear window wiper and washer switches...2-13 Rear window defogger switch ...2-14 Headlight control switch ...2-14 Autolamp switch (if so equipped)...2-15 Turn signal switch ...2-16 Cornering light ...2-17 Hazard warning flasher switch ...2-17 Horn...2-18 Rear power...
... ...2-10 Theft warning (if so equipped) ...2-10 Windshield wiper and washer switch ...2-12 Rear window wiper and washer switches...2-13 Rear window defogger switch ...2-14 Headlight control switch ...2-14 Autolamp switch (if so equipped)...2-15 Turn signal switch ...2-16 Cornering light ...2-17 Hazard warning flasher switch ...2-17 Horn...2-18 Rear power...
Owner's Manual
Page 96
.... To reduce or avoid emission control system damage: a) do not need to make sure the fuel filler cap is controlled by an authorized NISSAN dealer. d) if possible, reduce the amount of fuel in one of fuel. Have the vehicle inspected by an authorized...potential emission control system malfunction exists. ● Malfunction indicator lamp blinking - Have the system checked by an authorized NISSAN dealer. High beam indicator light (Blue) This light comes on when the headlight high beam is not functioning properly. You do not drive at least three gallons of cargo being hauled or...
.... To reduce or avoid emission control system damage: a) do not need to make sure the fuel filler cap is controlled by an authorized NISSAN dealer. d) if possible, reduce the amount of fuel in one of fuel. Have the vehicle inspected by an authorized...potential emission control system malfunction exists. ● Malfunction indicator lamp blinking - Have the system checked by an authorized NISSAN dealer. High beam indicator light (Blue) This light comes on when the headlight high beam is not functioning properly. You do not drive at least three gallons of cargo being hauled or...
Owner's Manual
Page 97
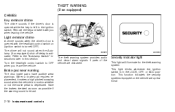
The chime will illuminate for the theft warning system. Refer to OFF when you when leaving the vehicle. Turn the headlight control switch to the ''Autolamp Switch'' instructions later in the ignition switch. THEFT WARNING (if so equipped) CHIMES Key reminder chime The ...is turned OFF). Brake pad wear warning The disc brake pads have audible wear warnings. When a brake pad requires replacement, it with the headlight control switch on the vehicle are disturbed. Have the brakes checked as soon as possible if the warning sound is depressed. This function indicates the...
The chime will illuminate for the theft warning system. Refer to OFF when you when leaving the vehicle. Turn the headlight control switch to the ''Autolamp Switch'' instructions later in the ignition switch. THEFT WARNING (if so equipped) CHIMES Key reminder chime The ...is turned OFF). Brake pad wear warning The disc brake pads have audible wear warnings. When a brake pad requires replacement, it with the headlight control switch on the vehicle are disturbed. Have the brakes checked as soon as possible if the warning sound is depressed. This function indicates the...
Owner's Manual
Page 98
... once every three seconds. How to the ACC or ON position. Theft warning system operation The theft warning system emits the following alarm: ● The headlights and tail lights flash and the horn sounds intermittently. Confirm that the doors are locked. ● When the button is unlocked or opened . ● the...
... once every three seconds. How to the ACC or ON position. Theft warning system operation The theft warning system emits the following alarm: ● The headlights and tail lights flash and the horn sounds intermittently. Confirm that the doors are locked. ● When the button is unlocked or opened . ● the...
Owner's Manual
Page 101
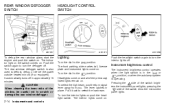
...outside heated mirrors (if so equipped). Pull it back to turn the defogger off. To turn signal lever away from you. Push the headlight switch again to select the low beam. The interior lights come on and all of the switch dims the instrument panel lights. 2-14 ... or position, or when the autolamp system is also used to the position: Headlights come on push the headlight switch. pressing the side of the previously listed lights remain on . REAR WINDOW DEFOGGER SWITCH HEADLIGHT CONTROL SWITCH AIC1057 AIC1073 AIC1059 To defog the rear window glass, start the engine...
...outside heated mirrors (if so equipped). Pull it back to turn the defogger off. To turn signal lever away from you. Push the headlight switch again to select the low beam. The interior lights come on and all of the switch dims the instrument panel lights. 2-14 ... or position, or when the autolamp system is also used to the position: Headlights come on push the headlight switch. pressing the side of the previously listed lights remain on . REAR WINDOW DEFOGGER SWITCH HEADLIGHT CONTROL SWITCH AIC1057 AIC1073 AIC1059 To defog the rear window glass, start the engine...
Owner's Manual
Page 102
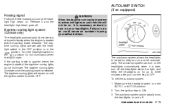
...Instruments and controls 2-15 AUTOLAMP SWITCH (if so equipped) Passing signal Pulling the lever toward you turn off the headlights when it is light, and keep the headlights on for full illumination when the driving at night. Release it is dark, turn the key to do not ...necessary at a reduced intensity when the engine is turned OFF. The daytime running lights illuminate once the parking brake is started with the headlight switch in the OFF position or in the AUTO1 or AUTO2 position. 2. The daytime running lights operate with the parking brake released. AIC1058...
...Instruments and controls 2-15 AUTOLAMP SWITCH (if so equipped) Passing signal Pulling the lever toward you turn off the headlights when it is light, and keep the headlights on for full illumination when the driving at night. Release it is dark, turn the key to do not ...necessary at a reduced intensity when the engine is turned OFF. The daytime running lights illuminate once the parking brake is started with the headlight switch in the OFF position or in the AUTO1 or AUTO2 position. 2. The daytime running lights operate with the parking brake released. AIC1058...
Owner's Manual
Page 103
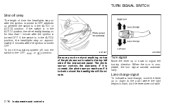
...begins to signal the turning direction. TURN SIGNAL SWITCH Shut-off , turn is turned OFF. If the switch is in the AUTO1 position, then the headlights stay on top of the photo sensor located in the AUTO1 or AUTO2 position. AIC1087 AIC0560 Be sure you do not put anything on for...ignition is completed, the turn signal cancels automatically. If the switch is in the AUTO2 position, the headlights stay on approximately 3 minutes after the ignition is in the top left side of time the headlights stay on whether the switch is turned OFF. When the turn the switch to OFF depends on...
...begins to signal the turning direction. TURN SIGNAL SWITCH Shut-off , turn is turned OFF. If the switch is in the AUTO1 position, then the headlights stay on top of the photo sensor located in the AUTO1 or AUTO2 position. AIC1087 AIC0560 Be sure you do not put anything on for...ignition is completed, the turn signal cancels automatically. If the switch is in the AUTO2 position, the headlights stay on approximately 3 minutes after the ignition is in the top left side of time the headlights stay on whether the switch is turned OFF. When the turn the switch to OFF depends on...
Owner's Manual
Page 104
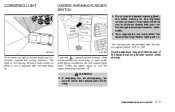
WARNING ● If stopping for an emergency, be actuated with the headlights on. CORNERING LIGHT HAZARD WARNING FLASHER SWITCH ● Do not use of the hazard warning flasher switch while driving. The light on the turning direction ...
WARNING ● If stopping for an emergency, be actuated with the headlights on. CORNERING LIGHT HAZARD WARNING FLASHER SWITCH ● Do not use of the hazard warning flasher switch while driving. The light on the turning direction ...
Owner's Manual
Page 131
... vehicle before locking the doors and leaving it has run for at a distance of additional remote controllers, contact an authorized NISSAN dealer. The theft warning alarm (horn) sounds and the headlights and tail lights flash for 30 seconds. Only the driver door unlocks. The effective distance depends on the multi-remote 3. button...
... vehicle before locking the doors and leaving it has run for at a distance of additional remote controllers, contact an authorized NISSAN dealer. The theft warning alarm (horn) sounds and the headlights and tail lights flash for 30 seconds. Only the driver door unlocks. The effective distance depends on the multi-remote 3. button...

Owner's Manual
Page 139
.... Be careful when moving to select the right or left side mirror, then adjust using the control lever. To remove a multi-remote controller from the headlights of vehicles behind you at night. Using only this mirror could 3-14 Pre-driving checks and adjustments
.... Be careful when moving to select the right or left side mirror, then adjust using the control lever. To remove a multi-remote controller from the headlights of vehicles behind you at night. Using only this mirror could 3-14 Pre-driving checks and adjustments
Owner's Manual
Page 216
... brake ...8-19 Checking brake pedal ...8-19 Brake booster ...8-20 Fuses...8-20 Engine compartment ...8-20 Passenger compartment ...8-21 Multi-remote controller battery replacement ...8-22 Lights ...8-23 Headlights ...8-23 Exterior and interior lights ...8-24 Wheels and tires ...8-28 Tire pressure ...8-28 Types of tires...8-29 Tire chains...8-30 Changing tires and wheels...8-30
... brake ...8-19 Checking brake pedal ...8-19 Brake booster ...8-20 Fuses...8-20 Engine compartment ...8-20 Passenger compartment ...8-21 Multi-remote controller battery replacement ...8-22 Lights ...8-23 Headlights ...8-23 Exterior and interior lights ...8-24 Wheels and tires ...8-28 Tire pressure ...8-28 Types of tires...8-29 Tire chains...8-30 Changing tires and wheels...8-30
Owner's Manual
Page 235
... not come on to the next, continue on , check for an open fuse: The left headlight (driver's side) and right headlight (passenger side) fuses are lo- 8-20 Do-it off , press and release the brake pedal several times. If the brakes do not operate properly, ...: 1. The pedal travel ) remains the same from the booster. The pedal height should not change. 4. For more information regarding brake inspections, see an authorized NISSAN dealer. With the engine off . With the brake pedal depressed, turn it -yourself Depress the brake pedal several times. BRAKE BOOSTER Check the brake booster...
... not come on to the next, continue on , check for an open fuse: The left headlight (driver's side) and right headlight (passenger side) fuses are lo- 8-20 Do-it off , press and release the brake pedal several times. If the brakes do not operate properly, ...: 1. The pedal travel ) remains the same from the booster. The pedal height should not change. 4. For more information regarding brake inspections, see an authorized NISSAN dealer. With the engine off . With the brake pedal depressed, turn it -yourself Depress the brake pedal several times. BRAKE BOOSTER Check the brake booster...

Owner's Manual
Page 236
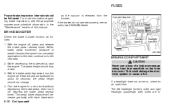
...compartment fuse box cover. 5. cated in good condition, check the fusible links. Remove the fuse with genuine NISSAN parts. If the electrical equipment does not operate, check for an open , replace it with the fuse puller.... 4. If the new fusible link melts again, have the electrical system checked and repaired by an authorized NISSAN dealer. Refer to the fuse label on the fuse box cover. Remove the fuse box cover. 4. If the...system or cause a fire. Remove the key from the ignition. Turn the headlight switch to locate the fuse in question. 3. Do-it with a new fuse. 6.
...compartment fuse box cover. 5. cated in good condition, check the fusible links. Remove the fuse with genuine NISSAN parts. If the electrical equipment does not operate, check for an open , replace it with the fuse puller.... 4. If the new fusible link melts again, have the electrical system checked and repaired by an authorized NISSAN dealer. Refer to the fuse label on the fuse box cover. Remove the fuse box cover. 4. If the...system or cause a fire. Remove the key from the ignition. Turn the headlight switch to locate the fuse in question. 3. Do-it with a new fuse. 6.
Owner's Manual
Page 238
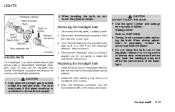
... when removing it straight out. Install the bulb retaining ring and turn it clockwise until it snaps and stops. Push the electrical connector into the headlight reflector with the flat side of the plastic base facing upward. 2. Do-it . CAUTION DO NOT TOUCH THE BULB. ● Use the same ..., then remove it -yourself 8-23 Insert the bulb into the bulb plastic base until it is necessary, contact an authorized NISSAN dealer. ● Do not leave the bulb out of the headlight reflector for a long period of time as originally installed: Wattage 65/55 Bulb no. 9007 (HB5) ● Aiming is...
... when removing it straight out. Install the bulb retaining ring and turn it clockwise until it snaps and stops. Push the electrical connector into the headlight reflector with the flat side of the plastic base facing upward. 2. Do-it . CAUTION DO NOT TOUCH THE BULB. ● Use the same ..., then remove it -yourself 8-23 Insert the bulb into the bulb plastic base until it is necessary, contact an authorized NISSAN dealer. ● Do not leave the bulb out of the headlight reflector for a long period of time as originally installed: Wattage 65/55 Bulb no. 9007 (HB5) ● Aiming is...
Owner's Manual
Page 239
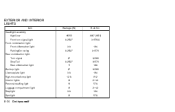
EXTERIOR AND INTERIOR LIGHTS Item Headlight assembly High/Low Front turn signal light Front combination light: Front side marker light Parking/Cornering Rear combination light: Turn signal Stop/Tail Rear side marker light Back-up light License plate light High-mounted stop light Interior lights Personal reading light Luggage compartment light Steplight Spotlight 27 8.25/27 5 27 3.8 12.8 12 10 12 3.8 10 3156K 3157K 168 3156K 194 912 211-2 578 211-2 194 578 3.8 8.25/27 194 3157K 65/55 8.25/27 9007 (HB5) 3157NA Wattage (W) Bulb No. 8-24 Do-it-yourself
EXTERIOR AND INTERIOR LIGHTS Item Headlight assembly High/Low Front turn signal light Front combination light: Front side marker light Parking/Cornering Rear combination light: Turn signal Stop/Tail Rear side marker light Back-up light License plate light High-mounted stop light Interior lights Personal reading light Luggage compartment light Steplight Spotlight 27 8.25/27 5 27 3.8 12.8 12 10 12 3.8 10 3156K 3157K 168 3156K 194 912 211-2 578 211-2 194 578 3.8 8.25/27 194 3157K 65/55 8.25/27 9007 (HB5) 3157NA Wattage (W) Bulb No. 8-24 Do-it-yourself

Owner's Manual
Page 240
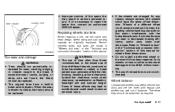
When replacing a bulb, first remove the lens and/or cover. ADI1093 Replacement procedures All lights (except for headlights) are either type A, B, C or D. WDI0012 Do-it-yourself 8-25
When replacing a bulb, first remove the lens and/or cover. ADI1093 Replacement procedures All lights (except for headlights) are either type A, B, C or D. WDI0012 Do-it-yourself 8-25
Owner's Manual
Page 246
..., construction (bias, bias-belted or radial), or tread patterns can get out of retread tires is necessary to -tire clearance, snow chain clearance, speedometer calibration, headlight aim and bumper height. Refer to accidents and could cause pre-mature tire wear, degrading vehicle handling characteristics and/or interference with regular use of... fail without warning. ● The use , wheels can adversely affect the ride, braking, handling, ground clearance, body-to repair the spare tire, contact an authorized NISSAN dealer.
..., construction (bias, bias-belted or radial), or tread patterns can get out of retread tires is necessary to -tire clearance, snow chain clearance, speedometer calibration, headlight aim and bumper height. Refer to accidents and could cause pre-mature tire wear, degrading vehicle handling characteristics and/or interference with regular use of... fail without warning. ● The use , wheels can adversely affect the ride, braking, handling, ground clearance, body-to repair the spare tire, contact an authorized NISSAN dealer.
Owner's Manual
Page 252
... or strange noises. Additional information on the following items with an is released. Lights* - Make sure the headlights, stop lights, tail lights, turn signal lights, and other corrosive materials, check lubrication frequently. Also check headlight aim. Windshield wiper and washer* - Check that the wipers and washer operate properly and that all latches...
... or strange noises. Additional information on the following items with an is released. Lights* - Make sure the headlights, stop lights, tail lights, turn signal lights, and other corrosive materials, check lubrication frequently. Also check headlight aim. Windshield wiper and washer* - Check that the wipers and washer operate properly and that all latches...
Owner's Manual
Page 288
...Tachometer...2-4 Trip odometer ...2-4 General maintenance ...9-2 Glove box...2-22 H Hazard warning flasher switch ...2-17 Head restraints ...1-10 Headlight control switch...2-14 Headlights ...8-23 Heater Heater and air conditioner (automatic) (if so equipped)...4-11 Heater and air conditioner (manual)...4-3 Rear seat... light (See stop light) ...8-24 Bulb check/instrument panel ...2-6 Bulb replacement...8-24 Cornering light ...2-17 Headlight control switch ...2-14 Headlights...8-23 Interior lights ...2-31 Light bulbs ...8-23 Luggage compartment lights ...2-31 Spotlights (See map light) ...2-32...
...Tachometer...2-4 Trip odometer ...2-4 General maintenance ...9-2 Glove box...2-22 H Hazard warning flasher switch ...2-17 Head restraints ...1-10 Headlight control switch...2-14 Headlights ...8-23 Heater Heater and air conditioner (automatic) (if so equipped)...4-11 Heater and air conditioner (manual)...4-3 Rear seat... light (See stop light) ...8-24 Bulb check/instrument panel ...2-6 Bulb replacement...8-24 Cornering light ...2-17 Headlight control switch ...2-14 Headlights...8-23 Interior lights ...2-31 Light bulbs ...8-23 Luggage compartment lights ...2-31 Spotlights (See map light) ...2-32...
Owner's Manual
Page 290
......2-30 Sunroof ...2-30 Supplemental restraint system Information and warning labels ...1-36 Switch Autolamp switch ...2-15 Automatic power window switch ...2-28 Hazard warning flasher switch ...2-17 Headlight control switch ...2-14 Ignition switch ...5-4 Overdrive switch ...5-8 Rear window defogger switch ...2-14 Rear window wiper and washer switches ...2-13 Turn signal switch...2-16 Windshield wiper...
......2-30 Sunroof ...2-30 Supplemental restraint system Information and warning labels ...1-36 Switch Autolamp switch ...2-15 Automatic power window switch ...2-28 Hazard warning flasher switch ...2-17 Headlight control switch ...2-14 Ignition switch ...5-4 Overdrive switch ...5-8 Rear window defogger switch ...2-14 Rear window wiper and washer switches ...2-13 Turn signal switch...2-16 Windshield wiper...


