
Owner's Manual
Page 16
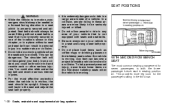
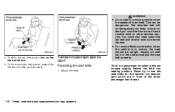
... mat positioning'' in your vehicle is securely locked. ● After sliding the seat, check that is not intended to be tightened to move each seat location. They could cause personal injury. However, if it must be seriously injured or killed. Proper usage is important to your vehicle that both sides of...
... mat positioning'' in your vehicle is securely locked. ● After sliding the seat, check that is not intended to be tightened to move each seat location. They could cause personal injury. However, if it must be seriously injured or killed. Proper usage is important to your vehicle that both sides of...

Owner's Manual
Page 24
... leg floor anchors before installing the seat. 1. The second row bucket seats are having difficulty installing the seats, you may have them in the wrong location. Second row passenger side bucket seat The bucket seat near the passenger side sliding door can be moved forward to be sure it is securely...
... leg floor anchors before installing the seat. 1. The second row bucket seats are having difficulty installing the seats, you may have them in the wrong location. Second row passenger side bucket seat The bucket seat near the passenger side sliding door can be moved forward to be sure it is securely...
Owner's Manual
Page 27
... to ride in any area of your vehicle that is not properly secured in one of a vehicle. Any item can become a projectile inside of the locations shown in this chapter, or in a place without a seat and seat belt can be dangerous. Sitting without a seat belt in a seat that is not equipped...
... to ride in any area of your vehicle that is not properly secured in one of a vehicle. Any item can become a projectile inside of the locations shown in this chapter, or in a place without a seat and seat belt can be dangerous. Sitting without a seat belt in a seat that is not equipped...

Owner's Manual
Page 37
... arranged properly, the positioning pins of the two mats on either side of the driver's seat. over the floor mat positioning bracket located at the base of each seat location. When the mats are attached to ride in a seat and is placed 1-30 Seats, restraints and supplemental air bag systems Improper seat...
... arranged properly, the positioning pins of the two mats on either side of the driver's seat. over the floor mat positioning bracket located at the base of each seat location. When the mats are attached to ride in a seat and is placed 1-30 Seats, restraints and supplemental air bag systems Improper seat...
Owner's Manual
Page 41
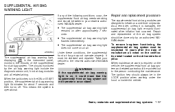
... front air bag may not inflate in the dashboard above the glove box. WRS0014 Supplemental front air bag system The driver supplemental air bag is located in the ON or START position. After turning the ignition key to the lower body. intentionally inhale it, as practical from the steering wheel or...
... front air bag may not inflate in the dashboard above the glove box. WRS0014 Supplemental front air bag system The driver supplemental air bag is located in the ON or START position. After turning the ignition key to the lower body. intentionally inhale it, as practical from the steering wheel or...
Owner's Manual
Page 44
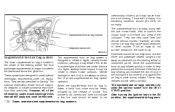
...unit, front air bag modules and all . It must be inspected 10 years after the date of manufacture as noted on the certification label located on , it is on the driver side front pillar. To ensure long-term functioning, the supplemental air bag system must be checked and ...the ignition key is operational. Under these conditions, the supplemental front air bag may not operate properly. Take your vehicle to your nearest authorized NISSAN dealer. ● The supplemental air bag warning light remains on after inflation has occurred. SUPPLEMENTAL AIR BAG WARNING LIGHT If any of the ...
...unit, front air bag modules and all . It must be inspected 10 years after the date of manufacture as noted on the certification label located on , it is on the driver side front pillar. To ensure long-term functioning, the supplemental air bag system must be checked and ...the ignition key is operational. Under these conditions, the supplemental front air bag may not operate properly. Take your vehicle to your nearest authorized NISSAN dealer. ● The supplemental air bag warning light remains on after inflation has occurred. SUPPLEMENTAL AIR BAG WARNING LIGHT If any of the ...
Owner's Manual
Page 57
Pull the shoulder belt portion toward the retractor to use the seat belts for the second row passengers which are located slightly behind the third row seating position. Adjust the seat. This can be against your body. The shoulder belt will not be dangerous. Third row ...
Pull the shoulder belt portion toward the retractor to use the seat belts for the second row passengers which are located slightly behind the third row seating position. Adjust the seat. This can be against your body. The shoulder belt will not be dangerous. Third row ...

Owner's Manual
Page 76
Seats, restraints and supplemental air bag systems 1-69 ARS1194 ARS1193 ARS1199 2. Hook the tether strap into the slot in the anchor bracket on the second row seat (located on the lower back of the seat, in line with the head restraint).
Seats, restraints and supplemental air bag systems 1-69 ARS1194 ARS1193 ARS1199 2. Hook the tether strap into the slot in the anchor bracket on the second row seat (located on the lower back of the seat, in line with the head restraint).

Owner's Manual
Page 77
follow the directions explained in ''Installation on the threepassenger bench seat when the seat is in the second row location. Once the child restraint is properly secured to make sure it is properly secured prior to the seat (see "Installation on second and third row ... on second and third row outboard positions, Front facing" or "Installation on the three-passenger bench seat when the seat is in the third row location. If not secure, repeat steps two through four. ARS1192 3. Once the child restraint is properly secured to each use force to tilt the child restraint...
follow the directions explained in ''Installation on the threepassenger bench seat when the seat is in the second row location. Once the child restraint is properly secured to make sure it is properly secured prior to the seat (see "Installation on second and third row ... on second and third row outboard positions, Front facing" or "Installation on the three-passenger bench seat when the seat is in the third row location. If not secure, repeat steps two through four. ARS1192 3. Once the child restraint is properly secured to each use force to tilt the child restraint...

Owner's Manual
Page 78
... properly secured prior to each use force to tilt the child restraint from side to side, and tug it forward to make sure it is located on the lower back of the seat. 3. Tighten the tether strap to a third row bench seat: 1. For the passenger side outboard seating position, route the...
... properly secured prior to each use force to tilt the child restraint from side to side, and tug it forward to make sure it is located on the lower back of the seat. 3. Tighten the tether strap to a third row bench seat: 1. For the passenger side outboard seating position, route the...
Owner's Manual
Page 103
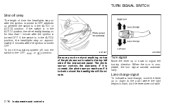
... as if it is completed, the turn signal cancels automatically. AIC1087 AIC0560 Be sure you do not put anything on top of the photo sensor located in the top left side of time the headlights stay on after the ignition is turned to the OFF, , or position. The photo sensor controls...
... as if it is completed, the turn signal cancels automatically. AIC1087 AIC0560 Be sure you do not put anything on top of the photo sensor located in the top left side of time the headlights stay on after the ignition is turned to the OFF, , or position. The photo sensor controls...

Owner's Manual
Page 105
... socket: ● Maximum load of any electrical equipment should not exceed 10 amps. ● Be sure to the power socket. The rear power socket is located on for extended periods can discharge your electrical equipment. When not in electrical equipment such as a cellular telephone, CB radio, etc. Leaving electrical equipment on...
... socket: ● Maximum load of any electrical equipment should not exceed 10 amps. ● Be sure to the power socket. The rear power socket is located on for extended periods can discharge your electrical equipment. When not in electrical equipment such as a cellular telephone, CB radio, etc. Leaving electrical equipment on...

Owner's Manual
Page 107
Pull down to close the conversation mirror. 2-20 Instruments and controls Push again to lock mirror into place. Push to desired position. STORAGE AIC1078 ARS1249 LIC0020 MAP POCKETS A map pocket is located on the right hand side of the instrument panel and on the back of the passenger seat. CONVERSATION MIRROR Some vehicles are equipped with a conversation mirror. Adjust mirror to open the conversation mirror. The map pocket can be used to store maps.
Pull down to close the conversation mirror. 2-20 Instruments and controls Push again to lock mirror into place. Push to desired position. STORAGE AIC1078 ARS1249 LIC0020 MAP POCKETS A map pocket is located on the right hand side of the instrument panel and on the back of the passenger seat. CONVERSATION MIRROR Some vehicles are equipped with a conversation mirror. Adjust mirror to open the conversation mirror. The map pocket can be used to store maps.

Owner's Manual
Page 112
PARCEL SHELF (if so equipped) ● Properly secure all three parcel shelf net loops onto the retainers located on the three-passenger bench seat that is securely latched. The packages placed on the parcel shelf and restrained by the parcel shelf net must ...
PARCEL SHELF (if so equipped) ● Properly secure all three parcel shelf net loops onto the retainers located on the three-passenger bench seat that is securely latched. The packages placed on the parcel shelf and restrained by the parcel shelf net must ...

Owner's Manual
Page 114
inside the vehicle. There are located on the Safety Compliance Certification Label (located on the driver's door pillar). CAUTION Use care when placing or removing items from the ground, use of the adjusting knobs. Unattended children could unknowingly ...
inside the vehicle. There are located on the Safety Compliance Certification Label (located on the driver's door pillar). CAUTION Use care when placing or removing items from the ground, use of the adjusting knobs. Unattended children could unknowingly ...
Owner's Manual
Page 118
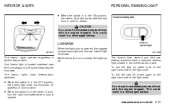
... is closed . When the back door is in the overhead trim panel. One interior light is located overhead near the front seats and one is in a discharged battery. The interior lights have a personal reading light located in the OFF position, the interior light does not illuminate, regardless of time with the engine...
... is closed . When the back door is in the overhead trim panel. One interior light is located overhead near the front seats and one is in a discharged battery. The interior lights have a personal reading light located in the OFF position, the interior light does not illuminate, regardless of time with the engine...
Owner's Manual
Page 122
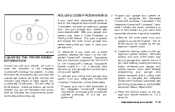
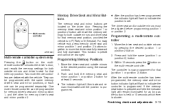
...rolling code system to recognize the Integrated HomeLink Universal Transceiver with the Rolling Code feature, call NISSAN Consumer Affairs Department. To determine if you sell your vehicle, be located by the garage door opener motor. To operate your rolling code garage door opener from ... have just programmed. AIC1070 2. Program your garage door opener every time you have a Code Protected or Rolling Code feature. The exact location and color of your hand held transmitter to 2 seconds, then remains on the HomeLink Universal Transceiver flashes rapidly for 1 to 2 seconds...
...rolling code system to recognize the Integrated HomeLink Universal Transceiver with the Rolling Code feature, call NISSAN Consumer Affairs Department. To determine if you sell your vehicle, be located by the garage door opener motor. To operate your rolling code garage door opener from ... have just programmed. AIC1070 2. Program your garage door opener every time you have a Code Protected or Rolling Code feature. The exact location and color of your hand held transmitter to 2 seconds, then remains on the HomeLink Universal Transceiver flashes rapidly for 1 to 2 seconds...
Owner's Manual
Page 134
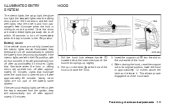
Pull the hood lock release handle 1 located below the instrument panel; Insert the support rod 3 into the slot on the underside of the hood latch. This allows proper engagement of the hood. 4. ...
Pull the hood lock release handle 1 located below the instrument panel; Insert the support rod 3 into the slot on the underside of the hood latch. This allows proper engagement of the hood. 4. ...
Owner's Manual
Page 138
... 1 or position 2. This function is preset and cannot be programmed separately. Within 10 seconds press the the multi-remote controller. Two multi-remote controllers are located on the multiremote controller unlocks the driver's door, and recalls the memory settings for both outside mirrors to move the driver seat fully rearward and...
... 1 or position 2. This function is preset and cannot be programmed separately. Within 10 seconds press the the multi-remote controller. Two multi-remote controllers are located on the multiremote controller unlocks the driver's door, and recalls the memory settings for both outside mirrors to move the driver seat fully rearward and...
Owner's Manual
Page 145
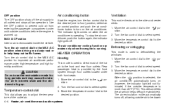
... conditioner is warmed up . The indicator light comes on the air conditioner. po- Rear passenger heat is provided by the front system through floor outlets located under cold outside conditions before the engine is operating. Move the temperature control dial to the sition. CAUTION Do not use the recirculation mode for...
... conditioner is warmed up . The indicator light comes on the air conditioner. po- Rear passenger heat is provided by the front system through floor outlets located under cold outside conditions before the engine is operating. Move the temperature control dial to the sition. CAUTION Do not use the recirculation mode for...


