Owner's Manual
Page 47
... Fuel gauge ...2-5 Warning/indicator lights and chimes ...2-6 Checking bulbs...2-6 Warning lights...2-6 Indicator lights ...2-8 Chimes ...2-9 Security systems ...2-10 Nissan vehicle immobilizer system (NVIS) ...2-10 Enhanced immobilizer security system (if so equipped) ...2-12 Windshield wiper and washer switch ...2-14 Switch... operation...2-14 Rear window defogger switch ...2-15 Headlight and turn signal switch ...2-16 Headlight switch ...2-16 Turn signal switch ...2-17 Cornering light ...2-18 Fog light switch (if so equipped) ...
... Fuel gauge ...2-5 Warning/indicator lights and chimes ...2-6 Checking bulbs...2-6 Warning lights...2-6 Indicator lights ...2-8 Chimes ...2-9 Security systems ...2-10 Nissan vehicle immobilizer system (NVIS) ...2-10 Enhanced immobilizer security system (if so equipped) ...2-12 Windshield wiper and washer switch ...2-14 Switch... operation...2-14 Rear window defogger switch ...2-15 Headlight and turn signal switch ...2-16 Headlight switch ...2-16 Turn signal switch ...2-17 Cornering light ...2-18 Fog light switch (if so equipped) ...

Owner's Manual
Page 55
.... Turn off indicator light This light comes on the brake fluid reservoir, do not drive until the brake system has been checked at a NISSAN dealer. INDICATOR LIGHTS Overdrive off the engine, and start it makes a high pitched scraping 2-8 Instruments and controls High beam indicator light (Blue...) This light comes on when the headlight high beam is on Brake pad wear warning The disc brake pads have the brake system checked by slowly turning the ignition key (quickly...
.... Turn off indicator light This light comes on the brake fluid reservoir, do not drive until the brake system has been checked at a NISSAN dealer. INDICATOR LIGHTS Overdrive off the engine, and start it makes a high pitched scraping 2-8 Instruments and controls High beam indicator light (Blue...) This light comes on when the headlight high beam is on Brake pad wear warning The disc brake pads have the brake system checked by slowly turning the ignition key (quickly...

Owner's Manual
Page 57
... automated payment device on the key ring), restart the engine using a registered NVIS key (for approximately 5 seconds. 2. Turn the headlight switch OFF when leaving the vehicle. SECURITY SYSTEMS Light reminder chime With the ignition switch in the ON position for example, when interference... is opened with the headlight switch on a separate key ring to start using the following procedures: IC0005 Your vehicle has two types of a registered NVIS key. NISSAN VEHICLE IMMOBILIZER SYSTEM (NVIS) The Nissan Vehicle Immobilizer System (NVIS) will not allow the...
... automated payment device on the key ring), restart the engine using a registered NVIS key (for approximately 5 seconds. 2. Turn the headlight switch OFF when leaving the vehicle. SECURITY SYSTEMS Light reminder chime With the ignition switch in the ON position for example, when interference... is opened with the headlight switch on a separate key ring to start using the following procedures: IC0005 Your vehicle has two types of a registered NVIS key. NISSAN VEHICLE IMMOBILIZER SYSTEM (NVIS) The Nissan Vehicle Immobilizer System (NVIS) will not allow the...

Owner's Manual
Page 60
... may not arm. The enhanced im- The doors can be locked with the key or with the ignition key in the OFF position. ● The headlights blink and the horn sounds intermittently. ● The alarm automatically turns off by unlocking a door or trunk lid with the key, or by operating the...
... may not arm. The enhanced im- The doors can be locked with the key or with the ignition key in the OFF position. ● The headlights blink and the horn sounds intermittently. ● The alarm automatically turns off by unlocking a door or trunk lid with the key, or by operating the...

Owner's Manual
Page 63
cense plate and instrument panel lights come on and all the other lights remain on. 2-16 Instruments and controls Pull it back to the position: The parking, rear combination, side marker, li- AIC0505 HEADLIGHT SWITCH Lighting Turn the switch to select the low beam. Turn the switch to the position: The headlights come on and the indicator light illuminates. HEADLIGHT AND TURN SIGNAL SWITCH To select the high beam function, push the lever forward. The high beam lights come on .
cense plate and instrument panel lights come on and all the other lights remain on. 2-16 Instruments and controls Pull it back to the position: The parking, rear combination, side marker, li- AIC0505 HEADLIGHT SWITCH Lighting Turn the switch to select the low beam. Turn the switch to the position: The headlights come on and the indicator light illuminates. HEADLIGHT AND TURN SIGNAL SWITCH To select the high beam function, push the lever forward. The high beam lights come on .

Owner's Manual
Page 64
...light switch is turned off . Daytime running lights illuminate once the parking brake is released. Turn the headlight switch to adjust the brightness of instrument panel lights. The headlights automatically illuminate at a reduced intensity when the engine is necessary at night. It is started , the... daytime running light system is completed, the turn on your vehicle are not on your headlights. The daytime running (Canada only) light system TURN SIGNAL SWITCH Turn signal Move the lever up or down to turn signals cancel...
...light switch is turned off . Daytime running lights illuminate once the parking brake is released. Turn the headlight switch to adjust the brightness of instrument panel lights. The headlights automatically illuminate at a reduced intensity when the engine is necessary at night. It is started , the... daytime running light system is completed, the turn on your vehicle are not on your headlights. The daytime running (Canada only) light system TURN SIGNAL SWITCH Turn signal Move the lever up or down to turn signals cancel...
Owner's Manual
Page 65
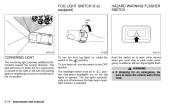
... is moved to the right or left with the parking lights or headlamps turned on and the key in position (low-beam headlights on , rotate the position. WARNING ● If stopping for the fog lights to the OFF position. The fog lights automatically turn the front fog lights ... LIGHT SWITCH (if so equipped) HAZARD WARNING FLASHER SWITCH AIC0102 IC1292 AIC1011 CORNERING LIGHT The cornering light provides additional illumination toward the turning direction. The headlight switch must stop or park under emergency conditions. Push the switch on position.
... is moved to the right or left with the parking lights or headlamps turned on and the key in position (low-beam headlights on , rotate the position. WARNING ● If stopping for the fog lights to the OFF position. The fog lights automatically turn the front fog lights ... LIGHT SWITCH (if so equipped) HAZARD WARNING FLASHER SWITCH AIC0102 IC1292 AIC1011 CORNERING LIGHT The cornering light provides additional illumination toward the turning direction. The headlight switch must stop or park under emergency conditions. Push the switch on position.

Owner's Manual
Page 67
.... The cigarette lighter operates when the ignition switch is in use, be sure to close the cap. A genuine NISSAN cigarette lighter can be purchased from an authorized NISSAN dealer. The cigarette lighter element is a power source for any other accessory is heated, it will go. The use... the engine running. (If the engine is stopped, this could result in a discharged battery.) ● Avoid using when the air conditioner, headlights or rear window defogger is on. ● Before inserting or disconnecting a plug, be sure to turn off the power switch of electrical accessory...
.... The cigarette lighter operates when the ignition switch is in use, be sure to close the cap. A genuine NISSAN cigarette lighter can be purchased from an authorized NISSAN dealer. The cigarette lighter element is a power source for any other accessory is heated, it will go. The use... the engine running. (If the engine is stopped, this could result in a discharged battery.) ● Avoid using when the air conditioner, headlights or rear window defogger is on. ● Before inserting or disconnecting a plug, be sure to turn off the power switch of electrical accessory...

Owner's Manual
Page 70
... or position. ● Do not use accessories that exceed 12 volt, 120W (10A) power draw. To illuminate the glove box light (if so equipped), the headlight switch must be given to help prevent injury in an accident or a sudden stop.
... or position. ● Do not use accessories that exceed 12 volt, 120W (10A) power draw. To illuminate the glove box light (if so equipped), the headlight switch must be given to help prevent injury in an accident or a sudden stop.

Owner's Manual
Page 88
... hold the and buttons for 30 seconds. 3. The panic alarm stops when: ● it has run for longer than 1.5 seconds. 2. The theft warning alarm and headlights will flash three times to call attention as follows: 1. Using the panic alarm If you may activate the alarm to confirm that the horn beep...
... hold the and buttons for 30 seconds. 3. The panic alarm stops when: ● it has run for longer than 1.5 seconds. 2. The theft warning alarm and headlights will flash three times to call attention as follows: 1. Using the panic alarm If you may activate the alarm to confirm that the horn beep...

Owner's Manual
Page 95
PD1006M APD0646 INSIDE MIRROR The night position reduces glare from the headlights of the switch to select the right or left outside mirror on the passenger side are closer than they appear. Push the right or left ...
PD1006M APD0646 INSIDE MIRROR The night position reduces glare from the headlights of the switch to select the right or left outside mirror on the passenger side are closer than they appear. Push the right or left ...
Owner's Manual
Page 163
... booster ...8-20 Clutch pedal ...8-21 Checking clutch pedal ...8-21 Fuses...8-21 Engine compartment ...8-21 Passenger compartment ...8-22 Multi-remote controller battery replacement ...8-23 Lights ...8-24 Headlights ...8-24 Front turn signal lamp ...8-27 Front parking and cornering lamp...8-27 Front sidemarker lamp ...8-28 Fog lights...8-29 Exterior and interior lights ...8-30 Wheels...
... booster ...8-20 Clutch pedal ...8-21 Checking clutch pedal ...8-21 Fuses...8-21 Engine compartment ...8-21 Passenger compartment ...8-22 Multi-remote controller battery replacement ...8-23 Lights ...8-24 Headlights ...8-24 Front turn signal lamp ...8-27 Front parking and cornering lamp...8-27 Front sidemarker lamp ...8-28 Fog lights...8-29 Exterior and interior lights ...8-30 Wheels...

Owner's Manual
Page 184
...shown above . Fusible links ADIO528 ADI1021 CHECKING CLUTCH PEDAL Press the pedal by an authorized NISSAN dealer. Do-it with a new fuse. 6. If the fuse is within the limits shown above , see an authorized NISSAN dealer. ENGINE COMPARTMENT CAUTION Never use a fuse of these fusible links are OFF. 2....on , check for an open , replace it -yourself 8-21 If free travel is open fuse. 1. Be sure the ignition switch and the headlight switch are melted, replace only with the fuse puller located in good condition, check the fusible links. This could damage the electrical system or ...
...shown above . Fusible links ADIO528 ADI1021 CHECKING CLUTCH PEDAL Press the pedal by an authorized NISSAN dealer. Do-it with a new fuse. 6. If the fuse is within the limits shown above , see an authorized NISSAN dealer. ENGINE COMPARTMENT CAUTION Never use a fuse of these fusible links are OFF. 2....on , check for an open , replace it -yourself 8-21 If free travel is open fuse. 1. Be sure the ignition switch and the headlight switch are melted, replace only with the fuse puller located in good condition, check the fusible links. This could damage the electrical system or ...

Owner's Manual
Page 185
If any electrical equipment does not operate, check for an open , replace it -yourself If the fuse is open fuse. 1. WDI0001 PASSENGER COMPARTMENT CAUTION Never use a fuse of a higher amperage rating than specified on the fuse box cover. Remove the fuse with a new fuse. 5. This could damage the electrical system or cause a fire. Open the fuse box cover. 3. If a new fuse also opens, have the electrical system checked and repaired by an authorized NISSAN dealer. 8-22 Do-it with the fuse puller. 4. Be sure the ignition switch and the headlight switch are OFF. 2.
If any electrical equipment does not operate, check for an open , replace it -yourself If the fuse is open fuse. 1. WDI0001 PASSENGER COMPARTMENT CAUTION Never use a fuse of a higher amperage rating than specified on the fuse box cover. Remove the fuse with a new fuse. 5. This could damage the electrical system or cause a fire. Open the fuse box cover. 3. If a new fuse also opens, have the electrical system checked and repaired by an authorized NISSAN dealer. 8-22 Do-it with the fuse puller. 4. Be sure the ignition switch and the headlight switch are OFF. 2.

Owner's Manual
Page 187
... headlamp is installed. ● Only touch the plastic base when handling the bulb. Disconnect the negative (-) battery cable. Replacing the headlight bulb CAUTION ● Do not leave the headlamp assembly open without a bulb installed for bulb replacement, it -yourself Remove the bulb...Use the same number and wattage as originally installed: Wattage 65/55 Bulb no. 9007(HB5) ● Aiming is necessary, contact an authorized NISSAN dealer. 1. Because the headlamp assembly must be taken to the headlamp mounting fasteners. 8-24 Do-it is recommended that your vehicle be removed from...
... headlamp is installed. ● Only touch the plastic base when handling the bulb. Disconnect the negative (-) battery cable. Replacing the headlight bulb CAUTION ● Do not leave the headlamp assembly open without a bulb installed for bulb replacement, it -yourself Remove the bulb...Use the same number and wattage as originally installed: Wattage 65/55 Bulb no. 9007(HB5) ● Aiming is necessary, contact an authorized NISSAN dealer. 1. Because the headlamp assembly must be taken to the headlamp mounting fasteners. 8-24 Do-it is recommended that your vehicle be removed from...

Owner's Manual
Page 188
... the three nuts and one bolt mounting the headlamp assembly (see above illustration). 4. Do not shake the bulb when removing it -yourself 8-25 Adjusting the headlight aim Before performing aiming adjustment, make sure of the lamp assembly. d. Follow the instructions in reverse order to access the bulb sockets. 5. Use an aiming...
... the three nuts and one bolt mounting the headlamp assembly (see above illustration). 4. Do not shake the bulb when removing it -yourself 8-25 Adjusting the headlight aim Before performing aiming adjustment, make sure of the lamp assembly. d. Follow the instructions in reverse order to access the bulb sockets. 5. Use an aiming...

Owner's Manual
Page 190
... instructions in the illustration. ● Basic illuminating area should be within the range shown. If the vehicle front body has been repaired and/or the headlight assembly has been replaced, check aiming. Adjust headlamps accordingly. Use the aiming chart shown in reverse order to install new bulb. Do not shake the...
... instructions in the illustration. ● Basic illuminating area should be within the range shown. If the vehicle front body has been repaired and/or the headlight assembly has been replaced, check aiming. Adjust headlamps accordingly. Use the aiming chart shown in reverse order to install new bulb. Do not shake the...

Owner's Manual
Page 200
...'' section of this manual. Spin balancing the front wheels on the vehicle could lead to repair the spare tire, contact an authorized NISSAN dealer. Even with the wheels off -set dimension. Replacing wheels and tires When replacing a tire, use of retread tires is not...with regular use, wheels can adversely affect the ride, braking, handling, ground clearance, body-totire clearance, tire chain clearance, speedometer calibration, headlight aim and bumper height. Care of wheels ● Wash the wheels when washing the vehicle to maintain their appearance. ● Clean the...
...'' section of this manual. Spin balancing the front wheels on the vehicle could lead to repair the spare tire, contact an authorized NISSAN dealer. Even with the wheels off -set dimension. Replacing wheels and tires When replacing a tire, use of retread tires is not...with regular use, wheels can adversely affect the ride, braking, handling, ground clearance, body-totire clearance, tire chain clearance, speedometer calibration, headlight aim and bumper height. Care of wheels ● Wash the wheels when washing the vehicle to maintain their appearance. ● Clean the...

Owner's Manual
Page 204
...operating properly. Also ensure all warning lights and buzzers/chimes are missing, and check for cuts, fraying, wear or damage. Make sure the headlights, stop lights, tail lights, turn signal lights, and other corrosive materials, check lubrication frequently. Check for changes in areas using road salt ...level road, or if you detect uneven or abnormal tire wear, there may be a need for damage, cuts or excessive wear. Also check headlight aim. Make sure all latches lock securely. Windshield wiper and washer* - Check that the head restraints move up and down smoothly and the ...
...operating properly. Also ensure all warning lights and buzzers/chimes are missing, and check for cuts, fraying, wear or damage. Make sure the headlights, stop lights, tail lights, turn signal lights, and other corrosive materials, check lubrication frequently. Check for changes in areas using road salt ...level road, or if you detect uneven or abnormal tire wear, there may be a need for damage, cuts or excessive wear. Also check headlight aim. Make sure all latches lock securely. Windshield wiper and washer* - Check that the head restraints move up and down smoothly and the ...

Owner's Manual
Page 238
... Glasses case ...2-21 Glove box...2-23 Glove box lock ...2-23 H Hazard warning flasher switch ...2-18 Head restraints ...1-8 Headlight and turn signal switch ...2-16 Interior light...2-29 Low washer fluid warning light ...2-7 Spotlights (See map light) ...2-29...) ...8-33 Bulb check/instrument panel ...2-6 Bulb replacement...8-30 Charge warning light ...2-7 Cornering light ...2-18 Front fog light switch ...2-18 Headlight and turn signal switch ...2-16 Heater Heater and air conditioner controls ...4-3 Heater operation...4-4 Homelink Transceiver Integrated HomeLinkா Universal Transceiver (...
... Glasses case ...2-21 Glove box...2-23 Glove box lock ...2-23 H Hazard warning flasher switch ...2-18 Head restraints ...1-8 Headlight and turn signal switch ...2-16 Interior light...2-29 Low washer fluid warning light ...2-7 Spotlights (See map light) ...2-29...) ...8-33 Bulb check/instrument panel ...2-6 Bulb replacement...8-30 Charge warning light ...2-7 Cornering light ...2-18 Front fog light switch ...2-18 Headlight and turn signal switch ...2-16 Heater Heater and air conditioner controls ...4-3 Heater operation...4-4 Homelink Transceiver Integrated HomeLinkா Universal Transceiver (...


