
Owner's Manual
Page 8
1 Seats, restraints and supplemental air bag systems Front seats ...1-2 Seat adjustment ...1-3 Head restraints ...1-6 Rear seat...1-7 Supplemental restraint system (air bag system) ...1-9 Supplemental air bag system...1-12 Warning labels...1-14 Supplemental air bag warning light...1-14 Seat belts ...1-...
1 Seats, restraints and supplemental air bag systems Front seats ...1-2 Seat adjustment ...1-3 Head restraints ...1-6 Rear seat...1-7 Supplemental restraint system (air bag system) ...1-9 Supplemental air bag system...1-12 Warning labels...1-14 Supplemental air bag warning light...1-14 Seat belts ...1-...
Owner's Manual
Page 13
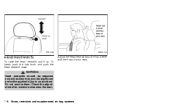
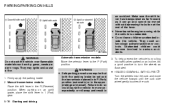
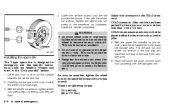
To lower, push the lock knob and push the head restraint down. PD1319 ARS1130 HEAD RESTRAINTS To raise the head restraint, pull it up. Do not remove them. Check the adjustment after someone else uses the seat. Adjust the head restraints so the top is level with the tops of your ears. 1-6 Seats, restraints and supplemental air bag systems WARNING Head restraints should be adjusted properly as they may provide significant protection against injury in an accident.
To lower, push the lock knob and push the head restraint down. PD1319 ARS1130 HEAD RESTRAINTS To raise the head restraint, pull it up. Do not remove them. Check the adjustment after someone else uses the seat. Adjust the head restraints so the top is level with the tops of your ears. 1-6 Seats, restraints and supplemental air bag systems WARNING Head restraints should be adjusted properly as they may provide significant protection against injury in an accident.
Owner's Manual
Page 94
... and left side of the display window. Precautions on cassette player operation ● To maintain good quality sound, NISSAN recommends using cassette tapes of time, the playback head, capstan and pinch roller may need to the desired level, press the AUDIO button repeatedly until the radio or ... squares illuminate on the right side of the display window. This residue accumulation can cause the cassette to play . The use cassettes with a head cleaning tape. The tape runs quickly, stops, then plays the next Heater, air conditioner and audio systems 4-13 If used, the label could...
... and left side of the display window. Precautions on cassette player operation ● To maintain good quality sound, NISSAN recommends using cassette tapes of time, the playback head, capstan and pinch roller may need to the desired level, press the AUDIO button repeatedly until the radio or ... squares illuminate on the right side of the display window. This residue accumulation can cause the cassette to play . The use cassettes with a head cleaning tape. The tape runs quickly, stops, then plays the next Heater, air conditioner and audio systems 4-13 If used, the label could...
Owner's Manual
Page 106
● Cassette tapes should be removed periodically with a head cleaning tape. COMPACT DISC (CD) PLAYER OPERATION Turn the ignition key to the ACC or ON position, and carefully insert the compact disc into the ... use . If used, the label could damage the player. Loose tape may cause jamming and wavering sound quality. ● Over a period of time, the playback head, capstan and pinch roller may cause the cassette to skip several selections. This residue accumulation can cause the cassette to play speed. If the radio...
● Cassette tapes should be removed periodically with a head cleaning tape. COMPACT DISC (CD) PLAYER OPERATION Turn the ignition key to the ACC or ON position, and carefully insert the compact disc into the ... use . If used, the label could damage the player. Loose tape may cause jamming and wavering sound quality. ● Over a period of time, the playback head, capstan and pinch roller may cause the cassette to skip several selections. This residue accumulation can cause the cassette to play speed. If the radio...
Owner's Manual
Page 115
... before shifting from P (Park) or N (Neutral) to R (Reverse), D (Drive), 2 or 1. Also check tires for proper inflation. ● Lock all doors. ● Position seat and adjust head restraints. ● Adjust inside and outside mirrors. ● Fasten seat belts and ask all windows and lights are shown on an uphill grade, do not...
... before shifting from P (Park) or N (Neutral) to R (Reverse), D (Drive), 2 or 1. Also check tires for proper inflation. ● Lock all doors. ● Position seat and adjust head restraints. ● Adjust inside and outside mirrors. ● Fasten seat belts and ask all windows and lights are shown on an uphill grade, do not...
Owner's Manual
Page 125
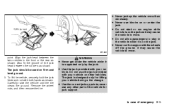
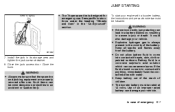
... it is unattended. ● Do not leave children unattended inside the vehicle. Make sure the shift lever has beenpushed as far forward as illustrated. ● HEADED DOWNHILL WITH CURB: 1 Turn the wheels into P (Park) position (automatic) or in the appropriate gear (manual). SD1006M WARNING Do not park the vehicle over flammable...
... it is unattended. ● Do not leave children unattended inside the vehicle. Make sure the shift lever has beenpushed as far forward as illustrated. ● HEADED DOWNHILL WITH CURB: 1 Turn the wheels into P (Park) position (automatic) or in the appropriate gear (manual). SD1006M WARNING Do not park the vehicle over flammable...
Owner's Manual
Page 126
... vehicle and stopping distance will move away from the curb and move the vehicle back until the curb side wheel gently touches the curb. ● HEADED UPHILL OR DOWNHILL, NO CURB: 3 Turn the wheels toward the side of the road so the vehicle will be much greater steering effort is washed... running or is designed to assist steering. To dry brakes, drive the vehicle at high speeds until the brakes function correctly. POWER STEERING SYSTEM ● HEADED UPHILL WITH CURB: 2 Turn the wheels away from the center of the road if it moves. 4. Turn the ignition key to heat-up the brakes...
... vehicle and stopping distance will move away from the curb and move the vehicle back until the curb side wheel gently touches the curb. ● HEADED UPHILL OR DOWNHILL, NO CURB: 3 Turn the wheels toward the side of the road so the vehicle will be much greater steering effort is washed... running or is designed to assist steering. To dry brakes, drive the vehicle at high speeds until the brakes function correctly. POWER STEERING SYSTEM ● HEADED UPHILL WITH CURB: 2 Turn the wheels away from the center of the road if it moves. 4. Turn the ignition key to heat-up the brakes...
Owner's Manual
Page 136
...-up the vehicle more than necessary. ● Never use the jack provided with the wheels off the ground. Also fit the groove of the jack head between the two notches in the vehicle while it is on the jack. ● Never run engine while vehicle is supported only by the jack.... point. It may cause the vehicle to stay in the front or the rear as it is on firm and level ground. 3. Align the jack head between the notches as shown. Do not use blocks on or under the vehicle while it may cause the vehicle to move . ● Do not...
...-up the vehicle more than necessary. ● Never use the jack provided with the wheels off the ground. Also fit the groove of the jack head between the two notches in the vehicle while it is on the jack. ● Never run engine while vehicle is supported only by the jack.... point. It may cause the vehicle to stay in the front or the rear as it is on firm and level ground. 3. Align the jack head between the notches as shown. Do not use blocks on or under the vehicle while it may cause the vehicle to move . ● Do not...
Owner's Manual
Page 137
... rod and wheel nut wrench in the tool bag and place the tool bag in the ''Do-it-yourself'' section. 1. See specific instructions under the heading ''Wheels and tires'' in the spare tire storage area. 6. Clean any mud or dirt from the surface between the wheel and hub. 2. Lower the vehicle...
... rod and wheel nut wrench in the tool bag and place the tool bag in the ''Do-it-yourself'' section. 1. See specific instructions under the heading ''Wheels and tires'' in the spare tire storage area. 6. Clean any mud or dirt from the surface between the wheel and hub. 2. Lower the vehicle...
Owner's Manual
Page 138
... must be followed. WARNING ● Always make sure that the spare tire and jacking equipment are properly secured after use . See specific instructions under the heading ''Wheels and tires'' in an accident or sudden stop. It could also damage your vehicle. ● Explosive hydrogen gas is always present in the vicinity...
... must be followed. WARNING ● Always make sure that the spare tire and jacking equipment are properly secured after use . See specific instructions under the heading ''Wheels and tires'' in an accident or sudden stop. It could also damage your vehicle. ● Explosive hydrogen gas is always present in the vicinity...
Owner's Manual
Page 184
... in all doors and the hood operate properly. Seats - Check seat position controls such as excessive freeplay, hard steering or strange noises. Check that the head restraints move up and down smoothly and the locks (if so equipped) hold securely in every position. Accelerator pedal - Check the pedal for cracks or...
... in all doors and the hood operate properly. Seats - Check seat position controls such as excessive freeplay, hard steering or strange noises. Check that the head restraints move up and down smoothly and the locks (if so equipped) hold securely in every position. Accelerator pedal - Check the pedal for cracks or...
Owner's Manual
Page 204
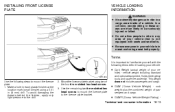
... seat belt properly. ATI1004 Use the following terms before loading your vehicle: ● Curb Weight (actual weight of the four 8 mm slotted hex head screws. 3. Technical and consumer information 10-13 vehicle weight including: standard and optional equipment, fluids, emergency tools, and spare tire assembly. Make a ...at the location mark (small dimple) using two of your vehicle is in your vehicle) - Use the remaining two 8 mm slotted hex head screws to mount the license plate to the drill. 2. In a collision, people riding in these areas are more likely to be seriously ...
... seat belt properly. ATI1004 Use the following terms before loading your vehicle: ● Curb Weight (actual weight of the four 8 mm slotted hex head screws. 3. Technical and consumer information 10-13 vehicle weight including: standard and optional equipment, fluids, emergency tools, and spare tire assembly. Make a ...at the location mark (small dimple) using two of your vehicle is in your vehicle) - Use the remaining two 8 mm slotted hex head screws to mount the license plate to the drill. 2. In a collision, people riding in these areas are more likely to be seriously ...

Owner's Manual
Page 216
... plate ...10-13 Light Air bag warning light ...1-12, 1-14, 2-6 Brake light (See stop light) ...8-27 Bulb check/instrument panel ...2-5 Hazard warning flasher switch ...2-14 Head restraints ...1-6 Headlight aiming adjustment ...8-22 Headlight and turn signal switch ...2-12 Headlights ...8-21 Heater Heater and air conditioner controls ...4-3 Heater and air conditioner (manual)...4-3 Heater...
... plate ...10-13 Light Air bag warning light ...1-12, 1-14, 2-6 Brake light (See stop light) ...8-27 Bulb check/instrument panel ...2-5 Hazard warning flasher switch ...2-14 Head restraints ...1-6 Headlight aiming adjustment ...8-22 Headlight and turn signal switch ...2-12 Headlights ...8-21 Heater Heater and air conditioner controls ...4-3 Heater and air conditioner (manual)...4-3 Heater...


