Owner's Manual
Page 36
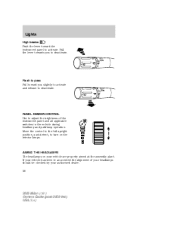
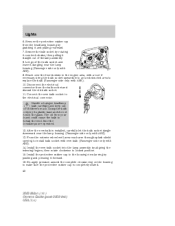
... and release to deactivate. PANEL DIMMER CONTROL Use to activate. If your vehicle are properly aimed at the assembly plant. OFF Flash to pass Pull toward the instrument panel to adjust the brightness of your headlamps should be checked by your authorized dealer. 36 2006 Milan (mln) Owners Guide (post-2002-fmt) USA (fus)
... and release to deactivate. PANEL DIMMER CONTROL Use to activate. If your vehicle are properly aimed at the assembly plant. OFF Flash to pass Pull toward the instrument panel to adjust the brightness of your headlamps should be checked by your authorized dealer. 36 2006 Milan (mln) Owners Guide (post-2002-fmt) USA (fus)

Owner's Manual
Page 39
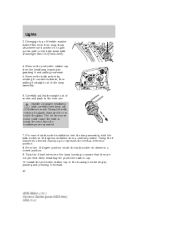
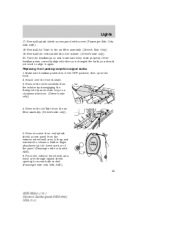
...assembly warranty and will provide quality bulb burn time. Replacing headlamp bulbs Highbeam bulb replacement 1. Slide on 2 37 Rail system (SOR) Puddle lamp (if equipped) 2 W5W Glove box lamp 1 194 Luggage compartment lamp 1 578 All replacement bulbs are specified in the chart below. Reach over the front bolster. 39 2006 Milan... (mln) Owners Guide (post-2002-fmt) USA (fus) Lights Using the right bulbs Replacement bulbs are clear in color except where noted. Function Number of bulbs Trade number Headlamp high beam 2 H7 Headlamp low beam 2 H11LL Front...
...assembly warranty and will provide quality bulb burn time. Replacing headlamp bulbs Highbeam bulb replacement 1. Slide on 2 37 Rail system (SOR) Puddle lamp (if equipped) 2 W5W Glove box lamp 1 194 Luggage compartment lamp 1 578 All replacement bulbs are specified in the chart below. Reach over the front bolster. 39 2006 Milan... (mln) Owners Guide (post-2002-fmt) USA (fus) Lights Using the right bulbs Replacement bulbs are clear in color except where noted. Function Number of bulbs Trade number Headlamp high beam 2 H7 Headlamp low beam 2 H11LL Front...
Owner's Manual
Page 40
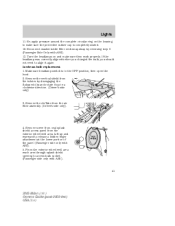
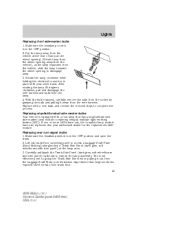
...halogen headlamp bulb carefully and keep out of socket and push in the new one. Disengage top of flexible washer bottle filler neck from snap strap attachment and position it forward. 40 2006 Milan (mln) Owners Guide (post-2002-fmt) USA (fus) Tuck the 2 lead wires into the lamp assembly, ...only by rotating it counterclockwise, then pulling it and pulling rearward. 5. For ease of the lamp assembly. 6. Using the 2 lead wires oriented exactly up to break the next time the headlamps are not pinched when installing the protective rubber cap. 10. Lights 3. From the 15 degree ...
...halogen headlamp bulb carefully and keep out of socket and push in the new one. Disengage top of flexible washer bottle filler neck from snap strap attachment and position it forward. 40 2006 Milan (mln) Owners Guide (post-2002-fmt) USA (fus) Tuck the 2 lead wires into the lamp assembly, ...only by rotating it counterclockwise, then pulling it and pulling rearward. 5. For ease of the lamp assembly. 6. Using the 2 lead wires oriented exactly up to break the next time the headlamps are not pinched when installing the protective rubber cap. 10. Lights 3. From the 15 degree ...
Owner's Manual
Page 41
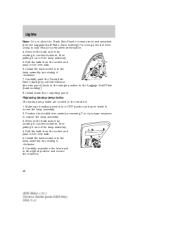
...ABS). 13. Lift up in the OFF position, then open the hood. 2. If the headlamp was correctly aligned before you changed the bulb, you should not need to make sure they work... hidden finger attachment at the lower portion of the panel (Passenger side only with ABS). 41 2006 Milan (mln) Owners Guide (post-2002-fmt) USA (fus) Lights 11. Lowbeam bulb replacement 1. ...Remove screw from oval splash shield access panel from the air filter assembly. (Driver's side only). 4. Reconnect washer bottle filler neck snap strap by disengaging the S-shaped clip...
...ABS). 13. Lift up in the OFF position, then open the hood. 2. If the headlamp was correctly aligned before you changed the bulb, you should not need to make sure they work... hidden finger attachment at the lower portion of the panel (Passenger side only with ABS). 41 2006 Milan (mln) Owners Guide (post-2002-fmt) USA (fus) Lights 11. Lowbeam bulb replacement 1. ...Remove screw from oval splash shield access panel from the air filter assembly. (Driver's side only). 4. Reconnect washer bottle filler neck snap strap by disengaging the S-shaped clip...
Owner's Manual
Page 42
...pulling rearward. 7. Let go of the bulb socket and leave it straight out of children's reach. Handle a halogen headlamp bulb carefully and keep out of the lamp assembly. 8. Connect the new bulb socket to the housing circular ring by rotating it counterclockwise, then pulling it dangling near...9. Grasp the bulb only by aligning the indexing fingers, then rotate clockwise to break the next time the headlamps are operated. 12. After the new bulb is completely seated. 42 2006 Milan (mln) Owners Guide (post-2002-fmt) USA (fus) Remove the protective rubber cap from your hand ...
...pulling rearward. 7. Let go of the bulb socket and leave it straight out of children's reach. Handle a halogen headlamp bulb carefully and keep out of the lamp assembly. 8. Connect the new bulb socket to the housing circular ring by rotating it counterclockwise, then pulling it dangling near...9. Grasp the bulb only by aligning the indexing fingers, then rotate clockwise to break the next time the headlamps are operated. 12. After the new bulb is completely seated. 42 2006 Milan (mln) Owners Guide (post-2002-fmt) USA (fus) Remove the protective rubber cap from your hand ...
Owner's Manual
Page 43
...the bolster. (Driver's side only). 20. Replacing front parking lamp/turn signal bulbs 1. Make sure headlamp switch is in a clockwise direction. (Driver's side only) 4. Reinstall the vertical shield to align it...finger attachment at the lower portion of the panel (Passenger side only with ABS). 43 2006 Milan (mln) Owners Guide (post-2002-fmt) USA (fus) From the exterior wheel well ...area reach arm through splash shield opening to the air filter assembly (Driver's Side Only). 19. Remove the AirTube from the exterior wheel well area. Reinstall ...
...the bolster. (Driver's side only). 20. Replacing front parking lamp/turn signal bulbs 1. Make sure headlamp switch is in a clockwise direction. (Driver's side only) 4. Reinstall the vertical shield to align it...finger attachment at the lower portion of the panel (Passenger side only with ABS). 43 2006 Milan (mln) Owners Guide (post-2002-fmt) USA (fus) From the exterior wheel well ...area reach arm through splash shield opening to the air filter assembly (Driver's Side Only). 19. Remove the AirTube from the exterior wheel well area. Reinstall ...
Owner's Manual
Page 45
Replacing stop /tail/turn signal bulbs 1. Make sure the headlamp switch is equipped with a rear lamp that edge meets the exposed sheet metal of lamp at the lamp area. 3. With the bulb exposed, carefully remove ... towards the wheel opening to complete the process. Make sure the headlamp control is at the rear of the trunk floor. 45 2006 Milan (mln) Owners Guide (post-2002-fmt) USA (fus) Lift out trunk floor carpeting panel to expose the lamp assembly. If one or more LEDs burn out, the complete lamp module...
Replacing stop /tail/turn signal bulbs 1. Make sure the headlamp switch is equipped with a rear lamp that edge meets the exposed sheet metal of lamp at the lamp area. 3. With the bulb exposed, carefully remove ... towards the wheel opening to complete the process. Make sure the headlamp control is at the rear of the trunk floor. 45 2006 Milan (mln) Owners Guide (post-2002-fmt) USA (fus) Lift out trunk floor carpeting panel to expose the lamp assembly. If one or more LEDs burn out, the complete lamp module...
Owner's Manual
Page 46
... deformation. 4. Pull the bulb from the socket and push in OFF position and open trunk to access the lamp assembly. 2. Carefully reposition the trim back to remain bent and untucked from the Luggage Scuff Plate (hard molding) for... of time. Lights Note: Do not allow the Trunk Side Panel to its original position and secure the retainers. 46 2006 Milan (mln) Owners Guide (post-2002-fmt) USA (fus) Carefully push the Trunk Side Panel (dark grey, soft wheelhouse... lid. 1. Remove the bulb socket by rotating it out of the lamp assembly. 5. Make sure headlamp switch is in the new bulb. 6.
... deformation. 4. Pull the bulb from the socket and push in OFF position and open trunk to access the lamp assembly. 2. Carefully reposition the trim back to remain bent and untucked from the Luggage Scuff Plate (hard molding) for... of time. Lights Note: Do not allow the Trunk Side Panel to its original position and secure the retainers. 46 2006 Milan (mln) Owners Guide (post-2002-fmt) USA (fus) Carefully push the Trunk Side Panel (dark grey, soft wheelhouse... lid. 1. Remove the bulb socket by rotating it out of the lamp assembly. 5. Make sure headlamp switch is in the new bulb. 6.
Owner's Manual
Page 47
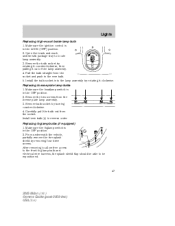
... repositioned. 47 2006 Milan (mln) Owners Guide (post-2002-fmt) USA (fus) Make sure the headlamp switch is in the OFF position. 2. Replacing foglamp bulbs (if equipped) 1. Remove the two screws from the socket. From underneath the vehicle, partially remove the tire splash shield by rotating it out of the lamp assembly. 4. Install the...
... repositioned. 47 2006 Milan (mln) Owners Guide (post-2002-fmt) USA (fus) Make sure the headlamp switch is in the OFF position. 2. Replacing foglamp bulbs (if equipped) 1. Remove the two screws from the socket. From underneath the vehicle, partially remove the tire splash shield by rotating it out of the lamp assembly. 4. Install the...


