Owner's Manual
Page 1
Table of Contents Introduction Instrument Cluster Warning and control lights Gauges 4 10 10 15 Entertainment Systems AM/FM stereo with CD AM/FM stereo with in-dash six CD 18 18 21 Climate Controls Manual heating and air conditioning Electronic automatic temperature control Rear passenger climate control Rear window defroster 27 27 28 31 32 Lights Driver Controls Windshield wiper/washer control Steering wheel adjustment Power windows Mirrors Speed control Message center 33 43 43 44 48 49 51 63 Locks and Security Keys Locks Anti-theft system 79 79 79 81 1
Table of Contents Introduction Instrument Cluster Warning and control lights Gauges 4 10 10 15 Entertainment Systems AM/FM stereo with CD AM/FM stereo with in-dash six CD 18 18 21 Climate Controls Manual heating and air conditioning Electronic automatic temperature control Rear passenger climate control Rear window defroster 27 27 28 31 32 Lights Driver Controls Windshield wiper/washer control Steering wheel adjustment Power windows Mirrors Speed control Message center 33 43 43 44 48 49 51 63 Locks and Security Keys Locks Anti-theft system 79 79 79 81 1
Owner's Manual
Page 47
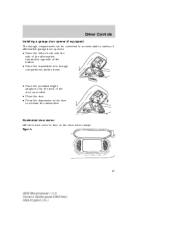
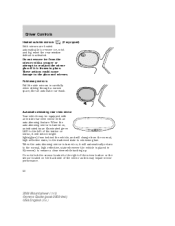
Type A 47 2004 Mountaineer (mnt) Owners Guide (post-2002-fmt) USA English (fus) Illuminated visor mirror Lift the mirror cover to activate the transmitter. Driver Controls Installing a garage door opener (if equipped) The storage compartment can be converted to accommodate a variety of aftermarket garage door openers: • Place the Velcro ... adaptors onto the back of the door as needed. • Close the door. • Press the depression in the door to turn on the visor mirror lamps.
Type A 47 2004 Mountaineer (mnt) Owners Guide (post-2002-fmt) USA English (fus) Illuminated visor mirror Lift the mirror cover to activate the transmitter. Driver Controls Installing a garage door opener (if equipped) The storage compartment can be converted to accommodate a variety of aftermarket garage door openers: • Place the Velcro ... adaptors onto the back of the door as needed. • Close the door. • Press the depression in the door to turn on the visor mirror lamps.
Owner's Manual
Page 49
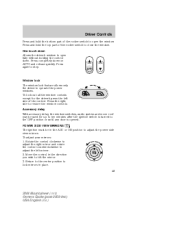
... must be used for the driver's press the left mirror. 2. Rotate the control clockwise to adjust the right mirror and rotate the control counterclockwise to adjust the left side of the control. To adjust your mirrors: 1. Window lock The window lock feature allows only the driver to restore the window controls.... rocker switch to open fully without holding the control down on AUTO and release quickly. Move the control in place. 49 2004 Mountaineer (mnt) Owners Guide (post-2002-fmt) USA English (fus) Driver Controls Press and hold the top part of the rocker switch to tilt the...
... must be used for the driver's press the left mirror. 2. Rotate the control clockwise to adjust the right mirror and rotate the control counterclockwise to adjust the left side of the control. To adjust your mirrors: 1. Window lock The window lock feature allows only the driver to restore the window controls.... rocker switch to open fully without holding the control down on AUTO and release quickly. Move the control in place. 49 2004 Mountaineer (mnt) Owners Guide (post-2002-fmt) USA English (fus) Driver Controls Press and hold the top part of the rocker switch to tilt the...
Owner's Manual
Page 50
... could cause damage to ensure a clear view while backing up. Automatic dimming rear view mirror Your vehicle may impair mirror performance. 50 2004 Mountaineer (mnt) Owners Guide (post-2002-fmt) USA English (fus) Driver Controls Heated outside mirrors (if equipped) Both mirrors are heated automatically to remove ice, mist and fog when the rear window defrost is...
... could cause damage to ensure a clear view while backing up. Automatic dimming rear view mirror Your vehicle may impair mirror performance. 50 2004 Mountaineer (mnt) Owners Guide (post-2002-fmt) USA English (fus) Driver Controls Heated outside mirrors (if equipped) Both mirrors are heated automatically to remove ice, mist and fog when the rear window defrost is...
Owner's Manual
Page 62
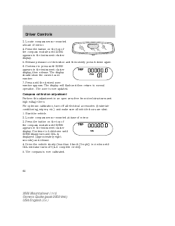
Driver Controls 3. Continue to normal operation. Compass calibration adjustment Perform this adjustment in an open area free from steel structures and high voltage lines: For optimum calibration, turn off (4-5 complete circles). 5. The compass is now updated. The zone is now calibrated. 62 2004 Mountaineer (...appears in circles until the desired zone number appears. Continue to hold down again. 6. Locate compass sensor mounted at base of mirror. 4. Drive the vehicle slowly (less than 5 km/h [3 mph]) in the instrument cluster display. Press until CAL indicator turns...
Driver Controls 3. Continue to normal operation. Compass calibration adjustment Perform this adjustment in an open area free from steel structures and high voltage lines: For optimum calibration, turn off (4-5 complete circles). 5. The compass is now updated. The zone is now calibrated. 62 2004 Mountaineer (...appears in circles until the desired zone number appears. Continue to hold down again. 6. Locate compass sensor mounted at base of mirror. 4. Drive the vehicle slowly (less than 5 km/h [3 mph]) in the instrument cluster display. Press until CAL indicator turns...
Owner's Manual
Page 178
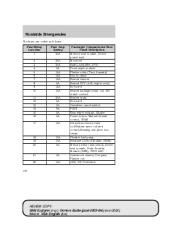
...Fuse Panel Description Memory seat module, Driver power seat Moonroof Radio, Amplifier, DVD Front wiper module Flasher relay (Turn, hazards) Key-in-chime Heated mirrors Heated PCV (4.0L engine only)...clutch contact Heated seats Not used Overdrive cancel switch PATS Rear wiper module, Cluster Power mirror, Manual climate control, TPMS Delayed accessory relay coil/Battery saver coil and contact/Reading... and glove box lamps Flexible fuel pump Restraint Control Module (RCM) Memory driver seat switch, Driver seat module, Body Security Module (BSM), PATS LED Instrument cluster, Compass, Flasher...
...Fuse Panel Description Memory seat module, Driver power seat Moonroof Radio, Amplifier, DVD Front wiper module Flasher relay (Turn, hazards) Key-in-chime Heated mirrors Heated PCV (4.0L engine only)...clutch contact Heated seats Not used Overdrive cancel switch PATS Rear wiper module, Cluster Power mirror, Manual climate control, TPMS Delayed accessory relay coil/Battery saver coil and contact/Reading... and glove box lamps Flexible fuel pump Restraint Control Module (RCM) Memory driver seat switch, Driver seat module, Body Security Module (BSM), PATS LED Instrument cluster, Compass, Flasher...

Owner Guide 2nd Printing (Spanish)
Page 313
Table of Contents Introduction Instrument Cluster Warning and control lights Gauges 4 10 10 15 Entertainment Systems AM/FM stereo with CD AM/FM stereo with in-dash six CD 18 18 21 Climate Controls Manual heating and air conditioning Electronic automatic temperature control Rear passenger climate control Rear window defroster 27 27 28 31 32 Lights Driver Controls Windshield wiper/washer control Steering wheel adjustment Power windows Mirrors Speed control Message center 33 44 44 45 50 50 52 63 Locks and Security Keys Locks Anti-theft system 79 79 79 81 1
Table of Contents Introduction Instrument Cluster Warning and control lights Gauges 4 10 10 15 Entertainment Systems AM/FM stereo with CD AM/FM stereo with in-dash six CD 18 18 21 Climate Controls Manual heating and air conditioning Electronic automatic temperature control Rear passenger climate control Rear window defroster 27 27 28 31 32 Lights Driver Controls Windshield wiper/washer control Steering wheel adjustment Power windows Mirrors Speed control Message center 33 44 44 45 50 50 52 63 Locks and Security Keys Locks Anti-theft system 79 79 79 81 1

Owner Guide 2nd Printing (Spanish)
Page 360
When the auto-dimming mirror is placed in the door to minimize glare. Driver Controls Installing a garage door opener (if equipped) The storage compartment can be converted to accommodate a variety of aftermarket garage door openers: • Place the Velcro ... the door as this may be equipped with an inside rear view mirror with an auto-dimming feature. Automatic dimming rear view mirror Your vehicle may impair mirror performance. 48 Do not block the sensor located to the right of the mirror button or the sensor located on the back side of the button...
When the auto-dimming mirror is placed in the door to minimize glare. Driver Controls Installing a garage door opener (if equipped) The storage compartment can be converted to accommodate a variety of aftermarket garage door openers: • Place the Velcro ... the door as this may be equipped with an inside rear view mirror with an auto-dimming feature. Automatic dimming rear view mirror Your vehicle may impair mirror performance. 48 Do not block the sensor located to the right of the mirror button or the sensor located on the back side of the button...

Owner Guide 2nd Printing (Spanish)
Page 361
... your warranty. Always keep the power point caps closed when not being used. It is located on the fuse rating. Driver Controls Illuminated visor mirror Lift the mirror cover to turn on the visor mirror lamps. Improper use only. For example: a 20A fuse should supply a maximum of 240 Watts, a 15A fuse should supply a maximum...
... your warranty. Always keep the power point caps closed when not being used. It is located on the fuse rating. Driver Controls Illuminated visor mirror Lift the mirror cover to turn on the visor mirror lamps. Improper use only. For example: a 20A fuse should supply a maximum of 240 Watts, a 15A fuse should supply a maximum...

Owner Guide 2nd Printing (Spanish)
Page 362
...the proximity of the rocker switch to operate the power windows. Press completely down . Press the right side to adjust the power side view mirrors. 50 Driver Controls POWER WINDOWS When closing the power windows, you should verify they are free of obstructions and ensure that children and/or pets are not... in the ACC or ON position to restore the window controls. One touch down Allows the driver's window to close the window. POWER SIDE VIEW MIRRORS The ignition must be used for the driver's press the left side of the rocker switch to open the window. Press and hold the top...
...the proximity of the rocker switch to operate the power windows. Press completely down . Press the right side to adjust the power side view mirrors. 50 Driver Controls POWER WINDOWS When closing the power windows, you should verify they are free of obstructions and ensure that children and/or pets are not... in the ACC or ON position to restore the window controls. One touch down Allows the driver's window to close the window. POWER SIDE VIEW MIRRORS The ignition must be used for the driver's press the left side of the rocker switch to open the window. Press and hold the top...

Owner Guide 2nd Printing (Spanish)
Page 363
..., mist and fog when the rear window defrost is frozen in carefully when driving through a narrow space, like an automatic car wash. 51 Fold-away mirrors Pull the side mirrors in place. Driver Controls To adjust your mirrors: 1. Heated outside mirrors (if equipped) Both mirrors are heated automatically to tilt the...
..., mist and fog when the rear window defrost is frozen in carefully when driving through a narrow space, like an automatic car wash. 51 Fold-away mirrors Pull the side mirrors in place. Driver Controls To adjust your mirrors: 1. Heated outside mirrors (if equipped) Both mirrors are heated automatically to tilt the...

Owner Guide 2nd Printing (Spanish)
Page 374
...for your vehicle in the instrument cluster display. 5. If the compass still appears to the zone map. 2. Compass zone adjustment 1. Driver Controls Usually, when something affects the compass readings, the compass will eliminate this error. Determine which magnetic zone you are in the instrument...release. Locate compass sensor mounted at base of the compass module until the desired zone number appears. Press the button on the top of mirror. 4. A correct zone setting will correct itself after a few days of operating your geographic location by referring to be inaccurate, a manual...
...for your vehicle in the instrument cluster display. 5. If the compass still appears to the zone map. 2. Compass zone adjustment 1. Driver Controls Usually, when something affects the compass readings, the compass will eliminate this error. Determine which magnetic zone you are in the instrument...release. Locate compass sensor mounted at base of the compass module until the desired zone number appears. Press the button on the top of mirror. 4. A correct zone setting will correct itself after a few days of operating your geographic location by referring to be inaccurate, a manual...

Owner Guide 2nd Printing (Spanish)
Page 375
.... Drive the vehicle slowly (less than 5 km/h [3 mph]) in the instrument cluster display. Locate compass sensor mounted at base of mirror. 3. Press the button on the message center for a display of status preceded by a long indicator chime. 63 The compass is displayed... (approximately eight seconds) and release. 4. Driver Controls Compass calibration adjustment Perform this adjustment in the ON position, the message center, located on your instrument cluster, displays important vehicle...
.... Drive the vehicle slowly (less than 5 km/h [3 mph]) in the instrument cluster display. Locate compass sensor mounted at base of mirror. 3. Press the button on the message center for a display of status preceded by a long indicator chime. 63 The compass is displayed... (approximately eight seconds) and release. 4. Driver Controls Compass calibration adjustment Perform this adjustment in the ON position, the message center, located on your instrument cluster, displays important vehicle...

Owner Guide 2nd Printing (Spanish)
Page 489
...20A 5A 5A 5A 5A 5A 15A Passenger Compartment Fuse Panel Description Memory seat module, Driver power seat Moonroof Radio, Amplifier, DVD Front wiper module Flasher relay (Turn, hazards) Key-in-chime Heated mirrors Heated PCV (4.0L engine only) Not used Heated backlight relay coil, A/C clutch contact... Delayed accessory relay coil/Battery saver coil and contact/Reading and glove box lamps Flexible fuel pump Restraint Control Module (RCM) Memory driver seat switch, Driver seat module, Body Security Module (BSM), PATS LED Instrument cluster, Compass, Flasher coil ABS, IVD Controller 177 18 19 20 ...
...20A 5A 5A 5A 5A 5A 15A Passenger Compartment Fuse Panel Description Memory seat module, Driver power seat Moonroof Radio, Amplifier, DVD Front wiper module Flasher relay (Turn, hazards) Key-in-chime Heated mirrors Heated PCV (4.0L engine only) Not used Heated backlight relay coil, A/C clutch contact... Delayed accessory relay coil/Battery saver coil and contact/Reading and glove box lamps Flexible fuel pump Restraint Control Module (RCM) Memory driver seat switch, Driver seat module, Body Security Module (BSM), PATS LED Instrument cluster, Compass, Flasher coil ABS, IVD Controller 177 18 19 20 ...


