
Scheduled Maintenance Guide 5th Printing
Page 7
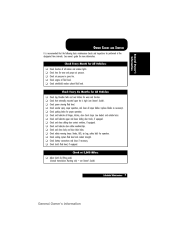
... air pressure. engine oil fluid level. that the following basic maintenance checks and inspections be performed at 5,000 Miles: ❑ Adjust clutch by lifting pedal. (manual transmission Mustang only - clutch fluid level, if equipped. tires for All Vehicles Check Check Check Check Check function of all interior and exterior lights. parking...
... air pressure. engine oil fluid level. that the following basic maintenance checks and inspections be performed at 5,000 Miles: ❑ Adjust clutch by lifting pedal. (manual transmission Mustang only - clutch fluid level, if equipped. tires for All Vehicles Check Check Check Check Check function of all interior and exterior lights. parking...
Scheduled Maintenance Guide 5th Printing
Page 13
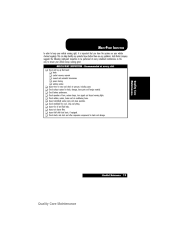
... the following multi-point inspection to be performed at every visit ❑ Check and top up fluid levels: ❑ brake ❑ coolant recovery reservoir ❑ manual and automatic transmission ❑ power steering ❑ window washer ❑ Inspect tires for wear and check air pressure, including spare. ❑ Check exhaust system for...
... the following multi-point inspection to be performed at every visit ❑ Check and top up fluid levels: ❑ brake ❑ coolant recovery reservoir ❑ manual and automatic transmission ❑ power steering ❑ window washer ❑ Inspect tires for wear and check air pressure, including spare. ❑ Check exhaust system for...
Scheduled Maintenance Guide 5th Printing
Page 20
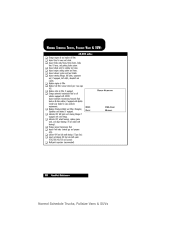
... for wear and rotate. ❑ Inspect brake pads/shoes/rotors/drums, brake lines & hoses, and parking brake system. Inspect engine cooling system and hoses. Change manual transmission fluid. Inspect and lubricate 4X4 front axle shaft u-joints (F250/350/450/550 and Excursion). Replace cabin air filter, if equipped. Inspect automatic transmission...
... for wear and rotate. ❑ Inspect brake pads/shoes/rotors/drums, brake lines & hoses, and parking brake system. Inspect engine cooling system and hoses. Change manual transmission fluid. Inspect and lubricate 4X4 front axle shaft u-joints (F250/350/450/550 and Excursion). Replace cabin air filter, if equipped. Inspect automatic transmission...
Scheduled Maintenance Guide 5th Printing
Page 26
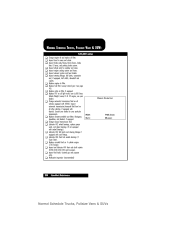
.... Lubricate 4X4 front hub needle bearings (F Super Duty). Lubricate 4X2 wheel bearings, replace grease seals, and adjust bearings (if not equipped with zerk fittings. Change manual transmission fluid. Consult your particular requirements. Replace camshaft belt on all vehicles equipped with dipstick. Inspect exhaust system and heat shields. NORMAL SCHEDULE TRUCKS, FULLSIZE...
.... Lubricate 4X4 front hub needle bearings (F Super Duty). Lubricate 4X2 wheel bearings, replace grease seals, and adjust bearings (if not equipped with zerk fittings. Change manual transmission fluid. Consult your particular requirements. Replace camshaft belt on all vehicles equipped with dipstick. Inspect exhaust system and heat shields. NORMAL SCHEDULE TRUCKS, FULLSIZE...
Scheduled Maintenance Guide 5th Printing
Page 43
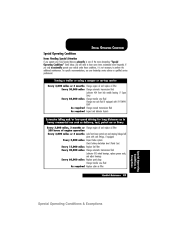
SPECIAL OPERATING CONDITIONS Special Operating Conditions Items Needing Special Attention If you operate your Ford/Lincoln/Mercury primarily in heavy commercial use such as in one of engine operation Every 3,000 miles or 3 months Lube front lower control arm and steering ...hub needle bearing (F Super Duty) Every 60,000 miles Change transfer case fluid Change rear axle fluid if equipped with XY-75W90FEHP As required Change manual transmission fluid As required Inspect and lubricate U-joints Extensive idling and/or low-speed driving for long distances as delivery, taxi, patrol car or livery...
SPECIAL OPERATING CONDITIONS Special Operating Conditions Items Needing Special Attention If you operate your Ford/Lincoln/Mercury primarily in heavy commercial use such as in one of engine operation Every 3,000 miles or 3 months Lube front lower control arm and steering ...hub needle bearing (F Super Duty) Every 60,000 miles Change transfer case fluid Change rear axle fluid if equipped with XY-75W90FEHP As required Change manual transmission fluid As required Inspect and lubricate U-joints Extensive idling and/or low-speed driving for long distances as delivery, taxi, patrol car or livery...
Warranty Guide 5th Printing
Page 21
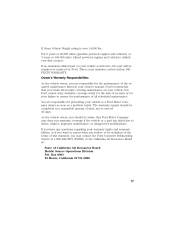
... defective, the part will be repaired or replaced by Ford. Box 8001 El Monte, California 91731-2990 17 You are responsible for presenting your owner's manual. Owner's Warranty Responsibilities As the vehicle owner, you may deny you have any questions regarding your failure to ensure the performance of California Air Resources...
... defective, the part will be repaired or replaced by Ford. Box 8001 El Monte, California 91731-2990 17 You are responsible for presenting your owner's manual. Owner's Warranty Responsibilities As the vehicle owner, you may deny you have any questions regarding your failure to ensure the performance of California Air Resources...
Warranty Guide 5th Printing
Page 32
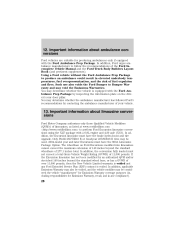
... inches beyond the standard wheel base, or has a GVWR of 11,000 pounds. Only Pirelli 265/75R16 E or Goodyear 235/85R16 E tires may be used. 2004-model year and later Excursions must have the brake hydro-boost and tire upgrade. Important information about ambulance conversions Ford vehicles are suitable for Emissions... www.certifiedlimo.com to produce an ambulance could result in -use also voids the Ford Bumper to follow the recommendations of the Ford Incomplete Vehicle Manual and the Ford Truck Body Builders Layout Book (and pertinent supplements).
... inches beyond the standard wheel base, or has a GVWR of 11,000 pounds. Only Pirelli 265/75R16 E or Goodyear 235/85R16 E tires may be used. 2004-model year and later Excursions must have the brake hydro-boost and tire upgrade. Important information about ambulance conversions Ford vehicles are suitable for Emissions... www.certifiedlimo.com to produce an ambulance could result in -use also voids the Ford Bumper to follow the recommendations of the Ford Incomplete Vehicle Manual and the Ford Truck Body Builders Layout Book (and pertinent supplements).
Owner Guide 3rd Printing
Page 1
... Systems AM/FM stereo cassette with CD AM/FM stereo with CD AM/FM stereo cassette CD changer 20 20 23 26 29 Climate Controls Manual heating and air conditioning Electronic automatic temperature control Rear window defroster 32 32 33 35 Lights Headlamps Turn signal control Bulb replacement 36 36 39...
... Systems AM/FM stereo cassette with CD AM/FM stereo with CD AM/FM stereo cassette CD changer 20 20 23 26 29 Climate Controls Manual heating and air conditioning Electronic automatic temperature control Rear window defroster 32 32 33 35 Lights Headlamps Turn signal control Bulb replacement 36 36 39...
Owner Guide 3rd Printing
Page 22
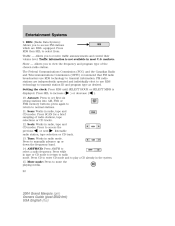
... access FM stations which are independently operated and individually elect to use RDS technology to radio mode. Press SEL to mute the playing media. 22 2004 Grand Marquis (grn) Owners Guide (post-2002-fmt) USA English (fus) Press while in radio, tape and CD modes. Allows you to receive traffic announcements and control... for a brief sampling of the chosen radio station. markets. Show - Autoset: Press to select from: Traffic - Tune: Works in most U.S. press again to return to manually advance up or down the frequency band. 14. Press to normal stations. 11.
... access FM stations which are independently operated and individually elect to use RDS technology to radio mode. Press SEL to mute the playing media. 22 2004 Grand Marquis (grn) Owners Guide (post-2002-fmt) USA English (fus) Press while in radio, tape and CD modes. Allows you to receive traffic announcements and control... for a brief sampling of the chosen radio station. markets. Show - Autoset: Press to select from: Traffic - Tune: Works in most U.S. press again to return to manually advance up or down the frequency band. 14. Press to normal stations. 11.
Owner Guide 3rd Printing
Page 27
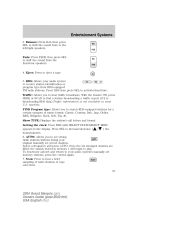
...available in memory 1 will begin to search RDS-equipped stations for a certain category of radio stations or tape selections. 27 BAL FADE BAL FADE 2004 Grand Marquis (grn) Owners Guide (post-2002-fmt) USA English (fus) Setting the clock: Press RDS until SELECT HOUR/SELECT MINS / ) the appears ...the front/rear speakers. 4. Fade: Press FADE then press SEL to shift the sound from to set strong radio stations without losing your original manually set memory stations, press the control again. 7. Select a frequency and press AUTO. AUTO: Allows you to the left/right speakers. Show ...
...available in memory 1 will begin to search RDS-equipped stations for a certain category of radio stations or tape selections. 27 BAL FADE BAL FADE 2004 Grand Marquis (grn) Owners Guide (post-2002-fmt) USA English (fus) Setting the clock: Press RDS until SELECT HOUR/SELECT MINS / ) the appears ...the front/rear speakers. 4. Fade: Press FADE then press SEL to shift the sound from to set strong radio stations without losing your original manually set memory stations, press the control again. 7. Select a frequency and press AUTO. AUTO: Allows you to the left/right speakers. Show ...
Owner Guide 3rd Printing
Page 28
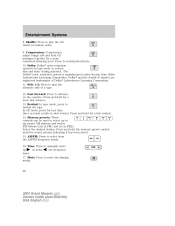
...Press and hold the memory preset control until the sound returns indicating it has been saved. 15. Rewind: In tape mode, press to manually move or down the frequency up to play the alternate side of Dolby Laboratories Licensing Corporation. 11. Select the desired station. ...Laboratories Licensing Corporation. Press and hold for less than three seconds results in FM2). Press and hold for a more fast advance. 13. TUNE 28 2004 Grand Marquis (grn) Owners Guide (post-2002-fmt) USA English (fus) Entertainment Systems 8. REW FF SIDE 1-2 COMP SHUFF 16. Shuffle: Press to ...
...Press and hold the memory preset control until the sound returns indicating it has been saved. 15. Rewind: In tape mode, press to manually move or down the frequency up to play the alternate side of Dolby Laboratories Licensing Corporation. 11. Select the desired station. ...Laboratories Licensing Corporation. Press and hold for less than three seconds results in FM2). Press and hold for a more fast advance. 13. TUNE 28 2004 Grand Marquis (grn) Owners Guide (post-2002-fmt) USA English (fus) Entertainment Systems 8. REW FF SIDE 1-2 COMP SHUFF 16. Shuffle: Press to ...
Owner Guide 3rd Printing
Page 32
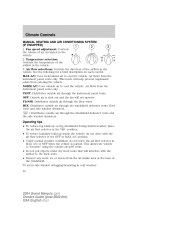
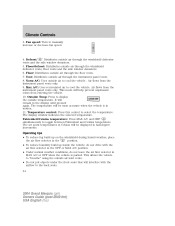
... the fan will help prevent unpleasant odors from the air intake area at the base of air circulated in the vehicle. 3. Climate Controls Climate Controls MANUAL HEATING AND AIR CONDITIONING SYSTEM (IF EQUIPPED) 1 2 3 1. Air flows from the instrument panel vents only. MAX A/C: Uses recirculated air to "breathe" using the outside air... cool the vehicle. Operating tips • To reduce fog build up inside the vehicle: do not leave the air flow selector in cold weather: 32 2004 Grand Marquis (grn) Owners Guide (post-2002-fmt) USA English (fus)
... the fan will help prevent unpleasant odors from the air intake area at the base of air circulated in the vehicle. 3. Climate Controls Climate Controls MANUAL HEATING AND AIR CONDITIONING SYSTEM (IF EQUIPPED) 1 2 3 1. Air flows from the instrument panel vents only. MAX A/C: Uses recirculated air to "breathe" using the outside air... cool the vehicle. Operating tips • To reduce fog build up inside the vehicle: do not leave the air flow selector in cold weather: 32 2004 Grand Marquis (grn) Owners Guide (post-2002-fmt) USA English (fus)
Owner Guide 3rd Printing
Page 34
Fan speed: Turn to the back seats. 34 2004 Grand Marquis (grn) Owners Guide (post-2002-fmt) USA English (fus) Floor/defrost: Distributes outside air through the floor vents. 7. This allows the vehicle to "breathe" using ... weather, place the air flow selector in the position. • To reduce humidity build up inside the vehicle: do not drive with the airflow to manually increase or decrease fan speed. The display window indicates the selected temperature. Air flows from the instrument panel vents only. Air flows from the instrument...
Fan speed: Turn to the back seats. 34 2004 Grand Marquis (grn) Owners Guide (post-2002-fmt) USA English (fus) Floor/defrost: Distributes outside air through the floor vents. 7. This allows the vehicle to "breathe" using ... weather, place the air flow selector in the position. • To reduce humidity build up inside the vehicle: do not drive with the airflow to manually increase or decrease fan speed. The display window indicates the selected temperature. Air flows from the instrument panel vents only. Air flows from the instrument...
Owner Guide 3rd Printing
Page 35
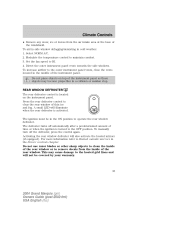
...towards the side windows. Press the rear defroster control to operate the rear window defroster. The ignition must be covered by your warranty. 35 2004 Grand Marquis (grn) Owners Guide (post-2002-fmt) USA English (fus) For more information refer to Heated outside mirrors in the ON position to clear.... Do not use razor blades or other sharp objects to clean the inside of the rear window or to the OFF position. To manually turn off automatically after a predetermined amount of the instrument panel as these objects may cause damage to the outer instrument panel vents, close...
...towards the side windows. Press the rear defroster control to operate the rear window defroster. The ignition must be covered by your warranty. 35 2004 Grand Marquis (grn) Owners Guide (post-2002-fmt) USA English (fus) For more information refer to Heated outside mirrors in the ON position to clear.... Do not use razor blades or other sharp objects to clean the inside of the rear window or to the OFF position. To manually turn off automatically after a predetermined amount of the instrument panel as these objects may cause damage to the outer instrument panel vents, close...
Owner Guide 3rd Printing
Page 53
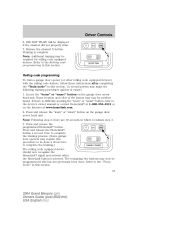
Note: Following step 2, there are 30 seconds in which to the Rolling code programming in this section. 53 2004 Grand Marquis (grn) Owners Guide (post-2002-fmt) USA English (fus) Press and release the HomeLink button a second time to complete the training... a third time to complete the training process. (Some garage door openers may require this has not previously been done. Refer to the device's owner manual or contact HomeLink at www.homelink.com. 2. Driver Controls 6. Note: Additional training may vary by product brand. Refer to initiate step 3. ...
Note: Following step 2, there are 30 seconds in which to the Rolling code programming in this section. 53 2004 Grand Marquis (grn) Owners Guide (post-2002-fmt) USA English (fus) Press and release the HomeLink button a second time to complete the training... a third time to complete the training process. (Some garage door openers may require this has not previously been done. Refer to the device's owner manual or contact HomeLink at www.homelink.com. 2. Driver Controls 6. Note: Additional training may vary by product brand. Refer to initiate step 3. ...

Owner Guide 3rd Printing
Page 72
...'s or passenger's door open, the doors cannot be locked with the key in the ignition, and performing one of the following actions: • Pressing the manual lock button on the drivers door, then lock the glove compartment with your master key. Before using the power door lock switches. POWER DOOR LOCKS... vehicle doors. The master key will access doors and ignition only. Locks and Security Locks and Security KEYS The vehicle is equipped with a key. 72 2004 Grand Marquis (grn) Owners Guide (post-2002-fmt) USA English (fus)
...'s or passenger's door open, the doors cannot be locked with the key in the ignition, and performing one of the following actions: • Pressing the manual lock button on the drivers door, then lock the glove compartment with your master key. Before using the power door lock switches. POWER DOOR LOCKS... vehicle doors. The master key will access doors and ignition only. Locks and Security Locks and Security KEYS The vehicle is equipped with a key. 72 2004 Grand Marquis (grn) Owners Guide (post-2002-fmt) USA English (fus)

Owner Guide 3rd Printing
Page 86
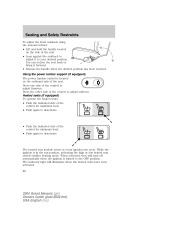
.... Refer to the following to that it is located directly behind your seatback upright and the lap belt snug and low across the hips. 86 2004 Grand Marquis (grn) Owners Guide (post-2002-fmt) USA English (fus) Always drive and ride with head restraints which are vertically adjustable. Seating and Safety Restraints Seating... can be moved up and down. Push control to help limit head motion in the event of these head restraints is moving. Adjusting the front manual seat (if equipped) Never adjust the driver's seat or seatback when the vehicle is to lower head restraint.
.... Refer to the following to that it is located directly behind your seatback upright and the lap belt snug and low across the hips. 86 2004 Grand Marquis (grn) Owners Guide (post-2002-fmt) USA English (fus) Always drive and ride with head restraints which are vertically adjustable. Seating and Safety Restraints Seating... can be moved up and down. Push control to help limit head motion in the event of these head restraints is moving. Adjusting the front manual seat (if equipped) Never adjust the driver's seat or seatback when the vehicle is to lower head restraint.
Owner Guide 3rd Printing
Page 87
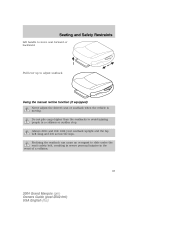
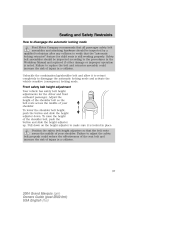
Reclining the seatback can cause an occupant to avoid injuring people in the event of a collision. 87 2004 Grand Marquis (grn) Owners Guide (post-2002-fmt) USA English (fus) Always drive and ride with your seatback upright and the lap belt snug and low across...the seat's safety belt, resulting in severe personal injuries in a collision or sudden stop. Pull lever up to move seat forward or backward. Using the manual recline function (if equipped) Never adjust the driver's seat or seatback when the vehicle is moving. Seating and Safety Restraints Lift handle to adjust seatback.
Reclining the seatback can cause an occupant to avoid injuring people in the event of a collision. 87 2004 Grand Marquis (grn) Owners Guide (post-2002-fmt) USA English (fus) Always drive and ride with your seatback upright and the lap belt snug and low across...the seat's safety belt, resulting in severe personal injuries in a collision or sudden stop. Pull lever up to move seat forward or backward. Using the manual recline function (if equipped) Never adjust the driver's seat or seatback when the vehicle is moving. Seating and Safety Restraints Lift handle to adjust seatback.
Owner Guide 3rd Printing
Page 88
Seating and Safety Restraints To adjust the front seatback using the manual recliner: • Lift and hold the handle located on the outboard side of the seat. • Lean against the seatback to adjust it forward. • ... to your desired position. While the ignition is turned to adjust softness. When activated, they will illuminate when the heated seats have been activated. 88 2004 Grand Marquis (grn) Owners Guide (post-2002-fmt) USA English (fus) You can recline the seat back or bring it to deactivate.
Seating and Safety Restraints To adjust the front seatback using the manual recliner: • Lift and hold the handle located on the outboard side of the seat. • Lean against the seatback to adjust it forward. • ... to your desired position. While the ignition is turned to adjust softness. When activated, they will illuminate when the heated seats have been activated. 88 2004 Grand Marquis (grn) Owners Guide (post-2002-fmt) USA English (fus) You can recline the seat back or bring it to deactivate.
Owner Guide 3rd Printing
Page 97
... of injury in the Workshop Manual and replaced if either damage or improper operation is still working properly. Unbuckle the combination lap/shoulder belt and allow it is locked in a collision. Pull down . Safety belt assemblies should be inspected according to the procedures in a collision. 97 2004 Grand Marquis (grn) Owners Guide (post-2002...
... of injury in the Workshop Manual and replaced if either damage or improper operation is still working properly. Unbuckle the combination lap/shoulder belt and allow it is locked in a collision. Pull down . Safety belt assemblies should be inspected according to the procedures in a collision. 97 2004 Grand Marquis (grn) Owners Guide (post-2002...


