Owner's Manual
Page 1
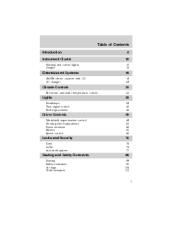
Table of Contents Introduction Instrument Cluster Warning and control lights Gauges 4 10 10 15 Entertainment Systems AM/FM stereo cassette with CD CD changer 19 19 28 Climate Controls Electronic automatic temperature control 33 33 Lights Headlamps Turn signal control Bulb replacement 38 38 42 43 Driver Controls Windshield wiper/washer control Steering wheel adjustment Power windows Mirrors Speed control 49 49 50 60 61 63 Locks and Security Keys Locks Anti-theft system 75 75 75 77 Seating and Safety Restraints Seating Safety restraints Air bags Child restraints 88 88 91 104 111 1
Table of Contents Introduction Instrument Cluster Warning and control lights Gauges 4 10 10 15 Entertainment Systems AM/FM stereo cassette with CD CD changer 19 19 28 Climate Controls Electronic automatic temperature control 33 33 Lights Headlamps Turn signal control Bulb replacement 38 38 42 43 Driver Controls Windshield wiper/washer control Steering wheel adjustment Power windows Mirrors Speed control 49 49 50 60 61 63 Locks and Security Keys Locks Anti-theft system 75 75 75 77 Seating and Safety Restraints Seating Safety restraints Air bags Child restraints 88 88 91 104 111 1
Owner's Manual
Page 8
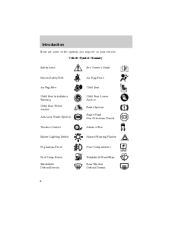
Introduction These are some of the symbols you may see on your vehicle. Vehicle Symbol Glossary Safety Alert See Owner's Guide Fasten Safety Belt Air Bag-Front Air Bag-Side Child Seat Installation Warning Child Seat Tether Anchor Anti-Lock Brake System Child Seat Child Seat Lower Anchor Brake System Brake Fluid Non-Petroleum Based AdvanceTrac Traction Control Master Lighting Switch Hazard Warning Flasher Fog Lamps-Front Fuse Compartment Fuel Pump Reset Windshield Defrost/Demist Windshield Wash/Wipe Rear Window Defrost/Demist 8
Introduction These are some of the symbols you may see on your vehicle. Vehicle Symbol Glossary Safety Alert See Owner's Guide Fasten Safety Belt Air Bag-Front Air Bag-Side Child Seat Installation Warning Child Seat Tether Anchor Anti-Lock Brake System Child Seat Child Seat Lower Anchor Brake System Brake Fluid Non-Petroleum Based AdvanceTrac Traction Control Master Lighting Switch Hazard Warning Flasher Fog Lamps-Front Fuse Compartment Fuel Pump Reset Windshield Defrost/Demist Windshield Wash/Wipe Rear Window Defrost/Demist 8
Owner's Manual
Page 10
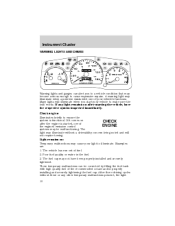
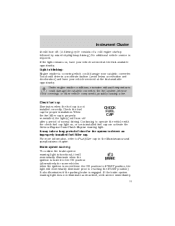
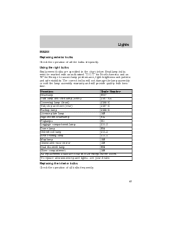
... tightened. The vehicle has run out of fuel. 2. Many lights will not require towing. A warning light may be corrected by filling the fuel tank with one of your vehicle's functions. Examples are: 1. Light remains on after the engine is functional. Poor fuel quality or... water in the fuel. 3. Instrument Cluster WARNING LIGHTS AND CHIMES Warning lights and gauges can be malfunctioning. These temporary malfunctions can alert you start your light to make sure the bulb works. After three driving cycles without a driveability concern...
... tightened. The vehicle has run out of fuel. 2. Many lights will not require towing. A warning light may be corrected by filling the fuel tank with one of your vehicle's functions. Examples are: 1. Light remains on after the engine is functional. Poor fuel quality or... water in the fuel. 3. Instrument Cluster WARNING LIGHTS AND CHIMES Warning lights and gauges can be malfunctioning. These temporary malfunctions can alert you start your light to make sure the bulb works. After three driving cycles without a driveability concern...
Owner's Manual
Page 11
... moved from the ON position to the ON position (alternatively for some vehicles when the ignition is properly re-installed, the light(s) will turn off after a period of time for proper installation. It may take a long period of normal driving. If the...first available opportunity. For more information, refer to detect an improperly installed fuel filler cap. Brake system warning To confirm the brake system warning light is occurring which could damage the catalytic converter, the fuel system, interior floor coverings or other vehicle components, possibly causing a fire. Check ...
... moved from the ON position to the ON position (alternatively for some vehicles when the ignition is properly re-installed, the light(s) will turn off after a period of time for proper installation. It may take a long period of normal driving. If the...first available opportunity. For more information, refer to detect an improperly installed fuel filler cap. Brake system warning To confirm the brake system warning light is occurring which could damage the catalytic converter, the fuel system, interior floor coverings or other vehicle components, possibly causing a fire. Check ...
Owner's Manual
Page 12
...fluid level or a brake system malfunction and the brake system should be serviced immediately by a qualified technician. For more information. If the light fails to illuminate, continues to flash or remains on , continues to flash or fails to illuminate, have the system serviced immediately. Charging ... fasten your safety belts. Instrument Cluster Illumination after the parking brake is moved from the ON position to the START position, the light will momentarily illuminate just prior to reaching the START position). Safety belt Illuminates to remind you to confirm that the air bags ...
...fluid level or a brake system malfunction and the brake system should be serviced immediately by a qualified technician. For more information. If the light fails to illuminate, continues to flash or remains on , continues to flash or fails to illuminate, have the system serviced immediately. Charging ... fasten your safety belts. Instrument Cluster Illumination after the parking brake is moved from the ON position to the START position, the light will momentarily illuminate just prior to reaching the START position). Safety belt Illuminates to remind you to confirm that the air bags ...

Owner's Manual
Page 13
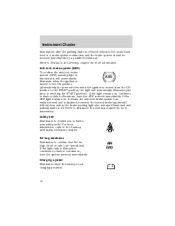
...switch off Illuminates when the overdrive O/D function has been turned OFF using OFF the Transmission Control Switch (TCS) on the gearshift. If the light does not come on after the vehicle warms up, have your vehicle serviced. Air suspension Illuminates when the air suspension AIR switch is turned ...OFF, the load limit SUSP is running or hot. If light stays on or continues to Fuel gauge in the Maintenance and specifications chapter. It will be lit for a minimum of the Traction Control ...
...switch off Illuminates when the overdrive O/D function has been turned OFF using OFF the Transmission Control Switch (TCS) on the gearshift. If the light does not come on after the vehicle warms up, have your vehicle serviced. Air suspension Illuminates when the air suspension AIR switch is turned ...OFF, the load limit SUSP is running or hot. If light stays on or continues to Fuel gauge in the Maintenance and specifications chapter. It will be lit for a minimum of the Traction Control ...
Owner's Manual
Page 14
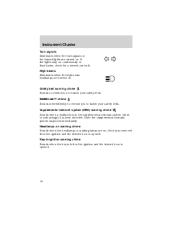
...ignition and the driver's door is opened . 14 Safety belt warning chime Sounds to remind you to fasten your safety belts. If the lights stay on . BeltMinder chime Sounds intermittently to remind you to fasten your safety belts. Headlamps on warning chime Sounds when the headlamps or ...parking lamps are on . Have the supplemental restraint system inspected immediately. Instrument Cluster Turn signals Illuminates when the turn signals or the hazard lights are turned on , the key is removed from the ignition and the driver's door is opened . Key-in-ignition warning chime Sounds ...
...ignition and the driver's door is opened . 14 Safety belt warning chime Sounds to remind you to fasten your safety belts. If the lights stay on . BeltMinder chime Sounds intermittently to remind you to fasten your safety belts. Headlamps on warning chime Sounds when the headlamps or ...parking lamps are on . Have the supplemental restraint system inspected immediately. Instrument Cluster Turn signals Illuminates when the turn signals or the hazard lights are turned on , the key is removed from the ignition and the driver's door is opened . Key-in-ignition warning chime Sounds ...
Owner's Manual
Page 32
... range can affect radio reception: • Distance/strength. RADIO RECEPTION FACTORS Three factors can be caused on AM stations by power lines, electric fences, traffic lights and thunderstorms. Moving away from an interfering structure (out of the average FM station is . Allowable frequencies are: AM 530, 540-1600, 1610 kHz FM...
... range can affect radio reception: • Distance/strength. RADIO RECEPTION FACTORS Three factors can be caused on AM stations by power lines, electric fences, traffic lights and thunderstorms. Moving away from an interfering structure (out of the average FM station is . Allowable frequencies are: AM 530, 540-1600, 1610 kHz FM...
Owner's Manual
Page 38
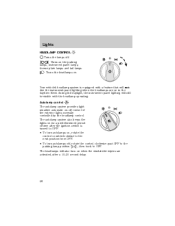
... the headlamp operating. Turns the headlamps on -off control of time after a 10-20 second delay. 38 Autolamp control The autolamp system provides light sensitive automatic on . Turns on , rotate the control counterclockwise to the next position from OFF. • To turn autolamps off . Even ... with a feature that will also turn on when the windshield wipers are on for a predetermined period of the exterior lights normally controlled by the headlamp control. Lights HEADLAMP CONTROL Turns the lamps off , rotate the control clockwise past OFF to the , then back to OFF. •...
... the headlamp operating. Turns the headlamps on -off control of time after a 10-20 second delay. 38 Autolamp control The autolamp system provides light sensitive automatic on . Turns on , rotate the control counterclockwise to the next position from OFF. • To turn autolamps off . Even ... with a feature that will also turn on when the windshield wipers are on for a predetermined period of the exterior lights normally controlled by the headlamp control. Lights HEADLAMP CONTROL Turns the lamps off , rotate the control clockwise past OFF to the , then back to OFF. •...

Owner's Manual
Page 39
...) Turns the lowbeam headlamps on with a reduced output. Always remember to turn on your headlamps under these conditions may not provide adequate lighting during inclement weather. High beams Push the lever toward you to deactivate. 39 Failure to activate your headlamps at dusk or during these ...conditions. To activate: • the key must be turned on when the headlamp control is pulled toward the instrument panel to activate. Lights Foglamp control The foglamps can be in the ON position, • the parking brake released, and • the headlamp control is in...
...) Turns the lowbeam headlamps on with a reduced output. Always remember to turn on your headlamps under these conditions may not provide adequate lighting during inclement weather. High beams Push the lever toward you to deactivate. 39 Failure to activate your headlamps at dusk or during these ...conditions. To activate: • the key must be turned on when the headlamp control is pulled toward the instrument panel to activate. Lights Foglamp control The foglamps can be in the ON position, • the parking brake released, and • the headlamp control is in...
Owner's Manual
Page 40
... during headlight and parklamp operation. • Rotate the thumbwheel from left to right to left . If your vehicle has been in front of it. 40 Lights Flash to pass Pull toward you slightly to activate and release to dim the instrument panel. PANEL DIMMER CONTROL Use to adjust the brightness of...
... during headlight and parklamp operation. • Rotate the thumbwheel from left to right to left . If your vehicle has been in front of it. 40 Lights Flash to pass Pull toward you slightly to activate and release to dim the instrument panel. PANEL DIMMER CONTROL Use to adjust the brightness of...
Owner's Manual
Page 41
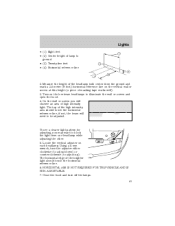
... the wall or screen you may want to be adjusted. To see a clearer light pattern for adjusting, you will observe an area of the brighter light should touch the horizontal reference line, if not, the beam will need to block... the light from the ground and mark a 2.5 meter (8 foot) horizontal reference line on the vertical ... a 4 mm wrench, turn off the lamps. 41 The horizontal edge of high intensity light. Measure the height of the headlamp bulb center from one headlamp while adjusting the other. 5.
... the wall or screen you may want to be adjusted. To see a clearer light pattern for adjusting, you will observe an area of the brighter light should touch the horizontal reference line, if not, the beam will need to block... the light from the ground and mark a 2.5 meter (8 foot) horizontal reference line on the vertical ... a 4 mm wrench, turn off the lamps. 41 The horizontal edge of high intensity light. Measure the height of the headlamp bulb center from one headlamp while adjusting the other. 5.
Owner's Manual
Page 42
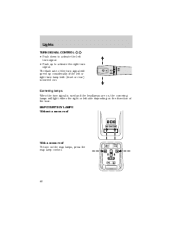
The flash rate of the turn signal will speed up to activate the left turn signal. • Push up considerably if the left or right turn lamp bulb (front or rear) is used and the headlamps are on, the cornering lamps will light either the right or left side depending on the map lamps, press the map lamp control. 42 Cornering lamps When the turn . Lights TURN SIGNAL CONTROL • Push down to activate the right turn on the direction of the turn signal is burned out. MAP/COURTESY LAMPS Without a moon roof With a moon roof To turn signal.
The flash rate of the turn signal will speed up to activate the left turn signal. • Push up considerably if the left or right turn lamp bulb (front or rear) is used and the headlamps are on, the cornering lamps will light either the right or left side depending on the map lamps, press the map lamp control. 42 Cornering lamps When the turn . Lights TURN SIGNAL CONTROL • Push down to activate the right turn on the direction of the turn signal is burned out. MAP/COURTESY LAMPS Without a moon roof With a moon roof To turn signal.
Owner's Manual
Page 43
... 168 Dual floorwell lamp 906 Glove compartment 168 All replacement bulbs are specified in color except where noted. To replace all the bulbs frequently. Lights BULBS Replacing exterior bulbs Check the operation of all bulbs frequently. 43 Using the right bulbs Replacement bulbs are clear in the chart below.... void the lamp assembly warranty and will provide quality bulb burn time. Replacing the interior bulbs Check the operation of all instrument panel lights - Headlamp bulbs must be marked with an authorized "D.O.T." for North America and an "E" for Europe to assure lamp performance...
... 168 Dual floorwell lamp 906 Glove compartment 168 All replacement bulbs are specified in color except where noted. To replace all the bulbs frequently. Lights BULBS Replacing exterior bulbs Check the operation of all bulbs frequently. 43 Using the right bulbs Replacement bulbs are clear in the chart below.... void the lamp assembly warranty and will provide quality bulb burn time. Replacing the interior bulbs Check the operation of all instrument panel lights - Headlamp bulbs must be marked with an authorized "D.O.T." for North America and an "E" for Europe to assure lamp performance...
Owner's Manual
Page 44
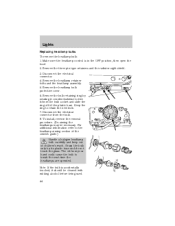
... to free it countercloskwise to the headlamp aiming section of the owner's guide.) Handle a halogen headlamp bulb carefully and keep out of the plastic base. Lights Replacing headlamp bulbs To remove the headlamp bulb: 1.
... to free it countercloskwise to the headlamp aiming section of the owner's guide.) Handle a halogen headlamp bulb carefully and keep out of the plastic base. Lights Replacing headlamp bulbs To remove the headlamp bulb: 1.
Owner's Manual
Page 45
... lamp assembly. Disconnect the electrical connector from the headlamp until just before a replacement bulb is installed. Never turn the lamps on the lens and reflector. Lights The headlamp bulb should not be replaced with the bulb removed. Removing the bulb for an extended period of time may enter the headlamp where...
... lamp assembly. Disconnect the electrical connector from the headlamp until just before a replacement bulb is installed. Never turn the lamps on the lens and reflector. Lights The headlamp bulb should not be replaced with the bulb removed. Removing the bulb for an extended period of time may enter the headlamp where...
Owner's Manual
Page 46
... and push in the new bulb. 6. Pull the bulb from the vehicle. 4. Make sure headlamp switch is in to prevent water from entering the trunk. 8. Lights 1. Remove the bulb socket by rotating it out of the lamp assembly. 5. Install the bulb socket into the lamp assembly by rotating it counterclockwise, then...
... and push in the new bulb. 6. Pull the bulb from the vehicle. 4. Make sure headlamp switch is in to prevent water from entering the trunk. 8. Lights 1. Remove the bulb socket by rotating it out of the lamp assembly. 5. Install the bulb socket into the lamp assembly by rotating it counterclockwise, then...

Owner's Manual
Page 47
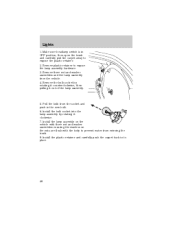
... in the foglamp turning clockwise. Disconnect the electrical connector from the socket and push in trunk lid by turning counterclockwise. 2. Replacing license plate lamp bulbs 1. Lights Replacing foglamp bulbs 1. Make sure headlamp switch is in OFF position, then remove two screws, grommets and the license plate lamp assembly from the foglamp...
... in the foglamp turning clockwise. Disconnect the electrical connector from the socket and push in trunk lid by turning counterclockwise. 2. Replacing license plate lamp bulbs 1. Lights Replacing foglamp bulbs 1. Make sure headlamp switch is in OFF position, then remove two screws, grommets and the license plate lamp assembly from the foglamp...

Owner's Manual
Page 48
Carefully pull the bulb socket out of the socket and push in the new bulb. To install, reverse the removal procedure. 48 Remove two screws from the lamp assembly. 2. Pull the bulb straight out of the lamp assembly. 4. Carefully lift the lamp assembly up for access to the bulbs. 3. Lights Replacing high-mount brakelamp bulbs 1.
Carefully pull the bulb socket out of the socket and push in the new bulb. To install, reverse the removal procedure. 48 Remove two screws from the lamp assembly. 2. Pull the bulb straight out of the lamp assembly. 4. Carefully lift the lamp assembly up for access to the bulbs. 3. Lights Replacing high-mount brakelamp bulbs 1.

Owner's Manual
Page 49
... as tree sap, road salt, oil film and some hot wax treatments used by commercial car washes reduce the effectiveness of the wiper blades. The lights will illuminate after using the windshield washer wiper system, or if the wiper blades chatter, streak or smear when operating, it is in this position...
... as tree sap, road salt, oil film and some hot wax treatments used by commercial car washes reduce the effectiveness of the wiper blades. The lights will illuminate after using the windshield washer wiper system, or if the wiper blades chatter, streak or smear when operating, it is in this position...


