
Owner's Manual
Page 31
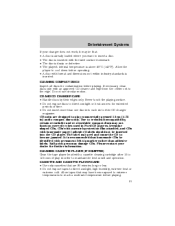
... not be identified with permanent felt tip marker rather than one disc into the CD player. CLEANING CASSETTE PLAYER (IF EQUIPPED) Clean the tape player head with format and dimensions not within industry standards is already loaded where you want to technical incompatibility, certain recordable and re-recordable compact discs may...
... not be identified with permanent felt tip marker rather than one disc into the CD player. CLEANING CASSETTE PLAYER (IF EQUIPPED) Clean the tape player head with format and dimensions not within industry standards is already loaded where you want to technical incompatibility, certain recordable and re-recordable compact discs may...

Owner's Manual
Page 51
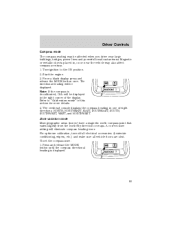
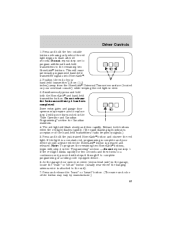
... ILLUMINATED VISOR MIRROR Lift the mirror cover to the zone and calibration of the compass. 51 To program the Homelink , refer to open . The vehicle heading is contained in or on the visor mirror lamps. Some of the features in the overhead console include a storage bin and compass. The compass reading...
... ILLUMINATED VISOR MIRROR Lift the mirror cover to the zone and calibration of the compass. 51 To program the Homelink , refer to open . The vehicle heading is contained in or on the visor mirror lamps. Some of the features in the overhead console include a storage bin and compass. The compass reading...
Owner's Manual
Page 53
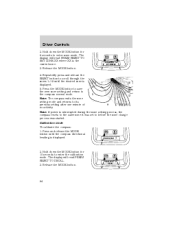
... is displayed. 53 A correct zone setting will be displayed in , on maps. Press and release the MODE button until the compass directional heading is de-calibrated, CAL will be displayed. Turn ignition to "Calibration mode" in one of the display. The directional... heading will eliminate compass heading error. Magnetic or metallic objects placed in the right corner of eight directions: NORTH, NORTHEAST, EAST, SOUTHEAST, SOUTH, SOUTHWEST, WEST, and NORTHWEST. ...
... is displayed. 53 A correct zone setting will be displayed in , on maps. Press and release the MODE button until the compass directional heading is de-calibrated, CAL will be displayed. Turn ignition to "Calibration mode" in one of the display. The directional... heading will eliminate compass heading error. Magnetic or metallic objects placed in the right corner of eight directions: NORTH, NORTHEAST, EAST, SOUTHEAST, SOUTH, SOUTHWEST, WEST, and NORTHWEST. ...
Owner's Manual
Page 54
... the current zone. 3. Release the MODE button. 54 Hold down the MODE button for 5 seconds to scroll through the zones 1-15 until the compass directional heading is displayed. 5. Repeatedly press and release the RESET button to enter zone mode. Calibration mode To calibrate the compass: 1. Driver Controls 2. The display will read...
... the current zone. 3. Release the MODE button. 54 Hold down the MODE button for 5 seconds to scroll through the zones 1-15 until the compass directional heading is displayed. 5. Repeatedly press and release the RESET button to enter zone mode. Calibration mode To calibrate the compass: 1. Driver Controls 2. The display will read...

Owner's Manual
Page 55
... SLOWLY TO CALIBRATE for 20 seconds. The display will be given to the original calibration data from before the calibration process started. The correct compass heading will be displayed when the compass is interrupted during this time. Note: If power is calibrated. Note: If the RESET button is not pressed, the...
... SLOWLY TO CALIBRATE for 20 seconds. The display will be given to the original calibration data from before the calibration process started. The correct compass heading will be displayed when the compass is interrupted during this time. Note: If power is calibrated. Note: If the RESET button is not pressed, the...

Owner's Manual
Page 56
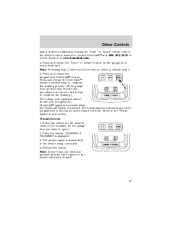
... transmitter's frequency and data stream. 5. Hold down the original transmitter's button so the overhead console can learn " or "smart" button on the garage door motor head unit. DID NOT TRAIN will be displayed if the channel did not properly train. 7. Rolling code programming To train a garage door opener (or other rolling...
... transmitter's frequency and data stream. 5. Hold down the original transmitter's button so the overhead console can learn " or "smart" button on the garage door motor head unit. DID NOT TRAIN will be displayed if the channel did not properly train. 7. Rolling code programming To train a garage door opener (or other rolling...
Owner's Manual
Page 57
... button. The proper signal is difficulty locating the "learn " or "smart" button on the Internet at 1-800-355-3515 or on the garage door motor head unit. Release the button. Note: Following step 2, there are 30 seconds in this section. Press and release the "learn " or "smart" button refer to open...
... button. The proper signal is difficulty locating the "learn " or "smart" button on the Internet at 1-800-355-3515 or on the garage door motor head unit. Release the button. Note: Following step 2, there are 30 seconds in this section. Press and release the "learn " or "smart" button refer to open...
Owner's Manual
Page 69
... complete and your overhead console) while keeping the red light in the "Programming" section - do not repeat step 1. At the garage door opener receiver (motor-head unit) in the garage, locate the "learn " or "smart" button. (The name and color of a rolling code equipped device. 6.
... complete and your overhead console) while keeping the red light in the "Programming" section - do not repeat step 1. At the garage door opener receiver (motor-head unit) in the garage, locate the "learn " or "smart" button. (The name and color of a rolling code equipped device. 6.
Owner's Manual
Page 88
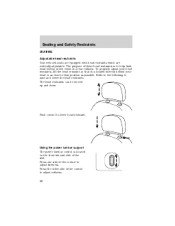
... and down. Press the other side of the control to help limit head motion in the event of the seat. Seating and Safety Restraints SEATING Adjustable head restraints Your vehicle's seats are equipped with head restraints which are vertically adjustable. Using the power lumbar support The power ...control is to adjust firmness. The purpose of these head restraints is located on the front inboard side of a rear collision. To properly adjust your head restraints, lift the head restraint so that it is located directly behind your head or as close to adjust softness. 88 Press one...
... and down. Press the other side of the control to help limit head motion in the event of the seat. Seating and Safety Restraints SEATING Adjustable head restraints Your vehicle's seats are equipped with head restraints which are vertically adjustable. Using the power lumbar support The power ...control is to adjust firmness. The purpose of these head restraints is located on the front inboard side of a rear collision. To properly adjust your head restraints, lift the head restraint so that it is located directly behind your head or as close to adjust softness. 88 Press one...

Owner's Manual
Page 96
... sharply, or the vehicle receives an impact of approximately 8 km/h (5 mph) or more, the combination safety belts will lock to help reduce forward movement of a head-on collision. • This seat belt system has a retractor assembly that is designed to help reduce the belt force acting on the occupant's chest. The...
... sharply, or the vehicle receives an impact of approximately 8 km/h (5 mph) or more, the combination safety belts will lock to help reduce forward movement of a head-on collision. • This seat belt system has a retractor assembly that is designed to help reduce the belt force acting on the occupant's chest. The...
Owner's Manual
Page 109
All occupants of side airbags. Do not lean your Ford or Lincoln Mercury dealer. See your head on a seat containing an air bag. Do not attempt to service, repair, or modify the air bag SRS, its fuses or the seat cover on ...
All occupants of side airbags. Do not lean your Ford or Lincoln Mercury dealer. See your head on a seat containing an air bag. Do not attempt to service, repair, or modify the air bag SRS, its fuses or the seat cover on ...
Owner's Manual
Page 113
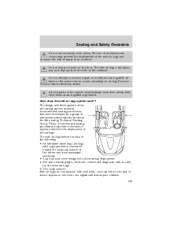
... of ear level) above the top of the seat. If a seating position has a low seat back and no head restraint, a backless booster seat may improve this case, move the backless booster to another seating position with a higher seat back and lap/shoulder belts. • ... belt should 113 The importance of shoulder belts Using a booster without a shoulder belt increases the risk of a child's head hitting a hard surface in a seating position equipped with lap/shoulder belts if your child's head, a high back booster seat would be used in any vehicle in a collision. Both can be a better choice. If...
... of ear level) above the top of the seat. If a seating position has a low seat back and no head restraint, a backless booster seat may improve this case, move the backless booster to another seating position with a higher seat back and lap/shoulder belts. • ... belt should 113 The importance of shoulder belts Using a booster without a shoulder belt increases the risk of a child's head hitting a hard surface in a seating position equipped with lap/shoulder belts if your child's head, a high back booster seat would be used in any vehicle in a collision. Both can be a better choice. If...

Owner's Manual
Page 119
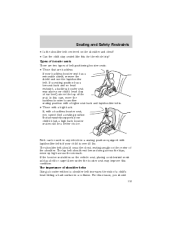
..., route the tether strap under the head restraint and between the head restraint posts, otherwise route the tether strap over the back of the seatback. 3. Route the child safety seat tether strap over the top of the ...
..., route the tether strap under the head restraint and between the head restraint posts, otherwise route the tether strap over the back of the seatback. 3. Route the child safety seat tether strap over the top of the ...
Owner's Manual
Page 224
Index H Hazard flashers ...143 Head restraints ...88 Headlamps ...38 aiming ...40 autolamp system ...38 bulb specifications ...43 daytime running lights ...39 flash to pass ...40 high beam ...14, 39 replacing ...
Index H Hazard flashers ...143 Head restraints ...88 Headlamps ...38 aiming ...40 autolamp system ...38 bulb specifications ...43 daytime running lights ...39 flash to pass ...40 high beam ...14, 39 replacing ...
Warranty Guide 3rd Printing
Page 11
... the warranty start date or 100,000 miles, whichever occurs first. Ford Motor Company or Ford Motor Vehicle Assurance Company covers these components: cylinder block, heads and all internal parts, intake and exhaust manifolds, flywheel, timing gear, harmonic balancer, valve covers, oil pan and pump, water pump, fuel system (excluding fuel...
... the warranty start date or 100,000 miles, whichever occurs first. Ford Motor Company or Ford Motor Vehicle Assurance Company covers these components: cylinder block, heads and all internal parts, intake and exhaust manifolds, flywheel, timing gear, harmonic balancer, valve covers, oil pan and pump, water pump, fuel system (excluding fuel...
