
Warranty Guide 4th Printing
Page 5
...your vehicle begins with quality protection and service. If you own or lease a 2001-model Electric Ranger, you must return to you receive and your 2001-model car or light truck. If you bought a previously owned 2001-model vehicle, you for selecting one of the New Vehicle Limited Warranty and ... Defect Warranties and Emissions Performance Warranties which cover your emissions control systems, and Noise Emissions Warranty which applies only to your dealer's handling of Ford Motor Company, The American Road, Dearborn, MI 48121) provides the New Vehicle Limited Warranty (pages 4-7).
...your vehicle begins with quality protection and service. If you own or lease a 2001-model Electric Ranger, you must return to you receive and your 2001-model car or light truck. If you bought a previously owned 2001-model vehicle, you for selecting one of the New Vehicle Limited Warranty and ... Defect Warranties and Emissions Performance Warranties which cover your emissions control systems, and Noise Emissions Warranty which applies only to your dealer's handling of Ford Motor Company, The American Road, Dearborn, MI 48121) provides the New Vehicle Limited Warranty (pages 4-7).
Warranty Guide 4th Printing
Page 25
... will perform the warranty repair for the work. Be sure to a delay, or if the delay is covered under Federal and California requirements HOW DO I HANDLE EMERGENCY REPAIRS? 7. Additional information about Performance Warranty coverage, the final decision must have the vehicle repaired more quickly in your dealer does not have to...
... will perform the warranty repair for the work. Be sure to a delay, or if the delay is covered under Federal and California requirements HOW DO I HANDLE EMERGENCY REPAIRS? 7. Additional information about Performance Warranty coverage, the final decision must have the vehicle repaired more quickly in your dealer does not have to...
Warranty Guide 4th Printing
Page 27
... show that you have followed Ford's instructions on the inside front cover, and Dispute Settlement Board, page 26. If you are not satisfied with the handling of a warranty matter, see Customer Assistance, on properly maintaining and using your vehicle. To have repairs made under the Federal Emissions Performance Warranty, or if...
... show that you have followed Ford's instructions on the inside front cover, and Dispute Settlement Board, page 26. If you are not satisfied with the handling of a warranty matter, see Customer Assistance, on properly maintaining and using your vehicle. To have repairs made under the Federal Emissions Performance Warranty, or if...
Warranty Guide 4th Printing
Page 30
... Board, an informal, cost-free alternative process for resolving warranty disputes. A warranty dispute must be available in achieving satisfaction by certain state laws. This dispute handling procedure is important to Ford Motor Company and to your warranty concern has not been resolved using the three-step procedure, you may apply to...
... Board, an informal, cost-free alternative process for resolving warranty disputes. A warranty dispute must be available in achieving satisfaction by certain state laws. This dispute handling procedure is important to Ford Motor Company and to your warranty concern has not been resolved using the three-step procedure, you may apply to...
Rear Seat Entertainment System Supplement 1st Printing
Page 7
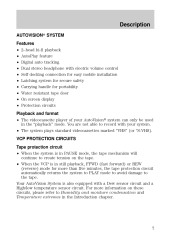
... tracking • Dual stereo headphone with electric volume control • Self docking connection for easy mobile installation • Latching system for secure safety • Carrying handle for more information on the tape. • When the VCP is also equipped with a Dew sensor circuit and a High/low temperature sensor circuit.
... tracking • Dual stereo headphone with electric volume control • Self docking connection for easy mobile installation • Latching system for secure safety • Carrying handle for more information on the tape. • When the VCP is also equipped with a Dew sensor circuit and a High/low temperature sensor circuit.

Owner Guide 2nd Printing
Page 79
.... • Tighten very loose tapes by their edges only. If necessary, clean discs only with the label surface downward. CD and CD changer care • Handle discs by inserting a finger or pencil into each slot of time. • Do not insert more than one disc into the hole and turning the...
.... • Tighten very loose tapes by their edges only. If necessary, clean discs only with the label surface downward. CD and CD changer care • Handle discs by inserting a finger or pencil into each slot of time. • Do not insert more than one disc into the hole and turning the...
Owner Guide 2nd Printing
Page 106
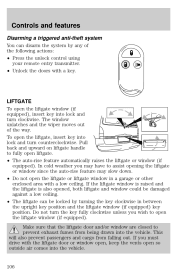
... exhaust fumes from falling out. This will also prevent passengers and cargo from being drawn into the vehicle. 106 Pull back and upward on liftgate handle to open liftgate. • The auto-rise feature automatically raises the liftgate or window (if equipped). To open the liftgate window (if equipped), insert key...
... exhaust fumes from falling out. This will also prevent passengers and cargo from being drawn into the vehicle. 106 Pull back and upward on liftgate handle to open liftgate. • The auto-rise feature automatically raises the liftgate or window (if equipped). To open the liftgate window (if equipped), insert key...

Owner Guide 2nd Printing
Page 111
Adjusting the power seats (if equipped) The power seat controls are located on the outboard side of a collision. Never adjust the driver's seat or seatback when the vehicle is moving. 111 Reclining the seatback can reduce the effectiveness of the seat's safety belt in the event of the seat. Lift handle to adjust seatback. Seating and safety restraints Always drive and ride with your seatback upright and the lap belt snug and low across the hips. Pull lever up to move seat forward or backward.
Adjusting the power seats (if equipped) The power seat controls are located on the outboard side of a collision. Never adjust the driver's seat or seatback when the vehicle is moving. 111 Reclining the seatback can reduce the effectiveness of the seat's safety belt in the event of the seat. Lift handle to adjust seatback. Seating and safety restraints Always drive and ride with your seatback upright and the lap belt snug and low across the hips. Pull lever up to move seat forward or backward.
Owner Guide 2nd Printing
Page 118
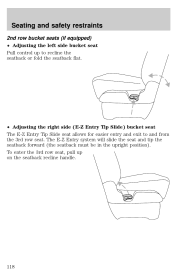
To enter the 3rd row seat, pull up to recline the seatback or fold the seatback flat. • Adjusting the right side (E-Z Entry Tip Slide) bucket seat The E-Z Entry Tip Slide seat allows for easier entry and exit to and from the 3rd row seat. The E-Z Entry system will slide the seat and tip the seatback forward (the seatback must be in the upright position). Seating and safety restraints 2nd row bucket seats (if equipped) • Adjusting the left side bucket seat Pull control up on the seatback recline handle. 118
To enter the 3rd row seat, pull up to recline the seatback or fold the seatback flat. • Adjusting the right side (E-Z Entry Tip Slide) bucket seat The E-Z Entry Tip Slide seat allows for easier entry and exit to and from the 3rd row seat. The E-Z Entry system will slide the seat and tip the seatback forward (the seatback must be in the upright position). Seating and safety restraints 2nd row bucket seats (if equipped) • Adjusting the left side bucket seat Pull control up on the seatback recline handle. 118

Owner Guide 2nd Printing
Page 119
To return the seat to move the seat rearward until the seat track locks. Then readjust the seatback. Lift handle to a seating position, move the seat forward or backward. 119 Seating and safety restraints To exit the third row seat, pull up on the 3rd row access control.
To return the seat to move the seat rearward until the seat track locks. Then readjust the seatback. Lift handle to a seating position, move the seat forward or backward. 119 Seating and safety restraints To exit the third row seat, pull up on the 3rd row access control.
Owner Guide 2nd Printing
Page 121
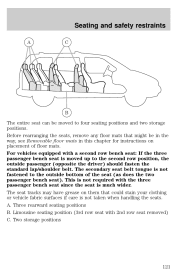
.... For vehicles equipped with 2nd row seat removed) C. This is not required with the three passenger bench seat since the seat is not taken when handling the seats. The seat tracks may have grease on placement of the seat (as does the two passenger bench seat). Three rearward seating positions B. Two...
.... For vehicles equipped with 2nd row seat removed) C. This is not required with the three passenger bench seat since the seat is not taken when handling the seats. The seat tracks may have grease on placement of the seat (as does the two passenger bench seat). Three rearward seating positions B. Two...

Owner Guide 2nd Printing
Page 123
... This must be sure that could come out of both bench and bucket seats. Fold the seatback flat before the vehicle is not taken when handling the seats. Two people should lift and rotate the seat and remove it from the seat belt detach anchor by pushing the release control and...
... This must be sure that could come out of both bench and bucket seats. Fold the seatback flat before the vehicle is not taken when handling the seats. Two people should lift and rotate the seat and remove it from the seat belt detach anchor by pushing the release control and...
Owner Guide 2nd Printing
Page 154
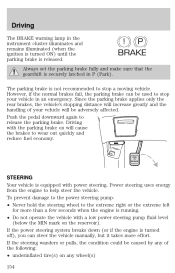
Since the parking brake applies only the rear brakes, the vehicle's stopping distance will increase greatly and the handling of the following: • underinflated tire(s) on any wheel(s) 154 If the power steering system breaks down (or if the engine is turned off), you ...
Since the parking brake applies only the rear brakes, the vehicle's stopping distance will increase greatly and the handling of the following: • underinflated tire(s) on any wheel(s) 154 If the power steering system breaks down (or if the engine is turned off), you ...
Owner Guide 2nd Printing
Page 178
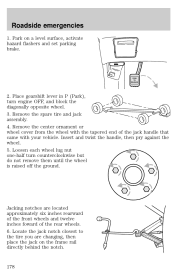
... 1. Place gearshift lever in P (Park), turn counterclockwise but do not remove them until the wheel is raised off the ground. Insert and twist the handle, then pry against the wheel. 5. Remove the spare tire and jack assembly. 4. Locate the jack notch closest to the tire you are located approximately ...six inches rearward of the front wheels and twelve inches foward of the jack handle that came with your vehicle. PUSH TO RELEASE 2. Loosen each wheel lug nut one-half turn engine OFF, and block the diagonally opposite wheel...
... 1. Place gearshift lever in P (Park), turn counterclockwise but do not remove them until the wheel is raised off the ground. Insert and twist the handle, then pry against the wheel. 5. Remove the spare tire and jack assembly. 4. Locate the jack notch closest to the tire you are located approximately ...six inches rearward of the front wheels and twelve inches foward of the jack handle that came with your vehicle. PUSH TO RELEASE 2. Loosen each wheel lug nut one-half turn engine OFF, and block the diagonally opposite wheel...
Owner Guide 2nd Printing
Page 179
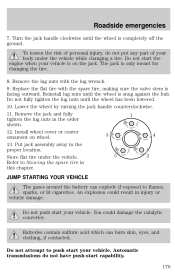
... have push-start your vehicle. Do not fully tighten the lug nuts until the wheel is facing outward. Lower the wheel by turning the jack handle counterclockwise. 11. JUMP STARTING YOUR VEHICLE The gases around the battery can burn skin, eyes, and clothing, if contacted. Do not start your vehicle. Reinstall... the spare tire, making sure the valve stem is snug against the hub. Put jack assembly away in the order shown. 12. Turn the jack handle clockwise until the wheel is only meant for changing the tire. 8. Roadside emergencies 7.
... have push-start your vehicle. Do not fully tighten the lug nuts until the wheel is facing outward. Lower the wheel by turning the jack handle counterclockwise. 11. JUMP STARTING YOUR VEHICLE The gases around the battery can burn skin, eyes, and clothing, if contacted. Do not start your vehicle. Reinstall... the spare tire, making sure the valve stem is snug against the hub. Put jack assembly away in the order shown. 12. Turn the jack handle clockwise until the wheel is only meant for changing the tire. 8. Roadside emergencies 7.
Owner Guide 2nd Printing
Page 187
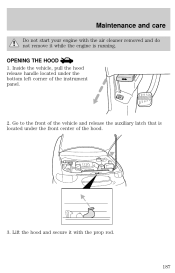
Go to the front of the vehicle and release the auxiliary latch that is running. Inside the vehicle, pull the hood release handle located under the front center of the instrument panel. 2. Lift the hood and secure it with the air cleaner removed and do not remove it while the engine is located under the bottom left corner of the hood. 3. OPENING THE HOOD 1. Maintenance and care Do not start your engine with the prop rod. 187
Go to the front of the vehicle and release the auxiliary latch that is running. Inside the vehicle, pull the hood release handle located under the front center of the instrument panel. 2. Lift the hood and secure it with the air cleaner removed and do not remove it while the engine is located under the bottom left corner of the hood. 3. OPENING THE HOOD 1. Maintenance and care Do not start your engine with the prop rod. 187

Owner Guide 2nd Printing
Page 202
... eyes, flush immediately with skin, eyes or clothing. Therefore, do not allow flames, sparks or lighted substances to the vehicle or battery. Wash hands after handling. Batteries normally produce explosive gases which can neutralize the acid with a wire brush. This operation is disconnected or a new battery installed, the transmission must relearn...
... eyes, flush immediately with skin, eyes or clothing. Therefore, do not allow flames, sparks or lighted substances to the vehicle or battery. Wash hands after handling. Batteries normally produce explosive gases which can neutralize the acid with a wire brush. This operation is disconnected or a new battery installed, the transmission must relearn...

Owner Guide 2nd Printing
Page 209
Improperly inflated tires can affect vehicle handling and can fail suddenly, possibly resulting in combination, can cause heat buildup and possible tire failure. SERVICING YOUR TIRES Checking the tire pressure • Use ...
Improperly inflated tires can affect vehicle handling and can fail suddenly, possibly resulting in combination, can cause heat buildup and possible tire failure. SERVICING YOUR TIRES Checking the tire pressure • Use ...
Owner Guide 2nd Printing
Page 211
... KNOW ABOUT AUTOMOTIVE FUELS Important safety precautions Do not overfill the fuel tank. Maintenance and care Failure to follow these precautions may adversely affect the handling of the vehicle and make it easier for the driver to use chains, it is recommended that the chains do not touch any wiring, brake...
... KNOW ABOUT AUTOMOTIVE FUELS Important safety precautions Do not overfill the fuel tank. Maintenance and care Failure to follow these precautions may adversely affect the handling of the vehicle and make it easier for the driver to use chains, it is recommended that the chains do not touch any wiring, brake...

Owner Guide 2nd Printing
Page 212
If fuel is a cancer-causing agent. Observe the following guidelines when handling automotive fuel: • Extinguish all smoking materials and any kind can lead to eye and respiratory tract irritation. Inhaling too much fuel vapor of any ...
If fuel is a cancer-causing agent. Observe the following guidelines when handling automotive fuel: • Extinguish all smoking materials and any kind can lead to eye and respiratory tract irritation. Inhaling too much fuel vapor of any ...

