
Scheduled Maintenance Guide 5th Printing
Page 8
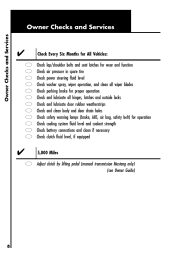
... and clean body and door drain holes safety warning lamps (brake, ABS, air bag, safety belt) for operation cooling system fluid level and coolant strength battery connections and clean if necessary clutch fluid level, if equipped 5,000 Miles Adjust clutch by lifting pedal (manual transmission Mustang only) (see Owner Guide) 8
... and clean body and door drain holes safety warning lamps (brake, ABS, air bag, safety belt) for operation cooling system fluid level and coolant strength battery connections and clean if necessary clutch fluid level, if equipped 5,000 Miles Adjust clutch by lifting pedal (manual transmission Mustang only) (see Owner Guide) 8
Scheduled Maintenance Guide 5th Printing
Page 35
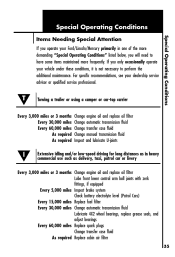
Special Operating Conditions Special Operating Conditions Items Needing Special Attention If you operate your Ford/Lincoln/Mercury primarily in heavy commercial use such as delivery, taxi, patrol car or livery Every 3,000 miles or 3 months Change engine oil and replace oil... filter Lube front lower control arm ball joints with zerk fittings, if equipped Every 5,000 miles Inspect brake system Check battery electrolyte level (Patrol Cars) Every 15,000 miles Replace fuel filter Every 30,000 miles Change automatic transmission fluid Lubricate 4X2 wheel bearings, replace...
Special Operating Conditions Special Operating Conditions Items Needing Special Attention If you operate your Ford/Lincoln/Mercury primarily in heavy commercial use such as delivery, taxi, patrol car or livery Every 3,000 miles or 3 months Change engine oil and replace oil... filter Lube front lower control arm ball joints with zerk fittings, if equipped Every 5,000 miles Inspect brake system Check battery electrolyte level (Patrol Cars) Every 15,000 miles Replace fuel filter Every 30,000 miles Change automatic transmission fluid Lubricate 4X2 wheel bearings, replace...
Rear Seat Entertainment System Supplement 1st Printing
Page 10
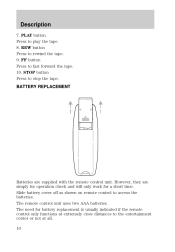
... Press to fast forward the tape. 10. STOP button Press to access the batteries. Slide battery cover off as shown on remote control to stop the tape. BATTERY REPLACEMENT Batteries are simply for operation check and will only work for battery replacement is usually indicated if the remote control only functions at extremely close distances...
... Press to fast forward the tape. 10. STOP button Press to access the batteries. Slide battery cover off as shown on remote control to stop the tape. BATTERY REPLACEMENT Batteries are simply for operation check and will only work for battery replacement is usually indicated if the remote control only functions at extremely close distances...
Rear Seat Entertainment System Supplement 1st Printing
Page 11
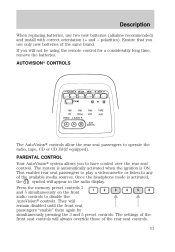
... the available media sources. Ensure that you use two new batteries (alkaline recommended) and install with correct orientation (+ and − polarities). AUTOVISIONா CONTROLS The AutoVision controls allow the rear seat passengers to disable the ... the rear seat controls. 11 The settings of the front seat controls will not be using the remote control for a considerably long time, remove the batteries.
... the available media sources. Ensure that you use two new batteries (alkaline recommended) and install with correct orientation (+ and − polarities). AUTOVISIONா CONTROLS The AutoVision controls allow the rear seat passengers to disable the ... the rear seat controls. 11 The settings of the front seat controls will not be using the remote control for a considerably long time, remove the batteries.
Rear Seat Entertainment System Supplement 1st Printing
Page 16
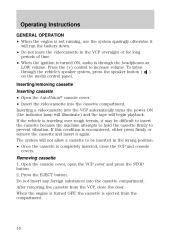
... machine attempts to hold the cassette firmly to prevent vibration. If the vehicle is traveling over rough terrain, it again. The system will run the battery down. • Do not leave the videocassette in the wrong position. • Once the cassette is completely inserted, close the door. Removing cassette...
... machine attempts to hold the cassette firmly to prevent vibration. If the vehicle is traveling over rough terrain, it again. The system will run the battery down. • Do not leave the videocassette in the wrong position. • Once the cassette is completely inserted, close the door. Removing cassette...
Owner Guide 2nd Printing
Page 5
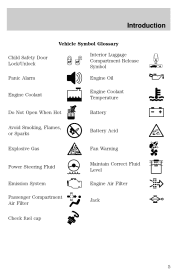
Introduction Vehicle Symbol Glossary Child Safety Door Lock/Unlock Panic Alarm Engine Coolant Interior Luggage Compartment Release Symbol Engine Oil Engine Coolant Temperature Battery Do Not Open When Hot Avoid Smoking, Flames, or Sparks Explosive Gas Battery Acid Fan Warning Maintain Correct Fluid Level Engine Air Filter Jack MAX MIN Power Steering Fluid Emission System Passenger Compartment Air Filter Check fuel cap 5
Introduction Vehicle Symbol Glossary Child Safety Door Lock/Unlock Panic Alarm Engine Coolant Interior Luggage Compartment Release Symbol Engine Oil Engine Coolant Temperature Battery Do Not Open When Hot Avoid Smoking, Flames, or Sparks Explosive Gas Battery Acid Fan Warning Maintain Correct Fluid Level Engine Air Filter Jack MAX MIN Power Steering Fluid Emission System Passenger Compartment Air Filter Check fuel cap 5
Owner Guide 2nd Printing
Page 8
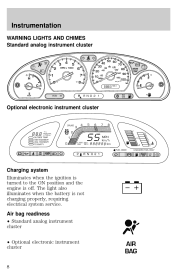
ECONOMY TO EMPTY MPH km/h km FUEL DOOR 1/2 N O R M A L E C UNLEADED FUEL ONLY ABS SERVICE ENGINE SOON AIR BAG ! The light also illuminates when the battery is off. Air bag readiness • Standard analog instrument cluster • Optional electronic instrument cluster AIR BAG 8 Instrumentation WARNING LIGHTS AND CHIMES Standard analog instrument ...
ECONOMY TO EMPTY MPH km/h km FUEL DOOR 1/2 N O R M A L E C UNLEADED FUEL ONLY ABS SERVICE ENGINE SOON AIR BAG ! The light also illuminates when the battery is off. Air bag readiness • Standard analog instrument cluster • Optional electronic instrument cluster AIR BAG 8 Instrumentation WARNING LIGHTS AND CHIMES Standard analog instrument ...
Owner Guide 2nd Printing
Page 100
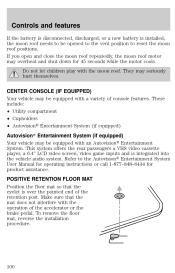
... mat, reverse the installation procedure. 100 Do not let children play with an Autovision Entertainment System. Controls and features If the battery is disconnected, discharged, or a new battery is installed, the moon roof needs to be opened to the vent position to the Autovision Entertainment System User Manual for operating...
... mat, reverse the installation procedure. 100 Do not let children play with an Autovision Entertainment System. Controls and features If the battery is disconnected, discharged, or a new battery is installed, the moon roof needs to be opened to the vent position to the Autovision Entertainment System User Manual for operating...
Owner Guide 2nd Printing
Page 103
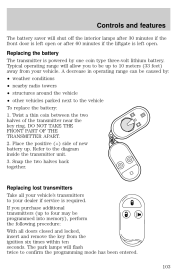
... NOT TAKE THE FRONT PART OF THE TRANSMITTER APART. 2. Place the positive (+) side of the transmitter near the key ring. Controls and features The battery saver will shut off the interior lamps after 30 minutes if the front door is left open or after 60 minutes if the liftgate is ... lamps will flash twice to the diagram inside the transmitter unit. 3. A decrease in operating range can be caused by one coin type three-volt lithium battery. Replacing lost transmitters Take all doors closed and locked, insert and remove the key from your dealer if service is required.
... NOT TAKE THE FRONT PART OF THE TRANSMITTER APART. 2. Place the positive (+) side of the transmitter near the key ring. Controls and features The battery saver will shut off the interior lamps after 30 minutes if the front door is left open or after 60 minutes if the liftgate is ... lamps will flash twice to the diagram inside the transmitter unit. 3. A decrease in operating range can be caused by one coin type three-volt lithium battery. Replacing lost transmitters Take all doors closed and locked, insert and remove the key from your dealer if service is required.
Owner Guide 2nd Printing
Page 156
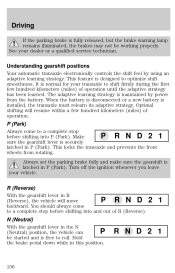
... gearshift lever in P (Park). Optimal shifting will move P R N D backward. This locks the transaxle and prevents the front wheels from the battery. Hold the brake pedal down while in R (Reverse), the vehicle will resume within a few hundred kilometers (miles) of operation until the adaptive ...strategy has been learned. When the battery is disconnected or a new battery is latched in the N P (Neutral) position, the vehicle can be working properly. Turn off the ignition whenever you leave...
... gearshift lever in P (Park). Optimal shifting will move P R N D backward. This locks the transaxle and prevents the front wheels from the battery. Hold the brake pedal down while in R (Reverse), the vehicle will resume within a few hundred kilometers (miles) of operation until the adaptive ...strategy has been learned. When the battery is disconnected or a new battery is latched in the N P (Neutral) position, the vehicle can be working properly. Turn off the ignition whenever you leave...
Owner Guide 2nd Printing
Page 159
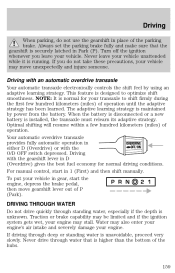
... manual control, start the P R N D 2 1 engine, depress the brake pedal, then move unexpectedly and injure someone. When the battery is disconnected or a new battery is running. To put your vehicle in gear, start in OVERDRIVE OFF/ON either D (Overdrive) or with an automatic overdrive transaxle Your ...automatic transaxle electronically controls the shift feel by power from the battery. Water may also enter your engine's air intake and severely damage your engine may stall. If you leave your vehicle. NOTE:...
... manual control, start the P R N D 2 1 engine, depress the brake pedal, then move unexpectedly and injure someone. When the battery is disconnected or a new battery is running. To put your vehicle in gear, start in OVERDRIVE OFF/ON either D (Overdrive) or with an automatic overdrive transaxle Your ...automatic transaxle electronically controls the shift feel by power from the battery. Water may also enter your engine's air intake and severely damage your engine may stall. If you leave your vehicle. NOTE:...
Owner Guide 2nd Printing
Page 162
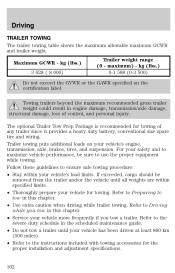
...; Service your vehicle more frequently if you tow in engine damage, transmission/axle damage, structural damage, loss of any trailer since it provides a heavy duty battery, conventional size spare tire and wiring. Refer to Preparing to use the proper equipment while towing.
...; Service your vehicle more frequently if you tow in engine damage, transmission/axle damage, structural damage, loss of any trailer since it provides a heavy duty battery, conventional size spare tire and wiring. Refer to Preparing to use the proper equipment while towing.
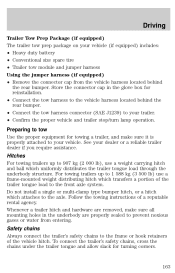
Owner Guide 2nd Printing
Page 163
... (2 000 lb), use a frame-mounted weight distributing hitch which transfers a portion of the trailer tongue load to your vehicle (if equipped) includes: • Heavy duty battery • Conventional size spare tire • Trailer tow module and jumper harness Using the jumper harness (if equipped) • Remove the connector cap from entering...
... (2 000 lb), use a frame-mounted weight distributing hitch which transfers a portion of the trailer tongue load to your vehicle (if equipped) includes: • Heavy duty battery • Conventional size spare tire • Trailer tow module and jumper harness Using the jumper harness (if equipped) • Remove the connector cap from entering...
Owner Guide 2nd Printing
Page 172
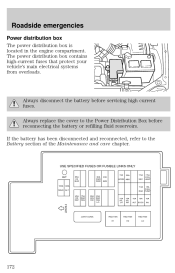
RAD FAN H1 RAD FAN H2 RAD FAN LO 172 Always replace the cover to the Battery section of the Maintenance and care chapter. If the battery has been disconnected and reconnected, refer to the Power Distribution Box before servicing high current fuses. The power distribution box... contains high-current fuses that protect your vehicle's main electrical systems from overloads. Always disconnect the battery before reconnecting the battery or refilling fluid reservoirs. USE SPECIFIED FUSES OR FUSIBLE LINKS ONLY 15A 65A FR BLW 30A PWR WND 40A ABS 20A 7.5A...
RAD FAN H1 RAD FAN H2 RAD FAN LO 172 Always replace the cover to the Battery section of the Maintenance and care chapter. If the battery has been disconnected and reconnected, refer to the Power Distribution Box before servicing high current fuses. The power distribution box... contains high-current fuses that protect your vehicle's main electrical systems from overloads. Always disconnect the battery before reconnecting the battery or refilling fluid reservoirs. USE SPECIFIED FUSES OR FUSIBLE LINKS ONLY 15A 65A FR BLW 30A PWR WND 40A ABS 20A 7.5A...
Owner Guide 2nd Printing
Page 174
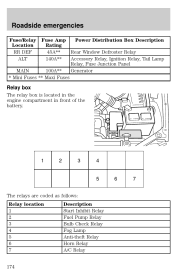
Fuse/Relay Location RR DEF ALT 1 2 3 4 5 The relays are coded as follows: Relay location 1 2 3 4 5 6 7 174 Description Start Inhibit Relay Fuel Pump Relay Bulb Check Relay Fog Lamp Anti-theft Relay Horn Relay A/C Relay 6 7 Roadside emergencies Fuse Amp Power Distribution Box Description Rating 45A** Rear Window Defroster Relay 140A** Accessory Relay, Ignition Relay, Tail Lamp Relay, Fuse Junction Panel MAIN 100A** Generator * Mini Fuses ** Maxi Fuses Relay box The relay box is located in the engine compartment in front of the battery.
Fuse/Relay Location RR DEF ALT 1 2 3 4 5 The relays are coded as follows: Relay location 1 2 3 4 5 6 7 174 Description Start Inhibit Relay Fuel Pump Relay Bulb Check Relay Fog Lamp Anti-theft Relay Horn Relay A/C Relay 6 7 Roadside emergencies Fuse Amp Power Distribution Box Description Rating 45A** Rear Window Defroster Relay 140A** Accessory Relay, Ignition Relay, Tail Lamp Relay, Fuse Junction Panel MAIN 100A** Generator * Mini Fuses ** Maxi Fuses Relay box The relay box is located in the engine compartment in front of the battery.
Owner Guide 2nd Printing
Page 179
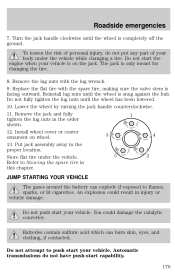
... to flames, sparks, or lit cigarettes. To lessen the risk of your vehicle is facing outward. JUMP STARTING YOUR VEHICLE The gases around the battery can burn skin, eyes, and clothing, if contacted. Roadside emergencies 7. You could result in this chapter. Do not start capability. 179 Remove ...Automatic transmissions do not put any part of personal injury, do not have push-start the engine when your body under the vehicle. Batteries contain sulfuric acid which can explode if exposed to Stowing the spare tire in injury or vehicle damage. Reinstall lug nuts until the ...
... to flames, sparks, or lit cigarettes. To lessen the risk of your vehicle is facing outward. JUMP STARTING YOUR VEHICLE The gases around the battery can burn skin, eyes, and clothing, if contacted. Roadside emergencies 7. You could result in this chapter. Do not start capability. 179 Remove ...Automatic transmissions do not put any part of personal injury, do not have push-start the engine when your body under the vehicle. Batteries contain sulfuric acid which can explode if exposed to Stowing the spare tire in injury or vehicle damage. Reinstall lug nuts until the ...

Owner Guide 2nd Printing
Page 180
... booster vehicle close to its adaptive strategy. Ensure that vent caps are used to start your vehicle When the battery is disconnected or a new battery is considered normal and will fully update transmission operation to the hood of the transmission. Connecting the jumper cables ... surges. Check all other moving parts. 4. Connect the positive (+) booster cable to protect any excessive corrosion before you attach the battery cables. Turn the heater fan on both vehicles to the positive (+) terminal of the disabled vehicle as this , the transmission may...
... booster vehicle close to its adaptive strategy. Ensure that vent caps are used to start your vehicle When the battery is disconnected or a new battery is considered normal and will fully update transmission operation to the hood of the transmission. Connecting the jumper cables ... surges. Check all other moving parts. 4. Connect the positive (+) booster cable to protect any excessive corrosion before you attach the battery cables. Turn the heater fan on both vehicles to the positive (+) terminal of the disabled vehicle as this , the transmission may...
Owner Guide 2nd Printing
Page 181
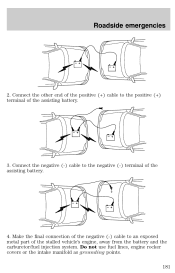
Roadside emergencies 2. Connect the other end of the positive (+) cable to the positive (+) terminal of the stalled vehicle's engine, away from the battery and the carburetor/fuel injection system. Do not use fuel lines, engine rocker covers or the intake manifold as grounding points. 181 - - - - + + - + + + + - Make the final connection of the negative (-) cable to the negative (-) terminal of the assisting battery. 4. Connect the negative (-) cable to an exposed metal part of the assisting battery. 3.
Roadside emergencies 2. Connect the other end of the positive (+) cable to the positive (+) terminal of the stalled vehicle's engine, away from the battery and the carburetor/fuel injection system. Do not use fuel lines, engine rocker covers or the intake manifold as grounding points. 181 - - - - + + - + + + + - Make the final connection of the negative (-) cable to the negative (-) terminal of the assisting battery. 4. Connect the negative (-) cable to an exposed metal part of the assisting battery. 3.

Owner Guide 2nd Printing
Page 182
... the illustrations, lightning bolts are clear of fan blades, belts, moving parts of the battery to be jumped. Removing the jumper cables Remove the jumper cables in the reverse order that surround the battery. 5. Start the engine of the disabled vehicle. 3. Start the engine of the booster...they were connected. 1. Remove the jumper cable from the ground metal surface. Ensure that the cables are used to designate the assisting (boosting) battery. 182 - - + + Roadside emergencies Do not connect the end of the second cable to the negative (-) terminal of both engines for an...
... the illustrations, lightning bolts are clear of fan blades, belts, moving parts of the battery to be jumped. Removing the jumper cables Remove the jumper cables in the reverse order that surround the battery. 5. Start the engine of the disabled vehicle. 3. Start the engine of the booster...they were connected. 1. Remove the jumper cable from the ground metal surface. Ensure that the cables are used to designate the assisting (boosting) battery. 182 - - + + Roadside emergencies Do not connect the end of the second cable to the negative (-) terminal of both engines for an...

Owner Guide 2nd Printing
Page 183
Remove the jumper cable from the positive (+) terminal of the booster vehicle's battery. 4. Remove the jumper cable from the positive (+) terminal of the booster vehicle's battery. 3. Roadside emergencies 2. Remove the jumper cable on the negative (-) connection of the disabled vehicle's battery. - - - - + - - + + + + + 183
Remove the jumper cable from the positive (+) terminal of the booster vehicle's battery. 4. Remove the jumper cable from the positive (+) terminal of the booster vehicle's battery. 3. Roadside emergencies 2. Remove the jumper cable on the negative (-) connection of the disabled vehicle's battery. - - - - + - - + + + + + 183

