
Warranty Guide 4th Printing
Page 26
... failures caused by properly installed Ford parts or non-Ford parts that are equivalent to Ford parts in an emergency situation. and (b) the labor charges (based on your vehicle, you are replaced; Ford Motor Company recommends that are having non-warranty work as effectively, and you use non-Ford parts. Environmental...
... failures caused by properly installed Ford parts or non-Ford parts that are equivalent to Ford parts in an emergency situation. and (b) the labor charges (based on your vehicle, you are replaced; Ford Motor Company recommends that are having non-warranty work as effectively, and you use non-Ford parts. Environmental...
Owner Guide 2nd Printing
Page 4
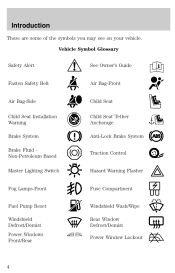
Vehicle Symbol Glossary Safety Alert See Owner's Guide Fasten Safety Belt Air Bag-Front Air Bag-Side Child Seat Installation Warning Brake System Brake Fluid Non-Petroleum Based Master Lighting Switch Child Seat Child Seat Tether Anchorage Anti-Lock Brake System Traction Control Hazard Warning Flasher Fog Lamps-Front Fuse Compartment Fuel Pump Reset Windshield Defrost/Demist Power Windows Front/Rear Windshield Wash/Wipe Rear Window Defrost/Demist Power Window Lockout 4 Introduction These are some of the symbols you may see on your vehicle.
Vehicle Symbol Glossary Safety Alert See Owner's Guide Fasten Safety Belt Air Bag-Front Air Bag-Side Child Seat Installation Warning Brake System Brake Fluid Non-Petroleum Based Master Lighting Switch Child Seat Child Seat Tether Anchorage Anti-Lock Brake System Traction Control Hazard Warning Flasher Fog Lamps-Front Fuse Compartment Fuel Pump Reset Windshield Defrost/Demist Power Windows Front/Rear Windshield Wash/Wipe Rear Window Defrost/Demist Power Window Lockout 4 Introduction These are some of the symbols you may see on your vehicle.
Owner Guide 2nd Printing
Page 20
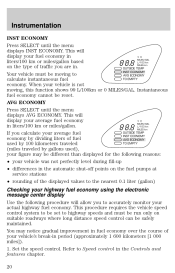
... to Speed control in period (approximately 1 600 kilometers [1 000 miles]). 1. When your fuel economy in ˚F ˚C MILES/GAL liters/100 km or miles/gallon based L/100 km MILES km on the type of traffic you to AVG ECONOMY TO EMPTY calculate instantaneous fuel economy. This will display your actual highway...
... to Speed control in period (approximately 1 600 kilometers [1 000 miles]). 1. When your fuel economy in ˚F ˚C MILES/GAL liters/100 km or miles/gallon based L/100 km MILES km on the type of traffic you to AVG ECONOMY TO EMPTY calculate instantaneous fuel economy. This will display your actual highway...
Owner Guide 2nd Printing
Page 28
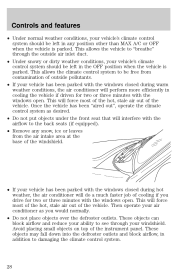
... than MAX A/C or OFF when the vehicle is parked. This allows the climate control system to be free from the air intake area at the base of the windshield. • If your vehicle's climate control system should be left in the OFF position when the vehicle is parked. Then operate your...
... than MAX A/C or OFF when the vehicle is parked. This allows the climate control system to be free from the air intake area at the base of the windshield. • If your vehicle's climate control system should be left in the OFF position when the vehicle is parked. Then operate your...
Owner Guide 2nd Printing
Page 38
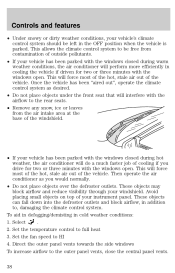
.../demisting in cooling the vehicle if driven for two or three minutes with the airflow to be free from the air intake area at the base of your vehicle's climate control system should be left in addition to full heat 3. This allows the climate control system to the rear seats. •...
.../demisting in cooling the vehicle if driven for two or three minutes with the airflow to be free from the air intake area at the base of your vehicle's climate control system should be left in addition to full heat 3. This allows the climate control system to the rear seats. •...

Owner Guide 2nd Printing
Page 107
The cargo restrained in the cargo area. Front Cargo net (if equipped) The front cargo net can be used to restrain objects during a collision or heavy braking. The cargo net is not designed to hold small items between the front seats. To install the net, secure the hooks into the retainers located on the inboard base of the front seats. 107 Controls and features Cargo Area Features Rear Cargo net The cargo net helps stabilize lightweight objects in the net must not exceed 22 kg (50 lbs.) or the net may not stay secured. Attach the net to the anchors provided.
The cargo restrained in the cargo area. Front Cargo net (if equipped) The front cargo net can be used to restrain objects during a collision or heavy braking. The cargo net is not designed to hold small items between the front seats. To install the net, secure the hooks into the retainers located on the inboard base of the front seats. 107 Controls and features Cargo Area Features Rear Cargo net The cargo net helps stabilize lightweight objects in the net must not exceed 22 kg (50 lbs.) or the net may not stay secured. Attach the net to the anchors provided.

Owner Guide 2nd Printing
Page 117
Adjusting 2nd row bench Pull control up to flip seatback to forward flat position. 117 below center of the seat cushion • Bucket seat (driver's side only) inboard side of seat base Use only soft cups in a collision. Seating and safety restraints Stowed cupholders The vehicle is equipped with cupholders that pull out from the 2nd row seat: • Bench seat - Hard objects can injure you in the cupholder.
Adjusting 2nd row bench Pull control up to flip seatback to forward flat position. 117 below center of the seat cushion • Bucket seat (driver's side only) inboard side of seat base Use only soft cups in a collision. Seating and safety restraints Stowed cupholders The vehicle is equipped with cupholders that pull out from the 2nd row seat: • Bench seat - Hard objects can injure you in the cupholder.
Owner Guide 2nd Printing
Page 160
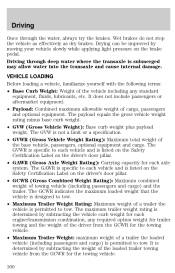
... GCWR indicates the maximum loaded weight that the vehicle is designed to tow. • Maximum Trailer Weight Rating: Maximum weight of the base vehicle, passengers, optional equipment and cargo. The maximum trailer weight rating is determined by subtracting the vehicle curb weight for each vehicle and...deep water where the transaxle is permitted to tow. VEHICLE LOADING Before loading a vehicle, familiarize yourself with the following terms: • Base Curb Weight: Weight of the vehicle including any required option weight for trailer towing and the weight of the driver from the GCWR for...
... GCWR indicates the maximum loaded weight that the vehicle is designed to tow. • Maximum Trailer Weight Rating: Maximum weight of the base vehicle, passengers, optional equipment and cargo. The maximum trailer weight rating is determined by subtracting the vehicle curb weight for each vehicle and...deep water where the transaxle is permitted to tow. VEHICLE LOADING Before loading a vehicle, familiarize yourself with the following terms: • Base Curb Weight: Weight of the vehicle including any required option weight for trailer towing and the weight of the driver from the GCWR for...
Owner Guide 2nd Printing
Page 204
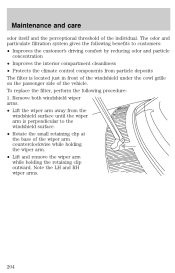
... system gives the following procedure: 1. To replace the filter, perform the following benefits to the windshield surface. • Rotate the small retaining clip at the base of the wiper arm counterclockwise while holding the wiper arm. • Lift and remove the wiper arm while holding the retaining clip outward. Note the...
... system gives the following procedure: 1. To replace the filter, perform the following benefits to the windshield surface. • Rotate the small retaining clip at the base of the wiper arm counterclockwise while holding the wiper arm. • Lift and remove the wiper arm while holding the retaining clip outward. Note the...
Owner Guide 2nd Printing
Page 205
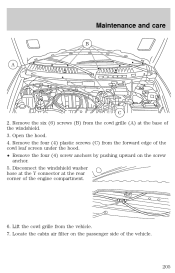
Disconnect the windshield washer hose at the Y connector at the base of the windshield. 3. Remove the four (4) plastic screws (C) from the vehicle. 7. Maintenance and care B A C 2. Lift the cowl grille from the forward edge of the cowl leaf screen under the hood. • Remove the four (4) screw anchors by pushing upward on the passenger side of the engine compartment. 6. Open the hood. 4. Locate the cabin air filter on the screw anchor. 5. Remove the six (6) screws (B) from the cowl grille (A) at the rear corner of the vehicle. 205
Disconnect the windshield washer hose at the Y connector at the base of the windshield. 3. Remove the four (4) plastic screws (C) from the vehicle. 7. Maintenance and care B A C 2. Lift the cowl grille from the forward edge of the cowl leaf screen under the hood. • Remove the four (4) screw anchors by pushing upward on the passenger side of the engine compartment. 6. Open the hood. 4. Locate the cabin air filter on the screw anchor. 5. Remove the six (6) screws (B) from the cowl grille (A) at the rear corner of the vehicle. 205
Owner Guide 2nd Printing
Page 208
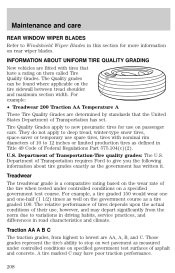
... production tires as defined in road characteristics and climate. They do not apply to lowest are AA, A, B, and C. Treadwear The treadwear grade is a comparative rating based on the wear rate of the tire when tested under controlled conditions on specified government test surfaces of Transportation has set. Traction AA A B C The traction...
... production tires as defined in road characteristics and climate. They do not apply to lowest are AA, A, B, and C. Treadwear The treadwear grade is a comparative rating based on the wear rate of the tire when tested under controlled conditions on specified government test surfaces of Transportation has set. Traction AA A B C The traction...

Owner Guide 2nd Printing
Page 209
... your tires wear evenly and last longer, rotate 209 Maintenance and care The traction grade assigned to this tire is established for a tire that is based on a specified indoor laboratory test wheel. Temperature A B C The temperature grades are cold, after the vehicle has been parked for at least one hour or has...
... your tires wear evenly and last longer, rotate 209 Maintenance and care The traction grade assigned to this tire is established for a tire that is based on a specified indoor laboratory test wheel. Temperature A B C The temperature grades are cold, after the vehicle has been parked for at least one hour or has...

Owner Guide 2nd Printing
Page 214
... cap may not be void for any damage to use fuel containing methanol. Do not use fuel or fuel additives with metallic compounds, including manganese-based compounds containing MMT. Your vehicle was not designed may not be under pressure. Maintenance and care 2. Carefully turn the filler cap counterclockwise 1/4 of a turn until...
... cap may not be void for any damage to use fuel containing methanol. Do not use fuel or fuel additives with metallic compounds, including manganese-based compounds containing MMT. Your vehicle was not designed may not be under pressure. Maintenance and care 2. Carefully turn the filler cap counterclockwise 1/4 of a turn until...
Owner Guide 2nd Printing
Page 222
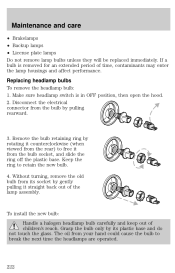
... be replaced immediately. Remove the bulb retaining ring by rotating it counterclockwise (when viewed from the bulb socket, and slide the ring off the plastic base. Keep the ring to break the next time the headlamps are operated. 222 Without turning, remove the old bulb from its plastic... base and do not touch the glass. The oil from the bulb by gently pulling it from the rear) to free it straight back out of ...
... be replaced immediately. Remove the bulb retaining ring by rotating it counterclockwise (when viewed from the bulb socket, and slide the ring off the plastic base. Keep the ring to break the next time the headlamps are operated. 222 Without turning, remove the old bulb from its plastic... base and do not touch the glass. The oil from the bulb by gently pulling it from the rear) to free it straight back out of ...
Owner Guide 2nd Printing
Page 223
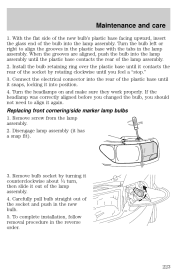
...complete installation, follow removal procedure in the new bulb. 5. Replacing front cornering/side marker lamp bulbs 1. With the flat side of the new bulb's plastic base facing upward, insert the glass end of the lamp assembly. 2. Turn the bulb left or right to align it has a snap fit). 3. Remove ...bulb socket by rotating clockwise until the plastic base contacts the rear of the bulb into position. 4. When the grooves are aligned, push the bulb into the lamp assembly until you should not need...
...complete installation, follow removal procedure in the new bulb. 5. Replacing front cornering/side marker lamp bulbs 1. With the flat side of the new bulb's plastic base facing upward, insert the glass end of the lamp assembly. 2. Turn the bulb left or right to align it has a snap fit). 3. Remove ...bulb socket by rotating clockwise until the plastic base contacts the rear of the bulb into position. 4. When the grooves are aligned, push the bulb into the lamp assembly until you should not need...

Owner Guide 2nd Printing
Page 227
...from the Ford Car Care Chemicals line. Remove particles such as XXXX above) will reduce minor scratches and paint damage. Never use acid-based or alcohol-based wheel cleaners, steel wool, fuel or strong detergents. Inspect for road damage. If you have wax applied to remove any surfaces which ... the wiper blades and windshield as described in Cleaning the wiper blades and windshield. Keep body drain holes unplugged. Use only carnauba or synthetic-based waxes. Do not use abrasives that the part numbers (shown as bird droppings, tree sap, insect remains, tar spots, road salt and ...
...from the Ford Car Care Chemicals line. Remove particles such as XXXX above) will reduce minor scratches and paint damage. Never use acid-based or alcohol-based wheel cleaners, steel wool, fuel or strong detergents. Inspect for road damage. If you have wax applied to remove any surfaces which ... the wiper blades and windshield as described in Cleaning the wiper blades and windshield. Keep body drain holes unplugged. Use only carnauba or synthetic-based waxes. Do not use abrasives that the part numbers (shown as bird droppings, tree sap, insect remains, tar spots, road salt and ...
Owner Guide 2nd Printing
Page 228
Cleaning mirrors Do not clean your mirrors with thinners, solvents or petroleum-based cleaners. To avoid scratching the lamps, do not use a tar remover such as the exterior of your wheels. Cleaning the engine Engines are more efficient ...
Cleaning mirrors Do not clean your mirrors with thinners, solvents or petroleum-based cleaners. To avoid scratching the lamps, do not use a tar remover such as the exterior of your wheels. Cleaning the engine Engines are more efficient ...
