
Owner's Manual
Page 2
... miles). Introduction ICONS Indicates a warning. BREAKING IN YOUR VEHICLE There are contained in . 2 This is necessary to give the moving parts a chance to others, your vehicle. We must all play our part in rules for a full explanation. Indicates that vehicle information related to such questions are no particular breaking-in protecting the...
... miles). Introduction ICONS Indicates a warning. BREAKING IN YOUR VEHICLE There are contained in . 2 This is necessary to give the moving parts a chance to others, your vehicle. We must all play our part in rules for a full explanation. Indicates that vehicle information related to such questions are no particular breaking-in protecting the...
Owner's Manual
Page 63
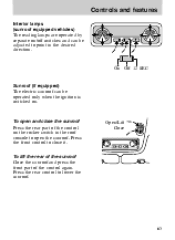
.../Lift Close 63 Press the front control to lower the sunroof. To lift the rear of the sunroof Close the sunroof and press the front part of the control on . To open the sunroof. Controls and features Interior lamps (sunroof equipped vehicles) The reading lamps are operated by separate on/off...
.../Lift Close 63 Press the front control to lower the sunroof. To lift the rear of the sunroof Close the sunroof and press the front part of the control on . To open the sunroof. Controls and features Interior lamps (sunroof equipped vehicles) The reading lamps are operated by separate on/off...
Owner's Manual
Page 70
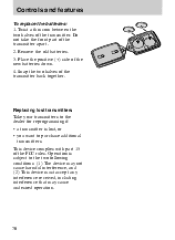
... dealer for reprogramming if: • a transmitter is subject to purchase additional transmitters. Do not take the front part of the transmitter back together. Snap the two halves of the transmitter apart. 2. This device complies with part 15 of the new batteries down. 4. Place the positive (+) side of the FCC rules. Remove the...
... dealer for reprogramming if: • a transmitter is subject to purchase additional transmitters. Do not take the front part of the transmitter back together. Snap the two halves of the transmitter apart. 2. This device complies with part 15 of the new batteries down. 4. Place the positive (+) side of the FCC rules. Remove the...

Owner's Manual
Page 85
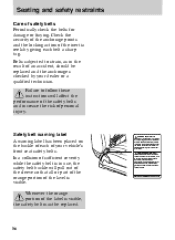
... not use extensions manufactured by flashing the Saftety belt light four times per second for three seconds, followed by three seconds with a safety belt extension (part number 611C22). Confirmation of the belt with the Saftety belt light off, then followed by the same supplier as the safety belt. Manufacturer identification is...
... not use extensions manufactured by flashing the Saftety belt light four times per second for three seconds, followed by three seconds with a safety belt extension (part number 611C22). Confirmation of the belt with the Saftety belt light off, then followed by the same supplier as the safety belt. Manufacturer identification is...
Owner's Manual
Page 86
... of the safety belts and increase the risk of collision. Failure to follow these instructions will pull out of the sleeve so that all or part of the orange portion of your dealer or a qualified technician. AVERTISSEMENT Remplacer l'ensemble de boucle de ceinture en cas de collision avec ce véhicule...
... of the safety belts and increase the risk of collision. Failure to follow these instructions will pull out of the sleeve so that all or part of the orange portion of your dealer or a qualified technician. AVERTISSEMENT Remplacer l'ensemble de boucle de ceinture en cas de collision avec ce véhicule...
Owner's Manual
Page 107
All vehicles built for sale include a tether hardware kit. 107 Seating and safety restraints Tether anchor hardware Tether anchor hardware kits (part number 613D74), including instructions, may be obtained at no charge from any Ford or LincolnMercury dealer.
All vehicles built for sale include a tether hardware kit. 107 Seating and safety restraints Tether anchor hardware Tether anchor hardware kits (part number 613D74), including instructions, may be obtained at no charge from any Ford or LincolnMercury dealer.
Owner's Manual
Page 155
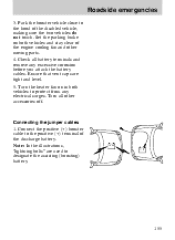
... the disabled vehicle, making sure the two vehicles do not touch. Note: In the illustrations, "lightning bolts" are tight and level. 5. Check all other moving parts. 4. Roadside emergencies 3. Park the booster vehicle close to designate the assisting (boosting) battery. 155 Connecting the jumper cables 1.
... the disabled vehicle, making sure the two vehicles do not touch. Note: In the illustrations, "lightning bolts" are tight and level. 5. Check all other moving parts. 4. Roadside emergencies 3. Park the booster vehicle close to designate the assisting (boosting) battery. 155 Connecting the jumper cables 1.
Owner's Manual
Page 156
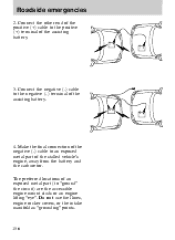
The preferred locations of an exposed metal part (to the positive (+) terminal of the positive (+) cable to "ground" the circuit) are the accessible engine mount studs or an engine lifting "eye". Do not ... the negative (-) terminal of the stalled vehicle's engine, away from the battery and the carburetor. Roadside emergencies 2. Connect the negative (-) cable to an exposed metal part of the assisting battery. 4.
The preferred locations of an exposed metal part (to the positive (+) terminal of the positive (+) cable to "ground" the circuit) are the accessible engine mount studs or an engine lifting "eye". Do not ... the negative (-) terminal of the stalled vehicle's engine, away from the battery and the carburetor. Roadside emergencies 2. Connect the negative (-) cable to an exposed metal part of the assisting battery. 4.
Owner's Manual
Page 158
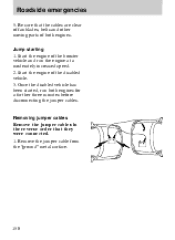
Start the engine of the disabled vehicle. 3. Jump starting 1. Start the engine of the booster vehicle and run both engines. Remove the jumper cable from the "ground" metal surface. 158 Removing jumper cables Remove the jumper cables in the reverse order that the cables are clear of fan blades, belts and other moving parts of both engines for a further three minutes before disconnecting the jumper cables. Once the disabled vehicle has been started, run the engine at a moderately increased speed. 2. Roadside emergencies 5. Be sure that they were connected. 1.
Start the engine of the disabled vehicle. 3. Jump starting 1. Start the engine of the booster vehicle and run both engines. Remove the jumper cable from the "ground" metal surface. 158 Removing jumper cables Remove the jumper cables in the reverse order that the cables are clear of fan blades, belts and other moving parts of both engines for a further three minutes before disconnecting the jumper cables. Once the disabled vehicle has been started, run the engine at a moderately increased speed. 2. Roadside emergencies 5. Be sure that they were connected. 1.
Owner's Manual
Page 162
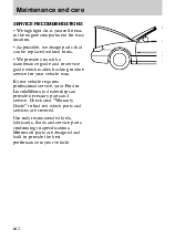
...the engine compartment for easy location. • As possible, we design parts that can be replaced without tools. • We provide you with a maintenance guide and or service guide which parts and services are designed and built to specifications. If your vehicle requires ...professional service, your vehicle easy. Check your "Warranty Guide" to find out which makes tracking routine service for your Ford or Lincoln/Mercury dealership can provide necessary parts and service....
...the engine compartment for easy location. • As possible, we design parts that can be replaced without tools. • We provide you with a maintenance guide and or service guide which parts and services are designed and built to specifications. If your vehicle requires ...professional service, your vehicle easy. Check your "Warranty Guide" to find out which makes tracking routine service for your Ford or Lincoln/Mercury dealership can provide necessary parts and service....
Owner's Manual
Page 163
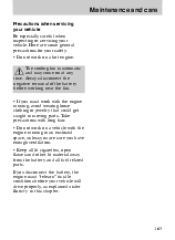
.... • If you have enough ventilation. • Keep all lit cigarettes, open flames and other lit material away from the battery and all fuel related parts. Take precautions with long hair. • Do not work on at any time. Maintenance and care Precautions when servicing your vehicle Be especially careful when...
.... • If you have enough ventilation. • Keep all lit cigarettes, open flames and other lit material away from the battery and all fuel related parts. Take precautions with long hair. • Do not work on at any time. Maintenance and care Precautions when servicing your vehicle Be especially careful when...
Owner's Manual
Page 173
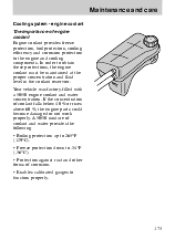
... protection down to -34°F (-36°C). • Protection against rust and other forms of coolant falls below 40 % or rises above 60 %, the engine parts could become damaged or not work properly. Your vehicle was factory-filled with a 50/50 engine coolant and water concentration. M A X MI N 173 Maintenance and care...
... protection down to -34°F (-36°C). • Protection against rust and other forms of coolant falls below 40 % or rises above 60 %, the engine parts could become damaged or not work properly. Your vehicle was factory-filled with a 50/50 engine coolant and water concentration. M A X MI N 173 Maintenance and care...
Owner's Manual
Page 174
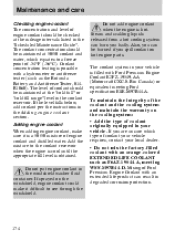
... coolant section. Maintenance and care Checking engine coolant The concentration and level of engine coolant should be burned if you spill coolant on hot engine parts. If sprayed on the cooling system: • Add the type of the coolant and the cooling system and maintain the warranty on the windshield, engine...
... coolant section. Maintenance and care Checking engine coolant The concentration and level of engine coolant should be burned if you spill coolant on hot engine parts. If sprayed on the cooling system: • Add the type of the coolant and the cooling system and maintain the warranty on the windshield, engine...
Owner's Manual
Page 187
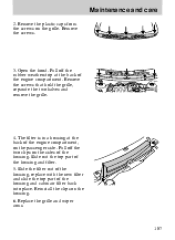
... from the screws on the housing. 6. Remove the screws that hold the grille, separate the two halves and remove the grille. 4. Slide out the top part of the housing and cabin air filter back into place. Slide the filter out of the housing, replace with the new filter and slide the... top part of the housing and filter. 5. Reinstall the clips on the grille. Maintenance and care 2. The filter is in a housing at the back of the engine...
... from the screws on the housing. 6. Remove the screws that hold the grille, separate the two halves and remove the grille. 4. Slide out the top part of the housing and cabin air filter back into place. Slide the filter out of the housing, replace with the new filter and slide the... top part of the housing and filter. 5. Reinstall the clips on the grille. Maintenance and care 2. The filter is in a housing at the back of the engine...
Owner's Manual
Page 188
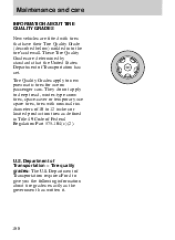
... grades: The U.S. Tire Quality Grades apply to give you the following information about tire grades exactly as defined in Title 49 Code of Federal Regulation Part 575.104(c)(2). Department of Transportation has set. These Tire Quality Grades are fitted with nominal rim diameters of 10 to 12 inches or limited production...
... grades: The U.S. Tire Quality Grades apply to give you the following information about tire grades exactly as defined in Title 49 Code of Federal Regulation Part 575.104(c)(2). Department of Transportation has set. These Tire Quality Grades are fitted with nominal rim diameters of 10 to 12 inches or limited production...
Owner's Manual
Page 200
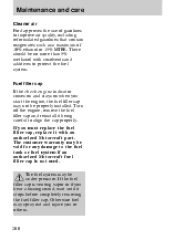
.... If you or others. 200 If the fuel filler cap is not used. Otherwise fuel may be no more than 5% methanol with an authorized Motorcraft part. There should be void for any damage to align the cap properly. Turn off the engine, remove the fuel filler cap and reinstall it being...
.... If you or others. 200 If the fuel filler cap is not used. Otherwise fuel may be no more than 5% methanol with an authorized Motorcraft part. There should be void for any damage to align the cap properly. Turn off the engine, remove the fuel filler cap and reinstall it being...

Owner's Manual
Page 202
... specified schedule. To make sure that the catalytic converter and other than Ford, Motorcraft, or Ford authorized parts are considered essential to the life and performance of components affecting emissions control, such non-Ford parts should be equivalent to its emissions system. Maintenance and care EMISSION CONTROL SYSTEM Your vehicle is moving... the "Scheduled Maintenance Guide" are required because they are used for maintenance replacements or for service of your vehicle and to genuine Ford Motor Company parts in performance and durability. 202
... specified schedule. To make sure that the catalytic converter and other than Ford, Motorcraft, or Ford authorized parts are considered essential to the life and performance of components affecting emissions control, such non-Ford parts should be equivalent to its emissions system. Maintenance and care EMISSION CONTROL SYSTEM Your vehicle is moving... the "Scheduled Maintenance Guide" are required because they are used for maintenance replacements or for service of your vehicle and to genuine Ford Motor Company parts in performance and durability. 202
Owner's Manual
Page 208
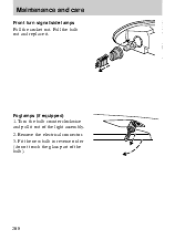
Maintenance and care Front turn signal/side lamps Pull the socket out. Turn the bulb counterclockwise and pull it . Remove the electrical connector. 3. Pull the bulb out and replace it out of the bulb). 208 Fit the new bulb in reverse order (do not touch the glass part of the light assembly. 2. Foglamps (if equipped) 1.
Maintenance and care Front turn signal/side lamps Pull the socket out. Turn the bulb counterclockwise and pull it . Remove the electrical connector. 3. Pull the bulb out and replace it out of the bulb). 208 Fit the new bulb in reverse order (do not touch the glass part of the light assembly. 2. Foglamps (if equipped) 1.
Owner's Manual
Page 218
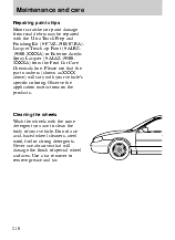
... Chemicals line. Cleaning the wheels Wash the wheels with the Ultra Touch Prep and Finishing Kit (# F7AZ-19K507-BA). Do not use abrasives that the part numbers (shown as XXXX above) will damage the finish of your vehicle's specific coloring. Use a tar remover to clean the body of special wheel surfaces...
... Chemicals line. Cleaning the wheels Wash the wheels with the Ultra Touch Prep and Finishing Kit (# F7AZ-19K507-BA). Do not use abrasives that the part numbers (shown as XXXX above) will damage the finish of your vehicle's specific coloring. Use a tar remover to clean the body of special wheel surfaces...
Owner's Manual
Page 219
... and dirt buildup act as insulators and keep the engine warmer than normal. water in the running ; The high pressure fluid could penetrate the sealed parts and cause damage. • Do not spray with cold water, to avoid cracking the engine block. • Cover the alternator to clean the engine. Follow...
... and dirt buildup act as insulators and keep the engine warmer than normal. water in the running ; The high pressure fluid could penetrate the sealed parts and cause damage. • Do not spray with cold water, to avoid cracking the engine block. • Cover the alternator to clean the engine. Follow...
