Owner's Manual
Page 6
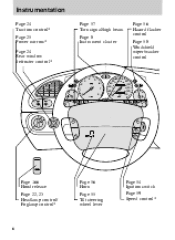
... 800 0 0 1 2 3 160100 30 40 10 180 1 20 20 0 0 0 0 200 120 1 0 130 BRAKE E F MPH CHECK ENGINE On Res MI RRORS Set Acc Off Coast Page 166 Hood release Page 22, 23 Headlamp control/ Foglamp control* Page 56 Horn Page 55 Tilt steering wheel lever Page 54 Ignition switch Page 59 Speed control* 6
... 800 0 0 1 2 3 160100 30 40 10 180 1 20 20 0 0 0 0 200 120 1 0 130 BRAKE E F MPH CHECK ENGINE On Res MI RRORS Set Acc Off Coast Page 166 Hood release Page 22, 23 Headlamp control/ Foglamp control* Page 56 Horn Page 55 Tilt steering wheel lever Page 54 Ignition switch Page 59 Speed control* 6
Owner's Manual
Page 28
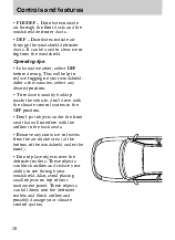
... (at the bottom of your instrument panel. This will interfere with the climate control system in the OFF position. • Don't put objects under the hood). • Do not place objects over the defroster outlets.
... (at the bottom of your instrument panel. This will interfere with the climate control system in the OFF position. • Don't put objects under the hood). • Do not place objects over the defroster outlets.

Owner's Manual
Page 32
.... • To reduce humidity buildup inside the vehicle, don't drive with the climate control system in the OFF position. • Don't put objects under the hood). • If your windshield.
.... • To reduce humidity buildup inside the vehicle, don't drive with the climate control system in the OFF position. • Don't put objects under the hood). • If your windshield.
Owner's Manual
Page 155
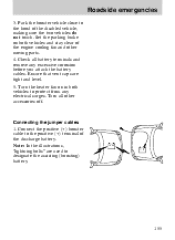
... to designate the assisting (boosting) battery. 155 Note: In the illustrations, "lightning bolts" are tight and level. 5. Ensure that vent caps are used to the hood of the engine cooling fan and other accessories off. Roadside emergencies 3. Connect the positive (+) booster cable to protect from any excessive corrosion before you attach...
... to designate the assisting (boosting) battery. 155 Note: In the illustrations, "lightning bolts" are tight and level. 5. Ensure that vent caps are used to the hood of the engine cooling fan and other accessories off. Roadside emergencies 3. Connect the positive (+) booster cable to protect from any excessive corrosion before you attach...
Owner's Manual
Page 166
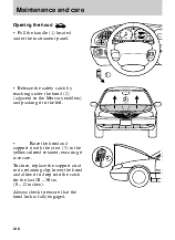
... CHECK ENGINE O/D OFF MI RRORS 1 • Release the safety catch by reaching under the hood (2) (adjacent to the Mercury emblem) and pushing it to ensure that the hood lock is secure. Always check to the left. 2 • Raise the hood and support it with the strut (3) in its retaining clip, lower the... hood and allow it is fully engaged. 3 166 To close, replace the support ...
... CHECK ENGINE O/D OFF MI RRORS 1 • Release the safety catch by reaching under the hood (2) (adjacent to the Mercury emblem) and pushing it to ensure that the hood lock is secure. Always check to the left. 2 • Raise the hood and support it with the strut (3) in its retaining clip, lower the... hood and allow it is fully engaged. 3 166 To close, replace the support ...
Owner's Manual
Page 169
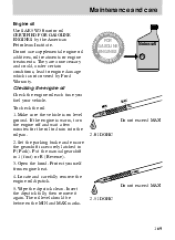
... TIT NS Motorcraft FOR GASOLINE ENGINES CE N PET ROLEUM I R T IFIE D Do not exceed MAX! 2.0 l DOHC NS TIT UTE 169 To check the oil: 1. Open the hood. Put the manual gearshift in P (Park). Maintenance and care Engine oil Use SAE 5W-30 motor oil CERTIFIED FOR GASOLINE ENGINES by Ford Warranty. If...
... TIT NS Motorcraft FOR GASOLINE ENGINES CE N PET ROLEUM I R T IFIE D Do not exceed MAX! 2.0 l DOHC NS TIT UTE 169 To check the oil: 1. Open the hood. Put the manual gearshift in P (Park). Maintenance and care Engine oil Use SAE 5W-30 motor oil CERTIFIED FOR GASOLINE ENGINES by Ford Warranty. If...
Owner's Manual
Page 187
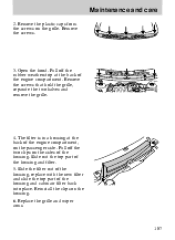
... grille and wiper arms. 187 Remove the screws. 3. Remove the screws that hold the grille, separate the two halves and remove the grille. 4. Open the hood. The filter is in a housing at the back of the engine compartment. Remove the plastic caps from the screws on the sides of the engine...
... grille and wiper arms. 187 Remove the screws. 3. Remove the screws that hold the grille, separate the two halves and remove the grille. 4. Open the hood. The filter is in a housing at the back of the engine compartment. Remove the plastic caps from the screws on the sides of the engine...
Owner's Manual
Page 204
Your vehicle may be a legal requirement to your vehicle's emission system is on the Vehicle Emission Control Information Decal located under the hood. This decal identifies engine displacement and gives some localities, it from working. Please consult your "Warranty Guide" for inspection/maintenance (I /M test of the on . 204 ...
Your vehicle may be a legal requirement to your vehicle's emission system is on the Vehicle Emission Control Information Decal located under the hood. This decal identifies engine displacement and gives some localities, it from working. Please consult your "Warranty Guide" for inspection/maintenance (I /M test of the on . 204 ...
Owner's Manual
Page 206
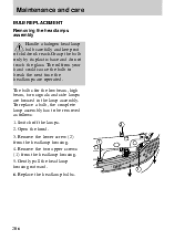
....Grasp the bulb only by its plastic base and do not touch the glass. Remove the two upper screws (1) from the headlamp housing. 4. Open the hood. 3. Replace the headlamp bulbs. 1 1 2 206 To replace a bulb, the complete lamp assembly has to break the next time the headlamps are housed in the lamp...
....Grasp the bulb only by its plastic base and do not touch the glass. Remove the two upper screws (1) from the headlamp housing. 4. Open the hood. 3. Replace the headlamp bulbs. 1 1 2 206 To replace a bulb, the complete lamp assembly has to break the next time the headlamps are housed in the lamp...
Owner's Manual
Page 214
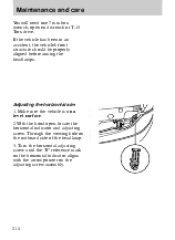
... You will need one 7 mm box wrench, open , locate the horizontal indicator and adjusting screw. Make sure the vehicle is on a level surface. 2.With the hood open end wrench or T-15 Torx drive. Turn the horizontal adjusting screw until the "0" reference mark on the horizontal indicator aligns with the arrow pointer...
... You will need one 7 mm box wrench, open , locate the horizontal indicator and adjusting screw. Make sure the vehicle is on a level surface. 2.With the hood open end wrench or T-15 Torx drive. Turn the horizontal adjusting screw until the "0" reference mark on the horizontal indicator aligns with the arrow pointer...
Owner's Manual
Page 215
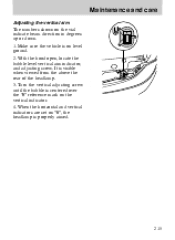
Turn the vertical adjusting screw until the bubble is properly aimed. 215 When the horizontal and vertical indicators are set on "0", the headlamp is centered over the "0" reference mark on the vertical indicator. 4. Make sure the vehicle is visible when viewed from the above the rear of the headlamp. 3. It is on the vial indicate beam direction in degrees up or down. 1. Maintenance and care Adjusting the vertical aim The numbers shown on level ground. 2. With the hood open, locate the bubble level vertical aim indicator, and adjusting screw.
Turn the vertical adjusting screw until the bubble is properly aimed. 215 When the horizontal and vertical indicators are set on "0", the headlamp is centered over the "0" reference mark on the vertical indicator. 4. Make sure the vehicle is visible when viewed from the above the rear of the headlamp. 3. It is on the vial indicate beam direction in degrees up or down. 1. Maintenance and care Adjusting the vertical aim The numbers shown on level ground. 2. With the hood open, locate the bubble level vertical aim indicator, and adjusting screw.
Owner's Manual
Page 216
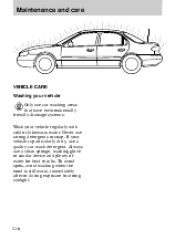
Never use a clean sponge, washing glove or similar device and plenty of water for best results. To avoid spots, avoid washing when the hood is particularly dirty, use a quality car wash detergent. Maintenance and care VEHICLE CARE Washing your vehicle Only use car washing areas that have environmentally friendly drainage systems. Wash your vehicle is still warm, immediately after or during exposure to strong sunlight. 216 If your vehicle regularly with cold or lukewarm water. Always use strong detergents or soap.
Never use a clean sponge, washing glove or similar device and plenty of water for best results. To avoid spots, avoid washing when the hood is particularly dirty, use a quality car wash detergent. Maintenance and care VEHICLE CARE Washing your vehicle Only use car washing areas that have environmentally friendly drainage systems. Wash your vehicle is still warm, immediately after or during exposure to strong sunlight. 216 If your vehicle regularly with cold or lukewarm water. Always use strong detergents or soap.
Owner's Manual
Page 239
... Bed mats Bedliners Car/truck covers Cargo liners, interior Carpet floor mats Cleaners, waxes and polishes Flat splash guards Frond end covers (full and mini) Hood deflectors Locking gas cap Lubricants and oils Molded splash guards Molded vinyl floor mats Rallye bars Rear air deflectors Rear decklid spoilers Side window air...
... Bed mats Bedliners Car/truck covers Cargo liners, interior Carpet floor mats Cleaners, waxes and polishes Flat splash guards Frond end covers (full and mini) Hood deflectors Locking gas cap Lubricants and oils Molded splash guards Molded vinyl floor mats Rallye bars Rear air deflectors Rear decklid spoilers Side window air...
Owner's Manual
Page 244
... H Page high beam ...57 replacing bulbs ...206 turning on and off ...22 warning chime ...19 High beams indicator light ...9 operation ...57 High-mount brakelamp ...210 Hood latch location ...166 release lever ...166 Horn ...56 I Identification Number, Vehicle (VIN) ...228 Idle, relearning ...185 Idle, speed ...185 Ignition chime ...19 positions on the...
... H Page high beam ...57 replacing bulbs ...206 turning on and off ...22 warning chime ...19 High beams indicator light ...9 operation ...57 High-mount brakelamp ...210 Hood latch location ...166 release lever ...166 Horn ...56 I Identification Number, Vehicle (VIN) ...228 Idle, relearning ...185 Idle, speed ...185 Ignition chime ...19 positions on the...
Owner's Manual
Page 248
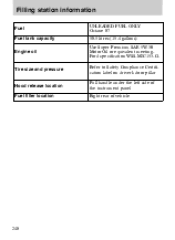
Filling station information Fuel Fuel tank capacity Engine oil UNLEADED FUEL ONLY Octane 87 58.5 litres (15.4 gallons) Use Super Premium SAE 5W-30 Motor Oil or equivalent meetingFord specification WSS-M2C153-G. Refer to Safety Compliance Certification label on driver's door pillar Pull handle under the left side of the instrument panel Right rear of vehicle Tire size and pressure Hood release location Fuel filler location 248
Filling station information Fuel Fuel tank capacity Engine oil UNLEADED FUEL ONLY Octane 87 58.5 litres (15.4 gallons) Use Super Premium SAE 5W-30 Motor Oil or equivalent meetingFord specification WSS-M2C153-G. Refer to Safety Compliance Certification label on driver's door pillar Pull handle under the left side of the instrument panel Right rear of vehicle Tire size and pressure Hood release location Fuel filler location 248
