Owner's Manual
Page 6
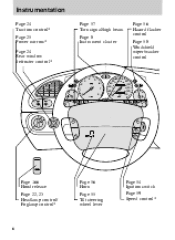
... 180 1 20 20 0 0 0 0 200 120 1 0 130 BRAKE E F MPH CHECK ENGINE On Res MI RRORS Set Acc Off Coast Page 166 Hood release Page 22, 23 Headlamp control/ Foglamp control* Page 56 Horn Page 55 Tilt steering wheel lever Page 54 Ignition switch Page 59 Speed control* 6
... 180 1 20 20 0 0 0 0 200 120 1 0 130 BRAKE E F MPH CHECK ENGINE On Res MI RRORS Set Acc Off Coast Page 166 Hood release Page 22, 23 Headlamp control/ Foglamp control* Page 56 Horn Page 55 Tilt steering wheel lever Page 54 Ignition switch Page 59 Speed control* 6

Owner's Manual
Page 9
The light also illuminates when the battery is switched on as a reminder to fasten the safety belts. Alternative design High beams Illuminates when the headlamp high beams are on. Alternative design Safety belt Illuminates when the ignition is not charging properly and the vehicle may require electrical system service. For ...
The light also illuminates when the battery is switched on as a reminder to fasten the safety belts. Alternative design High beams Illuminates when the headlamp high beams are on. Alternative design Safety belt Illuminates when the ignition is not charging properly and the vehicle may require electrical system service. For ...
Owner's Manual
Page 19
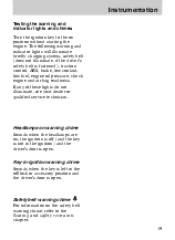
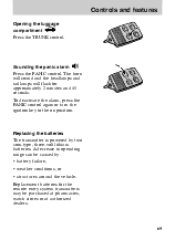
Safety belt warning chime For information on , the ignition is off /lock or accessory position and the driver's door is open . Headlamps on warning chime Sounds when the headlamps are on the safety belt warning chime, refer to the on position without starting the engine. Key-in-ignition warning chime Sounds when the...
Safety belt warning chime For information on , the ignition is off /lock or accessory position and the driver's door is open . Headlamps on warning chime Sounds when the headlamps are on the safety belt warning chime, refer to the on position without starting the engine. Key-in-ignition warning chime Sounds when the...
Owner's Manual
Page 23
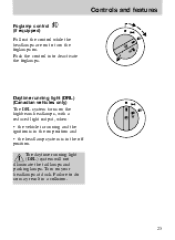
Daytime running light (DRL) (Canadian vehicles only) The DRL system turns on the highbeam headlamps, with a reduced light output, when: • the vehicle is running light (DRL) system will not illuminate the tail lamps and parking lamps. Failure to deactivate ...the foglamps. Push the control in to do so may result in a collision. 23 Turn on position and • the headlamp system is in the off position. Controls and features Foglamp control (if equipped) Pull out the control while the...
Daytime running light (DRL) (Canadian vehicles only) The DRL system turns on the highbeam headlamps, with a reduced light output, when: • the vehicle is running light (DRL) system will not illuminate the tail lamps and parking lamps. Failure to deactivate ...the foglamps. Push the control in to do so may result in a collision. 23 Turn on position and • the headlamp system is in the off position. Controls and features Foglamp control (if equipped) Pull out the control while the...
Owner's Manual
Page 69
... and 45 seconds. A decrease in operating range can be purchased at pharmacies, watch stores or at authorized dealers. 69 The horn will sound and the headlamps and tail lamps will flash for the remote entry system transmitters may be caused by two coin-type, three-volt lithium batteries. CK LO NIC...
... and 45 seconds. A decrease in operating range can be purchased at pharmacies, watch stores or at authorized dealers. 69 The horn will sound and the headlamps and tail lamps will flash for the remote entry system transmitters may be caused by two coin-type, three-volt lithium batteries. CK LO NIC...

Owner's Manual
Page 84
...unbuckle the safety belt three times, ending with the safety belt unbuckled. • After step 5, the Saftety belt warning light will be turned on the headlamps, turn off (approximately one minute). • Steps 3-5 must be completed within 60 seconds or the procedure will enable Belt Minder if it is currently... disabled, or disable Belt Minder if it is unbuckled. • the parklamps/headlamps are closed. • the driver's safety belt is currently enabled. 84 Wait until the Saftety belt warning light turns off the...
...unbuckle the safety belt three times, ending with the safety belt unbuckled. • After step 5, the Saftety belt warning light will be turned on the headlamps, turn off (approximately one minute). • Steps 3-5 must be completed within 60 seconds or the procedure will enable Belt Minder if it is currently... disabled, or disable Belt Minder if it is unbuckled. • the parklamps/headlamps are closed. • the driver's safety belt is currently enabled. 84 Wait until the Saftety belt warning light turns off the...
Owner's Manual
Page 111
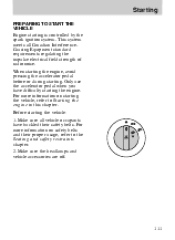
... proper usage, refer to Starting the engine in this chapter. For more information on safety belts and their safety belts. Before starting . Make sure the headlamps and vehicle accessories are off. 111 When starting the engine, avoid pressing the accelerator pedal before or during starting the vehicle: 1. Make sure all Canadian...
... proper usage, refer to Starting the engine in this chapter. For more information on safety belts and their safety belts. Before starting . Make sure the headlamps and vehicle accessories are off. 111 When starting the engine, avoid pressing the accelerator pedal before or during starting the vehicle: 1. Make sure all Canadian...

Owner's Manual
Page 145
... 20 Ignition, Electronic Engine Control 12 - Not used 13 20 HEGO sensor 14 7.5 ABS module 15 7.5 Low beam headlamp (passenger's side) 16 7.5 Low beam headlamp (driver's side) 17 7.5 High beam headlamp (passenger's side) 18 7.5 High beam headlamp (driver's side) 39 - Not used 40 20* Ignition, light switch, central junction box 41 20* EEC relay...
... 20 Ignition, Electronic Engine Control 12 - Not used 13 20 HEGO sensor 14 7.5 ABS module 15 7.5 Low beam headlamp (passenger's side) 16 7.5 Low beam headlamp (driver's side) 17 7.5 High beam headlamp (passenger's side) 18 7.5 High beam headlamp (driver's side) 39 - Not used 40 20* Ignition, light switch, central junction box 41 20* EEC relay...
Owner's Manual
Page 206
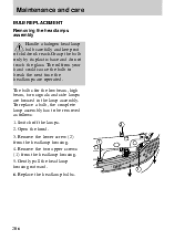
...Gently pull the headlamp housing outward. 6. Replace the headlamp bulbs. 1 1 2 206 Open the hood. 3. Remove the lower screw (2) from the headlamp housing. 5. The bulbs for the low beam, high beam, turn signals and side lamps are operated. Remove the two upper screws (1) from the headlamp housing. 4. The... oil from your hand could cause the bulb to be removed as follows: 1. Maintenance and care BULB REPLACEMENT Removing the headlamps assembly Handle a halogen headlamp bulb carefully and keep out of children's reach.Grasp the bulb only by its plastic base and do not touch the...
...Gently pull the headlamp housing outward. 6. Replace the headlamp bulbs. 1 1 2 206 Open the hood. 3. Remove the lower screw (2) from the headlamp housing. 5. The bulbs for the low beam, high beam, turn signals and side lamps are operated. Remove the two upper screws (1) from the headlamp housing. 4. The... oil from your hand could cause the bulb to be removed as follows: 1. Maintenance and care BULB REPLACEMENT Removing the headlamps assembly Handle a halogen headlamp bulb carefully and keep out of children's reach.Grasp the bulb only by its plastic base and do not touch the...
Owner's Manual
Page 207
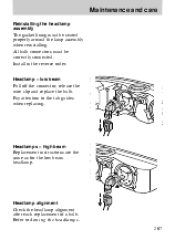
Pay attention to Aiming the headlamps. 207 Headlamps - high beam Replacement instructions are the same as for the low beam headlamp. Install in the reverse order. Headlamp alignment Check the headlamp alignment after each replacement of a bulb. Headlamp - low beam Pull off the connector, release the wire clip and replace the bulb. All bulb connectors must be correctly connected. Maintenance and care Reinstalling the headlamp assembly The gasket lining must be seated properly around the lamp assembly when reinstalling. Refer to the tab guides when replacing.
Pay attention to Aiming the headlamps. 207 Headlamps - high beam Replacement instructions are the same as for the low beam headlamp. Install in the reverse order. Headlamp alignment Check the headlamp alignment after each replacement of a bulb. Headlamp - low beam Pull off the connector, release the wire clip and replace the bulb. All bulb connectors must be correctly connected. Maintenance and care Reinstalling the headlamp assembly The gasket lining must be seated properly around the lamp assembly when reinstalling. Refer to the tab guides when replacing.
Owner's Manual
Page 212
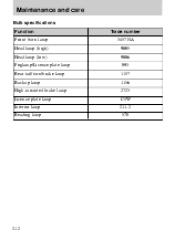
Maintenance and care Bulb specifications Function Front /turn lamp Headlamp (high) Headlamp (low) Foglamp/License plate lamp Rear tail/turn/brake lamp Backup lamp High-mounted brake lamp License plate lamp Interior lamp Reading lamp Trade number 3457 NA 9005 9006 893 1157 1156 2723 C5W 211-2 578 212
Maintenance and care Bulb specifications Function Front /turn lamp Headlamp (high) Headlamp (low) Foglamp/License plate lamp Rear tail/turn/brake lamp Backup lamp High-mounted brake lamp License plate lamp Interior lamp Reading lamp Trade number 3457 NA 9005 9006 893 1157 1156 2723 C5W 211-2 578 212
Owner's Manual
Page 213
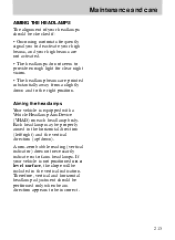
... only when beam direction appears to be properly aimed in the vertical indication. If your vehicle is equipped with a Vehicle Headlamp Aim Device (VHAD) on a level surface, the slope will be checked if: • Oncoming motorists frequently signal you...pointed substantially away from a slightly down ). Maintenance and care AIMING THE HEADLAMPS The alignment of -aim headlamps. Aiming the headlamps Your vehicle is not positioned on each headlamp body. Therefore, vertical and horizontal headlamp adjustment should be included in the horizontal direction (left/right) and the...
... only when beam direction appears to be properly aimed in the vertical indication. If your vehicle is equipped with a Vehicle Headlamp Aim Device (VHAD) on a level surface, the slope will be checked if: • Oncoming motorists frequently signal you...pointed substantially away from a slightly down ). Maintenance and care AIMING THE HEADLAMPS The alignment of -aim headlamps. Aiming the headlamps Your vehicle is not positioned on each headlamp body. Therefore, vertical and horizontal headlamp adjustment should be included in the horizontal direction (left/right) and the...
Owner's Manual
Page 214
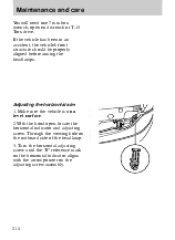
... end wrench or T-15 Torx drive. If the vehicle has been in an accident, the vehicle's front structure should be properly aligned before aiming the headlamps. Adjusting the horizontal aim 1. Turn the horizontal adjusting screw until the "0" reference mark on the horizontal indicator aligns with the arrow pointer on the outboard...
... end wrench or T-15 Torx drive. If the vehicle has been in an accident, the vehicle's front structure should be properly aligned before aiming the headlamps. Adjusting the horizontal aim 1. Turn the horizontal adjusting screw until the "0" reference mark on the horizontal indicator aligns with the arrow pointer on the outboard...
Owner's Manual
Page 215
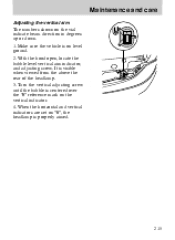
Maintenance and care Adjusting the vertical aim The numbers shown on the vertical indicator. 4. With the hood open, locate the bubble level vertical aim indicator, and adjusting screw. Turn the vertical adjusting screw until the bubble is centered over the "0" reference mark on the vial indicate beam direction in degrees up or down. 1. When the horizontal and vertical indicators are set on level ground. 2. Make sure the vehicle is on "0", the headlamp is visible when viewed from the above the rear of the headlamp. 3. It is properly aimed. 215
Maintenance and care Adjusting the vertical aim The numbers shown on the vertical indicator. 4. With the hood open, locate the bubble level vertical aim indicator, and adjusting screw. Turn the vertical adjusting screw until the bubble is centered over the "0" reference mark on the vial indicate beam direction in degrees up or down. 1. When the horizontal and vertical indicators are set on level ground. 2. Make sure the vehicle is on "0", the headlamp is visible when viewed from the above the rear of the headlamp. 3. It is properly aimed. 215
Owner's Manual
Page 242
... seat folding up the seat ...102 inspection after a collision ...102 interlock safety feature ...98 operation ...97 retractors ...98 Break-in period ...2 Bulbs, replacing foglamps ...208 headlamps ...206 high-mounted brake lamp ...210 license plate lamp ...209 rear lamps ...209 specifications ...212 C Cabin air filter ...33, 186 Capacities for refilling fluids ...224...
... seat folding up the seat ...102 inspection after a collision ...102 interlock safety feature ...98 operation ...97 retractors ...98 Break-in period ...2 Bulbs, replacing foglamps ...208 headlamps ...206 high-mounted brake lamp ...210 license plate lamp ...209 rear lamps ...209 specifications ...212 C Cabin air filter ...33, 186 Capacities for refilling fluids ...224...
Owner's Manual
Page 244
... trip odometer ...20 GAWR (Gross Axle Weight Rating) ...131 Gearshift ...123, 128 GVWR (Gross Vehicle Weight Rating) .131 H Hazard flashers ...56, 141 Head restraints ...74 Headlamps aiming ...213 bulb specifications ...212 daytime running light ...23 flashing ...57 244 H Page high beam ...57 replacing bulbs ...206 turning on and off ...22 warning...
... trip odometer ...20 GAWR (Gross Axle Weight Rating) ...131 Gearshift ...123, 128 GVWR (Gross Vehicle Weight Rating) .131 H Hazard flashers ...56, 141 Head restraints ...74 Headlamps aiming ...213 bulb specifications ...212 daytime running light ...23 flashing ...57 244 H Page high beam ...57 replacing bulbs ...206 turning on and off ...22 warning...

Owner's Manual
Page 245
Index L Page Lamps bulb replacement specification chart ...212 daytime running light system . .23 flashing the lamps ...57 foglamps ...23, 208 hazard flashers ...56, 141 headlamps ...22 high beams ...57 high-mounted brake lamp ...210 instrument panel, dimming ...25 interior lamps ...62 reading lamps ...62 replacing bulbs ...206 rear lamps ...209 ...
Index L Page Lamps bulb replacement specification chart ...212 daytime running light system . .23 flashing the lamps ...57 foglamps ...23, 208 hazard flashers ...56, 141 headlamps ...22 high beams ...57 high-mounted brake lamp ...210 instrument panel, dimming ...25 interior lamps ...62 reading lamps ...62 replacing bulbs ...206 rear lamps ...209 ...
Owner's Manual
Page 247
... ...216 Vehicle Identification Number (VIN) ...228 Vehicle Emission Control Information(VECI) ...204 Vehicle loading ...130 Ventilating your vehicle ...109 Viscosity (see Engine oil) W Warning chimes headlamps on ...19 key in ignition ...19 safety belt ...19 Warning lights (see Lights) Washer fluid reservoir ...167, 168 Weight limits (GAWR, GVWR) .130 Wheels cleaning...
... ...216 Vehicle Identification Number (VIN) ...228 Vehicle Emission Control Information(VECI) ...204 Vehicle loading ...130 Ventilating your vehicle ...109 Viscosity (see Engine oil) W Warning chimes headlamps on ...19 key in ignition ...19 safety belt ...19 Warning lights (see Lights) Washer fluid reservoir ...167, 168 Weight limits (GAWR, GVWR) .130 Wheels cleaning...