Owner's Manual
Page 208
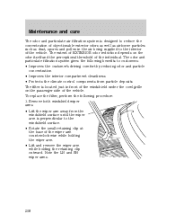
... the concentration of objectionable exterior odors as well as airborne particles such as dust, spores and pollen in front of the windshield under the cowl grille on the odor itself and the perceptional threshold of the vehicle. Note the LH and RH wiper arms. 208 To replace the filter, perform the...
... the concentration of objectionable exterior odors as well as airborne particles such as dust, spores and pollen in front of the windshield under the cowl grille on the odor itself and the perceptional threshold of the vehicle. Note the LH and RH wiper arms. 208 To replace the filter, perform the...
Owner's Manual
Page 209
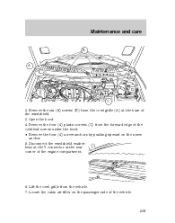
Locate the cabin air filter on the screw anchor. 5. Disconnect the windshield washer hose at the Y connector at the base of the cowl leaf screen under the hood. • Remove the four (4) screw anchors by pushing upward on the passenger side of the engine compartment. 6. Lift the cowl grille from the cowl grille (A) at the rear corner of the vehicle. 209 Remove the four (4) plastic screws (C) from the forward edge of the windshield. 3. Open the hood. 4. Maintenance and care B A C 2. Remove the six (6) screws (B) from the vehicle. 7.
Locate the cabin air filter on the screw anchor. 5. Disconnect the windshield washer hose at the Y connector at the base of the cowl leaf screen under the hood. • Remove the four (4) screw anchors by pushing upward on the passenger side of the engine compartment. 6. Lift the cowl grille from the cowl grille (A) at the rear corner of the vehicle. 209 Remove the four (4) plastic screws (C) from the forward edge of the windshield. 3. Open the hood. 4. Maintenance and care B A C 2. Remove the six (6) screws (B) from the vehicle. 7.

Owner's Manual
Page 211
... and press it from the windshield and lock into place until the small retaining clip snaps into the locked position. 20. Position the cowl grille in the cowl grille. 18. Maintenance and care 14. Reinstall the four (4) screw anchors and the four (4) plastic screws. 16. Reinstall the wiper arms. Ensure that you...
... and press it from the windshield and lock into place until the small retaining clip snaps into the locked position. 20. Position the cowl grille in the cowl grille. 18. Maintenance and care 14. Reinstall the four (4) screw anchors and the four (4) plastic screws. 16. Reinstall the wiper arms. Ensure that you...

Owner's Manual
Page 208
... the concentration of objectionable exterior odors as well as airborne particles such as dust, spores and pollen in front of the windshield under the cowl grille on the odor itself and the perceptional threshold of the individual. The extent of EXTERIOR odor reduction depends on the passenger side of the vehicle...
... the concentration of objectionable exterior odors as well as airborne particles such as dust, spores and pollen in front of the windshield under the cowl grille on the odor itself and the perceptional threshold of the individual. The extent of EXTERIOR odor reduction depends on the passenger side of the vehicle...

Owner's Manual
Page 209
Open the hood. 4. Disconnect the windshield washer hose at the Y connector at the base of the windshield. 3. Lift the cowl grille from the cowl grille (A) at the rear corner of the vehicle. 209 Locate the cabin air filter on the screw anchor. 5. Remove the six (6) screws (B) from the vehicle. 7. Remove the four (4) plastic screws (C) from the forward edge of the cowl leaf screen under the hood. • Remove the four (4) screw anchors by pushing upward on the passenger side of the engine compartment. 6. Maintenance and care B A C 2.
Open the hood. 4. Disconnect the windshield washer hose at the Y connector at the base of the windshield. 3. Lift the cowl grille from the cowl grille (A) at the rear corner of the vehicle. 209 Locate the cabin air filter on the screw anchor. 5. Remove the six (6) screws (B) from the vehicle. 7. Remove the four (4) plastic screws (C) from the forward edge of the cowl leaf screen under the hood. • Remove the four (4) screw anchors by pushing upward on the passenger side of the engine compartment. 6. Maintenance and care B A C 2.
Owner's Manual
Page 211
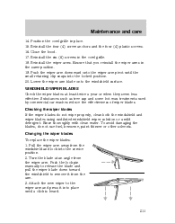
...position. 20. Attach the new wiper to remove it into place until the small retaining clip snaps into the service position. 2. Position the cowl grille in the same position. 19. Reinstall the wiper arms. Ensure that you reinstall the wiper arms in place. 15. Close the hood. 17.... the windshield surface. WINDSHIELD WIPER BLADES Check the wiper blades at an angle from the arm. 3. Reinstall the six (6) screws in the cowl grille. 18. Rinse thoroughly with clean water. Checking the wiper blades If the wiper blades do not use fuel, kerosene, paint thinner or other solvents...
...position. 20. Attach the new wiper to remove it into place until the small retaining clip snaps into the service position. 2. Position the cowl grille in the same position. 19. Reinstall the wiper arms. Ensure that you reinstall the wiper arms in place. 15. Close the hood. 17.... the windshield surface. WINDSHIELD WIPER BLADES Check the wiper blades at an angle from the arm. 3. Reinstall the six (6) screws in the cowl grille. 18. Rinse thoroughly with clean water. Checking the wiper blades If the wiper blades do not use fuel, kerosene, paint thinner or other solvents...
