Scheduled Maintenance Guide 3rd Printing
Page 9
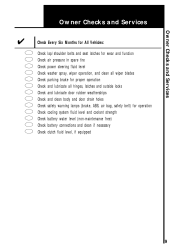
... washer spray, wiper operation, and clean all wiper blades parking brake for proper operation and lubricate all hinges, latches and outside locks and lubricate door rubber weatherstrips and clean body and door drain holes safety warning lamps (brake, ABS, air bag, safety belt) for operation cooling system fluid level and coolant strength battery...
... washer spray, wiper operation, and clean all wiper blades parking brake for proper operation and lubricate all hinges, latches and outside locks and lubricate door rubber weatherstrips and clean body and door drain holes safety warning lamps (brake, ABS, air bag, safety belt) for operation cooling system fluid level and coolant strength battery...

Owner Guide 1st Printing
Page 11
... Seating and safety restraints chapter. Key-in-ignition warning chime Sounds when the key is left in the ignition in the ignition) and the driver's door is opened . Headlamps on warning chime Sounds when the headlamps or parking lamps are on the safety belt warning chime, refer to fasten your safety... bag readiness Momentarily illuminates when the ignition is opened . 11 For information on , the ignition is off (and the key is not in the OFF/LOCK or ACC position and the driver's door is turned ON.
... Seating and safety restraints chapter. Key-in-ignition warning chime Sounds when the key is left in the ignition in the ignition) and the driver's door is opened . Headlamps on warning chime Sounds when the headlamps or parking lamps are on the safety belt warning chime, refer to fasten your safety... bag readiness Momentarily illuminates when the ignition is opened . 11 For information on , the ignition is off (and the key is not in the OFF/LOCK or ACC position and the driver's door is turned ON.

Owner Guide 1st Printing
Page 49
... allows only the driver to stop window operation. Depress again to operate the WINDOW LOCK power windows. Accessory delay (if equipped) With accessory delay, the window switches may be used for the driver's press the left side of the rocker ... fully. Controls and features • Press the bottom portion of the control. AUTO One touch down • Press AUTO completely down and release quickly. To lock out all the window controls except for up to ten minutes after the ignition switch is turned to restore the window controls. Press the right...
... allows only the driver to stop window operation. Depress again to operate the WINDOW LOCK power windows. Accessory delay (if equipped) With accessory delay, the window switches may be used for the driver's press the left side of the rocker ... fully. Controls and features • Press the bottom portion of the control. AUTO One touch down • Press AUTO completely down and release quickly. To lock out all the window controls except for up to ten minutes after the ignition switch is turned to restore the window controls. Press the right...

Owner Guide 1st Printing
Page 50
...50 to tilt the mirror. When locking, turn it once toward the back of the vehicle to lock all doors. Controls and features POWER DOOR LOCKS (IF EQUIPPED) Press U to unlock all doors and L to unlock all doors. Turn the key a second time to lock all doors. POWER SIDE VIEW MIRRORS To ...adjust your mirrors: to lock mirrors in the direction you wish ...
...50 to tilt the mirror. When locking, turn it once toward the back of the vehicle to lock all doors. Controls and features POWER DOOR LOCKS (IF EQUIPPED) Press U to unlock all doors and L to unlock all doors. Turn the key a second time to lock all doors. POWER SIDE VIEW MIRRORS To ...adjust your mirrors: to lock mirrors in the direction you wish ...

Owner Guide 1st Printing
Page 51
Controls and features Heated outside when the doors are set, the rear doors cannot be set the lock for each door. Setting the lock for one door will not automatically set separately for both doors. Move lock control up to disengage childproof locks. 51 Move control down to engage the lock. CHILDPROOF DOOR LOCKS When these locks are unlocked. Do not remove ice from...
Controls and features Heated outside when the doors are set, the rear doors cannot be set the lock for each door. Setting the lock for one door will not automatically set separately for both doors. Move lock control up to disengage childproof locks. 51 Move control down to engage the lock. CHILDPROOF DOOR LOCKS When these locks are unlocked. Do not remove ice from...

Owner Guide 1st Printing
Page 56
... is not securely installed. The clutch will now engage and stop or accident if it into the side mounting brackets and check to lock or unlock all vehicle doors and liftgate without a key. The cover may cause injury in the right end cap (marked RH) about 1⁄4 of the total length to...
... is not securely installed. The clutch will now engage and stop or accident if it into the side mounting brackets and check to lock or unlock all vehicle doors and liftgate without a key. The cover may cause injury in the right end cap (marked RH) about 1⁄4 of the total length to...

Owner Guide 1st Printing
Page 57
...liftgate/trunk Press the control to unlock all doors. Controls and features Unlocking the doors Press this control to lock all doors. To confirm all doors are ajar, the horn will make two quick chirps, reminding you to properly close all doors. The doors will lock again, the horn will chirp and the ...lamps will illuminate. If any of the doors are closed and locked, press the control a second time within five seconds to unlock the liftgate/ ...
...liftgate/trunk Press the control to unlock all doors. Controls and features Unlocking the doors Press this control to lock all doors. To confirm all doors are ajar, the horn will make two quick chirps, reminding you to properly close all doors. The doors will lock again, the horn will chirp and the ...lamps will illuminate. If any of the doors are closed and locked, press the control a second time within five seconds to unlock the liftgate/ ...

Owner Guide 1st Printing
Page 59
When completed, turn from your vehicle. The doors will allow you purchase additional transmitters (up to four may be up to confirm completion of program mode. All transmitters must be caused by one ... features Replacing lost transmitters Take all transmitters (up to 10 meters (33 feet) away from OFF to the vehicle 59 After doors lock/unlock, press any control on all your vehicle's transmitters to OFF. Typical operating range will lock/unlock one coin type three-volt lithium battery CR2032 or equivalent. A decrease in ON.
When completed, turn from your vehicle. The doors will allow you purchase additional transmitters (up to four may be up to confirm completion of program mode. All transmitters must be caused by one ... features Replacing lost transmitters Take all transmitters (up to 10 meters (33 feet) away from OFF to the vehicle 59 After doors lock/unlock, press any control on all your vehicle's transmitters to OFF. Typical operating range will lock/unlock one coin type three-volt lithium battery CR2032 or equivalent. A decrease in ON.

Owner Guide 1st Printing
Page 60
... replace the battery: 1. Twist a thin coin between the two halves of the following actions will prearm the alarm system: • Press the remote entry lock control (doors opened or closed). 60 Place the positive (+) side of the battery will chirp the horn. The remote transmitter should operate normally after battery replacement. PERIMETER...
... replace the battery: 1. Twist a thin coin between the two halves of the following actions will prearm the alarm system: • Press the remote entry lock control (doors opened or closed). 60 Place the positive (+) side of the battery will chirp the horn. The remote transmitter should operate normally after battery replacement. PERIMETER...

Owner Guide 1st Printing
Page 61
...to let you press the lock control twice within 5 seconds on the keyless entry pad at the same time to lock the doors (doors opened or closed). • Open a door and press the power door lock control to lock the doors. • Use the door key to lock the doors (doors opened or closed and ...you that the system is waiting for the door to close or liftgate to confirm the doors are locked, the ...
...to let you press the lock control twice within 5 seconds on the keyless entry pad at the same time to lock the doors (doors opened or closed). • Open a door and press the power door lock control to lock the doors. • Use the door key to lock the doors (doors opened or closed and ...you that the system is waiting for the door to close or liftgate to confirm the doors are locked, the ...

Owner Guide 1st Printing
Page 62
... on the remote entry transmitter. Controls and features Disarming the system You can : • lock or unlock the vehicle doors and liftgate (wagons) without using your keyless entry pad. • Unlock the doors or liftgate with a key. This will disarm the system when the alarm is sounding. Turn... the key full travel (toward the front of the following actions: • Unlock the doors by using your remote entry transmitter. • Unlock the doors by 1 2 3 4 5 6 7 8 9 0 using the key. • arm and disarm the perimeter alarm system (if ...
... on the remote entry transmitter. Controls and features Disarming the system You can : • lock or unlock the vehicle doors and liftgate (wagons) without using your keyless entry pad. • Unlock the doors or liftgate with a key. This will disarm the system when the alarm is sounding. Turn... the key full travel (toward the front of the following actions: • Unlock the doors by using your remote entry transmitter. • Unlock the doors by 1 2 3 4 5 6 7 8 9 0 using the key. • arm and disarm the perimeter alarm system (if ...
Owner Guide 1st Printing
Page 65
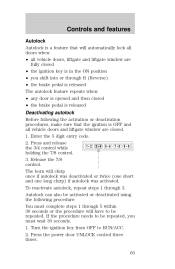
... 1. To reactivate autolock, repeat steps 1 through R (Reverse) • the brake pedal is released The autolock feature repeats when: • any door is opened and then closed • the ignition key is in the ON position • you must complete steps 1 through 5 within 30 seconds... Autolock can also be repeated, you shift into or through 3. Press the power door UNLOCK control three times. 65 Release the 7/8 control. The horn will automatically lock all doors when: • all vehicle doors, liftgate and liftgate window are fully closed • the brake pedal is released ...
... 1. To reactivate autolock, repeat steps 1 through R (Reverse) • the brake pedal is released The autolock feature repeats when: • any door is opened and then closed • the ignition key is in the ON position • you must complete steps 1 through 5 within 30 seconds... Autolock can also be repeated, you shift into or through 3. Press the power door UNLOCK control three times. 65 Release the 7/8 control. The horn will automatically lock all doors when: • all vehicle doors, liftgate and liftgate window are fully closed • the brake pedal is released ...
Owner Guide 1st Printing
Page 66
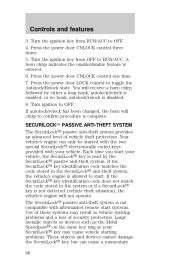
...Use of these systems may cause vehicle starting problems and a loss of vehicle theft protection. Press the power door UNLOCK control three times. 5. Press the power door LOCK control to start. You will receive a horn chirp followed by the SecuriLock passive anti-theft system. ...Controls and features 3. Press the power door UNLOCK control one time. 7. SECURILOCKி PASSIVE ANTI-THEFT SYSTEM The ...
...Use of these systems may cause vehicle starting problems and a loss of vehicle theft protection. Press the power door UNLOCK control three times. 5. Press the power door LOCK control to start. You will receive a horn chirp followed by the SecuriLock passive anti-theft system. ...Controls and features 3. Press the power door UNLOCK control one time. 7. SECURILOCKி PASSIVE ANTI-THEFT SYSTEM The ...

Owner Guide 1st Printing
Page 122
... 15 10A Multifunction Switch (Turn Signal) 16 - Accessory Delay Relay 122 Battery Saver Relay 35 - Driver Door Unlock Relay 36 - Interior Lamp Relay 38 - Not Used 32 10A ICP, Heated Mirrors 33 5A Power Windows, Lock Illumination 34 - One Touch Window Down Relay 39 - Not Used 17 30A Front Wiper/Washer 18...
... 15 10A Multifunction Switch (Turn Signal) 16 - Accessory Delay Relay 122 Battery Saver Relay 35 - Driver Door Unlock Relay 36 - Interior Lamp Relay 38 - Not Used 32 10A ICP, Heated Mirrors 33 5A Power Windows, Lock Illumination 34 - One Touch Window Down Relay 39 - Not Used 17 30A Front Wiper/Washer 18...

Owner Guide 1st Printing
Page 183
... LUBRICANT SPECIFICATIONS Items Ford Part Name or equivalent Brake fluid High Performance DOT 3 Motor Vehicle Brake Fluid Door latch, Multihood latch, Purpose auxiliary Grease hood latch, seat tracks, trunk and liftgate latches Lock Penetrating cylinders and Lock Lubricant Automatic Motorcraft transaxle MER(AX4S and CONV AX4N) ATF Engine oil Motorcraft 5W-30...
... LUBRICANT SPECIFICATIONS Items Ford Part Name or equivalent Brake fluid High Performance DOT 3 Motor Vehicle Brake Fluid Door latch, Multihood latch, Purpose auxiliary Grease hood latch, seat tracks, trunk and liftgate latches Lock Penetrating cylinders and Lock Lubricant Automatic Motorcraft transaxle MER(AX4S and CONV AX4N) ATF Engine oil Motorcraft 5W-30...

Owner Guide 1st Printing
Page 205
...-theft system . 60,67 arming the system .. 60 disarming a triggered system ...62 Automatic transaxle . 105 driving with ...107,108,109 Brakes ...101 anti-lock ...101,102 anti-lock brake system (ABS) warning light ...102 fluid, checking and adding ...141 shift interlock ...105 Break-in period ...2,3 Cargo area shade ...55 Cargo cover ...55... ...189 Getting the service you need ...191,192 Ordering additional owner's literature . 203 The Dispute Settlement Board . 193 194,195,196 Defrost rear window ...18 Doors central unlocking ...50 205
...-theft system . 60,67 arming the system .. 60 disarming a triggered system ...62 Automatic transaxle . 105 driving with ...107,108,109 Brakes ...101 anti-lock ...101,102 anti-lock brake system (ABS) warning light ...102 fluid, checking and adding ...141 shift interlock ...105 Break-in period ...2,3 Cargo area shade ...55 Cargo cover ...55... ...189 Getting the service you need ...191,192 Ordering additional owner's literature . 203 The Dispute Settlement Board . 193 194,195,196 Defrost rear window ...18 Doors central unlocking ...50 205

Owner Guide 1st Printing
Page 206
... conditioning system ...18,19,21 Hood ...136 Ignition ...184 Inspection/maintenance (I/M) testing ...168 Instrument panel ...6 cleaning ...178 Keyless entry system autolock ...65 keypad ...62 locking and unlocking doors ...64 programming entry code ...63,64 Keys positions of the ignition ...40 Lamps autolamp system ...17 daytime running light ...16 headlamps ...16 headlamps, flash...
... conditioning system ...18,19,21 Hood ...136 Ignition ...184 Inspection/maintenance (I/M) testing ...168 Instrument panel ...6 cleaning ...178 Keyless entry system autolock ...65 keypad ...62 locking and unlocking doors ...64 programming entry code ...63,64 Keys positions of the ignition ...40 Lamps autolamp system ...17 daytime running light ...16 headlamps ...16 headlamps, flash...

Owner Guide 1st Printing
Page 207
...50 Moon roof ...48 Motorcraft parts ...162 Octane rating ...161 Overdrive ...106 Parking brake ...103 Power distribution box (see Fuses) ...123 Power door locks ...50 Power steering ...104 fluid, checking and adding ...146,147 Radio ...29,30,31 32,33,34,35,36 Relays ...119,125 Remote ...entry system ...56,58 illuminated entry ...58 locking/unlocking doors ...57 replacement/additional transmitters ...59 replacing the batteries ...59 Roof rack ...117 Safety Compliance Certification Label .. 187 Safety defects, reporting ...204...
...50 Moon roof ...48 Motorcraft parts ...162 Octane rating ...161 Overdrive ...106 Parking brake ...103 Power distribution box (see Fuses) ...123 Power door locks ...50 Power steering ...104 fluid, checking and adding ...146,147 Radio ...29,30,31 32,33,34,35,36 Relays ...119,125 Remote ...entry system ...56,58 illuminated entry ...58 locking/unlocking doors ...57 replacement/additional transmitters ...59 replacing the batteries ...59 Roof rack ...117 Safety Compliance Certification Label .. 187 Safety defects, reporting ...204...


