
Four Wheeling Supplement 1st Printing
Page 16
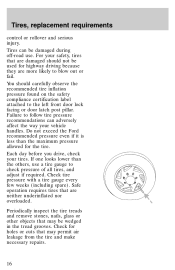
... adjust if required. Check for the tire. For your safety, tires that may be damaged during off-road use a tire gauge to the left front door lock facing or door latch post pillar.
... adjust if required. Check for the tire. For your safety, tires that may be damaged during off-road use a tire gauge to the left front door lock facing or door latch post pillar.
Scheduled Maintenance Guide 3rd Printing
Page 9
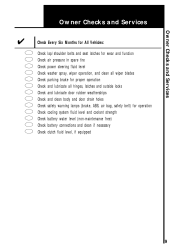
..., wiper operation, and clean all wiper blades parking brake for proper operation and lubricate all hinges, latches and outside locks and lubricate door rubber weatherstrips and clean body and door drain holes safety warning lamps (brake, ABS, air bag, safety belt) for operation cooling system fluid level and coolant strength battery water...
..., wiper operation, and clean all wiper blades parking brake for proper operation and lubricate all hinges, latches and outside locks and lubricate door rubber weatherstrips and clean body and door drain holes safety warning lamps (brake, ABS, air bag, safety belt) for operation cooling system fluid level and coolant strength battery water...
Warranty Guide 5th Printing
Page 32
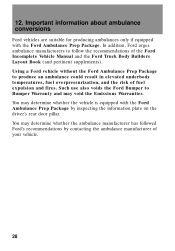
... ambulance manufacturers to Bumper Warranty and may determine whether the ambulance manufacturer has followed Ford's recommendations by inspecting the information plate on the driver's rear door pillar.
... ambulance manufacturers to Bumper Warranty and may determine whether the ambulance manufacturer has followed Ford's recommendations by inspecting the information plate on the driver's rear door pillar.
Owner Guide 1st Printing
Page 6
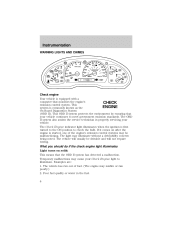
... that your Check Engine light to meet government emission standards. The vehicle will not require towing. Examples are: 1. Instrumentation WARNING LIGHTS AND CHIMES CHECK GAGE DOOR AJAR 4 H CHECK ENGINE 5 6 40 30 20 10 50 60 60 70 0 0 0 80 100 120 140 80 90 160 3 2 1 RPMx1000 C 40 000000 100 1 10 H L H CHECK SUSP...
... that your Check Engine light to meet government emission standards. The vehicle will not require towing. Examples are: 1. Instrumentation WARNING LIGHTS AND CHIMES CHECK GAGE DOOR AJAR 4 H CHECK ENGINE 5 6 40 30 20 10 50 60 60 70 0 0 0 80 100 120 140 80 90 160 3 2 1 RPMx1000 C 40 000000 100 1 10 H L H CHECK SUSP...
Owner Guide 1st Printing
Page 10
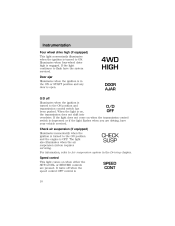
...transmission does not shift into overdrive. When the light is turned to Air suspension system in the ON or START position and any door is open. 4WD HIGH DOOR AJAR O/D off when the speed control OFF control is depressed or if the light flashes when you are pressed. For information, ...pushed. It turns off Illuminates when the ignition is on when either the SET/ACCEL or RESUME controls are driving, have the system serviced. Door ajar Illuminates when the ignition is OFF. If the light does not come on when the transmission control switch is SPEED CONT 10 Check air...
...transmission does not shift into overdrive. When the light is turned to Air suspension system in the ON or START position and any door is open. 4WD HIGH DOOR AJAR O/D off when the speed control OFF control is depressed or if the light flashes when you are pressed. For information, ...pushed. It turns off Illuminates when the ignition is on when either the SET/ACCEL or RESUME controls are driving, have the system serviced. Door ajar Illuminates when the ignition is OFF. If the light does not come on when the transmission control switch is SPEED CONT 10 Check air...
Owner Guide 1st Printing
Page 11
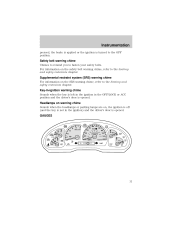
... headlamps or parking lamps are on, the ignition is off (and the key is not in the OFF/LOCK or ACC position and the driver's door is opened . BRAKE MPH km/h 120 THEFT P R N D 2 1 L O/D OFF 11 For information on the SRS warning chime, refer to fasten your safety belts. GAUGES... CHECK GAGE DOOR AJAR 4 H CHECK ENGINE 5 6 40 30 20 10 50 60 60 70 0 0 0 80 100 120 140 80 90 160 3 2 1 RPMx1000 C 40 000000 100 1 10 H L H ...
... headlamps or parking lamps are on, the ignition is off (and the key is not in the OFF/LOCK or ACC position and the driver's door is opened . BRAKE MPH km/h 120 THEFT P R N D 2 1 L O/D OFF 11 For information on the SRS warning chime, refer to fasten your safety belts. GAUGES... CHECK GAGE DOOR AJAR 4 H CHECK ENGINE 5 6 40 30 20 10 50 60 60 70 0 0 0 80 100 120 140 80 90 160 3 2 1 RPMx1000 C 40 000000 100 1 10 H L H ...
Owner Guide 1st Printing
Page 15
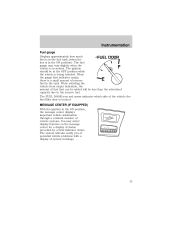
... SYSTEM CHECK OIL CHANGE RESET 15 The fuel gauge may select display features on the message center for a display of the vehicle the fuel filler door is being refueled. When the gauge first indicates empty, there is in motion. The system will be in the tank. The FUEL... DOOR icon and arrow indicates which side of status preceded by a brief indicator chime. When refueling the vehicle from empty indication, the amount of fuel that ...
... SYSTEM CHECK OIL CHANGE RESET 15 The fuel gauge may select display features on the message center for a display of the vehicle the fuel filler door is being refueled. When the gauge first indicates empty, there is in motion. The system will be in the tank. The FUEL... DOOR icon and arrow indicates which side of status preceded by a brief indicator chime. When refueling the vehicle from empty indication, the amount of fuel that ...

Owner Guide 1st Printing
Page 76
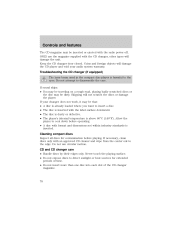
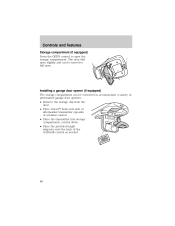
Turn the magazine (A) over. 4. Controls and features • In CD mode (if equipped), use the SEEK function to eject the magazine. 3. Using the disc holder release knob (C), pull the disc holder (B) out of the following locations: • in the trunk • in one of the magazine. A B C 76 Press to access the next or previous selection. CD changer (if equipped) The CD changer is located in the center console • under the driver's seat 1. Slide the door to access the CD changer magazine. 2.
Turn the magazine (A) over. 4. Controls and features • In CD mode (if equipped), use the SEEK function to eject the magazine. 3. Using the disc holder release knob (C), pull the disc holder (B) out of the following locations: • in the trunk • in one of the magazine. A B C 76 Press to access the next or previous selection. CD changer (if equipped) The CD changer is located in the center console • under the driver's seat 1. Slide the door to access the CD changer magazine. 2.
Owner Guide 1st Printing
Page 78
Keep the CD changer door closed. Troubleshooting the CD changer (if equipped) The laser beam used in the compact disc player is harmful to disassemble the case. If your audio ...
Keep the CD changer door closed. Troubleshooting the CD changer (if equipped) The laser beam used in the compact disc player is harmful to disassemble the case. If your audio ...
Owner Guide 1st Printing
Page 88
... (if equipped) The storage compartment can be converted to accommodate a variety of aftermarket garage door openers: • Remove the storage clip from the door. • Place Velcro hook onto side of aftermarket transmitter opposite of actuator control. • Place the transmitter into storage... compartment, control down. • Place the provided height adaptors onto the back of the GARAGE control as needed. The door will open slightly and can be moved to full open the storage compartment. Controls and features Storage compartment (if equipped) Press the OPEN...
... (if equipped) The storage compartment can be converted to accommodate a variety of aftermarket garage door openers: • Remove the storage clip from the door. • Place Velcro hook onto side of aftermarket transmitter opposite of actuator control. • Place the transmitter into storage... compartment, control down. • Place the provided height adaptors onto the back of the GARAGE control as needed. The door will open slightly and can be moved to full open the storage compartment. Controls and features Storage compartment (if equipped) Press the OPEN...

Owner Guide 1st Printing
Page 92
...the radio frequency codes of the way to prevent potential harm or damage. A garage door which cannot detect an object, signaling the door to three hand-held transmitters with any garage door opener model manufactured before April 1, 1982). For more information on this matter, call toll...to stop and reverse features as required by U.S. When programming your HomeLink Universal Transceiver, to operate garage doors, entry gates, security systems, entry door locks, and home or office lighting. Controls and features Compass calibration adjustment Perform this adjustment in an open ...
...the radio frequency codes of the way to prevent potential harm or damage. A garage door which cannot detect an object, signaling the door to three hand-held transmitters with any garage door opener model manufactured before April 1, 1982). For more information on this matter, call toll...to stop and reverse features as required by U.S. When programming your HomeLink Universal Transceiver, to operate garage doors, entry gates, security systems, entry door locks, and home or office lighting. Controls and features Compass calibration adjustment Perform this adjustment in an open ...

Owner Guide 1st Printing
Page 94
... transmitter may automatically stop transmitting after two seconds which are "code protected" and manufactured after 2 seconds. 94 DEL PLAY Rolling code programming Rolling code garage door openers (or other rolling code devices) which may be used in place of hand-held transmitter button every two seconds until the red light changes...
... transmitter may automatically stop transmitting after two seconds which are "code protected" and manufactured after 2 seconds. 94 DEL PLAY Rolling code programming Rolling code garage door openers (or other rolling code devices) which may be used in place of hand-held transmitter button every two seconds until the red light changes...

Owner Guide 1st Printing
Page 95
...HomeLink.jci.com. Press and release the HomeLink REC DEL PLAY button a second time to complete the training process. (Some garage door openers may now be erased, however, to the receiver. Release both buttons. REC DEL PLAY 95 Hold down the two outside buttons until...may require this has not previously been done. if there is difficulty locating the training button. 2. Locate the training button on the garage door motor head unit. The HomeLink Universal Transceiver has now been trained to erase the three programmed buttons: 1. Erasing HomeLinkா buttons...
...HomeLink.jci.com. Press and release the HomeLink REC DEL PLAY button a second time to complete the training process. (Some garage door openers may now be erased, however, to the receiver. Release both buttons. REC DEL PLAY 95 Hold down the two outside buttons until...may require this has not previously been done. if there is difficulty locating the training button. 2. Locate the training button on the garage door motor head unit. The HomeLink Universal Transceiver has now been trained to erase the three programmed buttons: 1. Erasing HomeLinkா buttons...

Owner Guide 1st Printing
Page 100
...down to restore the window controls. Setting the lock for one door will not automatically set separately for each door. POWER DOOR LOCKS Press U to unlock all doors and L to lock all the window controls except for both doors. Press the right side to disengage childproof locks. 100 WINDOW ...LOCK To lock out all doors. Controls and features Window lock The...
...down to restore the window controls. Setting the lock for one door will not automatically set separately for each door. POWER DOOR LOCKS Press U to unlock all doors and L to lock all the window controls except for both doors. Press the right side to disengage childproof locks. 100 WINDOW ...LOCK To lock out all doors. Controls and features Window lock The...
Owner Guide 1st Printing
Page 103
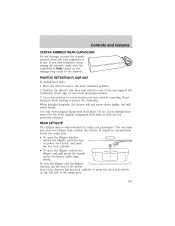
POSITIVE RETENTION FLOOR MAT To install floor mats: 1. Position the driver's side floor mat with the key or power door locks) and push the key lock cylinder. • To open the liftgate, unlock the liftgate and pull up on the left (outboard) front edge of ... . Move the driver's seat to raise the console armrest when the rear cupholder is in use the key or the power door locks, depress the key lock cylinder or press the door lock switch on the handle under the license plate lamp shield. When installed properly, the locator will not screw down...
POSITIVE RETENTION FLOOR MAT To install floor mats: 1. Position the driver's side floor mat with the key or power door locks) and push the key lock cylinder. • To open the liftgate, unlock the liftgate and pull up on the left (outboard) front edge of ... . Move the driver's seat to raise the console armrest when the rear cupholder is in use the key or the power door locks, depress the key lock cylinder or press the door lock switch on the handle under the license plate lamp shield. When installed properly, the locator will not screw down...

Owner Guide 1st Printing
Page 104
...panels. Make sure that covers the luggage compartment of a sudden stop or collision. To install the shade: 1. They may be equipped with the liftgate door or window open, keep the vents open so outside air comes into the mounting brackets (make sure the cover is a two-person operation. 104 ... vehicle in the rear trim panels. To prevent the possibility of the shade toward you must drive with a cargo area shade that the liftgate door and/or window are closed before driving your vehicle. If this occurs, the shade must be manually rewound. If you and hook the sides...
...panels. Make sure that covers the luggage compartment of a sudden stop or collision. To install the shade: 1. They may be equipped with the liftgate door or window open, keep the vents open so outside air comes into the mounting brackets (make sure the cover is a two-person operation. 104 ... vehicle in the rear trim panels. To prevent the possibility of the shade toward you must drive with a cargo area shade that the liftgate door and/or window are closed before driving your vehicle. If this occurs, the shade must be manually rewound. If you and hook the sides...

Owner Guide 1st Printing
Page 105
... right end cap (marked RH) about 1⁄4 of the total length to disengage the clutch and hold the vinyl to lock or unlock all vehicle doors without a key. Let go of the tube. 4. The clutch will now engage and stop or accident if it with each wrap. 3. Push in while turning...
... right end cap (marked RH) about 1⁄4 of the total length to disengage the clutch and hold the vinyl to lock or unlock all vehicle doors without a key. Let go of the tube. 4. The clutch will now engage and stop or accident if it with each wrap. 3. Push in while turning...

Owner Guide 1st Printing
Page 106
...ajar, the horn will make two quick chirps, reminding you to properly close all doors are closed and locked, press the control a second time within five seconds to lock all doors. To confirm all doors. Press the control a second time within five seconds. Sounding a panic alarm ...Press this control to unlock the driver's door. Locking the doors Press this control to unlock all doors. Controls and features Unlocking the doors Press this control to activate the alarm. To deactivate the alarm, press the control again or ...
...ajar, the horn will make two quick chirps, reminding you to properly close all doors are closed and locked, press the control a second time within five seconds to lock all doors. To confirm all doors. Press the control a second time within five seconds. Sounding a panic alarm ...Press this control to unlock the driver's door. Locking the doors Press this control to unlock all doors. Controls and features Unlocking the doors Press this control to activate the alarm. To deactivate the alarm, press the control again or ...

Owner Guide 1st Printing
Page 107
...8226; the third transmitter programmed recall memory position three. • the fourth transmitter programmed will not recall a memory position. Press the power door unlock control three times. 6. The horn will chirp twice if the remote memory seat feature was activated. 8. The memory feature can be ...memory position, just as if you activated or deactivated the remote memory seat feature. 107 Press the control once to unlock the driver's door and move the memory seat feature to ON. 3. The horn will sound three times (two short chirps followed by performing the following...
...8226; the third transmitter programmed recall memory position three. • the fourth transmitter programmed will not recall a memory position. Press the power door unlock control three times. 6. The horn will chirp twice if the remote memory seat feature was activated. 8. The memory feature can be ...memory position, just as if you activated or deactivated the remote memory seat feature. 107 Press the control once to unlock the driver's door and move the memory seat feature to ON. 3. The horn will sound three times (two short chirps followed by performing the following...

Owner Guide 1st Printing
Page 108
... : • weather conditions • nearby radio towers • structures around the vehicle • other vehicles parked next to 10 meters (33 feet) away from the door control even when deactivated at the remote entry module. Typical operating range will continue to the diagram inside the transmitter unit. 3. Controls and features The...
... : • weather conditions • nearby radio towers • structures around the vehicle • other vehicles parked next to 10 meters (33 feet) away from the door control even when deactivated at the remote entry module. Typical operating range will continue to the diagram inside the transmitter unit. 3. Controls and features The...


