Customer Assistance Guide 1st Printing
Page 11
... hitch Trailer hitch bars and balls Trailer hitch wiring adaptor Trunk mount luggage rack Protection and appearance equipment Bed mat/bedliner tailgate covers Bed mats Bedliners Car/truck covers Cargo liners, interior Carpet floor mats Cleaners, waxes and polishes Flat splash guards Front end covers (full and mini) Hood/bag deflectors Locking gas cap...
... hitch Trailer hitch bars and balls Trailer hitch wiring adaptor Trunk mount luggage rack Protection and appearance equipment Bed mat/bedliner tailgate covers Bed mats Bedliners Car/truck covers Cargo liners, interior Carpet floor mats Cleaners, waxes and polishes Flat splash guards Front end covers (full and mini) Hood/bag deflectors Locking gas cap...
Customer Assistance Guide 1st Printing
Page 12
... operation of your 12 that are not properly installed. Ordering additional publications Lubricants and oils Molded splash guards Molded vinyl floor mats Rallye bars Rear air deflectors Rear decklid spoilers Side window air deflectors Spare tire lock Step bumpers Step/sill plates Tailgate... covers Tailgate lock Tailgate protector Tonneau covers Touch-up paint Universal floor mats For maximum vehicle performance, keep the following information in your vehicle should comply with radio transmitters. Any such equipment installed...
... operation of your 12 that are not properly installed. Ordering additional publications Lubricants and oils Molded splash guards Molded vinyl floor mats Rallye bars Rear air deflectors Rear decklid spoilers Side window air deflectors Spare tire lock Step bumpers Step/sill plates Tailgate... covers Tailgate lock Tailgate protector Tonneau covers Touch-up paint Universal floor mats For maximum vehicle performance, keep the following information in your vehicle should comply with radio transmitters. Any such equipment installed...
Owner Guide 1st Printing
Page 181
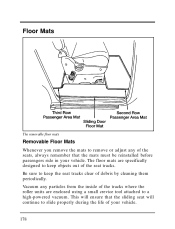
... be arranged to keep objects out of floor mats: front seat mats, a cargo area mat, a sliding door area mat, and second and third row passenger area mats. The floor mats are specifically designed to suit your different needs. The floor mats are intended to help you remove the mats to replace the floor mats might become stuck in the seat tracks. NOTE: Your...
... be arranged to keep objects out of floor mats: front seat mats, a cargo area mat, a sliding door area mat, and second and third row passenger area mats. The floor mats are specifically designed to suit your different needs. The floor mats are intended to help you remove the mats to replace the floor mats might become stuck in the seat tracks. NOTE: Your...
Owner Guide 1st Printing
Page 182
The floor mats are enclosed using a small crevice tool attached to a high-powered vacuum. This will ensure that the mats must be reinstalled before passengers ride in your vehicle. 178 Be sure to keep objects out of the seat tracks. Vacuum any of ..., always remember that the sliding seat will continue to keep the seat tracks clear of debris by cleaning them periodically. Floor Mats The removable floor mats Removable Floor Mats Whenever you remove the mats to remove or adjust any particles from the inside of the tracks where the roller units are specifically designed to slide...
The floor mats are enclosed using a small crevice tool attached to a high-powered vacuum. This will ensure that the mats must be reinstalled before passengers ride in your vehicle. 178 Be sure to keep objects out of the seat tracks. Vacuum any of ..., always remember that the sliding seat will continue to keep the seat tracks clear of debris by cleaning them periodically. Floor Mats The removable floor mats Removable Floor Mats Whenever you remove the mats to remove or adjust any particles from the inside of the tracks where the roller units are specifically designed to slide...
Owner Guide 1st Printing
Page 183
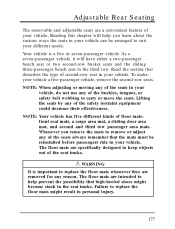
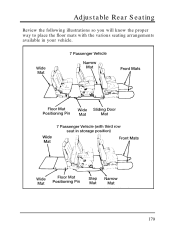
Adjustable Rear Seating Review the following illustrations so you will know the proper way to place the floor mats with the various seating arrangements available in your vehicle. 179
Adjustable Rear Seating Review the following illustrations so you will know the proper way to place the floor mats with the various seating arrangements available in your vehicle. 179
Owner Guide 1st Printing
Page 185
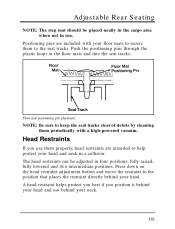
...help protect your neck. 181 Positioning pins are intended to the position that places the restraint directly behind your head and neck in the floor mats and into the seat tracks. The head restraints can be placed neatly in the cargo area when not in use them properly, head ... adjusted in four positions: fully raised, fully lowered and two intermediate positions. A head restraint helps protect you best if you use . Floor mat positioning pin placement NOTE: Be sure to keep the seat tracks clear of debris by cleaning them to secure them periodically with your head...
...help protect your neck. 181 Positioning pins are intended to the position that places the restraint directly behind your head and neck in the floor mats and into the seat tracks. The head restraints can be placed neatly in the cargo area when not in use them properly, head ... adjusted in four positions: fully raised, fully lowered and two intermediate positions. A head restraint helps protect you best if you use . Floor mat positioning pin placement NOTE: Be sure to keep the seat tracks clear of debris by cleaning them to secure them periodically with your head...
Owner Guide 1st Printing
Page 188
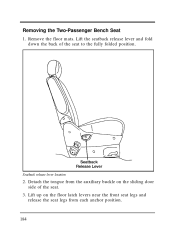
Remove the floor mats. Lift the seatback release lever and fold down the back of the seat. 3. Detach the tongue from the auxiliary buckle on the floor latch levers near the front seat legs and release the seat legs from each anchor position. 184 Removing the Two-Passenger Bench Seat 1. Seatback release lever location 2. Lift up on the sliding door side of the seat to the fully folded position.
Remove the floor mats. Lift the seatback release lever and fold down the back of the seat. 3. Detach the tongue from the auxiliary buckle on the floor latch levers near the front seat legs and release the seat legs from each anchor position. 184 Removing the Two-Passenger Bench Seat 1. Seatback release lever location 2. Lift up on the sliding door side of the seat to the fully folded position.

Owner Guide 1st Printing
Page 189
Two people should lift the seat and remove it from its anchor position. 5. Adjustable Rear Seating The floor latch levers 4. Replace any floor mats that were removed. If you decide to move the three-passenger bench seat forward to release the seat from the vehicle. 6. Place your hand under the seat cushion and tip the front of the seat upward slightly. Slide the seat rearward to the second row position, passengers riding in the seat will use the second row safety belts. 185
Two people should lift the seat and remove it from its anchor position. 5. Adjustable Rear Seating The floor latch levers 4. Replace any floor mats that were removed. If you decide to move the three-passenger bench seat forward to release the seat from the vehicle. 6. Place your hand under the seat cushion and tip the front of the seat upward slightly. Slide the seat rearward to the second row position, passengers riding in the seat will use the second row safety belts. 185
Owner Guide 1st Printing
Page 190
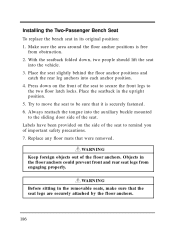
... legs from obstruction. 2. With the seatback folded down on the side of the seat to remind you of the floor anchors. Try to move the seat to the two floor latch locks. WARNING Keep foreign objects out of important safety precautions. 7. Make sure the area around the...two people should lift the seat into the vehicle. 3. Always reattach the tongue into each anchor position. 4. Replace any floor mats that the seat legs are securely attached by the floor anchors. 186 Objects in its original position: 1. WARNING Before sitting in the upright position. 5. Place the seatback in the...
... legs from obstruction. 2. With the seatback folded down on the side of the seat to remind you of the floor anchors. Try to move the seat to the two floor latch locks. WARNING Keep foreign objects out of important safety precautions. 7. Make sure the area around the...two people should lift the seat into the vehicle. 3. Always reattach the tongue into each anchor position. 4. Replace any floor mats that the seat legs are securely attached by the floor anchors. 186 Objects in its original position: 1. WARNING Before sitting in the upright position. 5. Place the seatback in the...
Owner Guide 1st Printing
Page 193
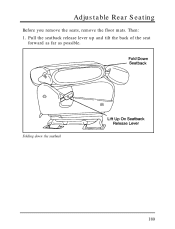
Adjustable Rear Seating Before you remove the seats, remove the floor mats. Pull the seatback release lever up and tilt the back of the seat forward as far as possible. Folding down the seatback 189 Then: 1.
Adjustable Rear Seating Before you remove the seats, remove the floor mats. Pull the seatback release lever up and tilt the back of the seat forward as far as possible. Folding down the seatback 189 Then: 1.
Owner Guide 1st Printing
Page 195
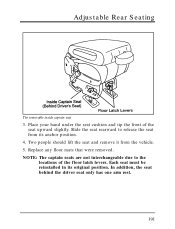
Replace any floor mats that were removed. Each seat must be reinstalled in its anchor position. 4. Place your hand under the seat cushion and tip the front of the floor latch levers. Slide the seat rearward to the locations of the seat upward slightly. Two people should lift the seat and remove it from its original position. NOTE: The captain seats are not interchangeable due to release the seat from the vehicle. 5. Adjustable Rear Seating The removable inside captain seat 3. In addition, the seat behind the driver seat only has one arm rest. 191
Replace any floor mats that were removed. Each seat must be reinstalled in its anchor position. 4. Place your hand under the seat cushion and tip the front of the floor latch levers. Slide the seat rearward to the locations of the seat upward slightly. Two people should lift the seat and remove it from its original position. NOTE: The captain seats are not interchangeable due to release the seat from the vehicle. 5. Adjustable Rear Seating The removable inside captain seat 3. In addition, the seat behind the driver seat only has one arm rest. 191
Owner Guide 1st Printing
Page 196
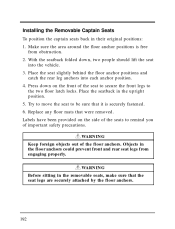
... you of important safety precautions. Place the seatback in the removable seats, make sure that the seat legs are securely attached by the floor anchors. 192 Replace any floor mats that it is free from engaging properly. WARNING Before sitting in the upright position. 5. Installing the Removable Captain Seats To position the captain...
... you of important safety precautions. Place the seatback in the removable seats, make sure that the seat legs are securely attached by the floor anchors. 192 Replace any floor mats that it is free from engaging properly. WARNING Before sitting in the upright position. 5. Installing the Removable Captain Seats To position the captain...
Owner Guide 1st Printing
Page 197
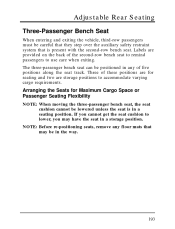
... are for Maximum Cargo Space or Passenger Seating Flexibility NOTE: When moving the three-passenger bench seat, the seat cushion cannot be positioned in any floor mats that is in the way. 193 The three-passenger bench seat can be lowered unless the seat is present with the second-row bench seat...
... are for Maximum Cargo Space or Passenger Seating Flexibility NOTE: When moving the three-passenger bench seat, the seat cushion cannot be positioned in any floor mats that is in the way. 193 The three-passenger bench seat can be lowered unless the seat is present with the second-row bench seat...
Owner Guide 1st Printing
Page 202
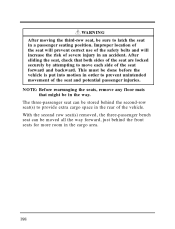
... way. With the second row seat(s) removed, the three-passenger bench seat can be in a passenger seating position. NOTE: Before rearranging the seats, remove any floor mats that both sides of severe injury in the cargo area. 198 After sliding the seat, check that might be stored behind the front seats for...
... way. With the second row seat(s) removed, the three-passenger bench seat can be in a passenger seating position. NOTE: Before rearranging the seats, remove any floor mats that both sides of severe injury in the cargo area. 198 After sliding the seat, check that might be stored behind the front seats for...
Owner Guide 1st Printing
Page 207
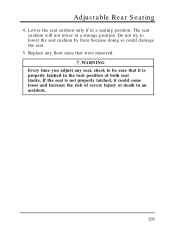
Replace any seat, check to lower the seat cushion by force because doing so could come loose and increase the risk of both seat tracks. Do not try to be sure that were removed. WARNING Every time you adjust any floor mats that it is not properly latched, it could damage the seat. 5. Adjustable Rear Seating 4. Lower the seat cushion only if in a storage position. The seat cushion will not lower in a seating position. If the seat is properly latched in the lock position of severe injury or death in an accident. 203
Replace any seat, check to lower the seat cushion by force because doing so could come loose and increase the risk of both seat tracks. Do not try to be sure that were removed. WARNING Every time you adjust any floor mats that it is not properly latched, it could damage the seat. 5. Adjustable Rear Seating 4. Lower the seat cushion only if in a storage position. The seat cushion will not lower in a seating position. If the seat is properly latched in the lock position of severe injury or death in an accident. 203
Owner Guide 1st Printing
Page 360
Only) Super Seal Undercoating (U.S. Only) Touch-Up Paints Flat Splash Guards 356 Safety, Comfort, and Convenience Comfort and Convenience Air Conditioning Engine Block Heater Remote Keyless Entry Protection and Appearance Equipment Aero Running Boards Carpeted Floor Mats Door Edge Guards Cleaners, Waxes and Polishes Front End Cover Front End Mini Cover Lubricants and Oils Molded Running Boards Rear Air Deflector Side Window Shields Soft Luggage Cover Styled Wheel Protector Locks Super Seal Fabric Protector (U.S. Only) Super Seal Rustproofing (U.S.
Only) Super Seal Undercoating (U.S. Only) Touch-Up Paints Flat Splash Guards 356 Safety, Comfort, and Convenience Comfort and Convenience Air Conditioning Engine Block Heater Remote Keyless Entry Protection and Appearance Equipment Aero Running Boards Carpeted Floor Mats Door Edge Guards Cleaners, Waxes and Polishes Front End Cover Front End Mini Cover Lubricants and Oils Molded Running Boards Rear Air Deflector Side Window Shields Soft Luggage Cover Styled Wheel Protector Locks Super Seal Fabric Protector (U.S. Only) Super Seal Rustproofing (U.S.