Owner Guide 1st Printing
Page 6
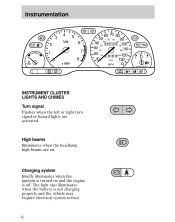
The light also illuminates when the battery is not charging properly and the vehicle may require electrical system service. 6 Charging system Briefly illuminates when the ignition is turned on . High beams Illuminates when the headlamp high beams are activated. Instrumentation 3 2 NORMAL 4 5 6 7 1 0 x 1000 8 ...
The light also illuminates when the battery is not charging properly and the vehicle may require electrical system service. 6 Charging system Briefly illuminates when the ignition is turned on . High beams Illuminates when the headlamp high beams are activated. Instrumentation 3 2 NORMAL 4 5 6 7 1 0 x 1000 8 ...

Owner Guide 1st Printing
Page 24
... key can return to avoid discharging the battery unnecessarily. 3. Steering unlocked, radio operational. Ignition switched on, all main electrical circuits are disabled. This key position is for too long to this position only if the gearshift lever is in this... TRACTION CONTROL O/D OFF Ignition 1. The ignition key should not be left in P (Park). 2. Warning and indicator lights illuminate. The accessory position. Ignition and all electrical circuits operational. Release the key as soon as the engine starts. 2 NORMAL 1 8 55 60 70 80 50 100 120 90 140 40 60 800 0 0...
... key can return to avoid discharging the battery unnecessarily. 3. Steering unlocked, radio operational. Ignition switched on, all main electrical circuits are disabled. This key position is for too long to this position only if the gearshift lever is in this... TRACTION CONTROL O/D OFF Ignition 1. The ignition key should not be left in P (Park). 2. Warning and indicator lights illuminate. The accessory position. Ignition and all electrical circuits operational. Release the key as soon as the engine starts. 2 NORMAL 1 8 55 60 70 80 50 100 120 90 140 40 60 800 0 0...

Owner Guide 1st Printing
Page 33
... Close the sunroof and press the front part of the control on the rocker switch in the desired direction. 12 SEC Sunroof (if equipped) The electric sunroof can be operated only when the ignition is switched to close the sunroof Press the rear part of the control again. Press the front...
... Close the sunroof and press the front part of the control on the rocker switch in the desired direction. 12 SEC Sunroof (if equipped) The electric sunroof can be operated only when the ignition is switched to close the sunroof Press the rear part of the control again. Press the front...

Owner Guide 1st Printing
Page 58
The SRS consists of injury in a collision. The diagnostic module monitors its own internal circuits and the supplemental air bag electrical system readiness (including the impact sensors), the system wiring, the air bag system readiness light, the air bag back up power and the air bag ... bag modules (which include the inflators and air bags), • one or more impact and safing sensors, • a readiness light and tone, • and the electrical wiring and components. Seating and safety restraints Several air bag system components get hot after inflation.
The SRS consists of injury in a collision. The diagnostic module monitors its own internal circuits and the supplemental air bag electrical system readiness (including the impact sensors), the system wiring, the air bag system readiness light, the air bag back up power and the air bag ... bag modules (which include the inflators and air bags), • one or more impact and safing sensors, • a readiness light and tone, • and the electrical wiring and components. Seating and safety restraints Several air bag system components get hot after inflation.

Owner Guide 1st Printing
Page 79
... you have buckled their proper usage, refer to Starting the engine in this chapter. Make sure all Canadian InterferenceCausing Equipment standard requirements regulating the impulse electrical field strength of radio noise. This system meets all vehicle occupants have difficulty starting the engine. For more information on starting is controlled by the...
... you have buckled their proper usage, refer to Starting the engine in this chapter. Make sure all Canadian InterferenceCausing Equipment standard requirements regulating the impulse electrical field strength of radio noise. This system meets all vehicle occupants have difficulty starting the engine. For more information on starting is controlled by the...

Owner Guide 1st Printing
Page 83
... at least three hours before starting , warms up the engine faster and allows the heaterdefroster system to respond quickly. To prevent electrical shock, do not use your heater with ungrounded electrical systems or two-pronged (cheater) adapters. 83 For best results, plug the heater in a region where temperatures reach -23°C (-10...
... at least three hours before starting , warms up the engine faster and allows the heaterdefroster system to respond quickly. To prevent electrical shock, do not use your heater with ungrounded electrical systems or two-pronged (cheater) adapters. 83 For best results, plug the heater in a region where temperatures reach -23°C (-10...
Owner Guide 1st Printing
Page 104
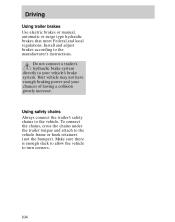
... trailer's safety chains to turn corners. 104 Make sure there is enough slack to allow the vehicle to the vehicle. Driving Using trailer brakes Use electric brakes or manual, automatic or surge type hydraulic brakes that meet Federal and local regulations. To connect the chains, cross the chains under the trailer...
... trailer's safety chains to turn corners. 104 Make sure there is enough slack to allow the vehicle to the vehicle. Driving Using trailer brakes Use electric brakes or manual, automatic or surge type hydraulic brakes that meet Federal and local regulations. To connect the chains, cross the chains under the trailer...

Owner Guide 1st Printing
Page 107
Depress to switch off. The shut-off switch is a device intended to stop the electric fuel pump when your vehicle. On Res Set Acc Off Coast FUEL PUMP SHUT-OFF SWITCH If the engine cranks, but does not start or ...
Depress to switch off. The shut-off switch is a device intended to stop the electric fuel pump when your vehicle. On Res Set Acc Off Coast FUEL PUMP SHUT-OFF SWITCH If the engine cranks, but does not start or ...

Owner Guide 1st Printing
Page 109
...to blow if the cause of the overload is located on the driver's side of the engine compartment. Check the appropriate fuses before replacing any electrical components. The circuits protected are identified by numbers on the passenger compartment fuse panel and inside the cover on the driver's side under the ... panel. The passenger compartment fuse panel is located on the power distribution box. 109 Blown fuses are not working, a fuse may have the vehicle's electrical system checked by your dealer or a qualified service technician. Roadside emergencies FUSES AND RELAYS If...
...to blow if the cause of the overload is located on the driver's side of the engine compartment. Check the appropriate fuses before replacing any electrical components. The circuits protected are identified by numbers on the passenger compartment fuse panel and inside the cover on the driver's side under the ... panel. The passenger compartment fuse panel is located on the power distribution box. 109 Blown fuses are not working, a fuse may have the vehicle's electrical system checked by your dealer or a qualified service technician. Roadside emergencies FUSES AND RELAYS If...
Owner Guide 1st Printing
Page 111
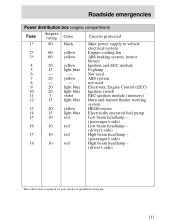
... light blue - light blue light blue violet light blue yellow light blue red red red red Main power supply to vehicle electrical system Engine cooling fan ABS braking system, heater blower Ignition and EEC module Foglamp Not used ABS system not used Electronic Engine... Control (EEC) Ignition switch EEC ignition module (memory) Horn and hazard flasher warning system HEGO sensor Electrically operated fuel pump Low beam headlamp - (passenger's side) Low beam headlamp - (driver's side) High beam headlamp - (passenger's side) High beam headlamp...
... light blue - light blue light blue violet light blue yellow light blue red red red red Main power supply to vehicle electrical system Engine cooling fan ABS braking system, heater blower Ignition and EEC module Foglamp Not used ABS system not used Electronic Engine... Control (EEC) Ignition switch EEC ignition module (memory) Horn and hazard flasher warning system HEGO sensor Electrically operated fuel pump Low beam headlamp - (passenger's side) Low beam headlamp - (driver's side) High beam headlamp - (passenger's side) High beam headlamp...
Owner Guide 1st Printing
Page 112
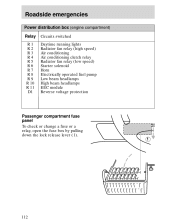
Roadside emergencies Power distribution box (engine compartment) Relay R1 R2 R3 R4 R5 R6 R7 R8 R9 R 10 R 11 D1 Circuits switched Daytime running lights Radiator fan relay (high speed) Air conditioning Air conditioning clutch relay Radiator fan relay (low speed) Starter solenoid Horn Electrically operated fuel pump Low beam headlamps High beam headlamps EEC module Reverse voltage protection Passenger compartment fuse panel To check or change a fuse or a relay, open the fuse box by pulling down the lock release lever (1). 1 112
Roadside emergencies Power distribution box (engine compartment) Relay R1 R2 R3 R4 R5 R6 R7 R8 R9 R 10 R 11 D1 Circuits switched Daytime running lights Radiator fan relay (high speed) Air conditioning Air conditioning clutch relay Radiator fan relay (low speed) Starter solenoid Horn Electrically operated fuel pump Low beam headlamps High beam headlamps EEC module Reverse voltage protection Passenger compartment fuse panel To check or change a fuse or a relay, open the fuse box by pulling down the lock release lever (1). 1 112
Owner Guide 1st Printing
Page 114
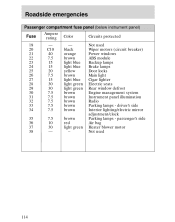
...green light green brown brown brown brown brown brown red light green - Circuits protected Not used 114 driver's side Interior lighting/electric mirror adjustment/clock Parking lamps - passenger's side Air bag Heater blower motor Not used Wiper motors (circuit breaker) Power windows... ABS module Backup lamps Brake lamps Door locks Main light Cigar lighter Electric seats Rear window defrost Engine management system Instrument panel illumination Radio Parking lamps - Color - Roadside emergencies Passenger compartment fuse panel ...
...green light green brown brown brown brown brown brown red light green - Circuits protected Not used 114 driver's side Interior lighting/electric mirror adjustment/clock Parking lamps - passenger's side Air bag Heater blower motor Not used Wiper motors (circuit breaker) Power windows... ABS module Backup lamps Brake lamps Door locks Main light Cigar lighter Electric seats Rear window defrost Engine management system Instrument panel illumination Radio Parking lamps - Color - Roadside emergencies Passenger compartment fuse panel ...
Owner Guide 1st Printing
Page 122
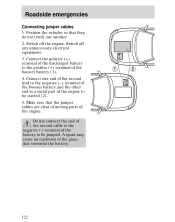
... cause an explosion of the gases that the jumper cables are clear of moving parts of the battery to be jumped. Switch off any unnecessary electrical equipment. 3. Connect one another. 2. Connect the positive (+) terminal of the discharged battery to the positive (+) terminal of the engine to be started (2). 5. Switch off the...
... cause an explosion of the gases that the jumper cables are clear of moving parts of the battery to be jumped. Switch off any unnecessary electrical equipment. 3. Connect one another. 2. Connect the positive (+) terminal of the discharged battery to the positive (+) terminal of the engine to be started (2). 5. Switch off the...

Owner Guide 1st Printing
Page 169
Detach the cover (access at bottom of the light assembly. 3. Turn the bulb counterclockwise and pull it . Pull the bulb out and replace it out of front bumper). 2. Fit the new bulb in reverse order (do not touch the glass part of the bulb). 169 Maintenance and care Front turn signal/side lamps Pull the socket out. Remove the electrical connector. 4. Foglamps (if equipped) 1.
Detach the cover (access at bottom of the light assembly. 3. Turn the bulb counterclockwise and pull it . Pull the bulb out and replace it out of front bumper). 2. Fit the new bulb in reverse order (do not touch the glass part of the bulb). 169 Maintenance and care Front turn signal/side lamps Pull the socket out. Remove the electrical connector. 4. Foglamps (if equipped) 1.

Owner Guide 1st Printing
Page 170
Remove the bulb from the clip holder. To install, fit the new bulb in reverse sequence. 170 Replacement instructions are located in the trunk lid. Turn the socket counterclockwise and pull it out. 4. License plate lamp Unscrew the bulb holder with a screwdriver. Disconnect the electrical conector. 2. Backup lamps The backup lamps are the same as for the brake/turn signal/tail lamps 1. Turn the bulb counterclockwise and pull it out. 3. Replace the new bulb in reverse order. Maintenance and care Brake/turn signal/tail lamps.
Remove the bulb from the clip holder. To install, fit the new bulb in reverse sequence. 170 Replacement instructions are located in the trunk lid. Turn the socket counterclockwise and pull it out. 4. License plate lamp Unscrew the bulb holder with a screwdriver. Disconnect the electrical conector. 2. Backup lamps The backup lamps are the same as for the brake/turn signal/tail lamps 1. Turn the bulb counterclockwise and pull it out. 3. Replace the new bulb in reverse order. Maintenance and care Brake/turn signal/tail lamps.
Owner Guide 1st Printing
Page 191
... ...189 Defrost rear window ...16 windshield ...23 Dipstick, engine oil ...130 Door mounted controls ...34 Driving under special conditions heavy load ...99 towing a trailer ...100 E Electrical system fuses ...109 Emergencies, roadside fuel pump shut-off switch ...107 jump starting ...121 towing ...124 Emergency brake (see Parking brake) Emission control system ...163...
... ...189 Defrost rear window ...16 windshield ...23 Dipstick, engine oil ...130 Door mounted controls ...34 Driving under special conditions heavy load ...99 towing a trailer ...100 E Electrical system fuses ...109 Emergencies, roadside fuel pump shut-off switch ...107 jump starting ...121 towing ...124 Emergency brake (see Parking brake) Emission control system ...163...
