
Owner Guide 1st Printing
Page 4
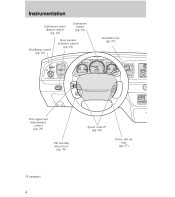
Instrumentation Instrument panel dimmer switch (pg. 23) Instrument cluster (pg. 22) Gearshift lever (pg. 87) Rear window defroster control (pg. 24) Headlamp control (pg. 23) AIR SUSP CHECK ENGINE OD OFF 50 40 60 80 60 70 100 120 80 140 BRAKE 90 160 VOL - PUSH ON ...
Instrumentation Instrument panel dimmer switch (pg. 23) Instrument cluster (pg. 22) Gearshift lever (pg. 87) Rear window defroster control (pg. 24) Headlamp control (pg. 23) AIR SUSP CHECK ENGINE OD OFF 50 40 60 80 60 70 100 120 80 140 BRAKE 90 160 VOL - PUSH ON ...
Owner Guide 1st Printing
Page 9
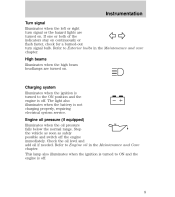
... oil if needed. The light also illuminates when the battery is not charging properly, requiring electrical system service. High beams Illuminates when the high beam headlamps are turned on continuously or flash faster, check for a burned-out turn signal or the hazard lights are turned on.
... oil if needed. The light also illuminates when the battery is not charging properly, requiring electrical system service. High beams Illuminates when the high beam headlamps are turned on continuously or flash faster, check for a burned-out turn signal or the hazard lights are turned on.
Owner Guide 1st Printing
Page 11
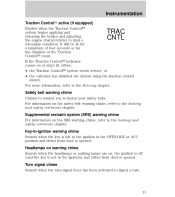
... the turn . 11 It will be lit for a minimum of four seconds or for the duration of the Traction Control event. Headlamps on warning chime Sounds when the headlamps or parking lamps are on the SRS warning chime, refer to signal a turn signal lever has been activated to the Seating and...
... the turn . 11 It will be lit for a minimum of four seconds or for the duration of the Traction Control event. Headlamps on warning chime Sounds when the headlamps or parking lamps are on the SRS warning chime, refer to signal a turn signal lever has been activated to the Seating and...
Owner Guide 1st Printing
Page 23
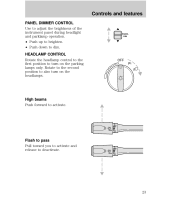
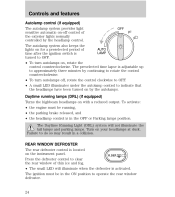
HI LO F S OFF Flash to pass Pull toward you to activate and release to also turn on the headlamps. Rotate to the second position to deactivate. PANEL DIM OFF P High beams Push forward to turn on the parking lamps only. HEADLAMP CONTROL Rotate the headlamp control to the first position to activate. HI LO F S OFF 23 Controls and features PANEL DIMMER CONTROL Use to adjust the brightness of the instrument panel during headlight and parklamp operation. • Push up to brighten. • Push down to dim.
HI LO F S OFF Flash to pass Pull toward you to activate and release to also turn on the headlamps. Rotate to the second position to deactivate. PANEL DIM OFF P High beams Push forward to turn on the parking lamps only. HEADLAMP CONTROL Rotate the headlamp control to the first position to activate. HI LO F S OFF 23 Controls and features PANEL DIMMER CONTROL Use to adjust the brightness of the instrument panel during headlight and parklamp operation. • Push up to brighten. • Push down to dim.
Owner Guide 1st Printing
Page 24
... rotate the control clockwise to OFF. • A small LED illuminates under the autolamp control to indicate that the headlamps have been turned on your headlamps at dusk. The preselected time lapse is adjustable up to approximately three minutes by continuing to rotate the control counterclockwise. ...Running Light (DRL) system will illuminate when the defroster is in a collision. Turn on by the headlamp control. Daytime running , • the parking brake released, and • the headlamp control is activated. To activate: • the engine must be running lamps (DRL) (if ...
... rotate the control clockwise to OFF. • A small LED illuminates under the autolamp control to indicate that the headlamps have been turned on your headlamps at dusk. The preselected time lapse is adjustable up to approximately three minutes by continuing to rotate the control counterclockwise. ...Running Light (DRL) system will illuminate when the defroster is in a collision. Turn on by the headlamp control. Daytime running , • the parking brake released, and • the headlamp control is activated. To activate: • the engine must be running lamps (DRL) (if ...
Owner Guide 1st Printing
Page 34
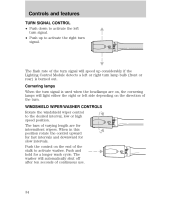
... length are on, the cornering lamps will light either the right or left or right turn lamp bulb (front or rear) is used when the headlamps are for intermittent wipers. Push the control on the direction of the turn. HI LO F S OFF The flash rate of the turn signal will automatically...
... length are on, the cornering lamps will light either the right or left or right turn lamp bulb (front or rear) is used when the headlamps are for intermittent wipers. Push the control on the direction of the turn. HI LO F S OFF The flash rate of the turn signal will automatically...
Owner Guide 1st Printing
Page 78
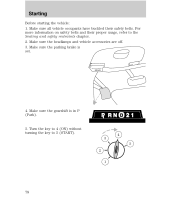
Turn the key to 4 (ON) without turning the key to the Seating and safety restraints chapter. 2. For more information on safety belts and their safety belts. Make sure the headlamps and vehicle accessories are off. 3. Make sure the gearshift is set. Make sure the parking brake is in P (Park). 5. Starting Before starting the vehicle: 1. HOOD BRAKE 4. Make sure all vehicle occupants have buckled their proper usage, refer to 5 (START). 4 3 5 2 1 78
Turn the key to 4 (ON) without turning the key to the Seating and safety restraints chapter. 2. For more information on safety belts and their safety belts. Make sure the headlamps and vehicle accessories are off. 3. Make sure the gearshift is set. Make sure the parking brake is in P (Park). 5. Starting Before starting the vehicle: 1. HOOD BRAKE 4. Make sure all vehicle occupants have buckled their proper usage, refer to 5 (START). 4 3 5 2 1 78
Owner Guide 1st Printing
Page 97
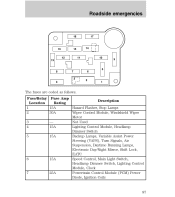
... 15 11 14 10 9 8 7 3 6 2 5 4 1 The fuses are coded as follows. Not Used 4 15A Lighting Control Module, Headlamp Dimmer Switch 5 15A Backup Lamps, Variable Assist Power Steering (VAPS), Turn Signals, Air Suspension, Daytime Running Lamps, Electronic Day/Night Mirror, Shift Lock..., EATC 6 15A Speed Control, Main Light Switch, Headlamp Dimmer Switch, Lighting Control Module, Clock 7 25A Powertrain Control Module (PCM) Power Diode, Ignition Coils 97 Fuse/Relay Fuse Amp Description Location...
... 15 11 14 10 9 8 7 3 6 2 5 4 1 The fuses are coded as follows. Not Used 4 15A Lighting Control Module, Headlamp Dimmer Switch 5 15A Backup Lamps, Variable Assist Power Steering (VAPS), Turn Signals, Air Suspension, Daytime Running Lamps, Electronic Day/Night Mirror, Shift Lock..., EATC 6 15A Speed Control, Main Light Switch, Headlamp Dimmer Switch, Lighting Control Module, Clock 7 25A Powertrain Control Module (PCM) Power Diode, Ignition Coils 97 Fuse/Relay Fuse Amp Description Location...
Owner Guide 1st Printing
Page 133
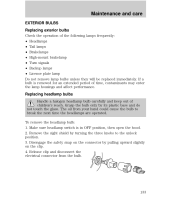
... Remove the sight shield by turning the three knobs to break the next time the headlamps are operated. Replacing headlamp bulbs Handle a halogen headlamp bulb carefully and keep out of the following lamps frequently: • Headlamps • Tail lamps • Brakelamps • High-mount brakelamp • Turn ...signals • Backup lamps • License plate lamp Do not remove lamp bulbs unless they will be replaced immediately. Make sure headlamp switch is removed for an extended period of time, contaminants may enter the lamp housings and affect performance. If a bulb is in...
... Remove the sight shield by turning the three knobs to break the next time the headlamps are operated. Replacing headlamp bulbs Handle a halogen headlamp bulb carefully and keep out of the following lamps frequently: • Headlamps • Tail lamps • Brakelamps • High-mount brakelamp • Turn ...signals • Backup lamps • License plate lamp Do not remove lamp bulbs unless they will be replaced immediately. Make sure headlamp switch is removed for an extended period of time, contaminants may enter the lamp housings and affect performance. If a bulb is in...
Owner Guide 1st Printing
Page 134
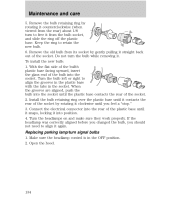
...until it clockwise until it snaps, locking it straight back out of the socket. Connect the electrical connector into the socket. Make sure the headlamp control is in the socket. Turn the bulb left or right to retain the new bulb. 6. To install the new bulb: 1. Turn the... rotating it counterclockwise (when viewed from the rear) about 1/8 turn signal bulbs 1. When the grooves are aligned, push the bulb into position. 4. If the headlamp was correctly aligned before you changed the bulb, you feel a "stop." 3. Remove the old bulb from the bulb socket, and slide the ring off the...
...until it clockwise until it snaps, locking it straight back out of the socket. Connect the electrical connector into the socket. Make sure the headlamp control is in the socket. Turn the bulb left or right to retain the new bulb. 6. To install the new bulb: 1. Turn the... rotating it counterclockwise (when viewed from the rear) about 1/8 turn signal bulbs 1. When the grooves are aligned, push the bulb into position. 4. If the headlamp was correctly aligned before you changed the bulb, you feel a "stop." 3. Remove the old bulb from the bulb socket, and slide the ring off the...
Owner Guide 1st Printing
Page 135
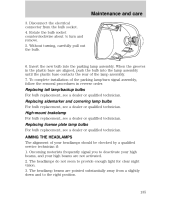
...clear night vision. 3. When the grooves in reverse order. Oncoming motorists frequently signal you to deactivate your high beams, and your headlamps should be checked by a qualified service technician if: 1. Replacing tail lamp/backup bulbs For bulb replacement, see a dealer or ...qualified technician. High-mount brakelamp For bulb replacement, see a dealer or qualified technician. Maintenance and care 3. AIMING THE HEADLAMPS The alignment of the lamp assembly. 7. To complete installation of the parking lamp/turn and remove. 5. Without turning, carefully pull out ...
...clear night vision. 3. When the grooves in reverse order. Oncoming motorists frequently signal you to deactivate your high beams, and your headlamps should be checked by a qualified service technician if: 1. Replacing tail lamp/backup bulbs For bulb replacement, see a dealer or ...qualified technician. High-mount brakelamp For bulb replacement, see a dealer or qualified technician. Maintenance and care 3. AIMING THE HEADLAMPS The alignment of the lamp assembly. 7. To complete installation of the parking lamp/turn and remove. 5. Without turning, carefully pull out ...
Owner Guide 1st Printing
Page 136
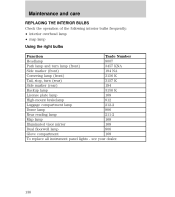
... INTERIOR BULBS Check the operation of the following interior bulbs frequently: • interior overhead lamp • map lamp Using the right bulbs Function Trade Number Headlamp 9007 Park lamp and turn lamp (front) 3457 KNA Side marker (front) 194 NA Cornering lamp (front) 3156 K Tail, stop, turn (rear) 3157 K Side marker...
... INTERIOR BULBS Check the operation of the following interior bulbs frequently: • interior overhead lamp • map lamp Using the right bulbs Function Trade Number Headlamp 9007 Park lamp and turn lamp (front) 3457 KNA Side marker (front) 194 NA Cornering lamp (front) 3156 K Tail, stop, turn (rear) 3157 K Side marker...
Owner Guide 1st Printing
Page 149
Index Aiming headlamps ...135 Air bag supplemental restraint system ...67 and child safety seats ...68 description ...67 disposal ...71 indicator light ...70 passenger air bag ...69 Air conditioning ... Break-in period ...2 Bulbs, replacing ...133 specifications ...136 Changing a tire ...100 Child safety seats ...72 Childproof locks ...48 Chime headlamps on ...11 Cleaning your vehicle ...137 engine compartment ...138,139 exterior ...140 headlamps ...139 plastic parts ...139 washing ...137 waxing ...137 wheels ...138 windows ...141 wiper blades ...139 Climate control system automatic...
Index Aiming headlamps ...135 Air bag supplemental restraint system ...67 and child safety seats ...68 description ...67 disposal ...71 indicator light ...70 passenger air bag ...69 Air conditioning ... Break-in period ...2 Bulbs, replacing ...133 specifications ...136 Changing a tire ...100 Child safety seats ...72 Childproof locks ...48 Chime headlamps on ...11 Cleaning your vehicle ...137 engine compartment ...138,139 exterior ...140 headlamps ...139 plastic parts ...139 washing ...137 waxing ...137 wheels ...138 windows ...141 wiper blades ...139 Climate control system automatic...
Owner Guide 1st Printing
Page 150
Index Headlamps ...23 autolamp system ...24 daytime running lights ...24 flashing ...23 high beam ...23 Heating ...25 High beams indicator light ...9 Hood release lever ...108 Ignition positions ... lighting up panel and interior .23 Keyless entry system autolock ...50 keypad ...55 programming entry code ...55,56 Keys key in ignition chime ...11 Lamps headlamps ...133 high-mount brakelamp ...135 interior lamps ...136 parking lamps ...134 tail lamps ...135 License plate lamps ...135 Lights, warning and indicator air bag ...8 air...
Index Headlamps ...23 autolamp system ...24 daytime running lights ...24 flashing ...23 high beam ...23 Heating ...25 High beams indicator light ...9 Hood release lever ...108 Ignition positions ... lighting up panel and interior .23 Keyless entry system autolock ...50 keypad ...55 programming entry code ...55,56 Keys key in ignition chime ...11 Lamps headlamps ...133 high-mount brakelamp ...135 interior lamps ...136 parking lamps ...134 tail lamps ...135 License plate lamps ...135 Lights, warning and indicator air bag ...8 air...
Scheduled Maintenance Guide 2nd Printing
Page 29
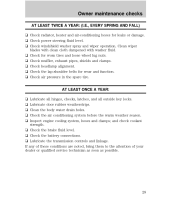
..., bring them to the attention of your dealer or qualified service technician as soon as possible. 29 u Check windshield washer spray and wiper operation. u Check headlamp alignment. u Check for leaks or damage. Clean the body water drain holes. Owner maintenance checks AT LEAST TWICE A YEAR: (I.E., EVERY SPRING AND FALL) u Check radiator...
..., bring them to the attention of your dealer or qualified service technician as soon as possible. 29 u Check windshield washer spray and wiper operation. u Check headlamp alignment. u Check for leaks or damage. Clean the body water drain holes. Owner maintenance checks AT LEAST TWICE A YEAR: (I.E., EVERY SPRING AND FALL) u Check radiator...

