

Customer Assistance Guide 1st Printing
Page 11
... luggage cover Trunk mount luggage rack Protection and appearance equipment Carpet floor mats Chemicals and paints Cleaners, waxes, and polishes Flat splash guards Full front end covers Lubricants and oils Mini-mask Molded splash guards Molded vinyl floor mats Rear decklid spoiler Side window air deflectors 11
... luggage cover Trunk mount luggage rack Protection and appearance equipment Carpet floor mats Chemicals and paints Cleaners, waxes, and polishes Flat splash guards Full front end covers Lubricants and oils Mini-mask Molded splash guards Molded vinyl floor mats Rear decklid spoiler Side window air deflectors 11
Warranty Guide 1st Printing
Page 5
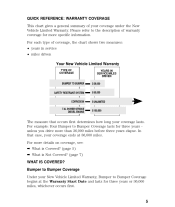
... DIESEL ENGINE 3/36,000 5/50,000 5/UNLIMITED 5/100,000 The measure that case, your coverage lasts. In that occurs first determines how long your coverage ends at the Warranty Start Date and lasts for three years or 36,000 miles, whichever occurs first. 5 For more than 36,000 miles before three...
... DIESEL ENGINE 3/36,000 5/50,000 5/UNLIMITED 5/100,000 The measure that case, your coverage lasts. In that occurs first determines how long your coverage ends at the Warranty Start Date and lasts for three years or 36,000 miles, whichever occurs first. 5 For more than 36,000 miles before three...
Warranty Guide 1st Printing
Page 7
... Caused by Accident Your New Vehicle Limited Warranty does not cover components or conditions that are examples: • altering or modifying the vehicle - After the end of time with the result that the actual mileage cannot be determined • misusing the vehicle, such as driving over curbs, overloading, racing or misusing...
... Caused by Accident Your New Vehicle Limited Warranty does not cover components or conditions that are examples: • altering or modifying the vehicle - After the end of time with the result that the actual mileage cannot be determined • misusing the vehicle, such as driving over curbs, overloading, racing or misusing...
Warranty Guide 1st Printing
Page 10
... rental unit. VIRGIN ISLANDS) Your vehicle is covered by another Ford warranty - Ford will cover: • towing to the nearest Ford or Mercury dealership • flat tire change • fuel delivery • jump starts • lock-out problems The Roadside Assistance Program is damaged during... the Bumper to Bumper Coverage has ended - You will find your new vehicle. Under this program Ford will pay the tow charge under the other warranty. 4. If you with ...
... rental unit. VIRGIN ISLANDS) Your vehicle is covered by another Ford warranty - Ford will cover: • towing to the nearest Ford or Mercury dealership • flat tire change • fuel delivery • jump starts • lock-out problems The Roadside Assistance Program is damaged during... the Bumper to Bumper Coverage has ended - You will find your new vehicle. Under this program Ford will pay the tow charge under the other warranty. 4. If you with ...
Owner Guide 1st Printing
Page 6
... up. Read your Warranty Information Booklet carefully to the addresses and phone numbers on certain parts, and Emissions Warranties. Introduction The Quick Index at the end of the book provides a page number following each item which indicates where detailed information can be obtained from your dealer or by three types of..., turn to the back of the book and search in good condition. If the word you need. Maintenance Schedule As with any Ford or Lincoln-Mercury dealer, or refer to find information under a technical term. Box 1580, Station B, Mississauga, Ontario L4Y 4G3.
... up. Read your Warranty Information Booklet carefully to the addresses and phone numbers on certain parts, and Emissions Warranties. Introduction The Quick Index at the end of the book provides a page number following each item which indicates where detailed information can be obtained from your dealer or by three types of..., turn to the back of the book and search in good condition. If the word you need. Maintenance Schedule As with any Ford or Lincoln-Mercury dealer, or refer to find information under a technical term. Box 1580, Station B, Mississauga, Ontario L4Y 4G3.
Owner Guide 1st Printing
Page 39
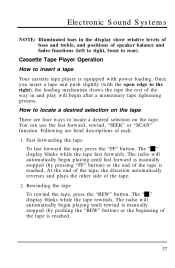
... are brief descriptions of each. 1. The radio will automatically begin playing until rewind is manually stopped (by pressing "FF" button) or the end of the tape is equipped with the open edge to locate a desired selection on the tape. The radio will automatically begin playing until fast ...REW" button. You can use the fast forward, rewind, "SEEK" or "SCAN" function. The "X" display blinks while the tape fast forwards. At the end of the tape, the direction automatically reverses and plays the other side of the tape. 2. Fast forwarding the tape To fast forward the tape, press...
... are brief descriptions of each. 1. The radio will automatically begin playing until rewind is manually stopped (by pressing "FF" button) or the end of the tape is equipped with the open edge to locate a desired selection on the tape. The radio will automatically begin playing until fast ...REW" button. You can use the fast forward, rewind, "SEEK" or "SCAN" function. The "X" display blinks while the tape fast forwards. At the end of the tape, the direction automatically reverses and plays the other side of the tape. 2. Fast forwarding the tape To fast forward the tape, press...
Owner Guide 1st Printing
Page 44
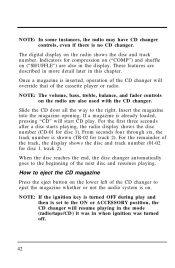
... the disc number (CD-01 for compression on ("COMP") and shuffle on the radio shows the disc and track number. When the disc reaches the end, the disc changer automatically goes to the beginning of the CD changer to eject the magazine whether or not the audio system is set to...
... the disc number (CD-01 for compression on ("COMP") and shuffle on the radio shows the disc and track number. When the disc reaches the end, the disc changer automatically goes to the beginning of the CD changer to eject the magazine whether or not the audio system is set to...
Owner Guide 1st Printing
Page 45
... during the fast reverse period. Holding this button for approximately a ten-second sampling. The audio level will drop and the elapsed time will show the end time of the a previous track or the right (a) side locate a later selection. How to enter the scan mode. When the fast forward ("FF")... button is released, the player resumes play at a faster speed. This continues until you have reached the end of the disc by keeping the fast forward ("FF") button pressed, the display will be muted. Press the left (b) side to locate of the ...
... during the fast reverse period. Holding this button for approximately a ten-second sampling. The audio level will drop and the elapsed time will show the end time of the a previous track or the right (a) side locate a later selection. How to enter the scan mode. When the fast forward ("FF")... button is released, the player resumes play at a faster speed. This continues until you have reached the end of the disc by keeping the fast forward ("FF") button pressed, the display will be muted. Press the left (b) side to locate of the ...
Owner Guide 1st Printing
Page 91
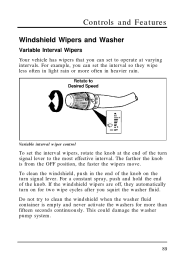
... can set to the most effective interval. If the windshield wipers are off, they wipe less often in light rain or more often in the end of the knob on the turn on for more than fifteen seconds continuously. The farther the knob is empty and never activate the washers for... Interval Wipers Your vehicle has wipers that you can set the interval so they automatically turn signal lever. For a constant spray, push and hold the end of the turn signal lever to operate at the...
... can set to the most effective interval. If the windshield wipers are off, they wipe less often in light rain or more often in the end of the knob on the turn on for more than fifteen seconds continuously. The farther the knob is empty and never activate the washers for... Interval Wipers Your vehicle has wipers that you can set the interval so they automatically turn signal lever. For a constant spray, push and hold the end of the turn signal lever to operate at the...
Owner Guide 1st Printing
Page 92
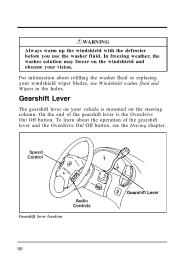
... information about the operation of the gearshift lever is mounted on the windshield and obscure your vehicle is the Overdrive On/Off button. On the end of the gearshift lever and the Overdrive On/Off button, see Windshield washer fluid and Wipers in the Index. To learn about refilling the washer...
... information about the operation of the gearshift lever is mounted on the windshield and obscure your vehicle is the Overdrive On/Off button. On the end of the gearshift lever and the Overdrive On/Off button, see Windshield washer fluid and Wipers in the Index. To learn about refilling the washer...
Owner Guide 1st Printing
Page 128
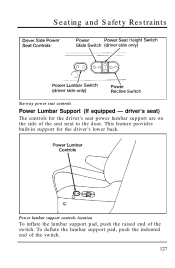
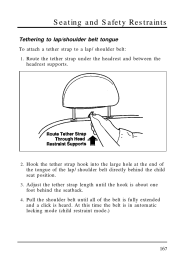
This feature provides built-in support for the driver's seat power lumbar support are on the side of the seat next to the door. To deflate the lumbar support pad, push the indented end of the switch. Seating and Safety Restraints Six-way power seat controls Power Lumbar Support (If equipped - Power lumbar support controls location To inflate the lumbar support pad, push the raised end of the switch. 127 driver's seat) The controls for the driver's lower back.
This feature provides built-in support for the driver's seat power lumbar support are on the side of the seat next to the door. To deflate the lumbar support pad, push the indented end of the switch. Seating and Safety Restraints Six-way power seat controls Power Lumbar Support (If equipped - Power lumbar support controls location To inflate the lumbar support pad, push the raised end of the switch. 127 driver's seat) The controls for the driver's lower back.
Owner Guide 1st Printing
Page 141
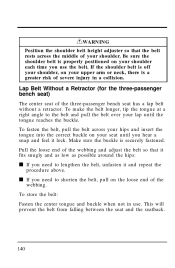
... upper arm or neck, there is a greater risk of your shoulder each time you need to lengthen the belt, unfasten it lock. Pull the loose end of the three-passenger bench seat has a lap belt without a retractor. To store the belt: Fasten the center tongue and buckle when not in a collision... the belt, pull the belt across the middle of severe injury in use the belt. Make sure the buckle is properly positioned on the loose end of the webbing.
... upper arm or neck, there is a greater risk of your shoulder each time you need to lengthen the belt, unfasten it lock. Pull the loose end of the three-passenger bench seat has a lap belt without a retractor. To store the belt: Fasten the center tongue and buckle when not in a collision... the belt, pull the belt across the middle of severe injury in use the belt. Make sure the buckle is properly positioned on the loose end of the webbing.
Owner Guide 1st Printing
Page 142
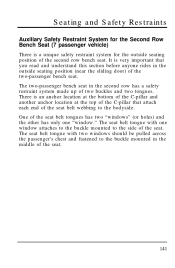
... buckle mounted to the side of two buckles and two tongues. The seat belt tongue with one "window." It is very important that attach each end of the seat belt webbing to the buckle mounted in the second row has a safety restraint system made up of the seat. The seat belt...
... buckle mounted to the side of two buckles and two tongues. The seat belt tongue with one "window." It is very important that attach each end of the seat belt webbing to the buckle mounted in the second row has a safety restraint system made up of the seat. The seat belt...
Owner Guide 1st Printing
Page 168
... Tethering to lap/shoulder belt tongue To attach a tether strap to a lap/shoulder belt: 1. Hook the tether strap hook into the large hole at the end of the tongue of the belt is fully extended and a click is in automatic locking mode (child restraint mode.) 167
... Tethering to lap/shoulder belt tongue To attach a tether strap to a lap/shoulder belt: 1. Hook the tether strap hook into the large hole at the end of the tongue of the belt is fully extended and a click is in automatic locking mode (child restraint mode.) 167
Owner Guide 1st Printing
Page 222
... the parking brake does not stop your vehicle as quickly as striking large potholes, sliding into curbs on icy roads, or a collision involving the front end, have the power steering system checked.
... the parking brake does not stop your vehicle as quickly as striking large potholes, sliding into curbs on icy roads, or a collision involving the front end, have the power steering system checked.
Owner Guide 1st Printing
Page 223
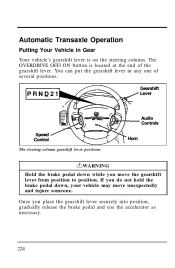
... OVERDRIVE OFF/ON button is on the steering column. You can put the gearshift lever in Gear Your vehicle's gearshift lever is located at the end of several positions. Once you move unexpectedly and injure someone. The steering column gearshift lever positions RWARNING Hold the brake pedal down , your vehicle may...
... OVERDRIVE OFF/ON button is on the steering column. You can put the gearshift lever in Gear Your vehicle's gearshift lever is located at the end of several positions. Once you move unexpectedly and injure someone. The steering column gearshift lever positions RWARNING Hold the brake pedal down , your vehicle may...
Owner Guide 1st Printing
Page 225
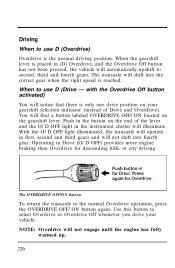
... right speed is the normal driving position. Push in first, second and third gears and will find a button labeled OVERDRIVE OFF/ON located on the end of Drive and Overdrive). When to select Overdrive or Overdrive Off whenever you drive your gearshift selection indicator (instead of the lever and the O/D OFF...
... right speed is the normal driving position. Push in first, second and third gears and will find a button labeled OVERDRIVE OFF/ON located on the end of Drive and Overdrive). When to select Overdrive or Overdrive Off whenever you drive your gearshift selection indicator (instead of the lever and the O/D OFF...
Owner Guide 1st Printing
Page 256
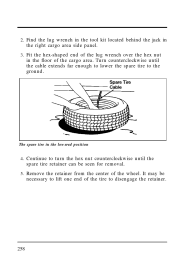
The spare tire in the right cargo area side panel. 3. Find the lug wrench in the tool kit located behind the jack in the lowered position 4. Fit the hex-shaped end of the lug wrench over the hex nut in the floor of the wheel. It may be seen for removal. 5. Continue to disengage the retainer. 258 Remove the retainer from the center of the cargo area. Turn counterclockwise until the spare tire retainer can be necessary to lift one end of the tire to turn the hex nut counterclockwise until the cable extends far enough to lower the spare tire to the ground. 2.
The spare tire in the right cargo area side panel. 3. Find the lug wrench in the tool kit located behind the jack in the lowered position 4. Fit the hex-shaped end of the lug wrench over the hex nut in the floor of the wheel. It may be seen for removal. 5. Continue to disengage the retainer. 258 Remove the retainer from the center of the cargo area. Turn counterclockwise until the spare tire retainer can be necessary to lift one end of the tire to turn the hex nut counterclockwise until the cable extends far enough to lower the spare tire to the ground. 2.
Owner Guide 1st Printing
Page 257
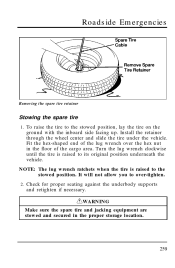
... underbody supports and retighten if necessary. To raise the tire to over the hex nut in the proper storage location. 259 Fit the hex-shaped end of the lug wrench over -tighten. 2.
... underbody supports and retighten if necessary. To raise the tire to over the hex nut in the proper storage location. 259 Fit the hex-shaped end of the lug wrench over -tighten. 2.

Owner Guide 1st Printing
Page 258
... off the jack, you or someone else could be sure the parking brake is diagonally opposite the tire that is diagonally opposite (other side and end of the front wheels is in both directions) the wheel that you change a tire, be seriously injured. 2. Set the parking brake and block the wheel...
... off the jack, you or someone else could be sure the parking brake is diagonally opposite the tire that is diagonally opposite (other side and end of the front wheels is in both directions) the wheel that you change a tire, be seriously injured. 2. Set the parking brake and block the wheel...

