

Warranty Guide 1st Printing
Page 14
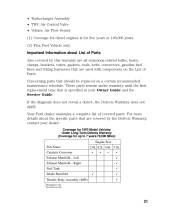
Concerning parts that are all emissions-related bulbs, hoses, clamps, brackets, tubes, gaskets, seals, belts, connectors, gasoline fuel lines and wiring harnesses that should be replaced on the List of Parts, above. • Fuel Filler Cap and Neck Restrictor • Fuel Injection System • Fuel Injector Supply Manifold • Fuel Sensor ...(1) Flex Fuel Vehicle only. Important information about List of Parts Also covered by the two emissions warranties are used with components on a certain recommended replacement schedule: These parts remain under warranty until : (a) the 14
Concerning parts that are all emissions-related bulbs, hoses, clamps, brackets, tubes, gaskets, seals, belts, connectors, gasoline fuel lines and wiring harnesses that should be replaced on the List of Parts, above. • Fuel Filler Cap and Neck Restrictor • Fuel Injection System • Fuel Injector Supply Manifold • Fuel Sensor ...(1) Flex Fuel Vehicle only. Important information about List of Parts Also covered by the two emissions warranties are used with components on a certain recommended replacement schedule: These parts remain under warranty until : (a) the 14
Warranty Guide 1st Printing
Page 21
These parts remain under warranty until the first replacement time that are all emissions-related bulbs, hoses, clamps, brackets, tubes, gaskets, seals, belts. Coverage for 1997-Model Vehicles Under Long-Term Defects Warranty (Coverage for up to 7 years/70,000 Miles) Engine Size Part Name ...by this warranty are used with components on a certain recommended maintenance schedule. Important Information about the specific parts that should be replaced on the List of covered parts. For more details about List of Parts Also covered by the Defects Warranty, contact your Owner...
These parts remain under warranty until the first replacement time that are all emissions-related bulbs, hoses, clamps, brackets, tubes, gaskets, seals, belts. Coverage for 1997-Model Vehicles Under Long-Term Defects Warranty (Coverage for up to 7 years/70,000 Miles) Engine Size Part Name ...by this warranty are used with components on a certain recommended maintenance schedule. Important Information about the specific parts that should be replaced on the List of covered parts. For more details about List of Parts Also covered by the Defects Warranty, contact your Owner...
Owner Guide 1st Printing
Page 315
... warmed up and at least four idle periods. s 20 minutes of the following lights frequently: s headlamps s high-mount brakelamp s tail lamps s brakelamps 318 Lights and Bulb Replacement It is a good idea to reach the ready condition consist of a minimum of 30 minutes of the On-Board Diagnostic (OBD) II system. If the...
... warmed up and at least four idle periods. s 20 minutes of the following lights frequently: s headlamps s high-mount brakelamp s tail lamps s brakelamps 318 Lights and Bulb Replacement It is a good idea to reach the ready condition consist of a minimum of 30 minutes of the On-Board Diagnostic (OBD) II system. If the...
Owner Guide 1st Printing
Page 316
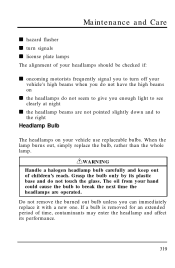
... frequently signal you to turn off your vehicle use replaceable bulbs. Grasp the bulb only by its performance. 319 Do not remove the burned out bulb unless you enough light to give you can immediately replace it with a new one. If a bulb is removed for an extended period of children's reach.... RWARNING Handle a halogen headlamp bulb carefully and keep out of time, contaminants ...
... frequently signal you to turn off your vehicle use replaceable bulbs. Grasp the bulb only by its performance. 319 Do not remove the burned out bulb unless you enough light to give you can immediately replace it with a new one. If a bulb is removed for an extended period of children's reach.... RWARNING Handle a halogen headlamp bulb carefully and keep out of time, contaminants ...
Owner Guide 1st Printing
Page 318
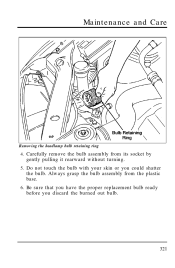
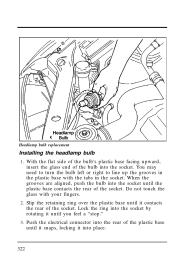
Always grasp the bulb assembly from its socket by gently pulling it rearward without turning. 5. Carefully remove the bulb assembly from the plastic base. 6. Be sure that you have the proper replacement bulb ready before you could shatter the bulb. Do not touch the bulb with your skin or you discard the burned out bulb. 321 Maintenance and Care Removing the headlamp bulb retaining ring 4.
Always grasp the bulb assembly from its socket by gently pulling it rearward without turning. 5. Carefully remove the bulb assembly from the plastic base. 6. Be sure that you have the proper replacement bulb ready before you could shatter the bulb. Do not touch the bulb with your skin or you discard the burned out bulb. 321 Maintenance and Care Removing the headlamp bulb retaining ring 4.
Owner Guide 1st Printing
Page 319
You may need to turn the bulb left or right to line up the grooves in the plastic base with your fingers. 2. Lock the ring into the socket. Slip the retaining ring ... are aligned, push the bulb into place. 322 Do not touch the glass with the tabs in the socket. With the flat side of the bulb's plastic base facing upward, insert the glass end of the bulb into the socket by rotating it contacts the rear of the socket. Headlamp bulb replacement Installing the headlamp...
You may need to turn the bulb left or right to line up the grooves in the plastic base with your fingers. 2. Lock the ring into the socket. Slip the retaining ring ... are aligned, push the bulb into place. 322 Do not touch the glass with the tabs in the socket. With the flat side of the bulb's plastic base facing upward, insert the glass end of the bulb into the socket by rotating it contacts the rear of the socket. Headlamp bulb replacement Installing the headlamp...
Owner Guide 1st Printing
Page 320
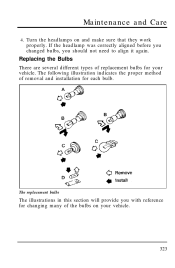
If the headlamp was correctly aligned before you changed bulbs, you with reference for changing many of the bulbs on and make sure that they work properly. The following illustration indicates the proper method of replacement bulbs for each bulb. Replacing the Bulbs There are several different types of removal and installation for your vehicle. 323 Maintenance and Care 4. The replacement bulbs The illustrations in this section will provide you should not need to align it again. Turn the headlamps on your vehicle.
If the headlamp was correctly aligned before you changed bulbs, you with reference for changing many of the bulbs on and make sure that they work properly. The following illustration indicates the proper method of replacement bulbs for each bulb. Replacing the Bulbs There are several different types of removal and installation for your vehicle. 323 Maintenance and Care 4. The replacement bulbs The illustrations in this section will provide you should not need to align it again. Turn the headlamps on your vehicle.
Owner Guide 1st Printing
Page 322
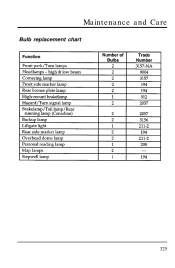
Maintenance and Care Bulb replacement chart 325
Maintenance and Care Bulb replacement chart 325
Owner Guide 1st Printing
Page 372
... 156 156 163 156 156 ...138, . . 387 master cylinder ...new brake linings ...noise ...parking ...servicing ...stopping distances...trailer ...when storing your vehicle Brights (high beams) ...Bulbs, replacing halogen ...headlamps ...specifications ...220, ...343 285 5 219 221 285 221 237 338 17 319 319 325 ... Index Brakes (continued) lubricant specifications . . C Canada, customer assistance ...Canadian...
... 156 156 163 156 156 ...138, . . 387 master cylinder ...new brake linings ...noise ...parking ...servicing ...stopping distances...trailer ...when storing your vehicle Brights (high beams) ...Bulbs, replacing halogen ...headlamps ...specifications ...220, ...343 285 5 219 221 285 221 237 338 17 319 319 325 ... Index Brakes (continued) lubricant specifications . . C Canada, customer assistance ...Canadian...
Owner Guide 1st Printing
Page 379
location ... ...Rating) ... ... 224 ...234 . 229, 232 ...229 ...233 H Hazard flashers ...Headlamps bulb specification ...checking alignment ...cleaning ...daytime running lights ...replacing bulbs ...warning chime ...Head restraints ...Heating, manual heating and air High beams, indicator light...Hitch...Hood latch location ...lubrication specifications ...release lever ...working under the hood......
location ... ...Rating) ... ... 224 ...234 . 229, 232 ...229 ...233 H Hazard flashers ...Headlamps bulb specification ...checking alignment ...cleaning ...daytime running lights ...replacing bulbs ...warning chime ...Head restraints ...Heating, manual heating and air High beams, indicator light...Hitch...Hood latch location ...lubrication specifications ...release lever ...working under the hood......
Owner Guide 1st Printing
Page 380
... ...disconnecting cables ...260 260 257 272 274 K Keys key in ignition chime ...17 positions of the ignition ...86 stuck in lock position ...86, 217 L Lamps bulb replacement specifications chart checking ...daytime running light system ...hazard flashers ...illuminated entry system...instrument panel, dimming...
... ...disconnecting cables ...260 260 257 272 274 K Keys key in ignition chime ...17 positions of the ignition ...86 stuck in lock position ...86, 217 L Lamps bulb replacement specifications chart checking ...daytime running light system ...hazard flashers ...illuminated entry system...instrument panel, dimming...
Owner Guide 1st Printing
Page 385
...) ... 341 343 94 94 95 95 95 238 . 20 211 212 244 223 86 91 ... . 112 . 128 . 336 . . 11 . 146 T Tachometer mechanical cluster...Tail lamps bulb replacement ...cleaning ...Temperature control (see Climate control) ...Tether anchor installation (see Child restraints). Tilt steering wheel...318, ...21 325 333 56 163 91 400
...) ... 341 343 94 94 95 95 95 238 . 20 211 212 244 223 86 91 ... . 112 . 128 . 336 . . 11 . 146 T Tachometer mechanical cluster...Tail lamps bulb replacement ...cleaning ...Temperature control (see Climate control) ...Tether anchor installation (see Child restraints). Tilt steering wheel...318, ...21 325 333 56 163 91 400


