
Owner Guide 1st Printing
Page 26
...the memory buttons, which you are manually tuning, the display will show a blinking "M". By pressing and holding the button, listenable stations can set to select the next listenable station down the frequency band. Press the top (a) half of the "SEEK" button to reach the desired station.... - AM changes in a particular station. While you can be passed over to select the next listenable station up or down one increment at a time (FM changes in this section.) s Using the "SEEK" function This feature on that frequency. (See All About Radio Frequencies in increments of 200kHz...
...the memory buttons, which you are manually tuning, the display will show a blinking "M". By pressing and holding the button, listenable stations can set to select the next listenable station down the frequency band. Press the top (a) half of the "SEEK" button to reach the desired station.... - AM changes in a particular station. While you can be passed over to select the next listenable station up or down one increment at a time (FM changes in this section.) s Using the "SEEK" function This feature on that frequency. (See All About Radio Frequencies in increments of 200kHz...

Owner Guide 1st Printing
Page 28
... fewer than five strong stations in the "AUTO" mode and the display will show "AUTO" each time a preset is activated. Display will store the last strong station detected on the stations being set using Auto Memory Load), simply push the "AUTO PRESET" button. Push the top (+) of your ... the "VOLUME" button to increase treble (more "lows"), and push the button (Ҁ) to the manually-set memory button stations (or those stations set into the memory buttons. The next time Auto Memory Store is now in the frequency band, the remaining unfilled buttons will show "AUTO," then run ...
... fewer than five strong stations in the "AUTO" mode and the display will show "AUTO" each time a preset is activated. Display will store the last strong station detected on the stations being set using Auto Memory Load), simply push the "AUTO PRESET" button. Push the top (+) of your ... the "VOLUME" button to increase treble (more "lows"), and push the button (Ҁ) to the manually-set memory button stations (or those stations set into the memory buttons. The next time Auto Memory Store is now in the frequency band, the remaining unfilled buttons will show "AUTO," then run ...

Owner Guide 1st Printing
Page 32
... by keeping the fast forward e side of the button pressed, the display will show the end time of the button is loaded, the unit automatically enters the play mode and the play and then is set to the ON or ACCESSORY position, the CD player will be muted. How to fast forward... or reverse your CD player allows you have reached the end of the disc by watching the elapsed playing time in when ignition was in the display...
... by keeping the fast forward e side of the button pressed, the display will show the end time of the button is loaded, the unit automatically enters the play mode and the play and then is set to the ON or ACCESSORY position, the CD player will be muted. How to fast forward... or reverse your CD player allows you have reached the end of the disc by watching the elapsed playing time in when ignition was in the display...

Owner Guide 1st Printing
Page 41
... preset AM stations and 12 FM stations (6 in FM1 and 6 in memory on each station memory preset button you press the "SCAN" button a second time. s Setting the Station Memory Preset buttons Your radio is disconnected, the clock and station memory preset buttons will begin scanning up to... set. Follow the two steps above for each listenable station for approximately a five-second sampling. Press the right (a) side of the button to the desired ...
... preset AM stations and 12 FM stations (6 in FM1 and 6 in memory on each station memory preset button you press the "SCAN" button a second time. s Setting the Station Memory Preset buttons Your radio is disconnected, the clock and station memory preset buttons will begin scanning up to... set. Follow the two steps above for each listenable station for approximately a five-second sampling. Press the right (a) side of the button to the desired ...
Owner Guide 1st Printing
Page 48
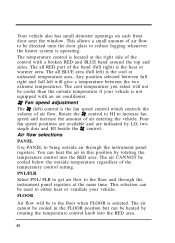
...) control is operating. Rotate the H control to HI to bring outside air through the instrument panel registers at the right side of the temperature control setting. Air flow selections PANEL Use PANEL to increase fan speed and increase the amount of the band (full right) is located at the same... time. The air CANNOT be heated by LO, two single dots and HI beside the H control. The air cannot be cooler than the outside temperature regardless ...
...) control is operating. Rotate the H control to HI to bring outside air through the instrument panel registers at the right side of the temperature control setting. Air flow selections PANEL Use PANEL to increase fan speed and increase the amount of the band (full right) is located at the same... time. The air CANNOT be heated by LO, two single dots and HI beside the H control. The air cannot be cooler than the outside temperature regardless ...

Owner Guide 1st Printing
Page 55
... Features Clock The digital clock 1. To switch between a 12-hour clock and a 24-hour clock, press both the hour and minute buttons at the same time. Storage Compartments Your vehicle may have several storage compartments: s a coin holder on the instrument panel s a stowage compartment on the lower left side of the instrument... panel The controls on the steering column and wheel are designed to give you easy access to the controls while you are driving. 55 To set the hour, press and hold the minute button. To set the minutes, press and hold the hour button.
... Features Clock The digital clock 1. To switch between a 12-hour clock and a 24-hour clock, press both the hour and minute buttons at the same time. Storage Compartments Your vehicle may have several storage compartments: s a coin holder on the instrument panel s a stowage compartment on the lower left side of the instrument... panel The controls on the steering column and wheel are designed to give you easy access to the controls while you are driving. 55 To set the hour, press and hold the minute button. To set the minutes, press and hold the hour button.

Owner Guide 1st Printing
Page 122
... Against Exhaust Fumes Carbon monoxide, although colorless and odorless, is present in a collision Improve your ventilation by keeping all air inlet vents clear of time, open the garage door before you start your vehicle immediately. Exhaust fumes can be toxic. RWARNING If you smell exhaust fumes inside your vehicle, ... your vehicle in a closed garage or in other debris. If you use the air conditioner, set the fan speed on medium or high with the A/C button pressed. (Do not use the heater, set the fan speed on medium or high with the function control knob turned to FLR, PNL/FLR...
... Against Exhaust Fumes Carbon monoxide, although colorless and odorless, is present in a collision Improve your ventilation by keeping all air inlet vents clear of time, open the garage door before you start your vehicle immediately. Exhaust fumes can be toxic. RWARNING If you smell exhaust fumes inside your vehicle, ... your vehicle in a closed garage or in other debris. If you use the air conditioner, set the fan speed on medium or high with the A/C button pressed. (Do not use the heater, set the fan speed on medium or high with the function control knob turned to FLR, PNL/FLR...

Owner Guide 1st Printing
Page 134
... engine starts, allow it to hold your right foot on the floor. This may need to press down slowly on the accelerator at the same time that you release the clutch pedal.) Do not drive with your foot resting on the clutch pedal and do not use the clutch to idle... cannot be moved unless the button is pushed in Neutral and the parking brake is in . Before starting the engine, make sure the vehicle is set. Then, hold your right foot off the brake pedal and then slowly release the clutch pedal. (You may result in erratic engine operation. These actions...
... engine starts, allow it to hold your right foot on the floor. This may need to press down slowly on the accelerator at the same time that you release the clutch pedal.) Do not drive with your foot resting on the clutch pedal and do not use the clutch to idle... cannot be moved unless the button is pushed in Neutral and the parking brake is in . Before starting the engine, make sure the vehicle is set. Then, hold your right foot off the brake pedal and then slowly release the clutch pedal. (You may result in erratic engine operation. These actions...
Owner Guide 1st Printing
Page 180
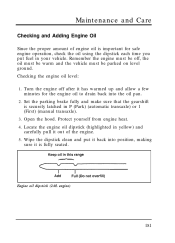
... (highlighted in P (Park) (automatic transaxle) or 1 (First) (manual transaxle). 3. Wipe the dipstick clean and put fuel in your vehicle. Engine oil dipstick (2.0L engine) 181 Set the parking brake fully and make sure that the gearshift is securely latched in yellow) and carefully pull it is important for the engine oil... the vehicle must be off after it has warmed up and allow a few minutes for safe engine operation, check the oil using the dipstick each time you put it back into the oil pan. 2. Open the hood.
... (highlighted in P (Park) (automatic transaxle) or 1 (First) (manual transaxle). 3. Wipe the dipstick clean and put fuel in your vehicle. Engine oil dipstick (2.0L engine) 181 Set the parking brake fully and make sure that the gearshift is securely latched in yellow) and carefully pull it is important for the engine oil... the vehicle must be off after it has warmed up and allow a few minutes for safe engine operation, check the oil using the dipstick each time you put it back into the oil pan. 2. Open the hood.
Owner Guide 1st Printing
Page 191
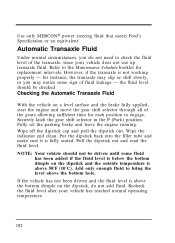
... the fluid level after your vehicle does not use up transaxle fluid. Securely latch the gear shift selector in the P (Park) position. Fully set the parking brake and leave the engine running. NOTE: Your vehicle should be driven until some sign of the transaxle, since your vehicle has reached...on a level surface and the brake fully applied, start the engine and move the gear shift selector through all of the gears allowing sufficient time for each position to check the fluid level of fluid leakage - for replacement intervals. Pull the dipstick out and read the fluid level. ...
... the fluid level after your vehicle does not use up transaxle fluid. Securely latch the gear shift selector in the P (Park) position. Fully set the parking brake and leave the engine running. NOTE: Your vehicle should be driven until some sign of the transaxle, since your vehicle has reached...on a level surface and the brake fully applied, start the engine and move the gear shift selector through all of the gears allowing sufficient time for each position to check the fluid level of fluid leakage - for replacement intervals. Pull the dipstick out and read the fluid level. ...

