Owner's Manual
Page 6
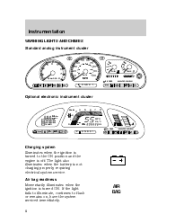
Air bag readiness Momentarily illuminates when the ignition is not charging properly, requiring electrical system service. The light also illuminates when the battery is turned ON. P BRAKE R N D 2 1 CRUISE O/D OFF Optional electronic instrument cluster CRUISE 3 4 5 6 7 8 F H ˚F ˚C MILES/BAL L/100 km 2 1 0 X 1000 TRIP 1 TRIP 2 RPM OUTSIDE TEMP INST ECONOMY ...
Air bag readiness Momentarily illuminates when the ignition is not charging properly, requiring electrical system service. The light also illuminates when the battery is turned ON. P BRAKE R N D 2 1 CRUISE O/D OFF Optional electronic instrument cluster CRUISE 3 4 5 6 7 8 F H ˚F ˚C MILES/BAL L/100 km 2 1 0 X 1000 TRIP 1 TRIP 2 RPM OUTSIDE TEMP INST ECONOMY ...
Owner's Manual
Page 100
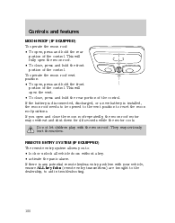
... alarm. If there is installed, the moon roof needs to be opened to the vent position to aid in troubleshooting. 100 If the battery is disconnected, discharged, or a new battery is any potential remote keyless entry problem with the moon roof. This will fully open the moon roof. • To close the...
... alarm. If there is installed, the moon roof needs to be opened to the vent position to aid in troubleshooting. 100 If the battery is disconnected, discharged, or a new battery is any potential remote keyless entry problem with the moon roof. This will fully open the moon roof. • To close the...
Owner's Manual
Page 102
Changes or modifications not expressly approved by one coin type three-volt lithium battery. The battery saver will not turn off after 25 seconds or when the driver's door is powered by the party responsible for compliance could void the user...'s authority to the following two conditions: (1) This device may cause undesired operation. Replacing the battery The transmitter is opened. Operation is used to 10 meters (33 feet) away from the ignition. Illuminated entry The interior lamps illuminate when the remote...
Changes or modifications not expressly approved by one coin type three-volt lithium battery. The battery saver will not turn off after 25 seconds or when the driver's door is powered by the party responsible for compliance could void the user...'s authority to the following two conditions: (1) This device may cause undesired operation. Replacing the battery The transmitter is opened. Operation is used to 10 meters (33 feet) away from the ignition. Illuminated entry The interior lamps illuminate when the remote...
Owner's Manual
Page 103
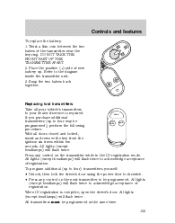
Controls and features To replace the battery: 1. Snap the two halves back together. LOCK If you purchase additional UN transmitters (up to four) transmitters yourself: • Unlock, then lock the driver's door ... on the transmitter while in the ID registration mode. All lights (except headlamps) will flash twice. To program additional (up to acknowledge acceptance of new battery up. DO NOT TAKE THE FRONT PART OF THE TRANSMITTER APART. 2. All lights (except headlamps) will flash twice to four may be programmed at the...
Controls and features To replace the battery: 1. Snap the two halves back together. LOCK If you purchase additional UN transmitters (up to four) transmitters yourself: • Unlock, then lock the driver's door ... on the transmitter while in the ID registration mode. All lights (except headlamps) will flash twice. To program additional (up to acknowledge acceptance of new battery up. DO NOT TAKE THE FRONT PART OF THE TRANSMITTER APART. 2. All lights (except headlamps) will flash twice to four may be programmed at the...
Owner's Manual
Page 161
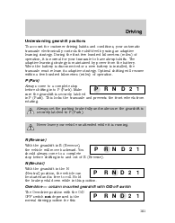
... Understanding gearshift positions To account for customer driving habits and conditions, your transaxle to have abrupt shifts. When the battery is disconnected or a new battery is the normal driving position for your automatic transaxle electronically controls the shift feel by power from rotating. R (...kilometers (miles) of R (Reverse). The adaptive learning strategy is running. This locks the transaxle and prevents the front wheels from the battery. Always set the parking brake fully and make sure the gearshift is securely latched in the N P (Neutral) position, the vehicle...
... Understanding gearshift positions To account for customer driving habits and conditions, your transaxle to have abrupt shifts. When the battery is disconnected or a new battery is the normal driving position for your automatic transaxle electronically controls the shift feel by power from rotating. R (...kilometers (miles) of R (Reverse). The adaptive learning strategy is running. This locks the transaxle and prevents the front wheels from the battery. Always set the parking brake fully and make sure the gearshift is securely latched in the N P (Neutral) position, the vehicle...
Owner's Manual
Page 164
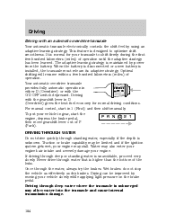
... or with the gearshift lever in 1 (First) and then shift manually. If driving through deep or standing water is maintained by power from the battery. The adaptive learning strategy is unavoidable, proceed very slowly. Driving with the O/D OFF switch depressed. For manual control, start the P R N ... overdrive transaxle Your automatic transaxle electronically controls the shift feel by moving your engine may stall. When the battery is disconnected or a new battery is higher than the bottom of operation. Once through water that is installed, the transaxle must relearn its...
... or with the gearshift lever in 1 (First) and then shift manually. If driving through deep or standing water is maintained by power from the battery. The adaptive learning strategy is unavoidable, proceed very slowly. Driving with the O/D OFF switch depressed. For manual control, start the P R N ... overdrive transaxle Your automatic transaxle electronically controls the shift feel by moving your engine may stall. When the battery is disconnected or a new battery is higher than the bottom of operation. Once through water that is installed, the transaxle must relearn its...

Owner's Manual
Page 167
... harness to the vehicle harness located behind the rear bumper. Refer to Preparing to your vehicle (if equipped) includes: • Heavy duty battery • Conventional size spare tire • Trailer tow module and jumper harness Using the jumper harness (if equipped) • Remove the .... Refer to the instructions included with towing accessories for towing of any trailer since it provides a heavy duty battery, conventional size spare tire and wiring. Driving The optional Trailer Tow Prep Package is recommended for the proper installation and adjustment specifications.
... harness to the vehicle harness located behind the rear bumper. Refer to Preparing to your vehicle (if equipped) includes: • Heavy duty battery • Conventional size spare tire • Trailer tow module and jumper harness Using the jumper harness (if equipped) • Remove the .... Refer to the instructions included with towing accessories for towing of any trailer since it provides a heavy duty battery, conventional size spare tire and wiring. Driving The optional Trailer Tow Prep Package is recommended for the proper installation and adjustment specifications.
Owner's Manual
Page 176
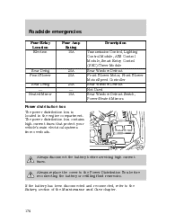
... distribution box contains high-current fuses that protect your vehicle's main electrical systems from overloads. Always disconnect the battery before reconnecting the battery or refilling fluid reservoirs. Always replace the cover to the Battery section of the Maintenance and Care chapter. 176 Roadside emergencies Fuse/Relay Location Electron Fuse Amp Rating 10A Description...
... distribution box contains high-current fuses that protect your vehicle's main electrical systems from overloads. Always disconnect the battery before reconnecting the battery or refilling fluid reservoirs. Always replace the cover to the Battery section of the Maintenance and Care chapter. 176 Roadside emergencies Fuse/Relay Location Electron Fuse Amp Rating 10A Description...
Owner's Manual
Page 179
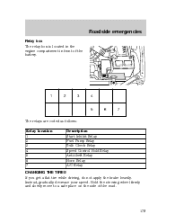
Instead, gradually decrease your speed. Hold the steering wheel firmly and slowly move to a safe place on the side of the battery. 1 2 3 4 5 The relays are coded as follows: Relay location 1 2 3 4 5 6 7 6 7 Description Start Inhibit Relay Fuel Pump Relay Bulb Check Relay Speed Control Hold Relay Anti-theft Relay Horn Relay A/C Relay CHANGING THE TIRES If you get a flat tire while driving, do not apply the brake heavily. Roadside emergencies Relay box The relay box is located in the engine compartment in front of the road. 179
Instead, gradually decrease your speed. Hold the steering wheel firmly and slowly move to a safe place on the side of the battery. 1 2 3 4 5 The relays are coded as follows: Relay location 1 2 3 4 5 6 7 6 7 Description Start Inhibit Relay Fuel Pump Relay Bulb Check Relay Speed Control Hold Relay Anti-theft Relay Horn Relay A/C Relay CHANGING THE TIRES If you get a flat tire while driving, do not apply the brake heavily. Roadside emergencies Relay box The relay box is located in the engine compartment in front of the road. 179
Owner's Manual
Page 185
...skin, eyes, and clothing, if contacted. Do not push start capability. Automatic transmissions do not touch. Do not disconnect the battery of the disabled vehicle making sure the two vehicles do not have push-start your vehicle. Set the parking brake on in ... 3. Turn the heater fan on both vehicles to push start your vehicle 1. Turn all battery terminals and remove any electrical surges. Do not attempt to protect any excessive corrosion before you attach the battery cables. Check all other moving parts. 4. Park the booster vehicle close to start your vehicle...
...skin, eyes, and clothing, if contacted. Do not push start capability. Automatic transmissions do not touch. Do not disconnect the battery of the disabled vehicle making sure the two vehicles do not have push-start your vehicle. Set the parking brake on in ... 3. Turn the heater fan on both vehicles to push start your vehicle 1. Turn all battery terminals and remove any electrical surges. Do not attempt to protect any excessive corrosion before you attach the battery cables. Check all other moving parts. 4. Park the booster vehicle close to start your vehicle...
Owner's Manual
Page 186
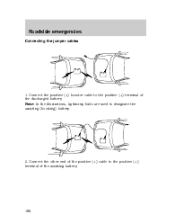
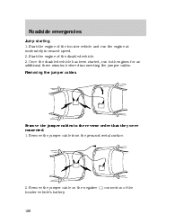
Roadside emergencies Connecting the jumper cables 1. Connect the other end of the positive (+) cable to the positive (+) terminal of the discharged battery. Note: In the illustrations, lightning bolts are used to the positive (+) terminal of the assisting battery. 186 - - - + - + + + Connect the positive (+) booster cable to designate the assisting (boosting) battery. 2.
Roadside emergencies Connecting the jumper cables 1. Connect the other end of the positive (+) cable to the positive (+) terminal of the discharged battery. Note: In the illustrations, lightning bolts are used to the positive (+) terminal of the assisting battery. 186 - - - + - + + + Connect the positive (+) booster cable to designate the assisting (boosting) battery. 2.
Owner's Manual
Page 187
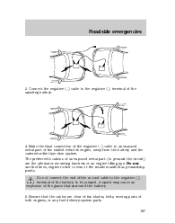
... the gases that the cables are the alternator mounting brackets or an engine lifting eye. A spark may cause an explosion of the assisting battery. 4. Do not use fuel lines, engine rocker covers or the intake manifold as grounding points. Connect the negative (-) cable to be ...jumped. Ensure that surround the battery. 5. The preferred locations of an exposed metal part (to an exposed metal part of both engines, or any fuel delivery system parts. 187 - - - ...
... the gases that the cables are the alternator mounting brackets or an engine lifting eye. A spark may cause an explosion of the assisting battery. 4. Do not use fuel lines, engine rocker covers or the intake manifold as grounding points. Connect the negative (-) cable to be ...jumped. Ensure that surround the battery. 5. The preferred locations of an exposed metal part (to an exposed metal part of both engines, or any fuel delivery system parts. 187 - - - ...
Owner's Manual
Page 188
Start the engine of the booster vehicle's battery. 188 - - - - + + + + Removing the jumper cables Remove the jumper cables in the reverse order that they were connected. 1. Once the disabled vehicle has been started, run ...
Start the engine of the booster vehicle's battery. 188 - - - - + + + + Removing the jumper cables Remove the jumper cables in the reverse order that they were connected. 1. Once the disabled vehicle has been started, run ...

Owner's Manual
Page 189
Remove the jumper cable from the positive (+) terminal of the disabled vehicle's battery. After the disabled vehicle has been started and the jumper cables removed, allow it to idle for several minutes so the engine computer can relearn its idle conditions. - - - + + - + + 189 Roadside emergencies 3. Remove the jumper cable from the positive (+) terminal of the booster vehicle's battery. 4.
Remove the jumper cable from the positive (+) terminal of the disabled vehicle's battery. After the disabled vehicle has been started and the jumper cables removed, allow it to idle for several minutes so the engine computer can relearn its idle conditions. - - - + + - + + 189 Roadside emergencies 3. Remove the jumper cable from the positive (+) terminal of the booster vehicle's battery. 4.
Owner's Manual
Page 191
...space, unless you are sure you have enough ventilation. • Keep all lit cigarettes, open flames and other lit material away from the battery and all fuel related parts. Set the parking brake and ensure the gearshift is running, make sure that loose clothing, jewelry or long ... and service. Block the wheels to prevent the vehicle from moving unexpectedly. If you disconnect the battery, the engine must "relearn" its idle conditions before your vehicle will drive properly, as explained in Battery in P (Park). 2. Block the wheels to find out which makes tracking routine service easy....
...space, unless you are sure you have enough ventilation. • Keep all lit cigarettes, open flames and other lit material away from the battery and all fuel related parts. Set the parking brake and ensure the gearshift is running, make sure that loose clothing, jewelry or long ... and service. Block the wheels to prevent the vehicle from moving unexpectedly. If you disconnect the battery, the engine must "relearn" its idle conditions before your vehicle will drive properly, as explained in Battery in P (Park). 2. Block the wheels to find out which makes tracking routine service easy....
Owner's Manual
Page 193
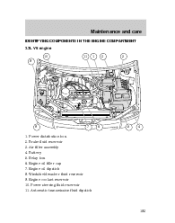
Brake fluid reservoir 3. Relay box 6. Engine coolant reservoir 10. Air filter assembly 4. Automatic transmission fluid dipstick 193 Battery 5. Power steering fluid reservoir 11. Engine oil dipstick 8. Engine oil filler cap 7. Windshield washer fluid reservoir 9. Power distribution box 2. Maintenance and care IDENTIFYING COMPONENTS IN THE ENGINE COMPARTMENT 3.3L V6 engine 10 9 11 1 2 3 8 7 6 5 4 1.
Brake fluid reservoir 3. Relay box 6. Engine coolant reservoir 10. Air filter assembly 4. Automatic transmission fluid dipstick 193 Battery 5. Power steering fluid reservoir 11. Engine oil dipstick 8. Engine oil filler cap 7. Windshield washer fluid reservoir 9. Power distribution box 2. Maintenance and care IDENTIFYING COMPONENTS IN THE ENGINE COMPARTMENT 3.3L V6 engine 10 9 11 1 2 3 8 7 6 5 4 1.
Owner's Manual
Page 205
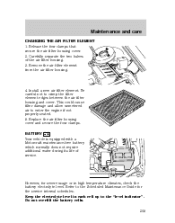
Install a new air filter element. Replace the air filter housing cover and secure the four clamps. BATTERY Your vehicle is equipped with a Motorcraft maintenance-free battery which normally does not require additional water during its life of the air filter housing. 3. However, for severe usage or in .... 4. Be careful not to enter the engine if not properly seated. 5. Carefully separate the two halves of service. Do not overfill the battery cells. 205 Release the four clamps that secure the air filter housing cover. 2. This could cause filter damage and allow unmetered air to crimp...
Install a new air filter element. Replace the air filter housing cover and secure the four clamps. BATTERY Your vehicle is equipped with a Motorcraft maintenance-free battery which normally does not require additional water during its life of the air filter housing. 3. However, for severe usage or in .... 4. Be careful not to enter the engine if not properly seated. 5. Carefully separate the two halves of service. Do not overfill the battery cells. 205 Release the four clamps that secure the air filter housing cover. 2. This could cause filter damage and allow unmetered air to crimp...
Owner's Manual
Page 206
.... Always provide proper ventilation. If you do not allow flames, sparks or lighted substances to come near the battery. When working near the battery, always shield your face and protect your eyes. Lift the battery with a battery carrier or with a wire brush. Avoid contact with distilled water. Shield your eyes when working near the...
.... Always provide proper ventilation. If you do not allow flames, sparks or lighted substances to come near the battery. When working near the battery, always shield your face and protect your eyes. Lift the battery with a battery carrier or with a wire brush. Avoid contact with distilled water. Shield your eyes when working near the...
Owner's Manual
Page 207
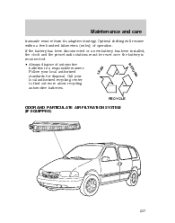
... been installed, the clock and the preset radio stations must relearn its adaptive strategy. Optimal shifting will resume within a few hundred kilometers (miles) of automotive batteries in a responsible manner. RE LE AD R TU N RECYCLE ODOR AND PARTICULATE AIR FILTRATION SYSTEM (IF EQUIPPED) 207 Follow your local authorized recycling center to find...
... been installed, the clock and the preset radio stations must relearn its adaptive strategy. Optimal shifting will resume within a few hundred kilometers (miles) of automotive batteries in a responsible manner. RE LE AD R TU N RECYCLE ODOR AND PARTICULATE AIR FILTRATION SYSTEM (IF EQUIPPED) 207 Follow your local authorized recycling center to find...
Owner's Manual
Page 224
... an I /M test with the "Check Engine/Service Engine Soon" light on -board diagnostics system. Do not park, idle, or drive your vehicle and to its battery has just been serviced, the on-board diagnostics system is on or near the engine. Do not make any unauthorized changes to your "Check Engine...
... an I /M test with the "Check Engine/Service Engine Soon" light on -board diagnostics system. Do not park, idle, or drive your vehicle and to its battery has just been serviced, the on-board diagnostics system is on or near the engine. Do not make any unauthorized changes to your "Check Engine...

