Owner's Manual
Page 5
... information...9 Operator's Manual ...10 Service and warranty information .. 10 Important notice for California retail buyers and lessees of Mercedes-Benz automobiles ...11 Maintenance ...12 Roadside Assistance ...12 Change of address or ownership...12 Operating your vehicle outside the ...18 Vehicle data recording...19 Information regarding electronic recording devices...19 At a glance ...21 Cockpit...22 Instrument cluster ...24 Multifunction steering wheel ...26 Center console ...27 Upper part ...27 Lower part ...28 Overhead control panel ...29 Door control panel...30 Driving...Fastening the...
... information...9 Operator's Manual ...10 Service and warranty information .. 10 Important notice for California retail buyers and lessees of Mercedes-Benz automobiles ...11 Maintenance ...12 Roadside Assistance ...12 Change of address or ownership...12 Operating your vehicle outside the ...18 Vehicle data recording...19 Information regarding electronic recording devices...19 At a glance ...21 Cockpit...22 Instrument cluster ...24 Multifunction steering wheel ...26 Center console ...27 Upper part ...27 Lower part ...28 Overhead control panel ...29 Door control panel...30 Driving...Fastening the...
Owner's Manual
Page 6
Contents Driving safety systems...ABS ...BAS ...ESP...Four wheel electronic traction system (4MATIC) with the ESP ...Anti-theft systems...Immobilizer...Anti-theft alarm system ...Tow-away alarm ... 80...139 139 Instrument cluster ...Instrument cluster illumination ...Coolant temperature gauge ...Trip odometer ...Tachometer...Outside temperature indicator ...Clock...Control system ...Multifunction display...Multifunction steering wheel...Menus ...Standard display menu ...AUDIO menu ...CD changer* operating mode ...TEL menu* ...NAVI menu...Distronic* menu ...Trip computer menu...Vehicle status ...
Contents Driving safety systems...ABS ...BAS ...ESP...Four wheel electronic traction system (4MATIC) with the ESP ...Anti-theft systems...Immobilizer...Anti-theft alarm system ...Tow-away alarm ... 80...139 139 Instrument cluster ...Instrument cluster illumination ...Coolant temperature gauge ...Trip odometer ...Tachometer...Outside temperature indicator ...Clock...Control system ...Multifunction display...Multifunction steering wheel...Menus ...Standard display menu ...AUDIO menu ...CD changer* operating mode ...TEL menu* ...NAVI menu...Distronic* menu ...Trip computer menu...Vehicle status ...
Owner's Manual
Page 7
Contents Automatic transmission...One-touch gearshifting...Gear ranges ...Gear selector lever position ...Automatic shift program ...Driving tips...Steering wheel gearshift control (Speedshift) S 55 AMG...Manual shift program S 55 AMG .. Emergency operation (Limp Home Mode) ...Good visibility ...Headlamp cleaning system* (Standard on S...tie-down hooks...241 Useful features...242 Vanity mirrors ...242 Storage compartments ...243 Ashtrays...251 Cigarette lighters ...252 Heated steering wheel* ...253 Telephone* ...254 Tele Aid...255 Garage door opener...264 Infrared reflecting windshield ...270
Contents Automatic transmission...One-touch gearshifting...Gear ranges ...Gear selector lever position ...Automatic shift program ...Driving tips...Steering wheel gearshift control (Speedshift) S 55 AMG...Manual shift program S 55 AMG .. Emergency operation (Limp Home Mode) ...Good visibility ...Headlamp cleaning system* (Standard on S...tie-down hooks...241 Useful features...242 Vanity mirrors ...242 Storage compartments ...243 Ashtrays...251 Cigarette lighters ...252 Heated steering wheel* ...253 Telephone* ...254 Tele Aid...255 Garage door opener...264 Infrared reflecting windshield ...270

Owner's Manual
Page 8
... compartment ...Hood ...Engine oil ...Transmission fluid level ...Active Body Control* (ABC*) fluid level...Coolant level ...Battery ...Windshield washer system and headlamp cleaning system*...Tires and wheels...Important guidelines ...Tire care and maintenance...Direction of vehicle ... 317 318 319 319 321 322 325 326 326 327 327 328 328 329 329 329...
... compartment ...Hood ...Engine oil ...Transmission fluid level ...Active Body Control* (ABC*) fluid level...Coolant level ...Battery ...Windshield washer system and headlamp cleaning system*...Tires and wheels...Important guidelines ...Tire care and maintenance...Direction of vehicle ... 317 318 319 319 321 322 325 326 326 327 327 328 328 329 329 329...

Owner's Manual
Page 9
......396 Removing wiper blades ...396 Installing wiper blades ...397 Flat tire...398 Preparing the vehicle ...398 Mounting the spare wheel ...398 Battery...403 Disconnecting the battery...404 Removing the battery...404 Charging and reinstalling the battery...404 Reconnecting the battery......status messages in the multifunction display...Where will I find ...? ...First aid kit...Vehicle jack, vehicle tool kit, luggage bowl, spare wheel ...Unlocking/locking in engine compartment ...413 Technical data ...415 Parts service ...416 Warranty coverage ...417 Loss of Service and Warranty Information ...
......396 Removing wiper blades ...396 Installing wiper blades ...397 Flat tire...398 Preparing the vehicle ...398 Mounting the spare wheel ...398 Battery...403 Disconnecting the battery...404 Removing the battery...404 Charging and reinstalling the battery...404 Reconnecting the battery......status messages in the multifunction display...Where will I find ...? ...First aid kit...Vehicle jack, vehicle tool kit, luggage bowl, spare wheel ...Unlocking/locking in engine compartment ...413 Technical data ...415 Parts service ...416 Warranty coverage ...417 Loss of Service and Warranty Information ...

Owner's Manual
Page 18
...modifications on the vehicle could also have it towed to the nearest authorized Mercedes-Benz Center or other systems. Electronic malfunctions could cause them to cease functioning. Inspect the vehicle underbody and tires/wheels for further inspection or repairs. G Various warning labels are intended to...an area which may produce an undesired effect on the label itself. See an authorized Mercedes-Benz Center for example when running . Heavy blows against the vehicle underbody or tires/wheels, for repairs or modifications to be unaware of your hazard warning flashers, carefully slow...
...modifications on the vehicle could also have it towed to the nearest authorized Mercedes-Benz Center or other systems. Electronic malfunctions could cause them to cease functioning. Inspect the vehicle underbody and tires/wheels for further inspection or repairs. G Various warning labels are intended to...an area which may produce an undesired effect on the label itself. See an authorized Mercedes-Benz Center for example when running . Heavy blows against the vehicle underbody or tires/wheels, for repairs or modifications to be unaware of your hazard warning flashers, carefully slow...

Owner's Manual
Page 23
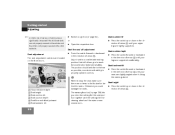
At a glance Cockpit Instrument cluster Multifunction steering wheel Center console Overhead control panel Door control panel 21
At a glance Cockpit Instrument cluster Multifunction steering wheel Center console Overhead control panel Door control panel 21
Owner's Manual
Page 25
...Cockpit Item 1 Combination switch Turn signals Windshield wipers High beam 2 Cruise control lever Cruise control Distronic* 3 Instrument cluster 4 Multifunction steering wheel 5 Steering wheel gearshift control (S 55 AMG only) 51 52 135 221 214 217 24 26 181 Page Item 6 Lever for voice control system*,... panel 9 Glove box lock a Glove box lid release b Glove box c Center console d Starter switch e Horn 237 Page Item f Steering wheel adjustment stalk Heated steering wheel* g Parking brake pedal h Hood lock release 29 244 244 244 27, 28 34 j Parking brake release k Door control panel l Exterior ...
...Cockpit Item 1 Combination switch Turn signals Windshield wipers High beam 2 Cruise control lever Cruise control Distronic* 3 Instrument cluster 4 Multifunction steering wheel 5 Steering wheel gearshift control (S 55 AMG only) 51 52 135 221 214 217 24 26 181 Page Item 6 Lever for voice control system*,... panel 9 Glove box lock a Glove box lid release b Glove box c Center console d Starter switch e Horn 237 Page Item f Steering wheel adjustment stalk Heated steering wheel* g Parking brake pedal h Hood lock release 29 244 244 244 27, 28 34 j Parking brake release k Door control panel l Exterior ...

Owner's Manual
Page 28
At a glance Multifunction steering wheel Item 1 Multifunction display Operating control system 2 Selecting the submenu or setting the volume: Press button æ up/to increase ç down/to decrease 3 Telephone*: Press button s to take a call to dial a call t to end a call to reject an incoming call 153 Page 143 143 144 Item 4 Menu systems: Press button è for next menu ÿ for previous menu 5 Moving within a menu: Press button j for next display k for previous display 144 Page 144 26
At a glance Multifunction steering wheel Item 1 Multifunction display Operating control system 2 Selecting the submenu or setting the volume: Press button æ up/to increase ç down/to decrease 3 Telephone*: Press button s to take a call to dial a call t to end a call to reject an incoming call 153 Page 143 143 144 Item 4 Menu systems: Press button è for next menu ÿ for previous menu 5 Moving within a menu: Press button j for next display k for previous display 144 Page 144 26

Owner's Manual
Page 32
At a glance Door control panel Item 1 Door handle 2 Memory function (for storing seat, exterior mirror, and steering wheel settings) 3 Seat heating* Seat ventilation* 4 Seat adjustment Page 102 128 6 Switches for opening/closing front door windows 125 127 38 7 Override switch for rear passenger compartment 8 Switches for opening/closing rear windows 9 Remote trunk lid switch Item 5 Exterior mirror adjustment Page 41, 186 207 78 207 104 30
At a glance Door control panel Item 1 Door handle 2 Memory function (for storing seat, exterior mirror, and steering wheel settings) 3 Seat heating* Seat ventilation* 4 Seat adjustment Page 102 128 6 Switches for opening/closing front door windows 125 127 38 7 Override switch for rear passenger compartment 8 Switches for opening/closing rear windows 9 Remote trunk lid switch Item 5 Exterior mirror adjustment Page 41, 186 207 78 207 104 30
Owner's Manual
Page 39
...leaving the vehicle, always remove the SmartKey or SmartKey with the child seat manufacturer's instructions. Therefore, do not leave children unattended in a Mercedes-Benz authorized BabySmartTM1 compatible child seat, which is properly installed. Otherwise they will result. If this can be dangerous. G All seat, head ...restraint, steering wheel, and rear view mirror adjustments, as well as this happens, serious or fatal injury will be struck by the air bag when...
...leaving the vehicle, always remove the SmartKey or SmartKey with the child seat manufacturer's instructions. Therefore, do not leave children unattended in a Mercedes-Benz authorized BabySmartTM1 compatible child seat, which is properly installed. Otherwise they will result. If this can be dangerous. G All seat, head ...restraint, steering wheel, and rear view mirror adjustments, as well as this happens, serious or fatal injury will be struck by the air bag when...
Owner's Manual
Page 40
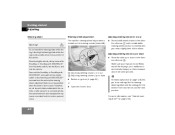
...Seat cushion depth Press the switch forward or backward in the direction of arrow 4 until your legs are slightly angled when holding the steering wheel. Seat adjustment The seat adjustment switches are lightly supported. or Open the respective door. Seat height Press the switch up or down in ...the footwell or behind the seats. The position should be as far to the rear as possible, consistent with the settings for the steering wheel and the exterior rear view mirrors. 1 Head restraint height 2 Seat height 3 Seat cushion tilt 4 Seat cushion depth 5 Seat fore and aft ...
...Seat cushion depth Press the switch forward or backward in the direction of arrow 4 until your legs are slightly angled when holding the steering wheel. Seat adjustment The seat adjustment switches are lightly supported. or Open the respective door. Seat height Press the switch up or down in ...the footwell or behind the seats. The position should be as far to the rear as possible, consistent with the settings for the steering wheel and the exterior rear view mirrors. 1 Head restraint height 2 Seat height 3 Seat cushion tilt 4 Seat cushion depth 5 Seat fore and aft ...
Owner's Manual
Page 42
... the vehicle, always remove the SmartKey or SmartKey with KEYLESS-GO* from the starter switch, take it with you store settings for the steering wheel together with your legs can be operated when the driver's door is located on the steering column (lower left). or Open the driver's door... driving could cause the driver to an unlocked vehicle. Even with the SmartKey or SmartKey with KEYLESS-GO* removed from the vehicle, the steering wheel adjustment feature can move freely and all the displays (incl. Unsupervised use of arrow 2. G The stalk for the exterior rear view mirrors and...
... the vehicle, always remove the SmartKey or SmartKey with KEYLESS-GO* from the starter switch, take it with you store settings for the steering wheel together with your legs can be operated when the driver's door is located on the steering column (lower left). or Open the driver's door... driving could cause the driver to an unlocked vehicle. Even with the SmartKey or SmartKey with KEYLESS-GO* removed from the vehicle, the steering wheel adjustment feature can move freely and all the displays (incl. Unsupervised use of arrow 2. G The stalk for the exterior rear view mirrors and...

Owner's Manual
Page 44
..." ( page 188). ! At low ambient temperatures, the mirrors will be heated automatically. For information on how to the desired setting. Press button 1 for the steering wheel and the seat position.
..." ( page 188). ! At low ambient temperatures, the mirrors will be heated automatically. For information on how to the desired setting. Press button 1 for the steering wheel and the seat position.

Owner's Manual
Page 51
... in order to obtain braking action. If you have forgotten to complete before setting the vehicle in position R only when the vehicle is in drive wheel slip and reduced vehicle control. In order to avoid damaging the transmission, wait for the gear selection process to release the parking brake. place the...
... in order to obtain braking action. If you have forgotten to complete before setting the vehicle in position R only when the vehicle is in drive wheel slip and reduced vehicle control. In order to avoid damaging the transmission, wait for the gear selection process to release the parking brake. place the...

Owner's Manual
Page 52
... on the dashboard to B. Getting started Driving Switching on headlamps Low beam headlamps The exterior lamp switch is located on the left of the steering wheel.
... on the dashboard to B. Getting started Driving Switching on headlamps Low beam headlamps The exterior lamp switch is located on the left of the steering wheel.

Owner's Manual
Page 53
The combination switch resets automatically after major steering wheel movements. Combination switch 1 Turn signals, right 2 Turn signals, left of resistance only and release. i To signal minor directional changes, e.g. The turn signal indicator lamp L or K flashes in the instrument cluster ( page 24). Getting started Driving Turn signals The combination switch is located on the left 51 The corresponding turn signal flashes three times. passing or changing lanes, move combination switch to point of the steering column. Press the combination switch up 1 or down 2.
The combination switch resets automatically after major steering wheel movements. Combination switch 1 Turn signals, right 2 Turn signals, left of resistance only and release. i To signal minor directional changes, e.g. The turn signal indicator lamp L or K flashes in the instrument cluster ( page 24). Getting started Driving Turn signals The combination switch is located on the left 51 The corresponding turn signal flashes three times. passing or changing lanes, move combination switch to point of the steering column. Press the combination switch up 1 or down 2.

Owner's Manual
Page 57
... that a considerably higher degree of vehicle movement, before turning off the engine and leaving the vehicle always: Keep right foot on an incline, turn front wheel towards the road curb. When parked on brake pedal. Getting started Parking and locking Parking and locking You have properly stopped and parked your first...
... that a considerably higher degree of vehicle movement, before turning off the engine and leaving the vehicle always: Keep right foot on an incline, turn front wheel towards the road curb. When parked on brake pedal. Getting started Parking and locking Parking and locking You have properly stopped and parked your first...

Owner's Manual
Page 58
... brake Warning! Always set the parking brake in the instrument cluster illuminates. 56 When the engine is dangerous. When parked on an incline, turn front wheels towards the road curb. 1 Parking brake 2 Release handle Step firmly on an incline, position P alone may not prevent your vehicle with the gear selector lever...
... brake Warning! Always set the parking brake in the instrument cluster illuminates. 56 When the engine is dangerous. When parked on an incline, turn front wheels towards the road curb. 1 Parking brake 2 Release handle Step firmly on an incline, position P alone may not prevent your vehicle with the gear selector lever...

Owner's Manual
Page 59
... lever in position P. Turning off the engine while the gear selector lever is set the parking brake in addition to shifting to turn the front wheels towards the curb. With the driver's door opened, the starter switch is not in P. If you hear a warning signal, you have either forgotten to turn...
... lever in position P. Turning off the engine while the gear selector lever is set the parking brake in addition to shifting to turn the front wheels towards the curb. With the driver's door opened, the starter switch is not in P. If you hear a warning signal, you have either forgotten to turn...
