Owner's Manual
Page 120
.... A delay also occurs when ambient temperatures rise. To help protect the engine, the fuel supply is interrupted if the engine is located in the front bumper area. Warning! Avoid driving at excessive engine speeds, as an ice-warning device and is therefore unsuitable for that the road surface is displayed. Outside... the tachometer denotes excessive engine speed. Controls in detail Instrument cluster Tachometer The red marking on bridges. This prevents inaccurate temperature indications caused by the Mercedes-Benz Limited Warranty.
.... A delay also occurs when ambient temperatures rise. To help protect the engine, the fuel supply is interrupted if the engine is located in the front bumper area. Warning! Avoid driving at excessive engine speeds, as an ice-warning device and is therefore unsuitable for that the road surface is displayed. Outside... the tachometer denotes excessive engine speed. Controls in detail Instrument cluster Tachometer The red marking on bridges. This prevents inaccurate temperature indications caused by the Mercedes-Benz Limited Warranty.
Owner's Manual
Page 213
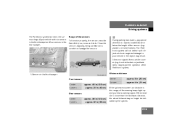
... the system. 213 The Parktronic system will not detect such objects at close range and damage to your vehicle with six sensors in the front bumper and four sensors in this range, all the warning lamps light up and you hear a warning signal. Range of the Parktronic system. 1 Sensors in the... front bumper Front sensors Center Corners Rear sensors Center Corners approx. 48 in (120 cm) approx. 32 in (80 cm) approx. 40 in (100 cm) approx. 23...
... the system. 213 The Parktronic system will not detect such objects at close range and damage to your vehicle with six sensors in the front bumper and four sensors in this range, all the warning lamps light up and you hear a warning signal. Range of the Parktronic system. 1 Sensors in the... front bumper Front sensors Center Corners Rear sensors Center Corners approx. 48 in (120 cm) approx. 32 in (80 cm) approx. 40 in (100 cm) approx. 23...
Owner's Manual
Page 335
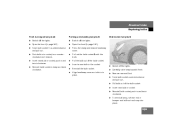
.... Pull bulb out of the bulb socket. Twist bulb socket counterclockwise and pull out. Reinstall the bulb socket. Insert new bulb in socket, push in bumper and let front end snap into place. Practical hints Replacing bulbs Front turn counterclockwise and remove.
.... Pull bulb out of the bulb socket. Twist bulb socket counterclockwise and pull out. Reinstall the bulb socket. Insert new bulb in socket, push in bumper and let front end snap into place. Practical hints Replacing bulbs Front turn counterclockwise and remove.
Owner's Manual
Page 350
... on right side of arrow. Never attach tow cable, tow rope or tow rod to its stop button (if so equipped) in direction of front bumper i The selector lever will remain locked in position P and the key will not turn in the storage compartment under the trunk floor). To reinstall cover...
... on right side of arrow. Never attach tow cable, tow rope or tow rod to its stop button (if so equipped) in direction of front bumper i The selector lever will remain locked in position P and the key will not turn in the storage compartment under the trunk floor). To reinstall cover...
Owner's Manual
Page 351
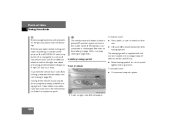
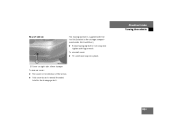
To reinstall cover: Fit cover and snap into place. 2 Cover on right side of rear bumper To remove cover: Pull cover in the storage compartment under the trunk floor). Practical hints Towing the vehicle Rear of vehicle The towing eye bolt is supplied with lug wrench. Screw towing eye bolt in to reveal threaded hole for the towing eye bolt. 351 Fold cover down to its stop and tighten with the tool kit (located in the direction of the arrow.
To reinstall cover: Fit cover and snap into place. 2 Cover on right side of rear bumper To remove cover: Pull cover in the storage compartment under the trunk floor). Practical hints Towing the vehicle Rear of vehicle The towing eye bolt is supplied with lug wrench. Screw towing eye bolt in to reveal threaded hole for the towing eye bolt. 351 Fold cover down to its stop and tighten with the tool kit (located in the direction of the arrow.