Owner's Manual
Page 8
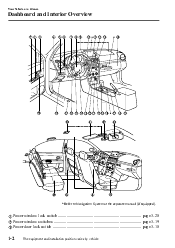
Your Vehicle at a Glance Dashboard and Interior Overview *Refer to Navigation System at the separate manual (if equipped). Power window lock switch ...page 3-20 Power window switches ...page 3-19 Power door lock switch ...page 3-10 1-2 The equipment and installation position varies by vehicle
Your Vehicle at a Glance Dashboard and Interior Overview *Refer to Navigation System at the separate manual (if equipped). Power window lock switch ...page 3-20 Power window switches ...page 3-19 Power door lock switch ...page 3-10 1-2 The equipment and installation position varies by vehicle
Owner's Manual
Page 10
Your Vehicle at a Glance Exterior Overview 4 Door 1-4 The equipment and installation position varies by vehicle
Your Vehicle at a Glance Exterior Overview 4 Door 1-4 The equipment and installation position varies by vehicle

Owner's Manual
Page 11
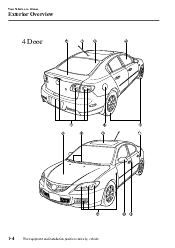
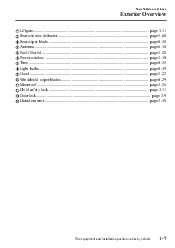
Your Vehicle at a Glance Exterior Overview Trunk lid ...page 3-14 Antenna ...page 6-16 Rear window defroster ...page 5-60 Power window ...page 3-18 Tires ...page 8-35 Fuel-filler lid ...page 3-20 Light bulbs ...page 8-39 Hood ...page 3-22 Windshield wiper blades ...page 8-29 Moonroof ...page 3-24 Child safety lock ...page 3-11 Door lock ...page 3-9 Outside mirror ...page 3-30 The equipment and installation position varies by vehicle 1-5
Your Vehicle at a Glance Exterior Overview Trunk lid ...page 3-14 Antenna ...page 6-16 Rear window defroster ...page 5-60 Power window ...page 3-18 Tires ...page 8-35 Fuel-filler lid ...page 3-20 Light bulbs ...page 8-39 Hood ...page 3-22 Windshield wiper blades ...page 8-29 Moonroof ...page 3-24 Child safety lock ...page 3-11 Door lock ...page 3-9 Outside mirror ...page 3-30 The equipment and installation position varies by vehicle 1-5
Owner's Manual
Page 12
Your Vehicle at a Glance Exterior Overview 5 Door 1-6 The equipment and installation position varies by vehicle
Your Vehicle at a Glance Exterior Overview 5 Door 1-6 The equipment and installation position varies by vehicle
Owner's Manual
Page 13
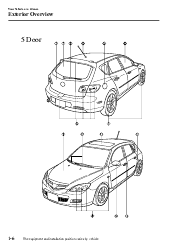
Your Vehicle at a Glance Exterior Overview Liftgate ...page 3-11 Rear window defroster ...page 5-60 Rear wiper blade ...page 8-30 Antenna ...page 6-16 Fuel-filler lid ...page 3-20 Power window ...page 3-18 Tires ...page 8-35 Light bulbs ...page 8-39 Hood ...page 3-22 Windshield wiper blades ...page 8-29 Moonroof ...page 3-24 Child safety lock ...page 3-11 Door lock ...page 3-9 Outside mirror ...page 3-30 The equipment and installation position varies by vehicle 1-7
Your Vehicle at a Glance Exterior Overview Liftgate ...page 3-11 Rear window defroster ...page 5-60 Rear wiper blade ...page 8-30 Antenna ...page 6-16 Fuel-filler lid ...page 3-20 Power window ...page 3-18 Tires ...page 8-35 Light bulbs ...page 8-39 Hood ...page 3-22 Windshield wiper blades ...page 8-29 Moonroof ...page 3-24 Child safety lock ...page 3-11 Door lock ...page 3-9 Outside mirror ...page 3-30 The equipment and installation position varies by vehicle 1-7
Owner's Manual
Page 22
Always lock the doors and the trunk, and as an added measure, keep the rear seatbacks locked, whether you support the seatback with the key is dangerous. Verify that ...
Always lock the doors and the trunk, and as an added measure, keep the rear seatbacks locked, whether you support the seatback with the key is dangerous. Verify that ...

Owner's Manual
Page 24
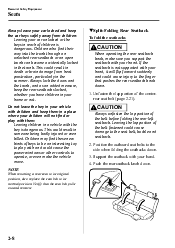
... The rear armrest in the center of the passenger's ears, never the passenger's neck to the desired position. Essential Safety Equipment Seats qRear Seatback Lock (4 Door) To lock or unlock a seatback, move the lever. WARNING Always drive with the head restraints installed when seats are being used (no occupant in a collision...
... The rear armrest in the center of the passenger's ears, never the passenger's neck to the desired position. Essential Safety Equipment Seats qRear Seatback Lock (4 Door) To lock or unlock a seatback, move the lever. WARNING Always drive with the head restraints installed when seats are being used (no occupant in a collision...
Owner's Manual
Page 39
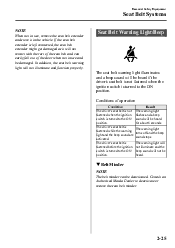
... will be deactivated. The warning light turns off and the beep sound stops. qBelt Minder NOTE The belt minder can easily fall out of the door when not in use , remove the seat belt extender and store it will not be damaged. If the seat belt extender is left connected, the.... The driver's seat belt is fastened before the ignition switch is fastened while the warning light and the beep sound are activated. Consult an Authorized Mazda Dealer to deactivate or restore the seat belt minder. 2-25
... will be deactivated. The warning light turns off and the beep sound stops. qBelt Minder NOTE The belt minder can easily fall out of the door when not in use , remove the seat belt extender and store it will not be damaged. If the seat belt extender is left connected, the.... The driver's seat belt is fastened before the ignition switch is fastened while the warning light and the beep sound are activated. Consult an Authorized Mazda Dealer to deactivate or restore the seat belt minder. 2-25

Owner's Manual
Page 43
Take special care not to allow a child to lean over or against the side window of position child. Furthermore, leaning over or against the front door could block the side and curtain air bags and eliminate the advantages of supplemental protection. Even with the front passenger seat weight sensors, if you ...
Take special care not to allow a child to lean over or against the side window of position child. Furthermore, leaning over or against the front door could block the side and curtain air bags and eliminate the advantages of supplemental protection. Even with the front passenger seat weight sensors, if you ...
Owner's Manual
Page 46
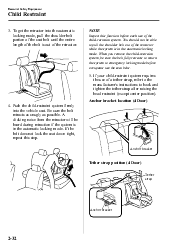
... possible. If the belt does not lock the seat down tight, repeat this function before occupants use the seat belts. 5. Anchor bracket Tether strap position (4 Door) Tether strap Anchor bracket 2-32 To get the retractor into the vehicle seat. When you remove the child-restraint system, be sure the belt fully...
... possible. If the belt does not lock the seat down tight, repeat this function before occupants use the seat belts. 5. Anchor bracket Tether strap position (4 Door) Tether strap Anchor bracket 2-32 To get the retractor into the vehicle seat. When you remove the child-restraint system, be sure the belt fully...
Owner's Manual
Page 47
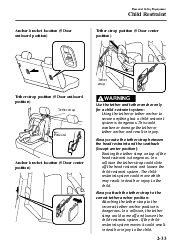
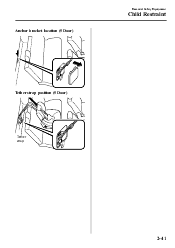
... strap on top of the head restraint is dangerous. Forward Anchor bracket location (5 Door center position) 2-33 Essential Safety Equipment Child Restraint Anchor bracket location (5 Door outboard position) Tether strap position (5 Door center position) Tether strap Tether strap position (5 Door outboard position) Tether strap WARNING Use the tether and tether anchor only for a child...
... strap on top of the head restraint is dangerous. Forward Anchor bracket location (5 Door center position) 2-33 Essential Safety Equipment Child Restraint Anchor bracket location (5 Door outboard position) Tether strap position (5 Door center position) Tether strap Tether strap position (5 Door outboard position) Tether strap WARNING Use the tether and tether anchor only for a child...
Owner's Manual
Page 49
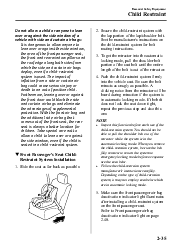
... child. Secure the child-restraint system with side and curtain air bags: It is dangerous to allow a child to lean over or against the front door could cause serious injury or death to lean over or against the side window of a vehicle with the lap portion of the retractor. 4. Push the...
... child. Secure the child-restraint system with side and curtain air bags: It is dangerous to allow a child to lean over or against the front door could cause serious injury or death to lean over or against the side window of a vehicle with the lap portion of the retractor. 4. Push the...
Owner's Manual
Page 52
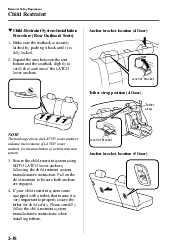
...-restraint to properly secure the tether for the attachment of the LATCH lower anchors. Anchor bracket Anchor bracket location (4 Door) Tether strap position (4 Door) Tether strap NOTE The markings above the LATCH lower anchors indicate the locations of LATCH lower anchors for child safety....equipped with a tether, that means it is very important to be sure both anchors are engaged. 4. Anchor bracket Anchor bracket location (5 Door) 3. Make sure the seatback is securely latched by pushing it back until it is fully locked. 2. Essential Safety Equipment Child Restraint qChild...
...-restraint to properly secure the tether for the attachment of the LATCH lower anchors. Anchor bracket Anchor bracket location (4 Door) Tether strap position (4 Door) Tether strap NOTE The markings above the LATCH lower anchors indicate the locations of LATCH lower anchors for child safety....equipped with a tether, that means it is very important to be sure both anchors are engaged. 4. Anchor bracket Anchor bracket location (5 Door) 3. Make sure the seatback is securely latched by pushing it back until it is fully locked. 2. Essential Safety Equipment Child Restraint qChild...
Owner's Manual
Page 53
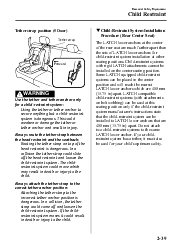
... only for your childrestraint system has a tether, it could slide off and loosen the child-restraint system. Essential Safety Equipment Child Restraint Tether strap position (5 Door) Tether strap qChild-Restraint System Installation Procedure (Rear Center Seat) The LATCH lower anchors at the center of the rear seat are much further apart...
... only for your childrestraint system has a tether, it could slide off and loosen the child-restraint system. Essential Safety Equipment Child Restraint Tether strap position (5 Door) Tether strap qChild-Restraint System Installation Procedure (Rear Center Seat) The LATCH lower anchors at the center of the rear seat are much further apart...

Owner's Manual
Page 54
... anchor to secure anything but a child-restraint system is dangerous. If the childrestraint system moves it is fully locked. 2. Anchor bracket location (4 Door) Anchor bracket Tether strap position (4 Door) Tether strap Anchor bracket NOTE The markings above the LATCH lower anchors indicate the locations of LATCH lower anchors for the attachment of...
... anchor to secure anything but a child-restraint system is dangerous. If the childrestraint system moves it is fully locked. 2. Anchor bracket location (4 Door) Anchor bracket Tether strap position (4 Door) Tether strap Anchor bracket NOTE The markings above the LATCH lower anchors indicate the locations of LATCH lower anchors for the attachment of...
Owner's Manual
Page 55
Essential Safety Equipment Child Restraint Anchor bracket location (5 Door) Tether strap position (5 Door) Tether strap 2-41
Essential Safety Equipment Child Restraint Anchor bracket location (5 Door) Tether strap position (5 Door) Tether strap 2-41

Owner's Manual
Page 57
... front passenger air bag deactivation indicator light illuminates, always move the front passenger seat as far back as possible and always sit upright against the door and be hit by the side air bag in the first collision with great force and speed.
... front passenger air bag deactivation indicator light illuminates, always move the front passenger seat as far back as possible and always sit upright against the door and be hit by the side air bag in the first collision with great force and speed.
Owner's Manual
Page 58
... bag, which inflates from the outboard side of the front seats, impeding the added protection of the front seat and expand along the front door on them is dangerous. Do not place hangers or any way is dangerous. Never use seat covers on the front seats. In an accident... where a curtain air bag deploys: Attaching objects to the supplemental restraint system, do not place luggage or other objects on the windshield glass, side door glass, front and rear window pillars and along the roof edge, impeding the added protection of a side collision. When hanging clothes, hang them is...
... bag, which inflates from the outboard side of the front seats, impeding the added protection of the front seat and expand along the front door on them is dangerous. Do not place hangers or any way is dangerous. Never use seat covers on the front seats. In an accident... where a curtain air bag deploys: Attaching objects to the supplemental restraint system, do not place luggage or other objects on the windshield glass, side door glass, front and rear window pillars and along the roof edge, impeding the added protection of a side collision. When hanging clothes, hang them is...

Owner's Manual
Page 65
... on the front passenger seat from the total seated weight of approximately 42 kg (93 lbs) required for air bag deployment is close to the door, grasping the assist grip or the rim of the moonroof and sitting with the seatback reclined too far. Ø Any accessories which could result in...
... on the front passenger seat from the total seated weight of approximately 42 kg (93 lbs) required for air bag deployment is close to the door, grasping the assist grip or the rim of the moonroof and sitting with the seatback reclined too far. Ø Any accessories which could result in...

Owner's Manual
Page 75
Doors and Locks ...3-2 Keys ...3-2 Keyless Entry System í ...3-3 Door Locks ...3-8 Liftgate (5 Door) ...3-11 Trunk Lid (4 Door) ...3-14 Inside Trunk Release Lever (4 Door) ...3-17 Power Windows í ...3-18 Fuel-Filler Lid and Cap ...3-20 Hood ...3-22 Moonroof í ...3-24 Security System ...3-26 Immobilizer System ...3-26 Theft-Deterrent System í ...3-28 Steering Wheel and Mirrors ...3-30 Steering Wheel ...3-30 Mirrors ...3-30 í Some models. 3-1 opening/closing and adjustment of basic operations and controls; 3 Knowing Your Mazda Explanation of various parts.
Doors and Locks ...3-2 Keys ...3-2 Keyless Entry System í ...3-3 Door Locks ...3-8 Liftgate (5 Door) ...3-11 Trunk Lid (4 Door) ...3-14 Inside Trunk Release Lever (4 Door) ...3-17 Power Windows í ...3-18 Fuel-Filler Lid and Cap ...3-20 Hood ...3-22 Moonroof í ...3-24 Security System ...3-26 Immobilizer System ...3-26 Theft-Deterrent System í ...3-28 Steering Wheel and Mirrors ...3-30 Steering Wheel ...3-30 Mirrors ...3-30 í Some models. 3-1 opening/closing and adjustment of basic operations and controls; 3 Knowing Your Mazda Explanation of various parts.


