Owner's Manual
Page 1
... and air conditioning 44 44 Lights Headlamps Turn signal control Bulb replacement 48 48 50 51 Driver Controls Windshield wiper/washer control Steering wheel adjustment Power windows Mirrors Speed control 56 56 58 61 62 63 Locks and Security Keys Locks Anti-theft system 70 70 70 75 Seating and Safety...
... and air conditioning 44 44 Lights Headlamps Turn signal control Bulb replacement 48 48 50 51 Driver Controls Windshield wiper/washer control Steering wheel adjustment Power windows Mirrors Speed control 56 56 58 61 62 63 Locks and Security Keys Locks Anti-theft system 70 70 70 75 Seating and Safety...

Owner's Manual
Page 6
Introduction These are some of the symbols you may see on your vehicle. Vehicle Symbol Glossary Safety Alert Protecting the Environment Air Bag-Front See Owner's Guide Fasten Safety Belt Air Bag-Side Child Seat Installation Warning Child Seat Tether Anchor Anti-Lock Brake System Master Lighting Switch Child Seat Child Seat Lower Anchor Brake System Brake Fluid Non-Petroleum Based Hazard Warning Flasher Fog Lamps-Front Fuse Compartment Fuel Pump Reset Windshield Defrost/Demist Power Windows Windshield Wash/Wipe Rear Window Defrost/Demist 6
Introduction These are some of the symbols you may see on your vehicle. Vehicle Symbol Glossary Safety Alert Protecting the Environment Air Bag-Front See Owner's Guide Fasten Safety Belt Air Bag-Side Child Seat Installation Warning Child Seat Tether Anchor Anti-Lock Brake System Master Lighting Switch Child Seat Child Seat Lower Anchor Brake System Brake Fluid Non-Petroleum Based Hazard Warning Flasher Fog Lamps-Front Fuse Compartment Fuel Pump Reset Windshield Defrost/Demist Power Windows Windshield Wash/Wipe Rear Window Defrost/Demist 6

Owner's Manual
Page 7
Introduction Vehicle Symbol Glossary Power Window Lockout Engine Oil Engine Coolant Temperature Battery Personal Alarm System Feature Engine Coolant Do Not Open When Hot Avoid Smoking, Flames, or Sparks Explosive Gas Battery Acid Fan Warning Maintain Correct Fluid Level Engine Air Filter Passenger Compartment Air Filter Check fuel cap MAX MIN Power Steering Fluid Emission System Traction Control Jack INFORMATION ABOUT THIS GUIDE The information found in this guide was accurate at the time of printing. Mazda may change the contents without notice. 7
Introduction Vehicle Symbol Glossary Power Window Lockout Engine Oil Engine Coolant Temperature Battery Personal Alarm System Feature Engine Coolant Do Not Open When Hot Avoid Smoking, Flames, or Sparks Explosive Gas Battery Acid Fan Warning Maintain Correct Fluid Level Engine Air Filter Passenger Compartment Air Filter Check fuel cap MAX MIN Power Steering Fluid Emission System Traction Control Jack INFORMATION ABOUT THIS GUIDE The information found in this guide was accurate at the time of printing. Mazda may change the contents without notice. 7

Owner's Manual
Page 8
Instrument Cluster Instrument Cluster Headlamp and turn signal control (pg. 48) Fog lamp control* (pg. 48) Instrument cluster (pg. 10) Windshield wiper/washer control (pg. 56) Power mirror control* (pg. 62) Speed controls* (pg. 63) Instrument panel Driver air bag dimmer/dome light (pg. 100) control (pg. 49) Hood release handle (pg. 203) * if equipped Manual tilt steering column lever (pg. 58) 8
Instrument Cluster Instrument Cluster Headlamp and turn signal control (pg. 48) Fog lamp control* (pg. 48) Instrument cluster (pg. 10) Windshield wiper/washer control (pg. 56) Power mirror control* (pg. 62) Speed controls* (pg. 63) Instrument panel Driver air bag dimmer/dome light (pg. 100) control (pg. 49) Hood release handle (pg. 203) * if equipped Manual tilt steering column lever (pg. 58) 8

Owner's Manual
Page 9
Instrument Cluster Rear window defroster control (pg. 47) Hazard flasher control (pg. 157) Audio system (pg. 17) 4WD control* (pg. 138) Cigarette lighter Climate controls (pg. 44) Auxiliary power point (pg. 60) *if equipped 9
Instrument Cluster Rear window defroster control (pg. 47) Hazard flasher control (pg. 157) Audio system (pg. 17) 4WD control* (pg. 138) Cigarette lighter Climate controls (pg. 44) Auxiliary power point (pg. 60) *if equipped 9
Owner's Manual
Page 17
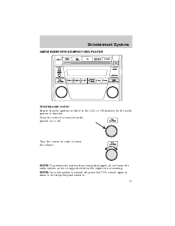
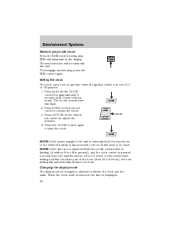
Press the control to turn the audio system on for the audio system to function. NOTE: To prevent the battery from being discharged, do not leave the audio system on or off , press the VOL control again to listen to the frequency last tuned to raise or lower the volume. NOTE: Once the system is not running. Turn the control to . 17 Entertainment Systems Entertainment Systems AM/FM RADIO WITH COMPACT DISC PLAYER Volume/power control Ensure that the ignition is either in the ACC or ON position for a long period when the engine is turned off .
Press the control to turn the audio system on for the audio system to function. NOTE: To prevent the battery from being discharged, do not leave the audio system on or off , press the VOL control again to listen to the frequency last tuned to raise or lower the volume. NOTE: Once the system is not running. Turn the control to . 17 Entertainment Systems Entertainment Systems AM/FM RADIO WITH COMPACT DISC PLAYER Volume/power control Ensure that the ignition is either in the ACC or ON position for a long period when the engine is turned off .
Owner's Manual
Page 23
... stations are filled, the strongest station will beep. 3. The system will start playing. 4. Press the AUTO-M (Auto memory) control to select a frequency. 2. NOTE: If the power supply is interrupted, (fuse blows or the battery is pressed. If there is illuminated in the display. The cassette's bottom side is playing when is...
... stations are filled, the strongest station will beep. 3. The system will start playing. 4. Press the AUTO-M (Auto memory) control to select a frequency. 2. NOTE: If the power supply is interrupted, (fuse blows or the battery is pressed. If there is illuminated in the display. The cassette's bottom side is playing when is...
Owner's Manual
Page 26
... 59 min), the hour setting will flash. 2. Press and hold the CLOCK control for approximately 2 seconds until a beep sound is displayed. 26 NOTE: If the power supply to adjust the hours. 3. Press SCAN on the minute set control to the unit is interrupted (if the fuse blows or the vehicle's battery...
... 59 min), the hour setting will flash. 2. Press and hold the CLOCK control for approximately 2 seconds until a beep sound is displayed. 26 NOTE: If the power supply to adjust the hours. 3. Press SCAN on the minute set control to the unit is interrupted (if the fuse blows or the vehicle's battery...

Owner's Manual
Page 27
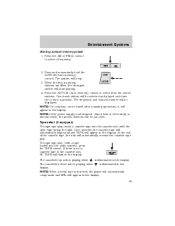
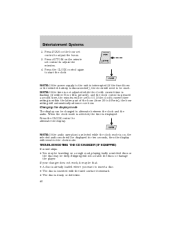
Entertainment Systems Press the CLOCK control to the clock mode. AM/FM RADIO WITH CASSETTE TAPE AND COMPACT DISC PLAYER/CHANGER (IN-DASH CD CHANGER) Volume/power control Ensure that the ignition is on or off. 27 NOTE: If the audio operation is selected while the clock mode is either in the ACC or ON position for ten seconds, then the display will revert to alternate the display. Press the control to turn the audio system on , the selected audio mode will be displayed for the audio system to function.
Entertainment Systems Press the CLOCK control to the clock mode. AM/FM RADIO WITH CASSETTE TAPE AND COMPACT DISC PLAYER/CHANGER (IN-DASH CD CHANGER) Volume/power control Ensure that the ignition is on or off. 27 NOTE: If the audio operation is selected while the clock mode is either in the ACC or ON position for ten seconds, then the display will revert to alternate the display. Press the control to turn the audio system on , the selected audio mode will be displayed for the audio system to function.

Owner's Manual
Page 34
... If there is illuminated in the display. is not a cassette tape in the cassette slot, NO TAPE will be canceled. Entertainment Systems NOTE: If the power supply is interrupted, (fuse blows or the battery is disconnected), the preset channels will flash in the display. Press the VOL (Volume) control to stop...
... If there is illuminated in the display. is not a cassette tape in the cassette slot, NO TAPE will be canceled. Entertainment Systems NOTE: If the power supply is interrupted, (fuse blows or the battery is disconnected), the preset channels will flash in the display. Press the VOL (Volume) control to stop...
Owner's Manual
Page 40
... latter part of the hour (from 30 to start the clock. Press SCAN on , the selected audio mode will revert to 00. NOTE: If the power supply to the unit is interrupted (if the fuse blows or the vehicle's battery is disconnected), the clock will need to be that: • A disc...
... latter part of the hour (from 30 to start the clock. Press SCAN on , the selected audio mode will revert to 00. NOTE: If the power supply to the unit is interrupted (if the fuse blows or the vehicle's battery is disconnected), the clock will need to be that: • A disc...
Owner's Manual
Page 43
..." for audio system warranty information. Entertainment Systems Radio reception factors Three factors can affect radio reception: • Distance/strength. Weak signals are sometimes captured by power lines, electric fences, traffic lights and thunderstorms. Moving away from an interfering structure (out of the average FM station is necessary, see your reception to...
..." for audio system warranty information. Entertainment Systems Radio reception factors Three factors can affect radio reception: • Distance/strength. Weak signals are sometimes captured by power lines, electric fences, traffic lights and thunderstorms. Moving away from an interfering structure (out of the average FM station is necessary, see your reception to...
Owner's Manual
Page 60
Press the storage compartment door (3) to verify proper fit. Do not hang any type of the power outlet can cause damage not covered by twisting and pushing it back into the slot. • Install the transmitter (6) on to turn...8226; Reinstall the rubber actuator (1) in the storage compartment (7) by your warranty. 60 Close the storage compartment door (3) to activate the transmitter (6). AUXILIARY POWER POINT WARNING: Power outlets are designed for accessory plugs only. If the rubber actuator (1) is the proper length the storage compartment door will close. Illuminated visor mirror...
Press the storage compartment door (3) to verify proper fit. Do not hang any type of the power outlet can cause damage not covered by twisting and pushing it back into the slot. • Install the transmitter (6) on to turn...8226; Reinstall the rubber actuator (1) in the storage compartment (7) by your warranty. 60 Close the storage compartment door (3) to activate the transmitter (6). AUXILIARY POWER POINT WARNING: Power outlets are designed for accessory plugs only. If the rubber actuator (1) is the proper length the storage compartment door will close. Illuminated visor mirror...
Owner's Manual
Page 61
...and/or pets are not in a blown fuse. The Maximum power each power point can supply depends on the instrument panel below the radio. Do not use the power point for operating the cigarette lighter element. Cargo area auxiliary power point An additional auxiliary power point is located on the fuse rating. Press and hold... the bottom part of 120 Watts. Driver Controls The auxiliary power point is located in the cargo area. For example: a 20A fuse should supply a maximum of 240 Watts, a 15A fuse should supply a maximum of 180 Watts ...
...and/or pets are not in a blown fuse. The Maximum power each power point can supply depends on the instrument panel below the radio. Do not use the power point for operating the cigarette lighter element. Cargo area auxiliary power point An additional auxiliary power point is located on the fuse rating. Press and hold... the bottom part of 120 Watts. Driver Controls The auxiliary power point is located in the cargo area. For example: a 20A fuse should supply a maximum of 240 Watts, a 15A fuse should supply a maximum of 180 Watts ...

Owner's Manual
Page 62
... is opened. Press again to restore the window controls. To lock out all the power windows except the driver's. NOTE: The window switches will only operate the driver's side window. Press ...be in the LOCKED position. Press completely down . Accessory delay With accessory delay, power windows and moonroof operate for the driver's window press the right side of the control...feature will not illuminate when the window control is turned from the ACC or ON to adjust the power side view mirrors. 62 They may seriously injure themselves. Driver Controls One touch down Allows the driver...
... is opened. Press again to restore the window controls. To lock out all the power windows except the driver's. NOTE: The window switches will only operate the driver's side window. Press ...be in the LOCKED position. Press completely down . Accessory delay With accessory delay, power windows and moonroof operate for the driver's window press the right side of the control...feature will not illuminate when the window control is turned from the ACC or ON to adjust the power side view mirrors. 62 They may seriously injure themselves. Driver Controls One touch down Allows the driver...
Owner's Manual
Page 67
... cools. NOTE: If the battery is disconnected, discharged, or a new battery is equipped with the moon roof. These include: • Utility compartment • Cupholders • Power point • Ashcup WARNING: Use only soft cups in a collision. 67 They may seriously injure themselves. Press and release the rear portion of the control...
... cools. NOTE: If the battery is disconnected, discharged, or a new battery is equipped with the moon roof. These include: • Utility compartment • Cupholders • Power point • Ashcup WARNING: Use only soft cups in a collision. 67 They may seriously injure themselves. Press and release the rear portion of the control...

Owner's Manual
Page 70
Locks and Security Locks and Security KEYS The key operates all the doors. POWER DOOR LOCKS The power door lock control is in the DOOR position the perimeter alarm system (if equipped) will deactivate. 2. Pressing the will illuminate, if the control on the ...
Locks and Security Locks and Security KEYS The key operates all the doors. POWER DOOR LOCKS The power door lock control is in the DOOR position the perimeter alarm system (if equipped) will deactivate. 2. Pressing the will illuminate, if the control on the ...

Owner's Manual
Page 82
... low across the hips. Move the front of the control up and out of the seat cushion. 82 Seating and Safety Restraints Adjusting the front power seat (if equipped) WARNING: Never adjust the driver's seat or seatback when the vehicle is dangerous because you could cause serious injury. WARNING: Do not...
... low across the hips. Move the front of the control up and out of the seat cushion. 82 Seating and Safety Restraints Adjusting the front power seat (if equipped) WARNING: Never adjust the driver's seat or seatback when the vehicle is dangerous because you could cause serious injury. WARNING: Do not...
Owner's Manual
Page 100
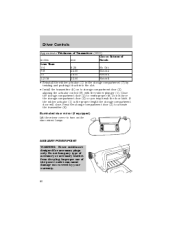
... 100 80 120 140 160 SCAN 4x4 F E AM/FM TAPE CD 100 180 km/h LOAD 1 20 20 MPH 120 CLOCK TUNE SEEK DISC PRO PUSH POWER VOL AUTO-M PUSH AUDIO CONT 1 4 TR/APC 2 5 RPT 3 6 TR/APC REW RDM/BS FF ON RSM LOCK SET ACC OFF CST OFF A/C MAX A/C 100 Safety... locking retractors on all safety belt assemblies used in vehicles involved in a collision be inspected and replaced if either damage or improper operation is noted. Mazda recommends that the belts do not show damage and continue to operate properly, they do not need to inspect and if necessary replace the safety...
... 100 80 120 140 160 SCAN 4x4 F E AM/FM TAPE CD 100 180 km/h LOAD 1 20 20 MPH 120 CLOCK TUNE SEEK DISC PRO PUSH POWER VOL AUTO-M PUSH AUDIO CONT 1 4 TR/APC 2 5 RPT 3 6 TR/APC REW RDM/BS FF ON RSM LOCK SET ACC OFF CST OFF A/C MAX A/C 100 Safety... locking retractors on all safety belt assemblies used in vehicles involved in a collision be inspected and replaced if either damage or improper operation is noted. Mazda recommends that the belts do not show damage and continue to operate properly, they do not need to inspect and if necessary replace the safety...

Owner's Manual
Page 104
... the supplemental air bag electrical system wiring (including the impact sensors), the system wiring, the air bag system readiness light, the air bag back up power and the air bag ignitors. The SRS consists of death or serious injuries such as possible while maintaining vehicle control. Thus, it is the risk...
... the supplemental air bag electrical system wiring (including the impact sensors), the system wiring, the air bag system readiness light, the air bag back up power and the air bag ignitors. The SRS consists of death or serious injuries such as possible while maintaining vehicle control. Thus, it is the risk...


