Owner's Manual
Page 9
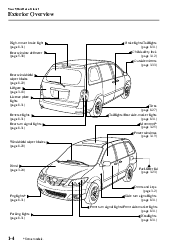
...) Brake lights/Taillights (page 8-31) Rear window defroster (page 5-38) Child safety lock (page 3-12) Outside mirrors (page 3-33) Rear windshield wiper blades (page 8-22) Liftgate (page 3-18) License plate lights (page 8-31) Tires (page 8-27) Reverse lights (page 8-31) Taillights/Rear side-marker lights (page 8-31) Rear turn signal lights...
...) Brake lights/Taillights (page 8-31) Rear window defroster (page 5-38) Child safety lock (page 3-12) Outside mirrors (page 3-33) Rear windshield wiper blades (page 8-22) Liftgate (page 3-18) License plate lights (page 8-31) Tires (page 8-27) Reverse lights (page 8-31) Taillights/Rear side-marker lights (page 8-31) Rear turn signal lights...

Owner's Manual
Page 35
... facing rearward. Support Bar: Sitting in the rear-facing, third-row seat position without installing the support bar is dangerous because the liftgate cannot be thrown out of the vehicle resulting in the road. Without the support of the seatback when it is dangerous. Remove the...position. Clear away all cargo from the seat well area before sitting in injury. Essential Safety Equipment Seats M Third-Row Seat and Open Liftgate Position NOTE WARNING Rear Facing Third-Row Seat and a Moving Vehicle: Driving with the seatback upright before driving the vehicle. Always install ...
... facing rearward. Support Bar: Sitting in the rear-facing, third-row seat position without installing the support bar is dangerous because the liftgate cannot be thrown out of the vehicle resulting in the road. Without the support of the seatback when it is dangerous. Remove the...position. Clear away all cargo from the seat well area before sitting in injury. Essential Safety Equipment Seats M Third-Row Seat and Open Liftgate Position NOTE WARNING Rear Facing Third-Row Seat and a Moving Vehicle: Driving with the seatback upright before driving the vehicle. Always install ...

Owner's Manual
Page 36
Pull the seatback towards the rear (liftgate) to make sure the support bar is securely latched. Attempt to push the seatback towards the front of the vehicle until the opposite end of the support bar hooks onto the anchor loop in the rear of the seatback. 2-27 Set the hook on the support bar in the side trim. Support bar Pocket 8. Remove the support bar from the pocket. 9. Essential Safety Equipment Seats 7.
Pull the seatback towards the rear (liftgate) to make sure the support bar is securely latched. Attempt to push the seatback towards the front of the vehicle until the opposite end of the support bar hooks onto the anchor loop in the rear of the seatback. 2-27 Set the hook on the support bar in the side trim. Support bar Pocket 8. Remove the support bar from the pocket. 9. Essential Safety Equipment Seats 7.

Owner's Manual
Page 84
Doors and Locks ...3-2 Keys ...3-2 Keyless Entry System* ...3-3 Door Locks ...3-8 Liftgate ...3-18 Power Windows* ...3-19 Rear Quarter Windows ...3-22 Fuel-Filler Lid and Cap ...3-23 Hood ...3-24 Moonroof* ...3-25 Security System ...3-28 Immobilizer System* ...3-28 Theft-Deterrent System* ...3-31 Steering Wheel and Mirrors ...3-33 Steering Wheel ...3-33 Mirrors ...3-33 *Some models. 3-1 opening/closing and adjustment of basic operations and controls; 3 Knowing Your Mazda Explanation of various parts.
Doors and Locks ...3-2 Keys ...3-2 Keyless Entry System* ...3-3 Door Locks ...3-8 Liftgate ...3-18 Power Windows* ...3-19 Rear Quarter Windows ...3-22 Fuel-Filler Lid and Cap ...3-23 Hood ...3-24 Moonroof* ...3-25 Security System ...3-28 Immobilizer System* ...3-28 Theft-Deterrent System* ...3-31 Steering Wheel and Mirrors ...3-33 Steering Wheel ...3-33 Mirrors ...3-33 *Some models. 3-1 opening/closing and adjustment of basic operations and controls; 3 Knowing Your Mazda Explanation of various parts.
Owner's Manual
Page 86
...This system locks and unlocks the doors and the liftgate. Press the button slowly and accurately. To install a new battery, refer to Maintenance (page 3-6). • Additional transmitters can be reset. Bring all transmitters to an Authorized Mazda Dealer when the electronic codes need to 3 transmitters... entry system transmitter is designed to operate up to heat or sunlight. *Some models. 3-3 Up to be obtained at an Authorized Mazda Dealer. NOTE • The keyless entry system is also possible on power sliding door-equipped vehicles. Opening and closing of local conditions...
...This system locks and unlocks the doors and the liftgate. Press the button slowly and accurately. To install a new battery, refer to Maintenance (page 3-6). • Additional transmitters can be reset. Bring all transmitters to an Authorized Mazda Dealer when the electronic codes need to 3 transmitters... entry system transmitter is designed to operate up to heat or sunlight. *Some models. 3-3 Up to be obtained at an Authorized Mazda Dealer. NOTE • The keyless entry system is also possible on power sliding door-equipped vehicles. Opening and closing of local conditions...
Owner's Manual
Page 88
... with Transmitter: Opening or closing the power sliding doors with the transmitter, all the doors and the liftgate are locked visually or aurally by use the transmitter could be sure your Mazda has power sliding doors (page 3-13), the transmitter can 't fully see it. Allowing children to ...rear fender area are closed /opened within about 30 seconds. 3-5 Be sure to the transmitter. Knowing Your Mazda Doors and Locks Lock button To lock the doors and the liftgate, press the LOCK button and the hazard warning lights will flash twice. NOTE Sliding door transmitter buttons If ...
... with Transmitter: Opening or closing the power sliding doors with the transmitter, all the doors and the liftgate are locked visually or aurally by use the transmitter could be sure your Mazda has power sliding doors (page 3-13), the transmitter can 't fully see it. Allowing children to ...rear fender area are closed /opened within about 30 seconds. 3-5 Be sure to the transmitter. Knowing Your Mazda Doors and Locks Lock button To lock the doors and the liftgate, press the LOCK button and the hazard warning lights will flash twice. NOTE Sliding door transmitter buttons If ...
Owner's Manual
Page 89
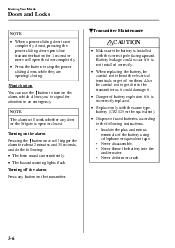
... dirt in an emergency. Also be careful not to get oil on the transmitter. 3-6 Turning off the alarm Press any door or the liftgate is open or closed , pressing the power sliding door open the door completely. • Press the button to signal for attention in the... the plus and minus terminals of battery explosion if it is incorrectly replaced. • Replace only with the correct pole facing upward. Knowing Your Mazda Doors and Locks M Transmitter Maintenance NOTE • When a power sliding door is not completely closed . Turning on the alarm Pressing the button ...
... dirt in an emergency. Also be careful not to get oil on the transmitter. 3-6 Turning off the alarm Press any door or the liftgate is open or closed , pressing the power sliding door open the door completely. • Press the button to signal for attention in the... the plus and minus terminals of battery explosion if it is incorrectly replaced. • Replace only with the correct pole facing upward. Knowing Your Mazda Doors and Locks M Transmitter Maintenance NOTE • When a power sliding door is not completely closed . Turning on the alarm Pressing the button ...

Owner's Manual
Page 93
... a second longer. Close the fuel-filler lid to the center position. Also, all doors and the liftgate. To unlock only the driver's door, insert the key into the driver's door lock and turn the... key briefly to the unlock position and then immediately return it up. Knowing Your Mazda Doors and Locks Sliding doors To lock a sliding door from the outside, push down its door-lock... knob and close the door. All doors and the liftgate unlock when the driver's door is unlocked and the key is held in the driver's door lock ...
... a second longer. Close the fuel-filler lid to the center position. Also, all doors and the liftgate. To unlock only the driver's door, insert the key into the driver's door lock and turn the... key briefly to the unlock position and then immediately return it up. Knowing Your Mazda Doors and Locks Sliding doors To lock a sliding door from the outside, push down its door-lock... knob and close the door. All doors and the liftgate unlock when the driver's door is unlocked and the key is held in the driver's door lock ...
Owner's Manual
Page 94
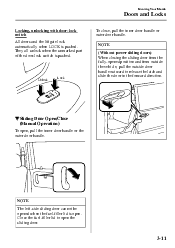
... when the unmarked part of the door-lock switch is open. M Sliding Door Open/Close (Manual Operation) To open the sliding door. 3-11 Knowing Your Mazda Doors and Locks Locking, unlocking with door-lock switch All doors and the liftgate lock automatically when LOCK is pushed.
... when the unmarked part of the door-lock switch is open. M Sliding Door Open/Close (Manual Operation) To open the sliding door. 3-11 Knowing Your Mazda Doors and Locks Locking, unlocking with door-lock switch All doors and the liftgate lock automatically when LOCK is pushed.
Owner's Manual
Page 101
.... If the open . Always press the power sliding doors main switch to Power Door Locks (page 3-10). 3-18 NOTE WARNING Open Liftgate: An open liftgate could become caught resulting in possible injury. Do not drive with the power sliding doors and you press the power sliding doors main switch...electrically. • When a sliding door is half open and the system is switched to fall out in an accident. Knowing Your Mazda Doors and Locks Liftgate WARNING Turn Power Sliding Doors Main Switch OFF When Working on Vehicle: Leaving the power sliding doors main switch in the ON position while...
.... If the open . Always press the power sliding doors main switch to Power Door Locks (page 3-10). 3-18 NOTE WARNING Open Liftgate: An open liftgate could become caught resulting in possible injury. Do not drive with the power sliding doors and you press the power sliding doors main switch...electrically. • When a sliding door is half open and the system is switched to fall out in an accident. Knowing Your Mazda Doors and Locks Liftgate WARNING Turn Power Sliding Doors Main Switch OFF When Working on Vehicle: Leaving the power sliding doors main switch in the ON position while...
Owner's Manual
Page 102
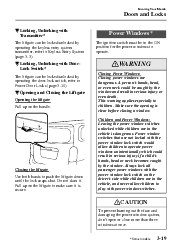
... fuse and damaging the power window system, don't open or close more than three windows at once. *Some models. 3-19 Knowing Your Mazda Doors and Locks M Locking, Unlocking with power window switches. Pull up on the handle. WARNING Closing Power Windows: Closing power windows are... system transmitter, refer to Power Door Locks (page 3-10). Always lock all passenger power windows with the power window lock switch on the liftgate to operate. Make sure the opening is dangerous. Power Windows* The ignition switch must be caught by the window. A person's hands, ...
... fuse and damaging the power window system, don't open or close more than three windows at once. *Some models. 3-19 Knowing Your Mazda Doors and Locks M Locking, Unlocking with power window switches. Pull up on the handle. WARNING Closing Power Windows: Closing power windows are... system transmitter, refer to Power Door Locks (page 3-10). Always lock all passenger power windows with the power window lock switch on the liftgate to operate. Make sure the opening is dangerous. Power Windows* The ignition switch must be caught by the window. A person's hands, ...
Owner's Manual
Page 114
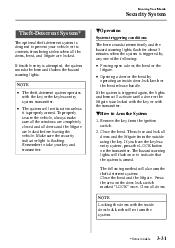
...the key or the keyless entry system transmitter. • The system will also arm the theft-deterrent system: Close the hood and the liftgate . Remove the key from the ignition switch. 2. Press the area on the transmitter. NOTE M Operation System triggering conditions The horn sounds... hazard warning lights will not arm the system. *Some models. 3-31 Close all doors and the liftgate from the outside using the key. Close the hood. Knowing Your Mazda Security System Theft-Deterrent System* The optional theft-deterrent system is designed to prevent your key and transmitter...
...the key or the keyless entry system transmitter. • The system will also arm the theft-deterrent system: Close the hood and the liftgate . Remove the key from the ignition switch. 2. Press the area on the transmitter. NOTE M Operation System triggering conditions The horn sounds... hazard warning lights will not arm the system. *Some models. 3-31 Close all doors and the liftgate from the outside using the key. Close the hood. Knowing Your Mazda Security System Theft-Deterrent System* The optional theft-deterrent system is designed to prevent your key and transmitter...
Owner's Manual
Page 115
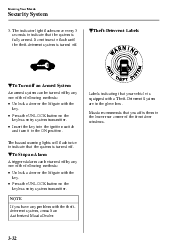
...turned off . M To Stop an Alarm A triggered alarm can be turned off by any one of the following methods: • Unlock a door or the liftgate with the key. • Press the UNLOCK button on the keyless entry system transmitter. • Insert the key into the ignition switch and turn it... to flash until the theft-deterrent system is equipped with the theftdeterrent system, consult an Authorized Mazda Dealer. 3-32 It continues to the ON position. M Theft-Deterrent Labels M To Turn off an Armed System An armed system can be turned ...
...turned off . M To Stop an Alarm A triggered alarm can be turned off by any one of the following methods: • Unlock a door or the liftgate with the key. • Press the UNLOCK button on the keyless entry system transmitter. • Insert the key into the ignition switch and turn it... to flash until the theft-deterrent system is equipped with the theftdeterrent system, consult an Authorized Mazda Dealer. 3-32 It continues to the ON position. M Theft-Deterrent Labels M To Turn off an Armed System An armed system can be turned ...

Owner's Manual
Page 169
.... An air bag/ pretensioner could cause serious injuries. If the system does not operate correctly, consult an Authorized Mazda Dealer. 5-30 *Some models. Never tamper with the systems is fastened. If any door or liftgate isn't securely closed. This warning light in the ignition switch, this light serves as possible. If the...
.... An air bag/ pretensioner could cause serious injuries. If the system does not operate correctly, consult an Authorized Mazda Dealer. 5-30 *Some models. Never tamper with the systems is fastened. If any door or liftgate isn't securely closed. This warning light in the ignition switch, this light serves as possible. If the...

Owner's Manual
Page 222
... Light on or off by pressing the switches. Without moonroof (with overhead console) DOO OFF Light off • Light on when any door or the liftgate is open • (With illuminated entry system) Light on or off when the illuminated entry system is on DOOR Rear R OFF Map light Without moonroof... (without overhead console) OFF OFF ON DOOR Light off • Light on when any door or the liftgate is open • (With illuminated entry system) Light on DOOR Map light Map light ON With moonroof Map light Map light 6-43
... Light on or off by pressing the switches. Without moonroof (with overhead console) DOO OFF Light off • Light on when any door or the liftgate is open • (With illuminated entry system) Light on or off when the illuminated entry system is on DOOR Rear R OFF Map light Without moonroof... (without overhead console) OFF OFF ON DOOR Light off • Light on when any door or the liftgate is open • (With illuminated entry system) Light on DOOR Map light Map light ON With moonroof Map light Map light 6-43

Owner's Manual
Page 223
... is on ON CAUTION • Don't touch the metal part of the lighter, you may damage it . Courtesy Light 6-44 *Some models. Use only a genuine Mazda lighter or the equivalent. • If the lighter doesn't pop out within 30 seconds, remove it automatically pops out. Interior Comfort Interior Equipment M Luggage Compartment... Lights Turns on when any door is open • (With illuminated entry system) Light on or off • Light on when any door or the liftgate is open or the illuminated entry system is on .
... is on ON CAUTION • Don't touch the metal part of the lighter, you may damage it . Courtesy Light 6-44 *Some models. Use only a genuine Mazda lighter or the equivalent. • If the lighter doesn't pop out within 30 seconds, remove it automatically pops out. Interior Comfort Interior Equipment M Luggage Compartment... Lights Turns on when any door is open • (With illuminated entry system) Light on or off • Light on when any door or the liftgate is open or the illuminated entry system is on .

Owner's Manual
Page 292
Remove the liftgate upper trim. 2. Install the new bulb in the reverse order of removal. 5. Turn the socket and bulb assembly counterclockwise and remove it . 4. Push the tab ...
Remove the liftgate upper trim. 2. Install the new bulb in the reverse order of removal. 5. Turn the socket and bulb assembly counterclockwise and remove it . 4. Push the tab ...

Owner's Manual
Page 337
... Flashing ...5-34 High-low beam ...5-34 On reminder ...5-34 Hood Release ...3-24 Horn ...5-39 K Keyless Entry System ...3-3 Keys ...3-2 L Label Information ...10-2 Lane-Change Signals ...5-35 Liftgate ...3-18 Light Bulbs Replacement ...8-31 Specifications ...10-6 Lighter ...6-44 Lighting Control ...5-34 Lubricant Quality ...10-4 Luggage Compartment Light ...6-44 I Ignition Keys ...3-2 Switch ...5-2 Illuminated Entry System...
... Flashing ...5-34 High-low beam ...5-34 On reminder ...5-34 Hood Release ...3-24 Horn ...5-39 K Keyless Entry System ...3-3 Keys ...3-2 L Label Information ...10-2 Lane-Change Signals ...5-35 Liftgate ...3-18 Light Bulbs Replacement ...8-31 Specifications ...10-6 Lighter ...6-44 Lighting Control ...5-34 Lubricant Quality ...10-4 Luggage Compartment Light ...6-44 I Ignition Keys ...3-2 Switch ...5-2 Illuminated Entry System...