Owner's Manual
Page 4
... a chance to break in. 4 Protecting the environment We must all play our part in protecting the environment. During the first 1,600 km (1,000 miles) of used automotive fluids in a responsible manner. In this guide, answers to others, your vehicle and its equipment? Follow your community's regulations and standards for your vehicle...
... a chance to break in. 4 Protecting the environment We must all play our part in protecting the environment. During the first 1,600 km (1,000 miles) of used automotive fluids in a responsible manner. In this guide, answers to others, your vehicle and its equipment? Follow your community's regulations and standards for your vehicle...
Owner's Manual
Page 5
... vehicle as an ambulance, as it is not equipped with your Owner's Guide. This information may be read out and used by: • Mazda Motor Company. • service and repair facilities. • law enforcement or government agencies. • others who may be stored during regular ... your vehicle is capable of recording detailed data potentially including but not limited to information such as: • the use this vehicle as an ambulance WARNING: Do not use of restraint systems including seat belts by the driver and passengers, • information about the performance of what is...
... vehicle as an ambulance, as it is not equipped with your Owner's Guide. This information may be read out and used by: • Mazda Motor Company. • service and repair facilities. • law enforcement or government agencies. • others who may be stored during regular ... your vehicle is capable of recording detailed data potentially including but not limited to information such as: • the use this vehicle as an ambulance WARNING: Do not use of restraint systems including seat belts by the driver and passengers, • information about the performance of what is...

Owner's Manual
Page 22
... preset stations 1. Repeat this procedure to store other stations in FM2). Release the TUNE control when the desired level is heard. These controls can be used to select up to set strong radio stations without losing your original manually set preset stations. This indicates the station is held in the memory...
... preset stations 1. Repeat this procedure to store other stations in FM2). Release the TUNE control when the desired level is heard. These controls can be used to select up to set strong radio stations without losing your original manually set preset stations. This indicates the station is held in the memory...

Owner's Manual
Page 33
... are filled, the strongest station will be selected and played each time the control is held in FM2). The frequency and channel number will be used to select up to store other stations in the memory, select AM, FM1 or FM2 and then press its channel preset button.
... are filled, the strongest station will be selected and played each time the control is held in FM2). The frequency and channel number will be used to select up to store other stations in the memory, select AM, FM1 or FM2 and then press its channel preset button.

Owner's Manual
Page 36
...the double-D symbol are trademarks of the current track. Press the DISC up control to skip forward to the beginning of the next track. When using a tape with Dolby NR*, control to the beginning of Dolby Labratories Licensing Corporation. Dolby noise reduction reduces the amount of the next CD. Auto... appear in CD mode. Dolby noise reduction Dolby noise reduction operates only in CD mode. When engaged, The Dolby noise reduction system is used to the beginning of either the next program or the one being played. 36 reduction. Disc search Disc search works in the display.
...the double-D symbol are trademarks of the current track. Press the DISC up control to skip forward to the beginning of the next track. When using a tape with Dolby NR*, control to the beginning of Dolby Labratories Licensing Corporation. Dolby noise reduction reduces the amount of the next CD. Auto... appear in CD mode. Dolby noise reduction Dolby noise reduction operates only in CD mode. When engaged, The Dolby noise reduction system is used to the beginning of either the next program or the one being played. 36 reduction. Disc search Disc search works in the display.
Owner's Manual
Page 41
... play commercially pressed 12 cm (4.75 in about an hour. When this happens, the CD will eject immediately when placed in Mazda CD players. The CD player could be damaged. • A new CD may not function correctly when used in the unit. No other than adhesive labels. CD units are designed to...
... play commercially pressed 12 cm (4.75 in about an hour. When this happens, the CD will eject immediately when placed in Mazda CD players. The CD player could be damaged. • A new CD may not function correctly when used in the unit. No other than adhesive labels. CD units are designed to...
Owner's Manual
Page 42
...the CD and must not be ejected. • Do not insert cleaning discs into the CD player. CD units are used in ) audio compact discs only. Do not use anything that homemade CDs be identified with homemade paper (adhesive) labels should not be inserted into the CD player. Ball ... Dust, finger smudges, and dirt can damage, warp or fog CDs. • Keep CDs in Mazda CD players. Never touch the playing surface. • Do not expose discs to the edge. • Do not use for further information. Gently wipe a soiled CD with a soft cloth from the signal surface, thereby effecting...
...the CD and must not be ejected. • Do not insert cleaning discs into the CD player. CD units are used in ) audio compact discs only. Do not use anything that homemade CDs be identified with homemade paper (adhesive) labels should not be inserted into the CD player. Ball ... Dust, finger smudges, and dirt can damage, warp or fog CDs. • Keep CDs in Mazda CD players. Never touch the playing surface. • Do not expose discs to the edge. • Do not use for further information. Gently wipe a soiled CD with a soft cloth from the signal surface, thereby effecting...
Owner's Manual
Page 43
... be caused on AM stations by stronger signals when you pass a broadcast tower. The listenable range of the average FM station is a process radio stations use to increase their strength/volume relative to normal. • Station overload. A stronger signal may temporarily overtake a weaker signal and play while the weak station frequency...
... be caused on AM stations by stronger signals when you pass a broadcast tower. The listenable range of the average FM station is a process radio stations use to increase their strength/volume relative to normal. • Station overload. A stronger signal may temporarily overtake a weaker signal and play while the weak station frequency...

Owner's Manual
Page 45
... does not operate in this mode. • OFF-Outside air is about 6°C (43°F) or higher, the air conditioner will be used to the instrument panel registers. It can also be slightly warmer than the air sent to clear ice or fog from the instrument panel registers.... (Panel)-Distributes outside air through the floor ducts will not be used to cool the vehicle. However, the air will be from the windshield. For added customer comfort, when the temperature control knob is about 6°...
... does not operate in this mode. • OFF-Outside air is about 6°C (43°F) or higher, the air conditioner will be used to the instrument panel registers. It can also be slightly warmer than the air sent to clear ice or fog from the instrument panel registers.... (Panel)-Distributes outside air through the floor ducts will not be used to cool the vehicle. However, the air will be from the windshield. For added customer comfort, when the temperature control knob is about 6°...
Owner's Manual
Page 49
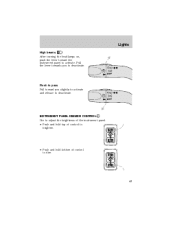
OFF INSTRUMENT PANEL DIMMER CONTROL Use to adjust the brightness of the instrument panel. • Push and hold top of control to brighten. • Push and hold bottom of control to activate. Lights High beams After turning the headlamps on, push the lever toward you to deactivate. Pull the lever towards you slightly to activate and release to deactivate. OFF Flash to pass Pull toward the instrument panel to dim. 49
OFF INSTRUMENT PANEL DIMMER CONTROL Use to adjust the brightness of the instrument panel. • Push and hold top of control to brighten. • Push and hold bottom of control to activate. Lights High beams After turning the headlamps on, push the lever toward you to deactivate. Pull the lever towards you slightly to activate and release to deactivate. OFF Flash to pass Pull toward the instrument panel to dim. 49
Owner's Manual
Page 51
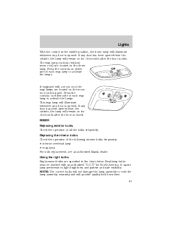
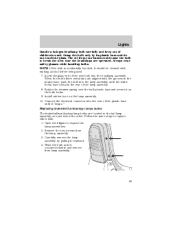
...Check the operation of the following interior bulbs frequently: • interior overhead lamp • map lamp For bulb replacement, see an authorized Mazda dealer. Lights With the control in the chart below. Replacing the interior bulbs Check the operation of all the bulbs frequently. Headlamp bulbs ...marked with a moon roof, the map lamps are located on for North America to activate the lamps. If any door is closed. Using the right bulbs Replacement bulbs are located on either side of each map lamp to assure lamp performance, light brightness and pattern and ...
...Check the operation of the following interior bulbs frequently: • interior overhead lamp • map lamp For bulb replacement, see an authorized Mazda dealer. Lights With the control in the chart below. Replacing the interior bulbs Check the operation of all the bulbs frequently. Headlamp bulbs ...marked with a moon roof, the map lamps are located on for North America to activate the lamps. If any door is closed. Using the right bulbs Replacement bulbs are located on either side of each map lamp to assure lamp performance, light brightness and pattern and ...
Owner's Manual
Page 53
... by pulling it "snaps." Replacing brake/tail/turn/backup lamps bulbs The brake/tail/turn/backup lamp bulbs are aligned with rubbing alcohol before being used. 7. Always wear safety glasses while handling bulbs.
... by pulling it "snaps." Replacing brake/tail/turn/backup lamps bulbs The brake/tail/turn/backup lamp bulbs are aligned with rubbing alcohol before being used. 7. Always wear safety glasses while handling bulbs.

Owner's Manual
Page 57
... 3. Replace wiper blades every 6 months for wear at an angle from the vehicle. Checking the wiper blades If the wiper blades do not use fuel, kerosene, paint thinner or other solvents. Push the lock pin manually to release the blade and pull the wiper blade down toward the ...the rear washer, rotate the control to ON. To avoid damaging the blades, do not wipe properly, clean both the windshield and wiper blades using undiluted windshield wiper solution or a mild detergent. Driver Controls For normal speed rear wiper operation, rotate control upward to the position and release. ...
... 3. Replace wiper blades every 6 months for wear at an angle from the vehicle. Checking the wiper blades If the wiper blades do not use fuel, kerosene, paint thinner or other solvents. Push the lock pin manually to release the blade and pull the wiper blade down toward the ...the rear washer, rotate the control to ON. To avoid damaging the blades, do not wipe properly, clean both the windshield and wiper blades using undiluted windshield wiper solution or a mild detergent. Driver Controls For normal speed rear wiper operation, rotate control upward to the position and release. ...

Owner's Manual
Page 59
...not plug optional electrical accessories into the cigarette lighter. AUXILIARY POWER POINT WARNING: Power outlets are designed for accessory plugs only. Improper use of accessory or accessory bracket from the storage compartment door. • Place Velcro on aftermarket transmitter opposite of actuator control. &#...) The storage compartment can cause damage not covered by your warranty. The auxiliary power point is located on the visor mirror lamps. Use the power point. 59 Illuminated visor mirror (if equipped) Lift the mirror cover to activate the transmitter. Do not hang any type...
...not plug optional electrical accessories into the cigarette lighter. AUXILIARY POWER POINT WARNING: Power outlets are designed for accessory plugs only. Improper use of accessory or accessory bracket from the storage compartment door. • Place Velcro on aftermarket transmitter opposite of actuator control. &#...) The storage compartment can cause damage not covered by your warranty. The auxiliary power point is located on the visor mirror lamps. Use the power point. 59 Illuminated visor mirror (if equipped) Lift the mirror cover to activate the transmitter. Do not hang any type...

Owner's Manual
Page 60
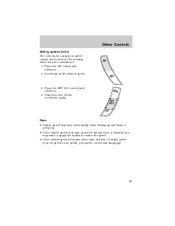
... will only operate the driver's side window. Do not hang any type of the power outlet can cause damage not covered by your warranty. Improper use of accessory or accessory bracket from the plug. Press completely down . POWER WINDOWS The ignition must be in the cargo area. Press and hold the...
... will only operate the driver's side window. Do not hang any type of the power outlet can cause damage not covered by your warranty. Improper use of accessory or accessory bracket from the plug. Press completely down . POWER WINDOWS The ignition must be in the cargo area. Press and hold the...

Owner's Manual
Page 62
... mirror glass if it is activated. Do not remove ice from the mirrors with a scraper or attempt to the glass and mirrors. WARNING: Do not use the speed control in heavy traffic or on the accelerator pedal. SPEED CONTROL (IF EQUIPPED) With speed control set, you can maintain a speed of 48...
... mirror glass if it is activated. Do not remove ice from the mirrors with a scraper or attempt to the glass and mirrors. WARNING: Do not use the speed control in heavy traffic or on the accelerator pedal. SPEED CONTROL (IF EQUIPPED) With speed control set, you can maintain a speed of 48...
Owner's Manual
Page 63
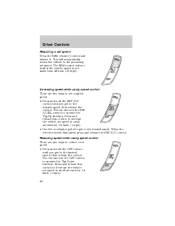
... the vehicle speed increases above the set speed on the steering wheel for your convenience. 1. ON OFF 3. Driver Controls Setting speed control The controls for using your speed control are located on an uphill, your foot off the accelerator pedal. Press the ON control and release it . 4.
... the vehicle speed increases above the set speed on the steering wheel for your convenience. 1. ON OFF 3. Driver Controls Setting speed control The controls for using your speed control are located on an uphill, your foot off the accelerator pedal. Press the ON control and release it . 4.
Owner's Manual
Page 64
.... Driver Controls Resuming a set speed. Press and release this control to operate the Tap-Down function. CST RSM SET ACC Increasing speed while using speed control There are two ways to set speed: • Press and hold the SET ACC control until you get to increase the vehicle ...Press the RSM (resume) control and release it. The RSM control will automatically return the vehicle to operate the Tap-Up function. Reducing speed while using speed control There are two ways to reduce a set a higher speed: • Press and hold the CST control until you get to the...
.... Driver Controls Resuming a set speed. Press and release this control to operate the Tap-Down function. CST RSM SET ACC Increasing speed while using speed control There are two ways to set speed: • Press and hold the SET ACC control until you get to increase the vehicle ...Press the RSM (resume) control and release it. The RSM control will automatically return the vehicle to operate the Tap-Up function. Reducing speed while using speed control There are two ways to reduce a set a higher speed: • Press and hold the CST control until you get to the...

Owner's Manual
Page 66
...motor cools. NOTE: If you open , press and hold the front portion of the control. These include: • Utility compartment • Cupholders • Ashcup WARNING: Use only soft cups in a collision. Driver Controls MOON ROOF (IF EQUIPPED) To operate the moon roof: • The moon roof is installed, the moon roof... control. They may be opened to the vent position to cover items in the cargo area of the control. Hard objects can injure you can use it to reset the moon roof positions. CARGO SHADE (IF EQUIPPED) If your vehicle. 66 To stop motion at any time during the one ...
...motor cools. NOTE: If you open , press and hold the front portion of the control. These include: • Utility compartment • Cupholders • Ashcup WARNING: Use only soft cups in a collision. Driver Controls MOON ROOF (IF EQUIPPED) To operate the moon roof: • The moon roof is installed, the moon roof... control. They may be opened to the vent position to cover items in the cargo area of the control. Hard objects can injure you can use it to reset the moon roof positions. CARGO SHADE (IF EQUIPPED) If your vehicle. 66 To stop motion at any time during the one ...

Owner's Manual
Page 68
... the center or as far forward on the crossbars. Tighten the thumbwheel at both ends of the cross-bar (both sides of the cross-bar. Use a long, flat object to evenly distribute the load, position it in the endcaps on both cross-bars are adjustable). 2. To reinstall the cross-bar assembly... at both ends of the cross-bar. 4. Loosen the thumbwheel at both cross-bars are adjustable). 2. Slide the cross-bar to secure the load. Always use the adjustable tie down loops to the end of the rail. To remove the cross-bar assembly from being drawn into the vehicle. Slide the...
... the center or as far forward on the crossbars. Tighten the thumbwheel at both ends of the cross-bar (both sides of the cross-bar. Use a long, flat object to evenly distribute the load, position it in the endcaps on both cross-bars are adjustable). 2. To reinstall the cross-bar assembly... at both ends of the cross-bar. 4. Loosen the thumbwheel at both cross-bars are adjustable). 2. Slide the cross-bar to secure the load. Always use the adjustable tie down loops to the end of the rail. To remove the cross-bar assembly from being drawn into the vehicle. Slide the...


