
Owner's Manual
Page 18
To return the rear seat to its original position, reverse the procedure. 2-7 Form No. 8Q94-EA-02G Pull the strap and lift the end of the seat bottoms forward. Remove the head restraints (page 2-9). 4. Lift the rear of each seat bottom up and fold each seatback forward. Pull the lock release up and forward. 5. Lock release Strap NOTE When raising the seat bottom, hold the seat belt and clear it from the seat bottom's housing space. J39L_EA.book Page 7 Saturday, June 8, 2002 5:35 PM Essential Safety Equipment Seats 2. Stop-catch release 3.
To return the rear seat to its original position, reverse the procedure. 2-7 Form No. 8Q94-EA-02G Pull the strap and lift the end of the seat bottoms forward. Remove the head restraints (page 2-9). 4. Lift the rear of each seat bottom up and fold each seatback forward. Pull the lock release up and forward. 5. Lock release Strap NOTE When raising the seat bottom, hold the seat belt and clear it from the seat bottom's housing space. J39L_EA.book Page 7 Saturday, June 8, 2002 5:35 PM Essential Safety Equipment Seats 2. Stop-catch release 3.

Owner's Manual
Page 19
... release the lever. Pull the retaining clip to catch your fingers between the seat bottom and floor is dangerous. Pull the strap and lift the end of the seat bottoms forward. Retaining clip Strap 2-8 Form No. 8Q94-EA-02G You could damage the seat belts. To remove 1. Remove the seat bottom...
... release the lever. Pull the retaining clip to catch your fingers between the seat bottom and floor is dangerous. Pull the strap and lift the end of the seat bottoms forward. Retaining clip Strap 2-8 Form No. 8Q94-EA-02G You could damage the seat belts. To remove 1. Remove the seat bottom...

Owner's Manual
Page 20
... belt buckles are on top of the seat bottom lever into the holders. When replacing the seat bottom, be seriously injured in a collision. Insert the ends of the seat bottom and the seat belts are properly adjusted. 2. Sudden braking or a collision could damage the seat belts. Never ride in a vehicle where...
... belt buckles are on top of the seat bottom lever into the holders. When replacing the seat bottom, be seriously injured in a collision. Insert the ends of the seat bottom and the seat belts are properly adjusted. 2. Sudden braking or a collision could damage the seat belts. Never ride in a vehicle where...

Owner's Manual
Page 50
...parts not covered with clothing through friction. • Should you to inflate unexpectedly, or it inoperable. CAUTION To prevent damage to your Mazda, we urge you sell your vehicle. This could be unable to accurately detect a collision resulting in the removal and installation of front... dangerous. J39L_EA.book Page 39 Saturday, June 8, 2002 5:35 PM Essential Safety Equipment SRS Air Bags WARNING Installation of Front-End Equipment: Installation of front-end equipment, such as frontal protection bar (kangaroo bar, bull bar, push bar, etc.), snowplow, or winches, is important to...
...parts not covered with clothing through friction. • Should you to inflate unexpectedly, or it inoperable. CAUTION To prevent damage to your Mazda, we urge you sell your vehicle. This could be unable to accurately detect a collision resulting in the removal and installation of front... dangerous. J39L_EA.book Page 39 Saturday, June 8, 2002 5:35 PM Essential Safety Equipment SRS Air Bags WARNING Installation of Front-End Equipment: Installation of front-end equipment, such as frontal protection bar (kangaroo bar, bull bar, push bar, etc.), snowplow, or winches, is important to...

Owner's Manual
Page 53
...: Collision from the rear. Vehicle roll-over, may not provide the stopping force necessary for air bag deployment. Impact to activate the air bag. Rear-ending or running under a truck's tail gate may deploy the side air bag(s) but it may deploy a side air bag. 2-42 Form No. 8Q94-EA-02G...
...: Collision from the rear. Vehicle roll-over, may not provide the stopping force necessary for air bag deployment. Impact to activate the air bag. Rear-ending or running under a truck's tail gate may deploy the side air bag(s) but it may deploy a side air bag. 2-42 Form No. 8Q94-EA-02G...

Owner's Manual
Page 79
... bar • Tighten the bolts with tightening torque of the rear cross bar until they click, then tighten the screw. Loosen the bolt at both ends of the rear cross bar alternately and evenly. Install the rear cross bar cover by inserting the clips into the square hole of 11-12... N•m {110-120 kgf•cm}. 4. J39L_EA.book Page 22 Saturday, June 8, 2002 5:35 PM Knowing Your Mazda Doors and Locks 3. Tighten the bolt at both ends of the rear cross bar, then slide the rear cross bar to one bolt is not needed. Loosen the screw at...
... bar • Tighten the bolts with tightening torque of the rear cross bar until they click, then tighten the screw. Loosen the bolt at both ends of the rear cross bar alternately and evenly. Install the rear cross bar cover by inserting the clips into the square hole of 11-12... N•m {110-120 kgf•cm}. 4. J39L_EA.book Page 22 Saturday, June 8, 2002 5:35 PM Knowing Your Mazda Doors and Locks 3. Tighten the bolt at both ends of the rear cross bar, then slide the rear cross bar to one bolt is not needed. Loosen the screw at...

Owner's Manual
Page 131
.... Pull it back for low. NOTE To prevent discharging the battery, don't leave the lights on the end of the control lever. J39L_EA.book Page 36 Saturday, June 8, 2002 5:35 PM Driving Your Mazda Switches and Controls Lighting Control M Lights-On Reminder If lights are on and the key is removed from...
.... Pull it back for low. NOTE To prevent discharging the battery, don't leave the lights on the end of the control lever. J39L_EA.book Page 36 Saturday, June 8, 2002 5:35 PM Driving Your Mazda Switches and Controls Lighting Control M Lights-On Reminder If lights are on and the key is removed from...

Owner's Manual
Page 161
... is lit, the cassette tape's top side is playing. Dolby noise reduction When using a tape with Dolby NR*, push the Dolby NR button ( ). At the end of the cassette tape, the unit automatically reverses cassette tape play a tape without Dolby NR, push the button once again. * Noise reduction system manufactured under...
... is lit, the cassette tape's top side is playing. Dolby noise reduction When using a tape with Dolby NR*, push the Dolby NR button ( ). At the end of the cassette tape, the unit automatically reverses cassette tape play a tape without Dolby NR, push the button once again. * Noise reduction system manufactured under...

Owner's Manual
Page 162
... button ( ) to rewind. To stop this operation and play the cassette tape, press the button again. NOTE When the cassette tape ends during play . NOTE When the cassette tape ends, the unit automatically reverses play This operation makes it possible to listen to a selection repeatedly. NOTE are ) to Press the APC button...
... button ( ) to rewind. To stop this operation and play the cassette tape, press the button again. NOTE When the cassette tape ends during play . NOTE When the cassette tape ends, the unit automatically reverses play This operation makes it possible to listen to a selection repeatedly. NOTE are ) to Press the APC button...

Owner's Manual
Page 185
... with the valve stem when installing it. CAUTION Align the notch on the wheel cover with the beveled end of the lug wrench. 2. Pry off the ground. Wheel cover Lug wrench NOTE Force the end of an Emergency Flat Tire M Removing a Flat Tire 1. Place the jack under the jacking position closest to...
... with the valve stem when installing it. CAUTION Align the notch on the wheel cover with the beveled end of the lug wrench. 2. Pry off the ground. Wheel cover Lug wrench NOTE Force the end of an Emergency Flat Tire M Removing a Flat Tire 1. Place the jack under the jacking position closest to...

Owner's Manual
Page 193
...stationary, exposed metallic point (for example, the engine hanger) away from the battery. Connect the cable to the negative ( ) terminal of the other end to a Moving Part: Connecting a jumper cable near any part that its negative terminal is in both vehicles. 3. Start the engine of an Emergency...booster vehicle and run it a few minutes. Make sure the booster battery is dangerous. WARNING Connecting to Negative Terminal: Connecting the end of the vehicle with the booster battery and all unnecessary electrical loads in another vehicle, don't allow the vehicles to explode and injure...
...stationary, exposed metallic point (for example, the engine hanger) away from the battery. Connect the cable to the negative ( ) terminal of the other end to a Moving Part: Connecting a jumper cable near any part that its negative terminal is in both vehicles. 3. Start the engine of an Emergency...booster vehicle and run it a few minutes. Make sure the booster battery is dangerous. WARNING Connecting to Negative Terminal: Connecting the end of the vehicle with the booster battery and all unnecessary electrical loads in another vehicle, don't allow the vehicles to explode and injure...

Owner's Manual
Page 218
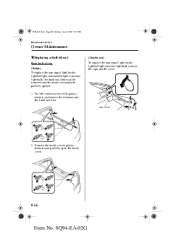
...; If the metal stiffeners are free of the rubber and pull until the tabs are switched, the blade's wiping efficiency could be reduced. Hold the end of the metal support. J39L_EA.book Page 21 Saturday, June 8, 2002 5:35 PM Maintenance and Care Owner Maintenance 1. Compress the clip and slide the assembly...
...; If the metal stiffeners are free of the rubber and pull until the tabs are switched, the blade's wiping efficiency could be reduced. Hold the end of the metal support. J39L_EA.book Page 21 Saturday, June 8, 2002 5:35 PM Maintenance and Care Owner Maintenance 1. Compress the clip and slide the assembly...
Owner's Manual
Page 233
Pull the center section of the plastic retainer and remove the retainers and the trunk end trim. Remove the inside cover's plastic retainers and partially open the inside cover must be partially opened. 1. Jack cover (Hatchback) To replace the turn signal ...light, brake light/taillight, side-marker light or reverse light bulb, the trunk end trim must be removed and the inside cover. 8-36 Form No. 8Q94-EA-02G J39L_EA.book Page 36 Saturday, June 8, 2002 5:35 PM Maintenance and...
Pull the center section of the plastic retainer and remove the retainers and the trunk end trim. Remove the inside cover's plastic retainers and partially open the inside cover must be partially opened. 1. Jack cover (Hatchback) To replace the turn signal ...light, brake light/taillight, side-marker light or reverse light bulb, the trunk end trim must be removed and the inside cover. 8-36 Form No. 8Q94-EA-02G J39L_EA.book Page 36 Saturday, June 8, 2002 5:35 PM Maintenance and...
Owner's Manual
Page 243
... to wet down the road grime without removing it. M Aluminum Wheel Maintenance A protective coating is normal. Rinse thoroughly with lukewarm or cold water at the end of each winter. This helps prevent corrosion. • Avoid washing your aluminum wheels lose luster, wax the wheels. 8-46 Form No. 8Q94-EA-02G Dry...
... to wet down the road grime without removing it. M Aluminum Wheel Maintenance A protective coating is normal. Rinse thoroughly with lukewarm or cold water at the end of each winter. This helps prevent corrosion. • Avoid washing your aluminum wheels lose luster, wax the wheels. 8-46 Form No. 8Q94-EA-02G Dry...
