Owner's Manual
Page 199
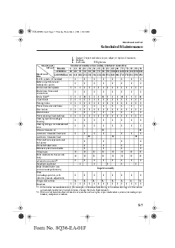
...shields Wheel nuts Bolts and nuts on chassis and body *6 5 T T T T T T T T I I I I I I I I All electrical system I I I I I Headlight alignment Body condition (for rust, Inspect annually corrosion and perforation) Tires I I I I I I I I (including spare tire, with inflation pressure adjustment) L L L L L L L ... I I I I I I I I I I I I I I I I : Inspect: Inspect and clean, repair, adjust, or replace if necessary . R : Replace L : Lubricate T: Tightenan Maintenance Interval Maintenance Item Months ×1000 Km Number of electrical systems such as lights, wiper and washer systems (including...
...shields Wheel nuts Bolts and nuts on chassis and body *6 5 T T T T T T T T I I I I I I I I All electrical system I I I I I Headlight alignment Body condition (for rust, Inspect annually corrosion and perforation) Tires I I I I I I I I (including spare tire, with inflation pressure adjustment) L L L L L L L ... I I I I I I I I I I I I I I I I : Inspect: Inspect and clean, repair, adjust, or replace if necessary . R : Replace L : Lubricate T: Tightenan Maintenance Interval Maintenance Item Months ×1000 Km Number of electrical systems such as lights, wiper and washer systems (including...
Owner's Manual
Page 221
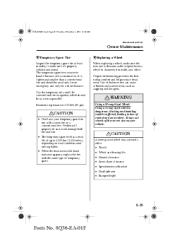
... Wheel and bearing life • Ground clearance • Snow-chain clearance • Speedometer calibration • Headlight aim • Bumper height 8-29 Form No. 8Q36-EA-01F M Replacing a Wheel When replacing a wheel, make sure it's properly inflated and stored. Proper tire balancing provides the best riding comfort and ...same type of the correct size on road conditions and driving habits. • When the tread wear solid-band indicator appears, replace the tire with a snow tire or a conventional tire. The temporary spare tire is repaired, which should be as soon as ...
... Wheel and bearing life • Ground clearance • Snow-chain clearance • Speedometer calibration • Headlight aim • Bumper height 8-29 Form No. 8Q36-EA-01F M Replacing a Wheel When replacing a wheel, make sure it's properly inflated and stored. Proper tire balancing provides the best riding comfort and ...same type of the correct size on road conditions and driving habits. • When the tread wear solid-band indicator appears, replace the tire with a snow tire or a conventional tire. The temporary spare tire is repaired, which should be as soon as ...
Owner's Manual
Page 224
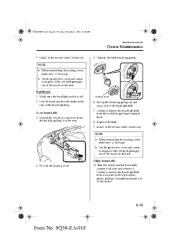
J39L(02MY).book Page 32 Thursday, November 1, 2001 10:49 AM Maintenance and Care Owner Maintenance Your Mazda's headlights have replaceable halogen bulbs. Lift the hood and find the bulb in the rear of children. 6. If one is broken, it will explode... off the sealing cover. Hatchback Do not touch the glass surface 5. Serious injuries could cause the bulb to free the headlight bulb. 7. M Replacing a Headlight Bulb Sedan 1. Make sure the headlight switch is dangerous. These bulbs contain pressurized gas. Pull off . 2. Swing the retaining spring out and away to overheat...
J39L(02MY).book Page 32 Thursday, November 1, 2001 10:49 AM Maintenance and Care Owner Maintenance Your Mazda's headlights have replaceable halogen bulbs. Lift the hood and find the bulb in the rear of children. 6. If one is broken, it will explode... off the sealing cover. Hatchback Do not touch the glass surface 5. Serious injuries could cause the bulb to free the headlight bulb. 7. M Replacing a Headlight Bulb Sedan 1. Make sure the headlight switch is dangerous. These bulbs contain pressurized gas. Pull off . 2. Swing the retaining spring out and away to overheat...
Owner's Manual
Page 225
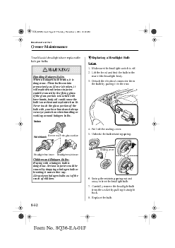
...of the reach of the socket. 8-33 Form No. 8Q36-EA-01F Replace the bulb. 9. Install in the reflector by pulling it straight backward out of children. (High beam bulb) 4. Pull off . 2. Carefully remove the headlight bulb from the socket by pulling it . Install in the rear of children.... Hatchback 1. Swing the retaining spring out and away to dispose of the old bulb promptly out of the reach of the headlight body. (Low beam bulb) 3. Sealing cover 6. Unhook the bulb retaining spring. • When reinstalling the sealing cover, make sure faces up . ...
...of the reach of the socket. 8-33 Form No. 8Q36-EA-01F Replace the bulb. 9. Install in the reflector by pulling it straight backward out of children. (High beam bulb) 4. Pull off . 2. Carefully remove the headlight bulb from the socket by pulling it . Install in the rear of children.... Hatchback 1. Swing the retaining spring out and away to dispose of the old bulb promptly out of the reach of the headlight body. (Low beam bulb) 3. Sealing cover 6. Unhook the bulb retaining spring. • When reinstalling the sealing cover, make sure faces up . ...
Owner's Manual
Page 232
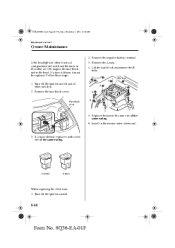
... block under the hood. Remove the fuse block cover. Follow these steps: 1. Lift the fuse block and remove the B bolts. 100A fuse A A A Fuse block cover A B 5. Replace the fuse with a new one of removal. If a fuse is blown, it with a new one of the same rating. Turn off the ignition switch and... fuses in the reverse order of the same rating. 6. Remove the A nuts. 4. Turn off the ignition switch. 8-40 Form No. 8Q36-EA-01F If the headlights or other switches. 2.
... block under the hood. Remove the fuse block cover. Follow these steps: 1. Lift the fuse block and remove the B bolts. 100A fuse A A A Fuse block cover A B 5. Replace the fuse with a new one of removal. If a fuse is blown, it with a new one of the same rating. Turn off the ignition switch and... fuses in the reverse order of the same rating. 6. Remove the A nuts. 4. Turn off the ignition switch. 8-40 Form No. 8Q36-EA-01F If the headlights or other switches. 2.

Owner's Manual
Page 267
... driving ...4-7 Money-saving suggestions ...4-6 Rocking the vehicle ...4-7 Trailer towing ...4-11 Winter driving ...4-8 F Flasher Hazard warning ...5-38 Headlights ...5-33 Flat Tire ...7-3 Changing ...7-7 Spare tire and tool storage ...7-3 Fluids Classification ...10-4 Owner maintenance ...8-8 Fog Lights ...5-... Fuel Filler lid and cap ...3-17 Gauge ...5-23 Requirements ...4-2 Tank capacity ...10-5 Fuses ...8-39 Panel description ...8-41 Replacement ...8-39 E Emergency Starting ...7-15 Flooded engine ...7-15 Jump-starting ...7-15 Push-starting ...7-17 Emergency Towing ...7-18 Emission Control...
... driving ...4-7 Money-saving suggestions ...4-6 Rocking the vehicle ...4-7 Trailer towing ...4-11 Winter driving ...4-8 F Flasher Hazard warning ...5-38 Headlights ...5-33 Flat Tire ...7-3 Changing ...7-7 Spare tire and tool storage ...7-3 Fluids Classification ...10-4 Owner maintenance ...8-8 Fog Lights ...5-... Fuel Filler lid and cap ...3-17 Gauge ...5-23 Requirements ...4-2 Tank capacity ...10-5 Fuses ...8-39 Panel description ...8-41 Replacement ...8-39 E Emergency Starting ...7-15 Flooded engine ...7-15 Jump-starting ...7-15 Push-starting ...7-17 Emergency Towing ...7-18 Emission Control...
Owner's Manual
Page 268
...I Ignition Keys ...3-2 Switch ...5-2 Illuminated Entry System ...6-35 In Case of Emergency ...7-1 Indicator Lights ...5-24 Cruise set ...5-31 Headlight high-beam ...5-31 O/D OFF ...5-31 Instrument Cluster ...5-20 Interior Care ...8-48 Interior Lights ...6-35 M Maintenance ...8-1 Introduction ...8-2......4-10 K Keyless Entry System ...3-2 Keys ...3-2 L Label Information ...10-2 Lane-Change Signals ...5-34 Liftgate ...3-9 Light Bulbs Replacement ...8-30 Specifications ...10-7 Lighter ...6-37 Lighting Control ...5-33 Lubricant Quality ...10-4 Luggage Compartment ...3-10 Luggage Compartment Light ...
...I Ignition Keys ...3-2 Switch ...5-2 Illuminated Entry System ...6-35 In Case of Emergency ...7-1 Indicator Lights ...5-24 Cruise set ...5-31 Headlight high-beam ...5-31 O/D OFF ...5-31 Instrument Cluster ...5-20 Interior Care ...8-48 Interior Lights ...6-35 M Maintenance ...8-1 Introduction ...8-2......4-10 K Keyless Entry System ...3-2 Keys ...3-2 L Label Information ...10-2 Lane-Change Signals ...5-34 Liftgate ...3-9 Light Bulbs Replacement ...8-30 Specifications ...10-7 Lighter ...6-37 Lighting Control ...5-33 Lubricant Quality ...10-4 Luggage Compartment ...3-10 Luggage Compartment Light ...


