

Owner's Manual
Page 14
... bottom M Head Restraint WARNING Head Restraints Adjustment: Driving with the head restraints inserted when seats are being used and make sure they are properly adjusted. Stop-catch release Up Down Dial Adjust the head restraint so that the top parallels the top of seat bottom To raise a head restraint, pull... it up to the desired position. To lower the head restraint, press the stop-catch release, then push the head restraint down. With no support behind your head, your neck could be adjusted by rotating the dial....
... bottom M Head Restraint WARNING Head Restraints Adjustment: Driving with the head restraints inserted when seats are being used and make sure they are properly adjusted. Stop-catch release Up Down Dial Adjust the head restraint so that the top parallels the top of seat bottom To raise a head restraint, pull... it up to the desired position. To lower the head restraint, press the stop-catch release, then push the head restraint down. With no support behind your head, your neck could be adjusted by rotating the dial....
Owner's Manual
Page 17
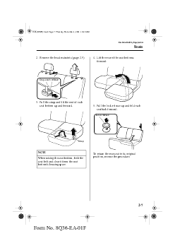
Remove the head restraints (page 2-9). 4. Pull the lock release up and forward. 5. Lift the rear of each seat bottom up and fold each seatback forward. Pull the strap and lift the end of the seat bottoms forward. J39L(02MY).book Page 7 Thursday, November 1, 2001 10:49 AM Essential Safety Equipment Seats 2. Lock release Strap NOTE When raising the seat bottom, hold the seat belt and clear it from the seat bottom's housing space. To return the rear seat to its original position, reverse the procedure. 2-7 Form No. 8Q36-EA-01F Stop-catch release 3.
Remove the head restraints (page 2-9). 4. Pull the lock release up and forward. 5. Lift the rear of each seat bottom up and fold each seatback forward. Pull the strap and lift the end of the seat bottoms forward. J39L(02MY).book Page 7 Thursday, November 1, 2001 10:49 AM Essential Safety Equipment Seats 2. Lock release Strap NOTE When raising the seat bottom, hold the seat belt and clear it from the seat bottom's housing space. To return the rear seat to its original position, reverse the procedure. 2-7 Form No. 8Q36-EA-01F Stop-catch release 3.
Owner's Manual
Page 19
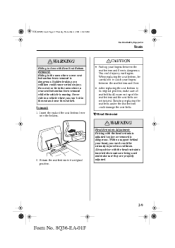
...Page 9 Thursday, November 1, 2001 10:49 AM Essential Safety Equipment Seats WARNING Riding in Area with the head restraints adjusted too low or removed is dangerous. M Head Restraint WARNING Head Restraints Adjustment: Driving with Rear Seat Bottom Removed: Riding in the area where a rear seat bottom has...under the seat bottom could injure your neck could cause serious injury. You could damage the seat belts. With no support behind your head, your fingers. Sudden braking or a collision could be careful not to catch your fingers between the seat bottom and floor. •...
...Page 9 Thursday, November 1, 2001 10:49 AM Essential Safety Equipment Seats WARNING Riding in Area with the head restraints adjusted too low or removed is dangerous. M Head Restraint WARNING Head Restraints Adjustment: Driving with Rear Seat Bottom Removed: Riding in the area where a rear seat bottom has...under the seat bottom could injure your neck could cause serious injury. You could damage the seat belts. With no support behind your head, your fingers. Sudden braking or a collision could be careful not to catch your fingers between the seat bottom and floor. •...

Owner's Manual
Page 20
To lower the head restraint, press the stop -catch release, then pull up to the desired position. Removal To remove the head restraint, press the stop -catch release, then push the head restraint down. Stop-catch release Adjust the head restraint so that the top parallels the top of the passenger's ears, never the passenger's neck. Stop-catch release 2-10 Form No. 8Q36-EA-01F J39L(02MY).book Page 10 Thursday, November 1, 2001 10:49 AM Essential Safety Equipment Seats Height adjustment To raise a head restraint, pull it up on the head restraint.
To lower the head restraint, press the stop -catch release, then pull up to the desired position. Removal To remove the head restraint, press the stop -catch release, then push the head restraint down. Stop-catch release Adjust the head restraint so that the top parallels the top of the passenger's ears, never the passenger's neck. Stop-catch release 2-10 Form No. 8Q36-EA-01F J39L(02MY).book Page 10 Thursday, November 1, 2001 10:49 AM Essential Safety Equipment Seats Height adjustment To raise a head restraint, pull it up on the head restraint.

Owner's Manual
Page 37
... could move and injure the child or someone else. Always position the tether strap between the head restraint and the seatback. J39L(02MY).book Page 27 Thursday, November 1, 2001 10:49 AM Essential Safety Equipment Child Restraint Hatchback (Outboard position) WARNING Child.... Use the tether and tether anchor only for a childrestraint system. Incorrect Positioning of the Tether Strap (Hatchback): Positioning the tether strap on top of the head restraint is dangerous. The child-restraint system could bend or break. This could weaken or damage the tether or tether anchor and result in injury...
... could move and injure the child or someone else. Always position the tether strap between the head restraint and the seatback. J39L(02MY).book Page 27 Thursday, November 1, 2001 10:49 AM Essential Safety Equipment Child Restraint Hatchback (Outboard position) WARNING Child.... Use the tether and tether anchor only for a childrestraint system. Incorrect Positioning of the Tether Strap (Hatchback): Positioning the tether strap on top of the head restraint is dangerous. The child-restraint system could bend or break. This could weaken or damage the tether or tether anchor and result in injury...

Owner's Manual
Page 42
...also for your child's optimum safety. Child-restraint systems with attachments on the center seating position. Always position the tether strap between the head restraint and the seatback. 2-32 Form No. 8Q36-EA-01F Do not attach two childrestraint systems to secure anything but a child-...restraint system is dangerous. In a collision, the head restraint could move and injure the child or someone else. Incorrect Positioning of the Tether Strap (Hatchback): Positioning the tether strap on top ...
...also for your child's optimum safety. Child-restraint systems with attachments on the center seating position. Always position the tether strap between the head restraint and the seatback. 2-32 Form No. 8Q36-EA-01F Do not attach two childrestraint systems to secure anything but a child-...restraint system is dangerous. In a collision, the head restraint could move and injure the child or someone else. Incorrect Positioning of the Tether Strap (Hatchback): Positioning the tether strap on top ...

Owner's Manual
Page 51
J39L(02MY).book Page 41 Thursday, November 1, 2001 10:49 AM Essential Safety Equipment SRS Air Bags M Air Bag Activation/Deactivation Front air bag activation A greater than about a 30 degree range from head-on at greater than moderate impact will cause the front air bags to inflate in the following cases: Hitting a solid wall straight on to the vehicle. Frontal impact within about 22 km/h (14 mph). Driving into a big hole or hitting the far side of a hole. Landing hard or the vehicle falling. 2-41 Form No. 8Q36-EA-01F Hitting a curb, pavement edge or hard object.
J39L(02MY).book Page 41 Thursday, November 1, 2001 10:49 AM Essential Safety Equipment SRS Air Bags M Air Bag Activation/Deactivation Front air bag activation A greater than about a 30 degree range from head-on at greater than moderate impact will cause the front air bags to inflate in the following cases: Hitting a solid wall straight on to the vehicle. Frontal impact within about 22 km/h (14 mph). Driving into a big hole or hitting the far side of a hole. Landing hard or the vehicle falling. 2-41 Form No. 8Q36-EA-01F Hitting a curb, pavement edge or hard object.
Owner's Manual
Page 71
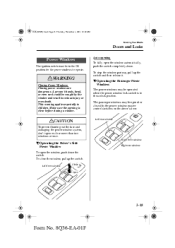
...pull up the switch and then release it. Left front window Close Open Right rear window 3-15 Form No. 8Q36-EA-01F A person's hands, head, or even neck could be operated when the power window lock switch is clear before closing a window. This warning applies especially to operate. M Operating...the power window master control switches on the driver's door. J39L(02MY).book Page 15 Thursday, November 1, 2001 10:49 AM Knowing Your Mazda Doors and Locks Power Windows The ignition switch must be opened or closed by the window and result in the unlock position. To stop ...
...pull up the switch and then release it. Left front window Close Open Right rear window 3-15 Form No. 8Q36-EA-01F A person's hands, head, or even neck could be operated when the power window lock switch is clear before closing a window. This warning applies especially to operate. M Operating...the power window master control switches on the driver's door. J39L(02MY).book Page 15 Thursday, November 1, 2001 10:49 AM Knowing Your Mazda Doors and Locks Power Windows The ignition switch must be opened or closed by the window and result in the unlock position. To stop ...
Owner's Manual
Page 72
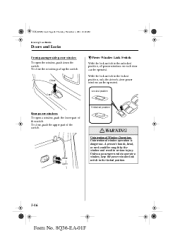
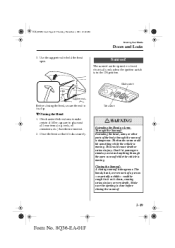
Locked position Close Open Unlocked position Rear power windows To open the window, push down the switch. A person's hands, head, or neck could be caught by the window and result in the locked position. To close , push the upper part of the switch. With the ... switch in serious injury. To close the window, pull up the switch. J39L(02MY).book Page 16 Thursday, November 1, 2001 10:49 AM Knowing Your Mazda Doors and Locks Front passenger-side power window To open a window, push the lower part of the switch.
Locked position Close Open Unlocked position Rear power windows To open the window, push down the switch. A person's hands, head, or neck could be caught by the window and result in the locked position. To close , push the upper part of the switch. With the ... switch in serious injury. To close the window, pull up the switch. J39L(02MY).book Page 16 Thursday, November 1, 2001 10:49 AM Knowing Your Mazda Doors and Locks Front passenger-side power window To open a window, push the lower part of the switch.
Owner's Manual
Page 75
... while the vehicle is dangerous. Tilt switch M Closing the Hood 1. Don't let passengers stand up or extend anything through the sunroof is moving . The hands, head, or even neck of the body through the open . Slide switch Clip Support rod Before closing the sunroof. 3-19 Form No. 8Q36-EA-01F Check... the hood so that it closes, causing serious injury or even death. J39L(02MY).book Page 19 Thursday, November 1, 2001 10:49 AM Knowing Your Mazda Doors and Locks 3.
... while the vehicle is dangerous. Tilt switch M Closing the Hood 1. Don't let passengers stand up or extend anything through the sunroof is moving . The hands, head, or even neck of the body through the open . Slide switch Clip Support rod Before closing the sunroof. 3-19 Form No. 8Q36-EA-01F Check... the hood so that it closes, causing serious injury or even death. J39L(02MY).book Page 19 Thursday, November 1, 2001 10:49 AM Knowing Your Mazda Doors and Locks 3.

Owner's Manual
Page 78
...may cause an accident or the luggage may loosen initially, retighten them. J39L(02MY).book Page 22 Thursday, November 1, 2001 10:49 AM Knowing Your Mazda Doors and Locks M Roof Rack Adjustment 1. CAUTION • The roof rack is equipped with the roof rack installed, be damaged. A special attachment ...; Because the bolts and screws may fall off. • Road conditions (especially steep curves or rough roads) and weather changes (strong cross wind, head wind, rain, snow, or fog) can be aware that the roof rack will raise the total clearance of the rear cross bar, then slide the...
...may cause an accident or the luggage may loosen initially, retighten them. J39L(02MY).book Page 22 Thursday, November 1, 2001 10:49 AM Knowing Your Mazda Doors and Locks M Roof Rack Adjustment 1. CAUTION • The roof rack is equipped with the roof rack installed, be damaged. A special attachment ...; Because the bolts and screws may fall off. • Road conditions (especially steep curves or rough roads) and weather changes (strong cross wind, head wind, rain, snow, or fog) can be aware that the roof rack will raise the total clearance of the rear cross bar, then slide the...
Owner's Manual
Page 145
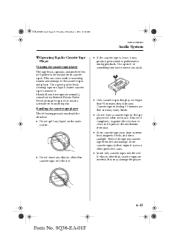
... unit not operate normally, consult an Authorized Mazda Dealer. Remove it or insert a screwdriver or anything else. J39L(02MY).book Page 13 Thursday, November 1, 2001 10:49 AM Interior Comfort Audio System M Operating Tips for Cassette Tape Player Cleaning the cassette tape player The tape head, capstans, and pinch rollers will gather...
... unit not operate normally, consult an Authorized Mazda Dealer. Remove it or insert a screwdriver or anything else. J39L(02MY).book Page 13 Thursday, November 1, 2001 10:49 AM Interior Comfort Audio System M Operating Tips for Cassette Tape Player Cleaning the cassette tape player The tape head, capstans, and pinch rollers will gather...

Owner's Manual
Page 233
... Engine control unit Air conditioner DESCRIPTION 12 13 14 15 16 17 18 19 20 21 22 23 24 (ST.SIG) HORN HAZARD TAIL (HEAD C/U) (FOG) (FOG) STOP HEAD-R HEAD-L - HEAD HI MAIN FUSE RATING 10 A 15 A 15 A 15 A 7.5 A 15 A 15 A 15 A 15 A 15 A - 15 A 100 A PROTECTED COMPONENT Starter signal Horn Hazard warning flashers...
... Engine control unit Air conditioner DESCRIPTION 12 13 14 15 16 17 18 19 20 21 22 23 24 (ST.SIG) HORN HAZARD TAIL (HEAD C/U) (FOG) (FOG) STOP HEAD-R HEAD-L - HEAD HI MAIN FUSE RATING 10 A 15 A 15 A 15 A 7.5 A 15 A 15 A 15 A 15 A 15 A - 15 A 100 A PROTECTED COMPONENT Starter signal Horn Hazard warning flashers...
