
Owner's Manual
Page 3
... and Specifications Engine compartment Engine oil Battery Fuel information Refill capacities Lubricant specifications Engine data 224 234 238 243 250 272 275 276 Accessories Index 279 280 All rights reserved. Mazda may change the contents without notice and without written authorization from Mazda Motor Corporation. Copyright © 2002 Mazda Motor Corporation 3 Reproduction by any means...
... and Specifications Engine compartment Engine oil Battery Fuel information Refill capacities Lubricant specifications Engine data 224 234 238 243 250 272 275 276 Accessories Index 279 280 All rights reserved. Mazda may change the contents without notice and without written authorization from Mazda Motor Corporation. Copyright © 2002 Mazda Motor Corporation 3 Reproduction by any means...

Owner's Manual
Page 9
Introduction Vehicle Symbol Glossary Power Window Lockout Engine Oil Engine Coolant Temperature Battery Panic Alarm System Feature Engine Coolant Do Not Open When Hot Avoid Smoking, Flames, or Sparks Explosive Gas Battery Acid Fan Warning Maintain Correct Fluid Level Engine Air Filter MAX MIN Power Steering Fluid Emission System Passenger Compartment Air Filter Jack Check fuel cap INFORMATION ABOUT THIS GUIDE The information found in this guide was accurate at the time of printing. Mazda may change the contents without notice. 9
Introduction Vehicle Symbol Glossary Power Window Lockout Engine Oil Engine Coolant Temperature Battery Panic Alarm System Feature Engine Coolant Do Not Open When Hot Avoid Smoking, Flames, or Sparks Explosive Gas Battery Acid Fan Warning Maintain Correct Fluid Level Engine Air Filter MAX MIN Power Steering Fluid Emission System Passenger Compartment Air Filter Jack Check fuel cap INFORMATION ABOUT THIS GUIDE The information found in this guide was accurate at the time of printing. Mazda may change the contents without notice. 9

Owner's Manual
Page 15
Speed control Illuminates when the speed control is not charging properly. Charging system Illuminates when the battery is activated. SPEED CONT 15 It may take a long period of normal driving. When CAP the fuel filler cap is properly re-installed, the light(s) ...
Speed control Illuminates when the speed control is not charging properly. Charging system Illuminates when the battery is activated. SPEED CONT 15 It may take a long period of normal driving. When CAP the fuel filler cap is properly re-installed, the light(s) ...
Owner's Manual
Page 19
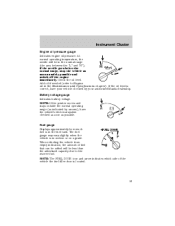
.... NOTE: If the pointer moves and stays outside the normal operating range (as indicated by arrows), have your vehicle checked by your authorized Mazda dealership. Battery voltage gauge Indicates battery voltage. H L Fuel gauge Displays approximately how much fuel is located. 19 When refueling the vehicle from empty indication, the amount of the vehicle...
.... NOTE: If the pointer moves and stays outside the normal operating range (as indicated by arrows), have your vehicle checked by your authorized Mazda dealership. Battery voltage gauge Indicates battery voltage. H L Fuel gauge Displays approximately how much fuel is located. 19 When refueling the vehicle from empty indication, the amount of the vehicle...
Owner's Manual
Page 98
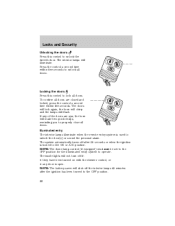
... system to unlock the driver's door. Locks and Security Unlocking the doors Press this control to lock all doors. To confirm all doors. NOTE: The battery saver will make two quick chirps, reminding you to properly close all doors are ajar, the horn will shut off after the ignition has been...
... system to unlock the driver's door. Locks and Security Unlocking the doors Press this control to lock all doors. To confirm all doors. NOTE: The battery saver will make two quick chirps, reminding you to properly close all doors are ajar, the horn will shut off after the ignition has been...

Owner's Manual
Page 100
... the ignition to activate the alarm. Panic alarm will allow you to be caused by one coin type three-volt lithium battery CR2032 or equivalent. Damage to the diagram inside the transmitter unit. 3. Twist a thin coin between the two halves of new... battery in the OFF position. A decrease in operation failure. 2. Replacing the battery The transmitter is powered by : • Weather conditions • Nearby radio towers • Structures around the vehicle •...
... the ignition to activate the alarm. Panic alarm will allow you to be caused by one coin type three-volt lithium battery CR2032 or equivalent. Damage to the diagram inside the transmitter unit. 3. Twist a thin coin between the two halves of new... battery in the OFF position. A decrease in operation failure. 2. Replacing the battery The transmitter is powered by : • Weather conditions • Nearby radio towers • Structures around the vehicle •...

Owner's Manual
Page 160
... from turning. N (Neutral) With the gearshift lever in this , the transmission may move gearshift lever out of this position. 160 Driving When the battery is disconnected or a new battery installed, the transmission must learn its optimum shift feel. Make sure the gearshift lever is securely latched in gear, start the engine, depress...
... from turning. N (Neutral) With the gearshift lever in this , the transmission may move gearshift lever out of this position. 160 Driving When the battery is disconnected or a new battery installed, the transmission must learn its optimum shift feel. Make sure the gearshift lever is securely latched in gear, start the engine, depress...
Owner's Manual
Page 177
... factory bumper are on and right-hand turn signal is on the bumper and its attachments. Use of any type of the vehicle. 1 2 4 Refer to battery's negative ground. 177 3 2. White Ground Circuit activated when brake pedal is depressed or when ignition is applied. Yellow Trailer left -hand turn signal is on...
... factory bumper are on and right-hand turn signal is on the bumper and its attachments. Use of any type of the vehicle. 1 2 4 Refer to battery's negative ground. 177 3 2. White Ground Circuit activated when brake pedal is depressed or when ignition is applied. Yellow Trailer left -hand turn signal is on...

Owner's Manual
Page 188
...Power Distribution Box before servicing high current fuses. WARNING: To reduce risk of electrical shock, always replace the cover to the Battery section of the Maintenance and specifications chapter. 188 The power distribution box contains high-current fuses that protect your vehicle's main... electrical systems from overloads. WARNING: Always disconnect the battery before reconnecting the battery or refilling fluid reservoirs. Roadside Emergencies Power distribution box The power distribution box is located in the engine compartment.
...Power Distribution Box before servicing high current fuses. WARNING: To reduce risk of electrical shock, always replace the cover to the Battery section of the Maintenance and specifications chapter. 188 The power distribution box contains high-current fuses that protect your vehicle's main... electrical systems from overloads. WARNING: Always disconnect the battery before reconnecting the battery or refilling fluid reservoirs. Roadside Emergencies Power distribution box The power distribution box is located in the engine compartment.

Owner's Manual
Page 201
... in the order shown. 11. Unblock the wheels. Park the booster vehicle close to Stowing the spare tire. 12. Do not disconnect the battery of the disabled vehicle making sure the two vehicles do not have firm and/or soft shifts. Set the parking brake on both vehicles and...and fully tighten the lug nuts in injury or vehicle damage. also, the catalytic converter may have push-start your vehicle When the battery is disconnected or a new battery is fastened so it does not rattle when you drive. 13. Over time, the adaptive learning process will not affect function or...
... in the order shown. 11. Unblock the wheels. Park the booster vehicle close to Stowing the spare tire. 12. Do not disconnect the battery of the disabled vehicle making sure the two vehicles do not have firm and/or soft shifts. Set the parking brake on both vehicles and...and fully tighten the lug nuts in injury or vehicle damage. also, the catalytic converter may have push-start your vehicle When the battery is disconnected or a new battery is fastened so it does not rattle when you drive. 13. Over time, the adaptive learning process will not affect function or...

Owner's Manual
Page 202
... and remove any electrical surges. Connect the positive (+) booster cable to the positive (+) terminal of the discharged battery. Check all other end of the positive (+) cable to the positive (+) terminal of the assisting battery. 202 - - - + - + + + Connecting the jumper cables 1. Connect the other accessories off. Note: In the illustrations, lightning bolts are tight...
... and remove any electrical surges. Connect the positive (+) booster cable to the positive (+) terminal of the discharged battery. Check all other end of the positive (+) cable to the positive (+) terminal of the assisting battery. 202 - - - + - + + + Connecting the jumper cables 1. Connect the other accessories off. Note: In the illustrations, lightning bolts are tight...

Owner's Manual
Page 203
... engine rocker covers or the intake manifold as grounding points. Ensure that surround the battery. 5. WARNING: Do not connect the end of the second cable to the negative (-) terminal of the battery to an exposed metal part of the negative (-) cable to be jumped. Make ...the final connection of the stalled vehicle's engine, away from the battery and the carburetor/fuel injection system. Connect the negative (-) cable to the negative (-) terminal of both engines, or any fuel delivery system parts. - - - + +...
... engine rocker covers or the intake manifold as grounding points. Ensure that surround the battery. 5. WARNING: Do not connect the end of the second cable to the negative (-) terminal of the battery to an exposed metal part of the negative (-) cable to be jumped. Make ...the final connection of the stalled vehicle's engine, away from the battery and the carburetor/fuel injection system. Connect the negative (-) cable to the negative (-) terminal of both engines, or any fuel delivery system parts. - - - + +...

Owner's Manual
Page 204
... cables in the reverse order that they were connected. 1. Note: In the illustrations, lightning bolts are used to designate the assisting (boosting) battery. 2. Remove the jumper cable on the negative (-) connection of the disabled vehicle. 3. Once the disabled vehicle has been started, run the... engine at moderately increased speed. 2. Start the engine of the booster vehicle's battery. 204 - - - - + + + + Remove the jumper cable from the ground metal surface. Start the engine of the booster vehicle and run...
... cables in the reverse order that they were connected. 1. Note: In the illustrations, lightning bolts are used to designate the assisting (boosting) battery. 2. Remove the jumper cable on the negative (-) connection of the disabled vehicle. 3. Once the disabled vehicle has been started, run the... engine at moderately increased speed. 2. Start the engine of the booster vehicle's battery. 204 - - - - + + + + Remove the jumper cable from the ground metal surface. Start the engine of the booster vehicle and run...

Owner's Manual
Page 205
Remove the jumper cable from the positive (+) terminal of the disabled vehicle's battery. After the disabled vehicle has been started and the jumper cables removed, allow it to idle for several minutes so the engine computer can relearn its idle conditions. - - - + + - + + 205 Remove the jumper cable from the positive (+) terminal of the booster vehicle's battery. 4. Roadside Emergencies 3.
Remove the jumper cable from the positive (+) terminal of the disabled vehicle's battery. After the disabled vehicle has been started and the jumper cables removed, allow it to idle for several minutes so the engine computer can relearn its idle conditions. - - - + + - + + 205 Remove the jumper cable from the positive (+) terminal of the booster vehicle's battery. 4. Roadside Emergencies 3.
Owner's Manual
Page 232
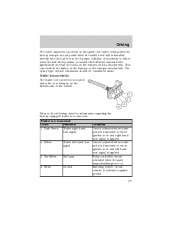
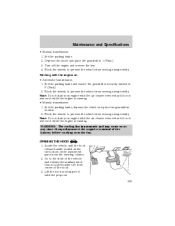
Maintenance and Specifications • Check battery water level (non-maintenance free). • Check battery connections and clean if necessary. If you disconnect the battery, the engine must "relearn" its idle conditions before your vehicle: • We highlight do-it-yourself items in the engine .... Block the wheels to provide the best performance in the Battery section of this chapter. SERVICE RECOMMENDATIONS To help you are covered. Genuine Mazda parts are designed and built to prevent the vehicle from the battery and all lit cigarettes, open flames and other lit material ...
Maintenance and Specifications • Check battery water level (non-maintenance free). • Check battery connections and clean if necessary. If you disconnect the battery, the engine must "relearn" its idle conditions before your vehicle: • We highlight do-it-yourself items in the engine .... Block the wheels to provide the best performance in the Battery section of this chapter. SERVICE RECOMMENDATIONS To help you are covered. Genuine Mazda parts are designed and built to prevent the vehicle from the battery and all lit cigarettes, open flames and other lit material ...
Owner's Manual
Page 233
..., depress the clutch and place the gearshift in 1 (First). 3. Go to prevent the vehicle from moving unexpectedly. Block the wheels to the front of the battery before working near the steering column. 2. Always disconnect the negative terminal of the vehicle and release the auxiliary latch that is running . Note: Do not...
..., depress the clutch and place the gearshift in 1 (First). 3. Go to prevent the vehicle from moving unexpectedly. Block the wheels to the front of the battery before working near the steering column. 2. Always disconnect the negative terminal of the vehicle and release the auxiliary latch that is running . Note: Do not...
Owner's Manual
Page 234
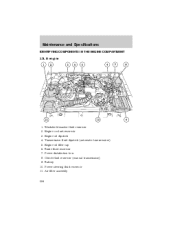
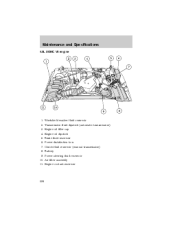
Transmission fluid dipstick (automatic transmission) 5. Power distribution box 8. Clutch fluid reservoir (manual transmission) 9. Maintenance and Specifications IDENTIFYING COMPONENTS IN THE ENGINE COMPARTMENT 2.3L I4 engine 1. Brake fluid reservoir 7. Windshield washer fluid reservoir 2. Engine oil filler cap 6. Battery 10. Engine coolant reservoir 3. Engine oil dipstick 4. Air filter assembly 234 Power steering fluid reservoir 11.
Transmission fluid dipstick (automatic transmission) 5. Power distribution box 8. Clutch fluid reservoir (manual transmission) 9. Maintenance and Specifications IDENTIFYING COMPONENTS IN THE ENGINE COMPARTMENT 2.3L I4 engine 1. Brake fluid reservoir 7. Windshield washer fluid reservoir 2. Engine oil filler cap 6. Battery 10. Engine coolant reservoir 3. Engine oil dipstick 4. Air filter assembly 234 Power steering fluid reservoir 11.
Owner's Manual
Page 235
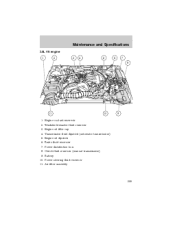
Power distribution box 8. Battery 10. Clutch fluid reservoir (manual transmission) 9. Power steering fluid reservoir 11. Transmission fluid dipstick (automatic transmission) 5. Engine oil dipstick 6. Engine oil filler cap 10 9 4. Engine coolant reservoir 2. Maintenance and Specifications 3.0L V6 engine 1 2 3 4 5 6 7 8 11 1. Air filter assembly 235 Windshield washer fluid reservoir 3. Brake fluid reservoir 7.
Power distribution box 8. Battery 10. Clutch fluid reservoir (manual transmission) 9. Power steering fluid reservoir 11. Transmission fluid dipstick (automatic transmission) 5. Engine oil dipstick 6. Engine oil filler cap 10 9 4. Engine coolant reservoir 2. Maintenance and Specifications 3.0L V6 engine 1 2 3 4 5 6 7 8 11 1. Air filter assembly 235 Windshield washer fluid reservoir 3. Brake fluid reservoir 7.
Owner's Manual
Page 236
Brake fluid reservoir 6. Power steering fluid reservoir 10. Maintenance and Specifications 4.0L SOHC V6 engine 1. Power distribution box 7. Battery 9. Clutch fluid reservoir (manual transmission) 8. Engine coolant reservoir 236 Engine oil dipstick 5. Air filter assembly 11. Transmission fluid dipstick (automatic transmission) 3. Windshield washer fluid reservoir 2. Engine oil filler cap 4.
Brake fluid reservoir 6. Power steering fluid reservoir 10. Maintenance and Specifications 4.0L SOHC V6 engine 1. Power distribution box 7. Battery 9. Clutch fluid reservoir (manual transmission) 8. Engine coolant reservoir 236 Engine oil dipstick 5. Air filter assembly 11. Transmission fluid dipstick (automatic transmission) 3. Windshield washer fluid reservoir 2. Engine oil filler cap 4.

Owner's Manual
Page 243
... in the service maintenance section. It is not covered by the American Petroleum Institute (API). BATTERY Your vehicle is equipped with a Mazda maintenance-free battery which is recommended you use the appropriate Mazda oil filter (or another brand meeting Mazda specifications) for the service interval schedules. Only use supplemental engine oil additives, oil treatments or...
... in the service maintenance section. It is not covered by the American Petroleum Institute (API). BATTERY Your vehicle is equipped with a Mazda maintenance-free battery which is recommended you use the appropriate Mazda oil filter (or another brand meeting Mazda specifications) for the service interval schedules. Only use supplemental engine oil additives, oil treatments or...