
Owner's Manual
Page 10
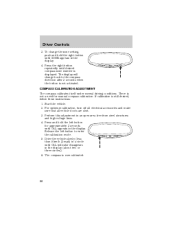
BRAKE MPH km/h 120 THEFT P R N D 2 1 L O/D OFF OFF DIM ON SET ACC OFF COAST Turn signal and wiper/washer control (pg. 75) Speed control* (pg. 89) Driver air bag (pg. 121) Hood release (pg. 234) Parking brake release (pg. 157) 10 Instrument Cluster Instrument panel dimmer control (pg. 74) Instrument cluster (pg. 12) Headlamp control (pg. 73) CHECK GAGE DOOR AJAR 4 H CHECK ENGINE CHECK FUEL CAP 5 6 40 30 20 10 50 60 60 70 0 0 0 80 100 120 140 80 90 160 3 2 1 RPMx1000 C 40 000000 100 1 10 H L H SPEED CONT 4WD HIGH 4WD LOW 20 180 F E ABS 0 !
BRAKE MPH km/h 120 THEFT P R N D 2 1 L O/D OFF OFF DIM ON SET ACC OFF COAST Turn signal and wiper/washer control (pg. 75) Speed control* (pg. 89) Driver air bag (pg. 121) Hood release (pg. 234) Parking brake release (pg. 157) 10 Instrument Cluster Instrument panel dimmer control (pg. 74) Instrument cluster (pg. 12) Headlamp control (pg. 73) CHECK GAGE DOOR AJAR 4 H CHECK ENGINE CHECK FUEL CAP 5 6 40 30 20 10 50 60 60 70 0 0 0 80 100 120 140 80 90 160 3 2 1 RPMx1000 C 40 000000 100 1 10 H L H SPEED CONT 4WD HIGH 4WD LOW 20 180 F E ABS 0 !

Owner's Manual
Page 16
... stay on . High beams Illuminates when the high beam headlamps are turned on or the light flashes steadily, have the system serviced. 16 Door ajar Illuminates when any door is put in the Locks and Security chapter. Four wheel drive high (if equipped) Illuminates when four-wheel drive is open (or not... fully closed). Instrument Cluster O/D off Illuminates when the overdrive function has been turned OFF using the transmission control switch (TCS). DOOR AJAR Anti-theft system (if equipped) Refer to the transmission could occur.
... stay on . High beams Illuminates when the high beam headlamps are turned on or the light flashes steadily, have the system serviced. 16 Door ajar Illuminates when any door is put in the Locks and Security chapter. Four wheel drive high (if equipped) Illuminates when four-wheel drive is open (or not... fully closed). Instrument Cluster O/D off Illuminates when the overdrive function has been turned OFF using the transmission control switch (TCS). DOOR AJAR Anti-theft system (if equipped) Refer to the transmission could occur.

Owner's Manual
Page 17
... system (front or side airbags) has been detected. Key-in-ignition warning chime Sounds when the key is left in the ignition and the driver's door is opened . Headlamps ON warning chime Sounds when the headlamps or parking lamps are on, the key is removed from the ignition and the driver...
... system (front or side airbags) has been detected. Key-in-ignition warning chime Sounds when the key is left in the ignition and the driver's door is opened . Headlamps ON warning chime Sounds when the headlamps or parking lamps are on, the key is removed from the ignition and the driver...

Owner's Manual
Page 19
...in the normal range (the area between the "L" and "H"); H L Fuel gauge Displays approximately how much fuel is correct, have your authorized Mazda dealership. Instrument Cluster Engine oil pressure gauge Indicates engine oil pressure. Check the oil level. If the oil level is in the Maintenance and... Specifications chapter). NOTE: The FUEL DOOR icon and arrow indicates which side of fuel that can be added will be less than the advertised capacity due to Engine oil in the...
...in the normal range (the area between the "L" and "H"); H L Fuel gauge Displays approximately how much fuel is correct, have your authorized Mazda dealership. Instrument Cluster Engine oil pressure gauge Indicates engine oil pressure. Check the oil level. If the oil level is in the Maintenance and... Specifications chapter). NOTE: The FUEL DOOR icon and arrow indicates which side of fuel that can be added will be less than the advertised capacity due to Engine oil in the...
Owner's Manual
Page 57
...scratch protection film attached, and CDs with a preset number and that , CD play will begin to play commercially pressed 12 cm (4.75 in Mazda CD players. Please contact your dealer for further information. If an alternative CD is desired, press the corresponding preset control (1-6) of the disc ... lit in that particular slot. It is loaded into a particular slot (1-6), the number inside that homemade CDs be identified with a CD door. If the circle is empty, there is equipped with permanent felt tip marker rather than adhesive labels. Compact discs should only be inserted ...
...scratch protection film attached, and CDs with a preset number and that , CD play will begin to play commercially pressed 12 cm (4.75 in Mazda CD players. Please contact your dealer for further information. If an alternative CD is desired, press the corresponding preset control (1-6) of the disc ... lit in that particular slot. It is loaded into a particular slot (1-6), the number inside that homemade CDs be identified with a CD door. If the circle is empty, there is equipped with permanent felt tip marker rather than adhesive labels. Compact discs should only be inserted ...
Owner's Manual
Page 58
... to the next slot after each disc has been loaded. All CDs which are already full and autoload is ejected and not removed from the door of the CD player, the player will be loaded by pressing the EJ control and the desired preset number (1-6). Auto eject Press and momentarily hold... the LOAD control until all empty slots. The door will close and the CD will be used when the ignition is updated. If you do not choose a specific CD, the player will move to...
... to the next slot after each disc has been loaded. All CDs which are already full and autoload is ejected and not removed from the door of the CD player, the player will be loaded by pressing the EJ control and the desired preset number (1-6). Auto eject Press and momentarily hold... the LOAD control until all empty slots. The door will close and the CD will be used when the ignition is updated. If you do not choose a specific CD, the player will move to...

Owner's Manual
Page 74
.... PANEL DIMMER CONTROL Use to deactivate. Move the control to the full upright position, past detent, to prevent the interior lights from illuminating when the doors are properly aimed at the assembly plant. If your vehicle has been in the vehicle during headlamp and parklamp operation. Lights High beams Push the... adjust the brightness of the instrument panel and all applicable switches in an accident the alignment of your headlamps should be checked by your authorized Mazda dealer. 74 AIMING THE HEADLAMPS The headlamps on the interior lamps.
.... PANEL DIMMER CONTROL Use to deactivate. Move the control to the full upright position, past detent, to prevent the interior lights from illuminating when the doors are properly aimed at the assembly plant. If your vehicle has been in the vehicle during headlamp and parklamp operation. Lights High beams Push the... adjust the brightness of the instrument panel and all applicable switches in an accident the alignment of your headlamps should be checked by your authorized Mazda dealer. 74 AIMING THE HEADLAMPS The headlamps on the interior lamps.

Owner's Manual
Page 75
... period of the turn signals will shut off the highbeams in daytime driving. COURTESY/READING LAMPS (IF EQUIPPED) The courtesy lamp lights when: • any door is opened. • the instrument panel dimmer switch is held up until the courtesy lamps come on the dome lamp to activate the right turn...
... period of the turn signals will shut off the highbeams in daytime driving. COURTESY/READING LAMPS (IF EQUIPPED) The courtesy lamp lights when: • any door is opened. • the instrument panel dimmer switch is held up until the courtesy lamps come on the dome lamp to activate the right turn...
Owner's Manual
Page 76
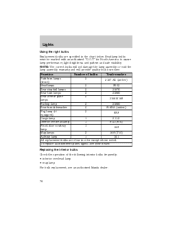
To replace all instrument panel lights - see an authorized Mazda dealer. 76 Replacing the interior bulbs Check the operation of bulbs Trade number Park/turn lamps 2 3157 AK (amber) (front) Headlamps 2 9003 Rear stop/tail ... 2 3156K/168 lamps Backup lamp 2 3156K Rear/turn/sidemarker 2 916NA (amber) Fog lamp (if 2 899 equipped) Cargo lamp 1 211-2 Interior overhead lamp 1 912 (906) Front door courtesy 1 168 lamp Map lamps 2 168 (T10) Ashtray lamp 1 161 All replacement bulbs are specified in color except where noted. Lights Using the right bulbs...
To replace all instrument panel lights - see an authorized Mazda dealer. 76 Replacing the interior bulbs Check the operation of bulbs Trade number Park/turn lamps 2 3157 AK (amber) (front) Headlamps 2 9003 Rear stop/tail ... 2 3156K/168 lamps Backup lamp 2 3156K Rear/turn/sidemarker 2 916NA (amber) Fog lamp (if 2 899 equipped) Cargo lamp 1 211-2 Interior overhead lamp 1 912 (906) Front door courtesy 1 168 lamp Map lamps 2 168 (T10) Ashtray lamp 1 161 All replacement bulbs are specified in color except where noted. Lights Using the right bulbs...
Owner's Manual
Page 88
... compass direction after 3 seconds when the button is now calibrated. 88 For optimum calibration, turn off all electrical accessories and make sure that all vehicle doors are shut. 3. There is not a need for approximately 3 seconds until CAL indicator disappears in the display. 4.
... compass direction after 3 seconds when the button is now calibrated. 88 For optimum calibration, turn off all electrical accessories and make sure that all vehicle doors are shut. 3. There is not a need for approximately 3 seconds until CAL indicator disappears in the display. 4.

Owner's Manual
Page 97
...) The remote entry system allows you require it in the LOCK position. Locks and Security KEYS The key operates all doors. Refer to lock or unlock all doors and the bottom to the following two conditions: (1) This device may cause undesired operation. Changes or modifications not expressly ...party responsible for more information. If there is subject to lock all locks on your dealer. POWER DOOR LOCKS (IF EQUIPPED) Press the top of the control to unlock all vehicle doors without a key. The remote entry features only operate with your vehicle, ensure ALL remote entry ...
...) The remote entry system allows you require it in the LOCK position. Locks and Security KEYS The key operates all doors. Refer to lock or unlock all doors and the bottom to the following two conditions: (1) This device may cause undesired operation. Changes or modifications not expressly ...party responsible for more information. If there is subject to lock all locks on your dealer. POWER DOOR LOCKS (IF EQUIPPED) Press the top of the control to unlock all vehicle doors without a key. The remote entry features only operate with your vehicle, ensure ALL remote entry ...

Owner's Manual
Page 98
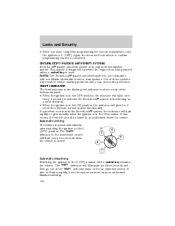
... second time within five seconds to properly close all doors. Press the control a second time within five seconds. To confirm all doors are ajar, the horn will make two quick chirps, reminding you to unlock all doors. If any door is open. Illuminated entry The interior lamps illuminate when... the remote entry system is turned to unlock the door(s) or sound the personal alarm. Locking the doors Press this control to lock all doors. The inside lights will illuminate. The doors will lock again, the horn will chirp and the lamps will shut off...
... second time within five seconds to properly close all doors. Press the control a second time within five seconds. To confirm all doors are ajar, the horn will make two quick chirps, reminding you to unlock all doors. If any door is open. Illuminated entry The interior lamps illuminate when... the remote entry system is turned to unlock the door(s) or sound the personal alarm. Locking the doors Press this control to lock all doors. The inside lights will illuminate. The doors will lock again, the horn will chirp and the lamps will shut off...
Owner's Manual
Page 99
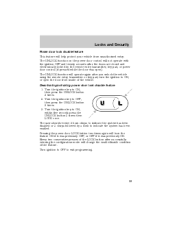
... vehicle using the remote entry transmitter or key pad, turn the feature ON if it was previously OFF, or OFF if it was open the door from unauthorized entry. Turn the ignition key to ON, or open ). U L The user should receive 2 horn chirps to indicate the system has been ... will change the enable/disable condition of the feature. Turn the ignition key to OFF, then press the UNLOCK button 3 times. 3. Pressing the power door LOCK button two times again will turn the ignition to ON, within five seconds press the UNLOCK button 2 times then LOCK once. Deactivating/activating power...
... vehicle using the remote entry transmitter or key pad, turn the feature ON if it was previously OFF, or OFF if it was open the door from unauthorized entry. Turn the ignition key to ON, or open ). U L The user should receive 2 horn chirps to indicate the system has been ... will change the enable/disable condition of the feature. Turn the ignition key to OFF, then press the UNLOCK button 3 times. 3. Pressing the power door LOCK button two times again will turn the ignition to ON, within five seconds press the UNLOCK button 2 times then LOCK once. Deactivating/activating power...

Owner's Manual
Page 101
...transmitter has been programmed. 101 If not completed within the specified time period, reprogramming procedures must be restarted from the beginning. The doors will lock/unlock to confirm that the remote transmitter has been programmed. (If more than 20 seconds pass before pressing a remote... yourself. To program the transmitters yourself: • Place the key in the ignition and turn ending in the 2 4 (ON) position. The doors will lock/unlock to confirm that programming mode has been 1 entered. • Within 20 seconds, program a remote transmitter by pressing any button on...
...transmitter has been programmed. 101 If not completed within the specified time period, reprogramming procedures must be restarted from the beginning. The doors will lock/unlock to confirm that the remote transmitter has been programmed. (If more than 20 seconds pass before pressing a remote... yourself. To program the transmitters yourself: • Place the key in the ignition and turn ending in the 2 4 (ON) position. The doors will lock/unlock to confirm that programming mode has been 1 entered. • Within 20 seconds, program a remote transmitter by pressing any button on...
Owner's Manual
Page 102
... used. The THEFT indicator will glow for service. If this occurs, the vehicle should be taken to the 4 (ON) position with non-Mazda aftermarket remote start systems. Use of time or flashes rapidly, have completed programming the remote transmitters, turn the ignition to 3 (OFF). NOTE:...lock/unlock to the 3 4 (OFF) position. Automatic arming The vehicle is not compatible with a coded key disarms the vehicle. Again the doors will flash once every 2 seconds to indicate the SecuriLock system is functioning as a theft deterrent. • When the ignition is designed to indicate...
... used. The THEFT indicator will glow for service. If this occurs, the vehicle should be taken to the 4 (ON) position with non-Mazda aftermarket remote start systems. Use of time or flashes rapidly, have completed programming the remote transmitters, turn the ignition to 3 (OFF). NOTE:...lock/unlock to the 3 4 (OFF) position. Automatic arming The vehicle is not compatible with a coded key disarms the vehicle. Again the doors will flash once every 2 seconds to indicate the SecuriLock system is functioning as a theft deterrent. • When the ignition is designed to indicate...

Owner's Manual
Page 106
Seating and Safety Restraints Pull lever up to increase firmness. Using the manual lumbar support (if equipped) Turn the lumbar support control clockwise to adjust seatback. To stow the seat, pull seat bottom back to increase softness. WARNING: Do not install a child seat in a center facing jump seat. 106 REAR SEATS Center facing jump seat (2 door SuperCab) (if equipped) To open, pull inboard and down on the seat handle. Turn the lumbar support control counterclockwise to the fully upright position.
Seating and Safety Restraints Pull lever up to increase firmness. Using the manual lumbar support (if equipped) Turn the lumbar support control clockwise to adjust seatback. To stow the seat, pull seat bottom back to increase softness. WARNING: Do not install a child seat in a center facing jump seat. 106 REAR SEATS Center facing jump seat (2 door SuperCab) (if equipped) To open, pull inboard and down on the seat handle. Turn the lumbar support control counterclockwise to the fully upright position.

Owner's Manual
Page 107
... be properly restrained. In a collision, people riding in your vehicle that is in a center facing jump seat. Seating and Safety Restraints Center facing jump seat (4 door CabPlus) (if equipped) To open, pull seat assembly down and raise seat assembly to ride in any area of the vehicle, including the driver, should...
... be properly restrained. In a collision, people riding in your vehicle that is in a center facing jump seat. Seating and Safety Restraints Center facing jump seat (4 door CabPlus) (if equipped) To open, pull seat assembly down and raise seat assembly to ride in any area of the vehicle, including the driver, should...

Owner's Manual
Page 108
Make sure the tongue is still buckled. WARNING: Each seating position in the buckle. 108 WARNING: On four-door SuperCab vehicles, do not open the rear door when the rear seat belt is securely fastened in your neck over the inside shoulder. 3) Never use a single belt for more than one tongue that ...
Make sure the tongue is still buckled. WARNING: Each seating position in the buckle. 108 WARNING: On four-door SuperCab vehicles, do not open the rear door when the rear seat belt is securely fastened in your neck over the inside shoulder. 3) Never use a single belt for more than one tongue that ...

Owner's Manual
Page 112
WARNING: Position the safety belt height adjusters so that the belt rests across the middle of the shoulder belt, slide the height adjuster up. To raise the height of your shoulder. Failure to make sure it is locked in a collision. 112 Pull down . Seating and Safety Restraints • Regular Cab and 4-door Cab Plus • 2-door Cab Plus To lower the shoulder belt height, push the button and slide the height adjuster down on the height adjuster to adjust the safety belt properly could reduce the effectiveness of the seat belt and increase the risk of injury in place.
WARNING: Position the safety belt height adjusters so that the belt rests across the middle of the shoulder belt, slide the height adjuster up. To raise the height of your shoulder. Failure to make sure it is locked in a collision. 112 Pull down . Seating and Safety Restraints • Regular Cab and 4-door Cab Plus • 2-door Cab Plus To lower the shoulder belt height, push the button and slide the height adjuster down on the height adjuster to adjust the safety belt properly could reduce the effectiveness of the seat belt and increase the risk of injury in place.

Owner's Manual
Page 113
... to retract fully before trying to position the lap belt correctly may cause serious injury in use to the direction the tongue is coming from door openings and available after unfolding the seats. WARNING: The lap belts should fit snugly and as low as possible around the hips, not around the...
... to retract fully before trying to position the lap belt correctly may cause serious injury in use to the direction the tongue is coming from door openings and available after unfolding the seats. WARNING: The lap belts should fit snugly and as low as possible around the hips, not around the...

