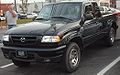
Owner's Manual
Page 92
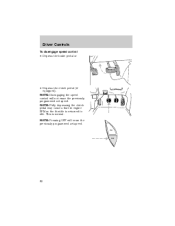
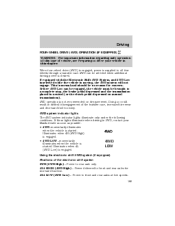
Driver Controls To disengage speed control • Depress the brake pedal or • Depress the clutch pedal (if equipped). NOTE: Pressing OFF will not erase the previously programmed set speed. NOTE: Disengaging the speed control will erase the previously programmed set speed. ON OFF 92 NOTE: Fully depressing the clutch pedal may cause a flare in engine RPM as the throttle is normal. This is returned to idle.
Driver Controls To disengage speed control • Depress the brake pedal or • Depress the clutch pedal (if equipped). NOTE: Pressing OFF will not erase the previously programmed set speed. NOTE: Disengaging the speed control will erase the previously programmed set speed. ON OFF 92 NOTE: Fully depressing the clutch pedal may cause a flare in engine RPM as the throttle is normal. This is returned to idle.

Owner's Manual
Page 93
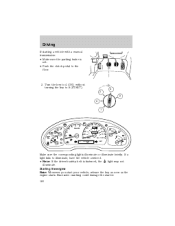
... the Transmission Control Switch (TCS) located on the instrument cluster. It turns off when the speed CONT control OFF control is pressed, the brake or clutch is applied or the ignition is the normal drive position for the best fuel economy. O/D ON/OFF 93 The O/D Off indicator light will operate in...
... the Transmission Control Switch (TCS) located on the instrument cluster. It turns off when the speed CONT control OFF control is pressed, the brake or clutch is applied or the ignition is the normal drive position for the best fuel economy. O/D ON/OFF 93 The O/D Off indicator light will operate in...
Owner's Manual
Page 150
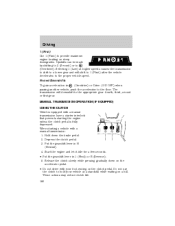
...) without turning the key to illuminate, have the vehicle serviced. light may not • Note: If the driver's safety belt is set. • Push the clutch pedal to the floor. 3. Excessive cranking could damage the starter. 150 Driving If starting a vehicle with a manual transmission: • Make sure the parking brake is...
...) without turning the key to illuminate, have the vehicle serviced. light may not • Note: If the driver's safety belt is set. • Push the clutch pedal to the floor. 3. Excessive cranking could damage the starter. 150 Driving If starting a vehicle with a manual transmission: • Make sure the parking brake is...
Owner's Manual
Page 162
...8226; Put the gearshift lever in (Overdrive) or Drive (O/D OFF) when passing another vehicle, push the accelerator to the floor. These actions may reduce clutch life. 162 Driving 1 (First) Use 1 (First) to (Overdrive). The transmission will shift to 1 (First) after the vehicle decelerates to the...hold your foot resting on the accelerator pedal. • Do not drive with a manual transmission: 1. Hold down on the clutch pedal. Release the clutch slowly while pressing gradually down the brake pedal. 2. Selecting 1 (Low) at a standstill while waiting on steep downgrades. Upshifts ...
...8226; Put the gearshift lever in (Overdrive) or Drive (O/D OFF) when passing another vehicle, push the accelerator to the floor. These actions may reduce clutch life. 162 Driving 1 (First) Use 1 (First) to (Overdrive). The transmission will shift to 1 (First) after the vehicle decelerates to the...hold your foot resting on the accelerator pedal. • Do not drive with a manual transmission: 1. Hold down on the clutch pedal. Release the clutch slowly while pressing gradually down the brake pedal. 2. Selecting 1 (Low) at a standstill while waiting on steep downgrades. Upshifts ...

Owner's Manual
Page 163
Apply the brake, depress the clutch and shift into 1 (First). 4. Shift into N (Neutral). 2. Use 1 (First) gear and set the parking brake fully. 163 Engage the parking brake. 3. Driving PARKING 1. Turn the ignition to Off. WARNING: Do not park your vehicle in Neutral, it may move unexpectedly and injure someone.
Apply the brake, depress the clutch and shift into 1 (First). 4. Shift into N (Neutral). 2. Use 1 (First) gear and set the parking brake fully. 163 Engage the parking brake. 3. Driving PARKING 1. Turn the ignition to Off. WARNING: Do not park your vehicle in Neutral, it may move unexpectedly and injure someone.
Owner's Manual
Page 165
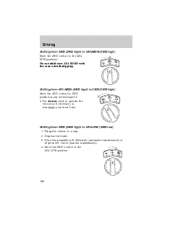
.... 4X4 HIGH (4WD High) - Power delivered to a complete stop, the brake pedal depressed and the transmission placed in neutral (or the clutch pedal depressed on manual transmissions). 4WD operation is not recommended on dry pavement. Before 4WD Low can be brought to front and rear axles for...The 4WD system indicator lights illuminate only under the following conditions. When four-wheel drive (4WD) is engaged, power is supplied to drive your Mazda dealer as soon as possible. • 4WD -momentarily illuminates when the vehicle is started . If these lights illuminate when driving in 2WD, ...
.... 4X4 HIGH (4WD High) - Power delivered to a complete stop, the brake pedal depressed and the transmission placed in neutral (or the clutch pedal depressed on manual transmissions). 4WD operation is not recommended on dry pavement. Before 4WD Low can be brought to front and rear axles for...The 4WD system indicator lights illuminate only under the following conditions. When four-wheel drive (4WD) is engaged, power is supplied to drive your Mazda dealer as soon as possible. • 4WD -momentarily illuminates when the vehicle is started . If these lights illuminate when driving in 2WD, ...
Owner's Manual
Page 166
... position at any forward speed. 4X4 HIGH LOW 2WD • You do not need to operate the vehicle in N (Neutral) (automatic transmission) or depress the clutch (manual transmission). 4. Place the gearshift in R (Reverse) to disengage your front hubs. Bring the vehicle to the 4X4 LOW position. 4X4 4X4 2WD HIGH LOW...
... position at any forward speed. 4X4 HIGH LOW 2WD • You do not need to operate the vehicle in N (Neutral) (automatic transmission) or depress the clutch (manual transmission). 4. Place the gearshift in R (Reverse) to disengage your front hubs. Bring the vehicle to the 4X4 LOW position. 4X4 4X4 2WD HIGH LOW...
Owner's Manual
Page 167
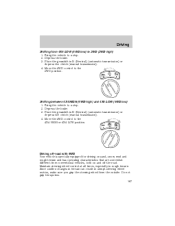
... LOW (4WD low) 1. Do not grip the spokes. 167 Place the gearshift in N (Neutral) (automatic transmission) or depress the clutch (manual transmission). 4. Place the gearshift in N (Neutral) (automatic transmission) or depress the clutch (manual transmission). 4. Bring the vehicle to a stop . 2. Move the 4WD control to the 4X4 HIGH or 4X4 LOW position...
... LOW (4WD low) 1. Do not grip the spokes. 167 Place the gearshift in N (Neutral) (automatic transmission) or depress the clutch (manual transmission). 4. Place the gearshift in N (Neutral) (automatic transmission) or depress the clutch (manual transmission). 4. Bring the vehicle to a stop . 2. Move the 4WD control to the 4X4 HIGH or 4X4 LOW position...

Owner's Manual
Page 190
... Not used Not used Not used Blower motor Auxiliary cooling fan Not used Not used Not used PCM memory Not used Fuel pump motor Headlamps A/C clutch relay Not used Not used ABS module Not used Trailer Tow Foglamp, Daytime Running Lamps (DRL) Not used Park lamp, Central security module Not used...
... Not used Not used Not used Blower motor Auxiliary cooling fan Not used Not used Not used PCM memory Not used Fuel pump motor Headlamps A/C clutch relay Not used Not used ABS module Not used Trailer Tow Foglamp, Daytime Running Lamps (DRL) Not used Park lamp, Central security module Not used...

Owner's Manual
Page 191
Roadside Emergencies Fuse/Relay Fuse Amp Location Rating 42 10A* 43 - 44 - 45A - 45B - 46A - 46B - 47 - 48 - 49 - 50 - 51 - 52 - 53 - 54 - 55 - 56A - 56B - * Mini Fuses ** Maxi Fuses Power Distribution Box Description Right headlamp low beam (Resistor) Not used Wiper HI/LO relay Wiper park/run relay Fuel pump relay Trailer tow relay Starter relay Auxiliary cooling fan Not used Not used Not used Not used PCM Diode PCM Relay Blower motor relay A/C clutch relay Front washer pump relay 191
Roadside Emergencies Fuse/Relay Fuse Amp Location Rating 42 10A* 43 - 44 - 45A - 45B - 46A - 46B - 47 - 48 - 49 - 50 - 51 - 52 - 53 - 54 - 55 - 56A - 56B - * Mini Fuses ** Maxi Fuses Power Distribution Box Description Right headlamp low beam (Resistor) Not used Wiper HI/LO relay Wiper park/run relay Fuel pump relay Trailer tow relay Starter relay Auxiliary cooling fan Not used Not used Not used Not used PCM Diode PCM Relay Blower motor relay A/C clutch relay Front washer pump relay 191

Owner's Manual
Page 193
... Distribution Box Description Not used Not used Blower motor Not used Not used Not used Not used PCM memory Not used Fuel pump motor Headlamps A/C clutch solenoid Not used Not used ABS module Not used Trailer tow Foglamps, Daytime Running Lamps (DRL) Not used Park lamp Not used Not used Not...
... Distribution Box Description Not used Not used Blower motor Not used Not used Not used Not used PCM memory Not used Fuel pump motor Headlamps A/C clutch solenoid Not used Not used ABS module Not used Trailer tow Foglamps, Daytime Running Lamps (DRL) Not used Park lamp Not used Not used Not...

Owner's Manual
Page 194
... - 52 - 53 - 54 - 55 - 56 - * Mini Fuses ** Maxi Fuses Power Distribution Box Description Not used Wiper HI/LO Wiper park/run Fuel pump Trailer tow A/C clutch solenoid Front washer pump Fog lamps Fog lamp relay Not used Not used PCM Diode PCM Blower Starter CHANGING THE TIRES If you get a flat...
... - 52 - 53 - 54 - 55 - 56 - * Mini Fuses ** Maxi Fuses Power Distribution Box Description Not used Wiper HI/LO Wiper park/run Fuel pump Trailer tow A/C clutch solenoid Front washer pump Fog lamps Fog lamp relay Not used Not used PCM Diode PCM Blower Starter CHANGING THE TIRES If you get a flat...
Owner's Manual
Page 225
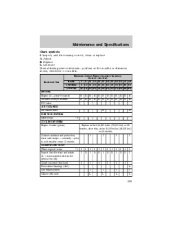
... to cold weather every 12 months CHASSIS AND BODY Wheel lug nut torque *1 I Inspect tires for wear and rotate I (X = recommended interval for optimal tire life) Clutch reservoir fluid level I Front wheel bearings (4x2) Disc brake system Caliper slide rails Replace at first 45,000 miles (72,000 km) or 36 months...
... to cold weather every 12 months CHASSIS AND BODY Wheel lug nut torque *1 I Inspect tires for wear and rotate I (X = recommended interval for optimal tire life) Clutch reservoir fluid level I Front wheel bearings (4x2) Disc brake system Caliper slide rails Replace at first 45,000 miles (72,000 km) or 36 months...

Owner's Manual
Page 227
... to cold weather every 12 months CHASSIS AND BODY Wheel lug nut *1 I I I I I I I I I I I I torque Inspect tires for wear and X X I X X I X X I X X I rotate (X = recommended interval for optimal tire life) Clutch reservoir fluid level I I I I I I Front wheel bearings (4x2) L Disc brake system I I I I Caliper slide rails L L L L Drum brake system, lines and I I I I hoses 227
... to cold weather every 12 months CHASSIS AND BODY Wheel lug nut *1 I I I I I I I I I I I I torque Inspect tires for wear and X X I X X I X X I X X I rotate (X = recommended interval for optimal tire life) Clutch reservoir fluid level I I I I I I Front wheel bearings (4x2) L Disc brake system I I I I Caliper slide rails L L L L Drum brake system, lines and I I I I hoses 227
Owner's Manual
Page 231
...; Check windshield washer spray and wiper operation. At least twice a year (for example, every spring and fall) • Check power steering fluid level. • Check clutch fluid level (if equipped). • Check and clean body and door drain holes. • Check and lubricate all interior and exterior lights. • Check tires...
...; Check windshield washer spray and wiper operation. At least twice a year (for example, every spring and fall) • Check power steering fluid level. • Check clutch fluid level (if equipped). • Check and clean body and door drain holes. • Check and lubricate all interior and exterior lights. • Check tires...

Owner's Manual
Page 233
... the parking brake and ensure the gearshift is running . • Manual transmission: 1. OPENING THE HOOD 1. Go to prevent the vehicle from moving unexpectedly. Depress the clutch and place the gearshift in neutral. 2. Note: Do not start your engine with the engine on at any time. Turn off the engine and remove... column. 2. Always disconnect the negative terminal of the hood. 3. Set the parking brake. 2. Maintenance and Specifications • Manual transmission: 1. Set the parking brake, depress the clutch and place the gearshift in 1 (First). 3.
... the parking brake and ensure the gearshift is running . • Manual transmission: 1. OPENING THE HOOD 1. Go to prevent the vehicle from moving unexpectedly. Depress the clutch and place the gearshift in neutral. 2. Note: Do not start your engine with the engine on at any time. Turn off the engine and remove... column. 2. Always disconnect the negative terminal of the hood. 3. Set the parking brake. 2. Maintenance and Specifications • Manual transmission: 1. Set the parking brake, depress the clutch and place the gearshift in 1 (First). 3.

Owner's Manual
Page 234
Engine oil dipstick 4. Engine oil filler cap 6. Brake fluid reservoir 7. Power distribution box 8. Engine coolant reservoir 3. Battery 10. Power steering fluid reservoir 11. Transmission fluid dipstick (automatic transmission) 5. Air filter assembly 234 Clutch fluid reservoir (manual transmission) 9. Windshield washer fluid reservoir 2. Maintenance and Specifications IDENTIFYING COMPONENTS IN THE ENGINE COMPARTMENT 2.3L I4 engine 1.
Engine oil dipstick 4. Engine oil filler cap 6. Brake fluid reservoir 7. Power distribution box 8. Engine coolant reservoir 3. Battery 10. Power steering fluid reservoir 11. Transmission fluid dipstick (automatic transmission) 5. Air filter assembly 234 Clutch fluid reservoir (manual transmission) 9. Windshield washer fluid reservoir 2. Maintenance and Specifications IDENTIFYING COMPONENTS IN THE ENGINE COMPARTMENT 2.3L I4 engine 1.

Owner's Manual
Page 235
Air filter assembly 235 Battery 10. Engine oil filler cap 10 9 4. Engine oil dipstick 6. Power distribution box 8. Brake fluid reservoir 7. Power steering fluid reservoir 11. Clutch fluid reservoir (manual transmission) 9. Windshield washer fluid reservoir 3. Engine coolant reservoir 2. Maintenance and Specifications 3.0L V6 engine 1 2 3 4 5 6 7 8 11 1. Transmission fluid dipstick (automatic transmission) 5.
Air filter assembly 235 Battery 10. Engine oil filler cap 10 9 4. Engine oil dipstick 6. Power distribution box 8. Brake fluid reservoir 7. Power steering fluid reservoir 11. Clutch fluid reservoir (manual transmission) 9. Windshield washer fluid reservoir 3. Engine coolant reservoir 2. Maintenance and Specifications 3.0L V6 engine 1 2 3 4 5 6 7 8 11 1. Transmission fluid dipstick (automatic transmission) 5.

Owner's Manual
Page 236
Transmission fluid dipstick (automatic transmission) 3. Brake fluid reservoir 6. Battery 9. Engine oil filler cap 4. Power steering fluid reservoir 10. Maintenance and Specifications 4.0L SOHC V6 engine 1. Engine oil dipstick 5. Power distribution box 7. Air filter assembly 11. Clutch fluid reservoir (manual transmission) 8. Engine coolant reservoir 236 Windshield washer fluid reservoir 2.
Transmission fluid dipstick (automatic transmission) 3. Brake fluid reservoir 6. Battery 9. Engine oil filler cap 4. Power steering fluid reservoir 10. Maintenance and Specifications 4.0L SOHC V6 engine 1. Engine oil dipstick 5. Power distribution box 7. Air filter assembly 11. Clutch fluid reservoir (manual transmission) 8. Engine coolant reservoir 236 Windshield washer fluid reservoir 2.

Owner's Manual
Page 263
... immediately. 1. Add fluid until it is at normal operating 263 If taken internally, drink water and induce vomiting. Maintenance and Specifications CLUTCH FLUID (IF EQUIPPED) Check the fluid level. WARNING: Brake fluid is not working properly, i.e., if the transmission slips or shifts ...to the service maintenance section for the service interval schedules. TRANSMISSION FLUID Checking automatic transmission fluid (if equipped) Refer to meet Mazda specification. However, the fluid level should remain constant. To obtain an accurate fluid check, drive the vehicle until the level ...
... immediately. 1. Add fluid until it is at normal operating 263 If taken internally, drink water and induce vomiting. Maintenance and Specifications CLUTCH FLUID (IF EQUIPPED) Check the fluid level. WARNING: Brake fluid is not working properly, i.e., if the transmission slips or shifts ...to the service maintenance section for the service interval schedules. TRANSMISSION FLUID Checking automatic transmission fluid (if equipped) Refer to meet Mazda specification. However, the fluid level should remain constant. To obtain an accurate fluid check, drive the vehicle until the level ...

