

Owner's Manual
Page 41
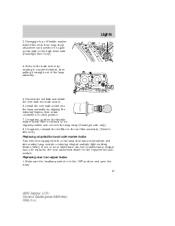
Using the right bulbs Replacement bulbs are vented to ensure lamp performance, light brightness and pattern and safe visibility. Headlamp bulbs must be marked with an authorized "D.O.T." for North America and an "E" for Europe to equalize pressure. Lights Your vehicle may also have reading lamps within 45 minutes of headlamp... side of the dome lamp to turn signal lamp Front redundant park lamp *Rear sidemarker lamp *Stop/tail lamp Number of all the bulbs frequently. The correct bulbs will not damage the lamp assembly or void the lamp assembly warranty and will clear within the rear ...
Using the right bulbs Replacement bulbs are vented to ensure lamp performance, light brightness and pattern and safe visibility. Headlamp bulbs must be marked with an authorized "D.O.T." for North America and an "E" for Europe to equalize pressure. Lights Your vehicle may also have reading lamps within 45 minutes of headlamp... side of the dome lamp to turn signal lamp Front redundant park lamp *Rear sidemarker lamp *Stop/tail lamp Number of all the bulbs frequently. The correct bulbs will not damage the lamp assembly or void the lamp assembly warranty and will clear within the rear ...

Owner's Manual
Page 42
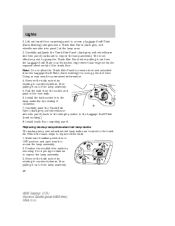
... dealer. *To replace these lamps - Make sure headlamp switch is in color except where noted. Replacing headlamp bulbs Highbeam bulb replacement 1. Reach over the front bolster. 3. Lights Function Rear turn signal lamp Number of flexible washer bottle filler neck from snap strap attachment and position it to... Zephyr (378) Owners Guide (post-2002-fmt) USA (fus) see your authorized dealer. Disengage top of bulbs 2 Trade number 3157A (amber) 161 921 C5WL 921 H11 12V6W 578 194 Redundant tail lamp 8 Backup lamp 2 License plate lamp 2 High-mount brake lamp 1 Foglamp 2 Front map lamp 2...
... dealer. *To replace these lamps - Make sure headlamp switch is in color except where noted. Replacing headlamp bulbs Highbeam bulb replacement 1. Reach over the front bolster. 3. Lights Function Rear turn signal lamp Number of flexible washer bottle filler neck from snap strap attachment and position it to... Zephyr (378) Owners Guide (post-2002-fmt) USA (fus) see your authorized dealer. Disengage top of bulbs 2 Trade number 3157A (amber) 161 921 C5WL 921 H11 12V6W 578 194 Redundant tail lamp 8 Backup lamp 2 License plate lamp 2 High-mount brake lamp 1 Foglamp 2 Front map lamp 2...
Owner's Manual
Page 47
...strap (Passenger side only). 8. Make sure the headlamp switch is equipped with a rear lamp that has a stop/tail/turn signal bulbs 1. Install the new bulb socket into bulb socket. 6. See your authorized dealer for the replacement LED module. Replacing rear turn and side marker lamp module ...containing integral multiple light emitting diodes (LED). Replacing stop/tail/turn and side marker bulbs Your vehicle is in the OFF position and open the trunk. 47 2007 Zephyr (378) Owners Guide ...
...strap (Passenger side only). 8. Make sure the headlamp switch is equipped with a rear lamp that has a stop/tail/turn signal bulbs 1. Install the new bulb socket into bulb socket. 6. See your authorized dealer for the replacement LED module. Replacing rear turn and side marker lamp module ...containing integral multiple light emitting diodes (LED). Replacing stop/tail/turn and side marker bulbs Your vehicle is in the OFF position and open the trunk. 47 2007 Zephyr (378) Owners Guide ...
Owner's Manual
Page 48
...assembly. 2. Remove the bulb socket by rotating it counterclockwise...most effective point to expose the lamp assembly. 3. Remove the bulb socket by rotating it counterclockwise, then pulling it out of ...panel) outboard to replace either bulb. 1. Doing so may result in the new bulb. 6. Install the bulb socket into the lamp assembly...Panel when pulling it out of the trunk floor. Pull the bulb from the Luggage Scuff Plate (hard molding) for a long...area. 3. Replacing backup lamp/redundant tail lamp bulbs The backup lamp and redundant tail lamp bulbs are located in OFF position and ...
...assembly. 2. Remove the bulb socket by rotating it counterclockwise...most effective point to expose the lamp assembly. 3. Remove the bulb socket by rotating it counterclockwise, then pulling it out of ...panel) outboard to replace either bulb. 1. Doing so may result in the new bulb. 6. Install the bulb socket into the lamp assembly...Panel when pulling it out of the trunk floor. Pull the bulb from the Luggage Scuff Plate (hard molding) for a long...area. 3. Replacing backup lamp/redundant tail lamp bulbs The backup lamp and redundant tail lamp bulbs are located in OFF position and ...
Owner Guide 3rd Printing
Page 59
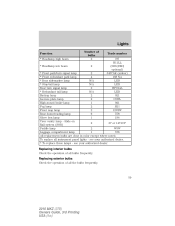
... dealer. Lights Function * Headlamp high beam * Headlamp low beam Number of all bulbs frequently. To replace all the bulbs frequently. 59 2010 MKZ (378) Owners Guide, 3rd Printing USA (fus) Replacing exterior bulbs Check the operation of all instrument panel lights - see...bulbs Check the operation of bulbs 2 2 Trade number H7 H11LL (D3S [HID] optional) 3457AK (amber) 168 NA LED LED HPC24A LED 921 C5WL 921 H11 12V6W 578 194 * Front park/turn signal lamp 2 * Front redundant park lamp 4 * Rear sidemarker lamp N/A * Stop/tail lamp N/A Rear turn signal lamp 2 * Redundant tail...
... dealer. Lights Function * Headlamp high beam * Headlamp low beam Number of all bulbs frequently. To replace all the bulbs frequently. 59 2010 MKZ (378) Owners Guide, 3rd Printing USA (fus) Replacing exterior bulbs Check the operation of all instrument panel lights - see...bulbs Check the operation of bulbs 2 2 Trade number H7 H11LL (D3S [HID] optional) 3457AK (amber) 168 NA LED LED HPC24A LED 921 C5WL 921 H11 12V6W 578 194 * Front park/turn signal lamp 2 * Front redundant park lamp 4 * Rear sidemarker lamp N/A * Stop/tail lamp N/A Rear turn signal lamp 2 * Redundant tail...

Owner Guide 3rd Printing
Page 64
... then pulling it 's bottom edge where that has a stop /tail/turn and side marker bulbs Your vehicle is in the off position and open the trunk. 2. Replacing stop /tail/turn and side marker lamp module containing integral multiple light emitting diodes (LED). If one or more LEDs burn out, the... side trim panel) at it out of the lamp assembly. 5. Reinstall the trunk floor carpeting panel. 64 2010 MKZ (378) Owners Guide, 3rd Printing USA (fus) Replacing rear turn signal bulbs 1. Make sure the headlamp switch is equipped with a rear lamp that edge meets the exposed sheet metal of...
... then pulling it 's bottom edge where that has a stop /tail/turn and side marker bulbs Your vehicle is in the off position and open the trunk. 2. Replacing stop /tail/turn and side marker lamp module containing integral multiple light emitting diodes (LED). If one or more LEDs burn out, the... side trim panel) at it out of the lamp assembly. 5. Reinstall the trunk floor carpeting panel. 64 2010 MKZ (378) Owners Guide, 3rd Printing USA (fus) Replacing rear turn signal bulbs 1. Make sure the headlamp switch is equipped with a rear lamp that edge meets the exposed sheet metal of...

Owner Guide 3rd Printing
Page 65
... secure the retainers. Position the decklid trim aside by rotating it counterclockwise, then pull it clockwise. 65 2010 MKZ (378) Owners Guide, 3rd Printing USA (fus) Remove the bulb socket by removing 3 to 4 pin-type retainers to expose the lamp assembly. 3. Make sure the ...the lamp assembly. 4. Make sure the headlamp switch is in the new bulb. 5. Lights Replacing backup lamp/redundant tail lamp The backup lamp and redundant tail lamps are located in the new bulb. 5. Install the bulb socket into the lamp assembly by rotating it counterclockwise, then pull it clockwise....
... secure the retainers. Position the decklid trim aside by rotating it counterclockwise, then pull it clockwise. 65 2010 MKZ (378) Owners Guide, 3rd Printing USA (fus) Remove the bulb socket by removing 3 to 4 pin-type retainers to expose the lamp assembly. 3. Make sure the ...the lamp assembly. 4. Make sure the headlamp switch is in the new bulb. 5. Lights Replacing backup lamp/redundant tail lamp The backup lamp and redundant tail lamps are located in the new bulb. 5. Install the bulb socket into the lamp assembly by rotating it counterclockwise, then pull it clockwise....


