

Owner Guide 1st Printing
Page 40
HORIZONTAL AIM IS NOT REQUIRED FOR THIS VEHICLE AND IS NON-ADJUSTABLE. 40 2009 MKX (mkx) Owners Guide, 1st Printing USA (fus) The top edge of this height (a piece of masking tape works well). 3. Close the hood and turn the adjuster either clockwise (to adjust down) or counterclockwise (to ground... a clearer light pattern for adjusting, you may want to block the light from light to illuminate the wall or screen and open the hood. Using a Phillips #2 screwdriver, turn off should touch the horizontal reference line. 6. Locate the vertical adjuster on the low beam headlamps...
HORIZONTAL AIM IS NOT REQUIRED FOR THIS VEHICLE AND IS NON-ADJUSTABLE. 40 2009 MKX (mkx) Owners Guide, 1st Printing USA (fus) The top edge of this height (a piece of masking tape works well). 3. Close the hood and turn the adjuster either clockwise (to adjust down) or counterclockwise (to ground... a clearer light pattern for adjusting, you may want to block the light from light to illuminate the wall or screen and open the hood. Using a Phillips #2 screwdriver, turn off should touch the horizontal reference line. 6. Locate the vertical adjuster on the low beam headlamps...

Owner Guide 1st Printing
Page 44
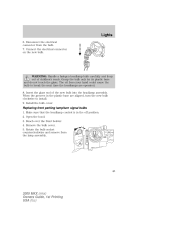
Make sure that the headlamp control is in the off position. 2. Highbeam bulb Lowbeam bulb 4. Note: The driver side has a side access bulb cover instead of all the bulbs frequently. Reach over the front bolster. Remove the bulb cover. Open the hood. 3. Lights Replacing exterior bulbs Check the operation of a back access bulb cover. 5. Remove the bulb by turning it counterclockwise and then pulling it straight out. 44 2009 MKX (mkx) Owners Guide, 1st Printing USA (fus) Replacing headlamp bulbs 1.
Make sure that the headlamp control is in the off position. 2. Highbeam bulb Lowbeam bulb 4. Note: The driver side has a side access bulb cover instead of all the bulbs frequently. Reach over the front bolster. Remove the bulb cover. Open the hood. 3. Lights Replacing exterior bulbs Check the operation of a back access bulb cover. 5. Remove the bulb by turning it counterclockwise and then pulling it straight out. 44 2009 MKX (mkx) Owners Guide, 1st Printing USA (fus) Replacing headlamp bulbs 1.
Owner Guide 1st Printing
Page 45
Open the hood. 3. Rotate the bulb socket counterclockwise and remove from the bulb. 7. WARNING: Handle a halogen headlamp bulb carefully and keep out of the new bulb into the headlamp assembly. Install the bulb cover. Remove the bulb cover. 5. Disconnect the electrical connector from the lamp assembly. 45 2009 MKX (mkx) Owners Guide, 1st Printing USA...
Open the hood. 3. Rotate the bulb socket counterclockwise and remove from the bulb. 7. WARNING: Handle a halogen headlamp bulb carefully and keep out of the new bulb into the headlamp assembly. Install the bulb cover. Remove the bulb cover. 5. Disconnect the electrical connector from the lamp assembly. 45 2009 MKX (mkx) Owners Guide, 1st Printing USA...

Owner Guide 1st Printing
Page 94
... the liftgate open, keep the vents open the WARNING: Make sure all persons are clear of the liftgate area before using the panic alarm. 94 2009 MKX (mkx) Owners Guide, 1st Printing USA (fus) Note: The ignition must be in the off position and the accessory delay feature must drive with the ...this feature to prevent exhaust fumes from falling out. Locks and Security • If any door or the liftgate is not closed, or if the hood is not closed in order for this method be resumed. and release again within three seconds. Opening the power liftgate (if equipped) Press liftgate.
... the liftgate open, keep the vents open the WARNING: Make sure all persons are clear of the liftgate area before using the panic alarm. 94 2009 MKX (mkx) Owners Guide, 1st Printing USA (fus) Note: The ignition must be in the off position and the accessory delay feature must drive with the ...this feature to prevent exhaust fumes from falling out. Locks and Security • If any door or the liftgate is not closed, or if the hood is not closed in order for this method be resumed. and release again within three seconds. Opening the power liftgate (if equipped) Press liftgate.

Owner Guide 1st Printing
Page 105
... vehicle becomes armed. There is locked and entering the 20 second countdown. The turn signal lamps will flash once when all doors, the hood and the liftgate are closed. If any of your Integrated Keyhead Transmitter. • Unlock the doors by using your keyless entry pad (...if equipped). • Unlock the driver's door with a valid SecuriLock™ key or Integrated Keyhead Transmitter (IKT). 105 2009 MKX (mkx) Owners Guide, 1st Printing USA (fus) Each door, the hood, and the liftgate is open, then close the door. • Press the 7 • 8 and 9 • 0 controls ...
... vehicle becomes armed. There is locked and entering the 20 second countdown. The turn signal lamps will flash once when all doors, the hood and the liftgate are closed. If any of your Integrated Keyhead Transmitter. • Unlock the doors by using your keyless entry pad (...if equipped). • Unlock the driver's door with a valid SecuriLock™ key or Integrated Keyhead Transmitter (IKT). 105 2009 MKX (mkx) Owners Guide, 1st Printing USA (fus) Each door, the hood, and the liftgate is open, then close the door. • Press the 7 • 8 and 9 • 0 controls ...

Owner Guide 1st Printing
Page 106
... state. This will be armed. control within the 20 second prearmed Pressing the power door mode will still be triggered if: • Any door, the hood or the liftgate is opened without using the door key, keypad or the remote entry transmitter portion of your IKT. • The ignition is sounding... entry transmitter portion of your IKT. Locks and Security • Press the panic control on position with an invalid SecuriLock™ key or IKT. 106 2009 MKX (mkx) Owners Guide, 1st Printing USA (fus)
... state. This will be armed. control within the 20 second prearmed Pressing the power door mode will still be triggered if: • Any door, the hood or the liftgate is opened without using the door key, keypad or the remote entry transmitter portion of your IKT. • The ignition is sounding... entry transmitter portion of your IKT. Locks and Security • Press the panic control on position with an invalid SecuriLock™ key or IKT. 106 2009 MKX (mkx) Owners Guide, 1st Printing USA (fus)

Owner Guide 1st Printing
Page 241
... update transmission operation. 1. If there is installed, the automatic transmission must relearn its shift strategy. Apply grease only to the hood of the engine cooling fan and other moving parts. 241 2009 MKX (mkx) Owners Guide, 1st Printing USA (fus) Do not disconnect the battery of the disabled vehicle as this could result in...
... update transmission operation. 1. If there is installed, the automatic transmission must relearn its shift strategy. Apply grease only to the hood of the engine cooling fan and other moving parts. 241 2009 MKX (mkx) Owners Guide, 1st Printing USA (fus) Do not disconnect the battery of the disabled vehicle as this could result in...

Owner Guide 1st Printing
Page 263
Maintenance and Specifications OPENING THE HOOD 1. Lift the hood and support it with the prop rod. 263 2009 MKX (mkx) Owners Guide, 1st Printing USA (fus) Go to the front of the vehicle and release the secondary hood latch that is located under the bottom of the hood. 3. Inside the vehicle, pull the hood release handle located under the front center of the instrument panel near the steering column. 2.
Maintenance and Specifications OPENING THE HOOD 1. Lift the hood and support it with the prop rod. 263 2009 MKX (mkx) Owners Guide, 1st Printing USA (fus) Go to the front of the vehicle and release the secondary hood latch that is located under the bottom of the hood. 3. Inside the vehicle, pull the hood release handle located under the front center of the instrument panel near the steering column. 2.

Owner Guide 1st Printing
Page 267
... intervals for the oil to the wiper arm and press it into the oil pan. 3. Locate and carefully remove the engine oil level dipstick. 267 2009 MKX (mkx) Owners Guide, 1st Printing USA (fus) Maintenance and Specifications 4. If you find this procedure too difficult, please see your dealer. Set the parking brake and...
... intervals for the oil to the wiper arm and press it into the oil pan. 3. Locate and carefully remove the engine oil level dipstick. 267 2009 MKX (mkx) Owners Guide, 1st Printing USA (fus) Maintenance and Specifications 4. If you find this procedure too difficult, please see your dealer. Set the parking brake and...

Owner Guide 1st Printing
Page 295
... Fluid Capacity Ford part name Ford part number / Ford specification PM-1-C / WSS-M6C62-A or WSS-M6C65-A1 XL-6 / ESR-M13P4-A 2009 MKX (mkx) Owners Guide, 1st Printing USA (fus) Door latch, hood latch, auxiliary hood latch, door hinges, striker plates, seat tracks and fuel filler door hinge - Multi-Purpose Grease XG-4 or XL-5 / ESB-M1C93...
... Fluid Capacity Ford part name Ford part number / Ford specification PM-1-C / WSS-M6C62-A or WSS-M6C65-A1 XL-6 / ESR-M13P4-A 2009 MKX (mkx) Owners Guide, 1st Printing USA (fus) Door latch, hood latch, auxiliary hood latch, door hinges, striker plates, seat tracks and fuel filler door hinge - Multi-Purpose Grease XG-4 or XL-5 / ESB-M1C93...

Owner Guide 1st Printing
Page 301
... the vehicle by the authorized dealer or the owner may adversely affect battery performance and durability. 301 2009 MKX (mkx) Owners Guide, 1st Printing USA (fus) Any such equipment installed in the area of the driver's side hood. • Electrical or electronic accessories or components that are not properly designed for specific weight information...
... the vehicle by the authorized dealer or the owner may adversely affect battery performance and durability. 301 2009 MKX (mkx) Owners Guide, 1st Printing USA (fus) Any such equipment installed in the area of the driver's side hood. • Electrical or electronic accessories or components that are not properly designed for specific weight information...

Owner Guide 1st Printing
Page 304
... pass ...38 high beam ...38 replacing bulbs ...44 turning on and off ...37 Heating heating and air conditioning system ...32 Homelink wireless control system ...63 Hood ...263 I Ignition ...199, 297 Illuminated visor mirror ...51 Infant seats (see Safety seats) ...152 Inspection/maintenance (I/M) testing ...288 Instrument panel cleaning ...258 cluster ...12 304...
... pass ...38 high beam ...38 replacing bulbs ...44 turning on and off ...37 Heating heating and air conditioning system ...32 Homelink wireless control system ...63 Hood ...263 I Ignition ...199, 297 Illuminated visor mirror ...51 Infant seats (see Safety seats) ...152 Inspection/maintenance (I/M) testing ...288 Instrument panel cleaning ...258 cluster ...12 304...
