
Owner Guide 1st Printing
Page 1
Table of Contents Introduction Congratulations Safety and environment protection Symbol glossary 4 4 5 8 Instrument Cluster Warning and control lights Gauges 10 10 17 Entertainment Systems AM/FM stereo cassette AM/FM stereo cassette (CD changer compatible) CD changer 19 19 26 38 Climate Controls Electronic automatic temperature control 43 43 Lights Headlamps Bulb replacement 49 49 53 Driver Controls Steering wheel adjustment Power windows Mirrors Message center 59 60 62 63 77 Locks and Security Keys Locks Anti-theft system 88 88 88 90 1
Table of Contents Introduction Congratulations Safety and environment protection Symbol glossary 4 4 5 8 Instrument Cluster Warning and control lights Gauges 10 10 17 Entertainment Systems AM/FM stereo cassette AM/FM stereo cassette (CD changer compatible) CD changer 19 19 26 38 Climate Controls Electronic automatic temperature control 43 43 Lights Headlamps Bulb replacement 49 49 53 Driver Controls Steering wheel adjustment Power windows Mirrors Message center 59 60 62 63 77 Locks and Security Keys Locks Anti-theft system 88 88 88 90 1

Owner Guide 1st Printing
Page 61
ILLUMINATED VISOR MIRROR (IF EQUIPPED) To turn on the visor mirror lamps, lift the mirror cover. Press the left control to increase the time displayed. Driver Controls Never adjust the steering wheel when the vehicle is not equipped with an instrument panel mounted clock, refer to Setting the Clock section in the Entertainment chapter. Press the right control to decrease the time displayed. 61 CLOCK (IF EQUIPPED) If your vehicle is moving.
ILLUMINATED VISOR MIRROR (IF EQUIPPED) To turn on the visor mirror lamps, lift the mirror cover. Press the left control to increase the time displayed. Driver Controls Never adjust the steering wheel when the vehicle is not equipped with an instrument panel mounted clock, refer to Setting the Clock section in the Entertainment chapter. Press the right control to decrease the time displayed. 61 CLOCK (IF EQUIPPED) If your vehicle is moving.

Owner Guide 1st Printing
Page 63
...controls. To adjust your mirrors: 1. The mirror support arm has two pivot points which has an auto-dimming function (available as an option on the outside driver's side mirror). COMP MIRROR Power side view mirrors The ignition must be in R (Reverse)(when the mirror is placed in ACC or... ON position to adjust the power side view mirrors. Driver Controls MIRRORS Automatic dimming inside rear view mirror which lets you adjust the mirror UP or ...
...controls. To adjust your mirrors: 1. The mirror support arm has two pivot points which has an auto-dimming function (available as an option on the outside driver's side mirror). COMP MIRROR Power side view mirrors The ignition must be in R (Reverse)(when the mirror is placed in ACC or... ON position to adjust the power side view mirrors. Driver Controls MIRRORS Automatic dimming inside rear view mirror which lets you adjust the mirror UP or ...

Owner Guide 1st Printing
Page 64
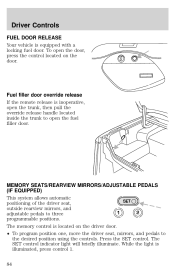
... the rocker control to adjust accelerator and brake pedal. • Press the bottom of the control to adjust the pedals toward you wish to lock mirrors in the P(Park) position. Move the control in the direction you . • Press the top of maximum travel. POWER ADJUSTABLE FOOT PEDALS The accelerator and... brake pedal should only be adjusted when the vehicle is stopped and the gearshift lever is moving. 64 Driver Controls 2. Return to the center position to tilt the...
... the rocker control to adjust accelerator and brake pedal. • Press the bottom of the control to adjust the pedals toward you wish to lock mirrors in the P(Park) position. Move the control in the direction you . • Press the top of maximum travel. POWER ADJUSTABLE FOOT PEDALS The accelerator and... brake pedal should only be adjusted when the vehicle is stopped and the gearshift lever is moving. 64 Driver Controls 2. Return to the center position to tilt the...
Owner Guide 1st Printing
Page 79
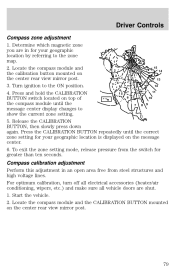
... module until the correct zone setting for greater than ten seconds. Locate the compass module and the CALIBRATION BUTTON mounted on 3 the center rear view mirror post. 13 4 12 3. Press and hold the CALIBRATION 5 6 10 BUTTON switch located on the message center. 6. Press the CALIBRATION BUTTON repeatedly until the 7 8 9 ... referring to the zone map. 1 15 2. Start the vehicle. 2. Locate the compass module and 2 14 the calibration button mounted on the center rear view mirror post. 79 Driver Controls Compass zone adjustment 1. Determine which magnetic zone you are shut. 1.
... module until the correct zone setting for greater than ten seconds. Locate the compass module and the CALIBRATION BUTTON mounted on 3 the center rear view mirror post. 13 4 12 3. Press and hold the CALIBRATION 5 6 10 BUTTON switch located on the message center. 6. Press the CALIBRATION BUTTON repeatedly until the 7 8 9 ... referring to the zone map. 1 15 2. Start the vehicle. 2. Locate the compass module and 2 14 the calibration button mounted on the center rear view mirror post. 79 Driver Controls Compass zone adjustment 1. Determine which magnetic zone you are shut. 1.
Owner Guide 1st Printing
Page 84
...press control 1. 84 The SET control indicator light will briefly illuminate. MEMORY SEATS/REARVIEW MIRRORS/ADJUSTABLE PEDALS (IF EQUIPPED) This system allows automatic SET positioning of the driver seat, outside rearview mirrors, and 2 1 adjustable pedals to the desired position using the controls. To open ... release handle located inside the trunk to open the door, press the control located on the driver door. • To program position one, move the driver seat, mirrors, and pedals to three programmable positions. Fuel filler door override release If the remote release is...
...press control 1. 84 The SET control indicator light will briefly illuminate. MEMORY SEATS/REARVIEW MIRRORS/ADJUSTABLE PEDALS (IF EQUIPPED) This system allows automatic SET positioning of the driver seat, outside rearview mirrors, and 2 1 adjustable pedals to the desired position using the controls. To open ... release handle located inside the trunk to open the door, press the control located on the driver door. • To program position one, move the driver seat, mirrors, and pedals to three programmable positions. Fuel filler door override release If the remote release is...

Owner Guide 1st Printing
Page 94
...• you shift into any gear putting the vehicle in motion The autolock feature repeats when: • any door, except the drivers door, is opened then closed while the engine is running and • you put the vehicle in motion Autolock can also control the seat...1. Press the power door unlock control three times. 5. With this feature, the first two programmed transmitters will lock and unlock. 6. Memory seat/mirrors/adjustable pedals feature (if equipped) The remote keyless entry system can also be activated or deactivated using the following procedure: You must complete steps 1 ...
...• you shift into any gear putting the vehicle in motion The autolock feature repeats when: • any door, except the drivers door, is opened then closed while the engine is running and • you put the vehicle in motion Autolock can also control the seat...1. Press the power door unlock control three times. 5. With this feature, the first two programmed transmitters will lock and unlock. 6. Memory seat/mirrors/adjustable pedals feature (if equipped) The remote keyless entry system can also be activated or deactivated using the following procedure: You must complete steps 1 ...

Owner Guide 1st Printing
Page 95
... a third or fourth transmitter is added, it will not recall a memory position. Locks and Security Press the control once to unlock the driver's door and move the memory features to the corresponding memory position, just as if you had pressed the memory control in the vehicle. &#...transmitter #1 will recall memory feature position one or two. Press the SET control. SET 2. Memory seat positions can be changed at any seat, mirror or pedal during these steps will cancel the programming procedure. 95 Press any control on the remote entry transmitter. 2 1 3. Within five seconds,...
... a third or fourth transmitter is added, it will not recall a memory position. Locks and Security Press the control once to unlock the driver's door and move the memory features to the corresponding memory position, just as if you had pressed the memory control in the vehicle. &#...transmitter #1 will recall memory feature position one or two. Press the SET control. SET 2. Memory seat positions can be changed at any seat, mirror or pedal during these steps will cancel the programming procedure. 95 Press any control on the remote entry transmitter. 2 1 3. Within five seconds,...

Owner Guide 1st Printing
Page 106
..., repeat the previous procedure using the seat controls. A position can only be programmed at any time. Your vehicle's Personal Safety System consists of the driver seat, outside rearview mirrors, and 2 1 adjustable pedals to three programmable positions. A memory seat position may be recalled when the transmission gearshift is in the Locks and security...
..., repeat the previous procedure using the seat controls. A position can only be programmed at any time. Your vehicle's Personal Safety System consists of the driver seat, outside rearview mirrors, and 2 1 adjustable pedals to three programmable positions. A memory seat position may be recalled when the transmission gearshift is in the Locks and security...


