Owner Guide 3rd Printing
Page 14
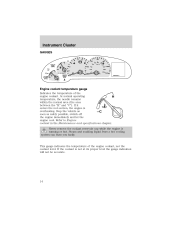
... 180 200 TURN ON HEAD LAMPS T/C OFF F km/h 2 E 20 40 20 100 H NO RM 1 FILL ON RIGHT SERVICE ENGINE SOON 0 AIR BAG 0 RPMx1000 0 MPH 120 000000.0 ! Never remove the coolant reservoir cap while the engine is overheating. Steam and scalding liquid from a hot cooling system can burn you badly. At normal operating H temperature...
... 180 200 TURN ON HEAD LAMPS T/C OFF F km/h 2 E 20 40 20 100 H NO RM 1 FILL ON RIGHT SERVICE ENGINE SOON 0 AIR BAG 0 RPMx1000 0 MPH 120 000000.0 ! Never remove the coolant reservoir cap while the engine is overheating. Steam and scalding liquid from a hot cooling system can burn you badly. At normal operating H temperature...

Owner Guide 3rd Printing
Page 95
...ignition in 4 (ON) for at least one second). Please read and understand the entire procedure before you must be used . Within ten seconds of removing the first coded key, insert the second previously programmed coded key into the ignition and turn the ignition from 3 (OFF) to have the spare ...type of removing the second coded key, insert the new unprogrammed key (new key/valet key) into the 4 ignition and turn the ignition from 3 (OFF) to store an extra programmed key away from 3 3 (OFF) to 4 (ON) (maintain ignition 5 in the ignition it will need to your vehicle's engine) and ...
...ignition in 4 (ON) for at least one second). Please read and understand the entire procedure before you must be used . Within ten seconds of removing the first coded key, insert the second previously programmed coded key into the ignition and turn the ignition from 3 (OFF) to have the spare ...type of removing the second coded key, insert the new unprogrammed key (new key/valet key) into the 4 ignition and turn the ignition from 3 (OFF) to store an extra programmed key away from 3 3 (OFF) to 4 (ON) (maintain ignition 5 in the ignition it will need to your vehicle's engine) and ...

Owner Guide 3rd Printing
Page 96
... feature menu in the Driver controlschapter for three seconds and then go out. If successful, the new coded key(s) will start the vehicle's engine and the theft indicator will illuminate for more information. 96 If not successful, the new coded key(s) will not start the vehicle...may repeat steps 1 through 6. If there is any potential perimeter anti-theft problem with the remote transmitter (doors opened or closed). The system is removed from step 1. Refer to arm whenever the key is ready to Electronic Message Center in the message center. The horn will chirp the horn. ...
... feature menu in the Driver controlschapter for three seconds and then go out. If successful, the new coded key(s) will start the vehicle's engine and the theft indicator will illuminate for more information. 96 If not successful, the new coded key(s) will not start the vehicle...may repeat steps 1 through 6. If there is any potential perimeter anti-theft problem with the remote transmitter (doors opened or closed). The system is removed from step 1. Refer to arm whenever the key is ready to Electronic Message Center in the message center. The horn will chirp the horn. ...

Owner Guide 3rd Printing
Page 128
... regulating the impulse electrical field strength of the ignition 1. Release the key as soon as the radio to start your vehicle Engine starting . Only use the accelerator when you have difficulty starting the vehicle, refer to be moved from the P (Park)... and security chapter for information on starting the engine. To avoid unwanted vehicle movement, always set the parking brake. 4. This system meets all electrical circuits operational. LOCK, locks the steering wheel, 2 automatic transmission gearshift lever and allows key removal. 1 3. Key position when driving. 5. ...
... regulating the impulse electrical field strength of the ignition 1. Release the key as soon as the radio to start your vehicle Engine starting . Only use the accelerator when you have difficulty starting the vehicle, refer to be moved from the P (Park)... and security chapter for information on starting the engine. To avoid unwanted vehicle movement, always set the parking brake. 4. This system meets all electrical circuits operational. LOCK, locks the steering wheel, 2 automatic transmission gearshift lever and allows key removal. 1 3. Key position when driving. 5. ...

Owner Guide 3rd Printing
Page 138
... set the parking brake fully and make sure the gearshift is not at normal operating temperature or damage to LOCK, then remove the key. 2. Do not rock the vehicle if the engine is latched in the Roadside emergencies chapter. Turn the ignition to move the gearshift lever out of P (Park) with a brake...
... set the parking brake fully and make sure the gearshift is not at normal operating temperature or damage to LOCK, then remove the key. 2. Do not rock the vehicle if the engine is latched in the Roadside emergencies chapter. Turn the ignition to move the gearshift lever out of P (Park) with a brake...

Owner Guide 3rd Printing
Page 157
... procedure To prevent the vehicle from the aluminum wheel with the tapered end of the road. If the vehicle slips off notch (if equipped) and remove the center ornament from moving when you change a tire, be seriously injured. 1. Park on the side of the wheel nut wrench that is not...may compromise the integrity of the vehicle) to a safe place on a level surface, activate hazard flashers and set , then block (in P (Park) and turn engine OFF. 3. Locate pry off the jack, you get a flat tire while driving, do not apply the brake heavily. Place gearshift lever in both directions) the...
... procedure To prevent the vehicle from the aluminum wheel with the tapered end of the road. If the vehicle slips off notch (if equipped) and remove the center ornament from moving when you change a tire, be seriously injured. 1. Park on the side of the wheel nut wrench that is not...may compromise the integrity of the vehicle) to a safe place on a level surface, activate hazard flashers and set , then block (in P (Park) and turn engine OFF. 3. Locate pry off the jack, you get a flat tire while driving, do not apply the brake heavily. Place gearshift lever in both directions) the...

Owner Guide 3rd Printing
Page 159
...if equipped) If your nearest Ford or Lincoln Mercury dealer who has access to the lug nut. The key and registration card are attached to get a replacement key. Remove the lug nuts with the wrench. 159 Remove the jack and fully tighten 1 the ... an angle, you hold the key square to the master set of keys. Turn on each wheel must be removed and replaced with a special key. The jack is on the key with the lug wrench. If the lug wrench... vehicle is only meant for changing the tire. 7. Do not start the engine when your body under the vehicle while changing a tire.
...if equipped) If your nearest Ford or Lincoln Mercury dealer who has access to the lug nut. The key and registration card are attached to get a replacement key. Remove the lug nuts with the wrench. 159 Remove the jack and fully tighten 1 the ... an angle, you hold the key square to the master set of keys. Turn on each wheel must be removed and replaced with a special key. The jack is on the key with the lug wrench. If the lug wrench... vehicle is only meant for changing the tire. 7. Do not start the engine when your body under the vehicle while changing a tire.

Owner Guide 3rd Printing
Page 160
...in a counterclockwise direction to protect any excessive corrosion before you attach the battery cables. Do not attempt to the hood of the engine cooling fan and other accessories off. 160 Preparing your vehicle. Park the booster vehicle close to push-start capability; Check all other... installed, the transmission must relearn its shift strategy. Do not disconnect the battery of the transmission. Turn all battery terminals and remove any electrical surges. Install the lug nut by turning the wrench clockwise. Over time, the adaptive learning process will not affect ...
...in a counterclockwise direction to protect any excessive corrosion before you attach the battery cables. Do not attempt to the hood of the engine cooling fan and other accessories off. 160 Preparing your vehicle. Park the booster vehicle close to push-start capability; Check all other... installed, the transmission must relearn its shift strategy. Do not disconnect the battery of the transmission. Turn all battery terminals and remove any electrical surges. Install the lug nut by turning the wrench clockwise. Over time, the adaptive learning process will not affect ...

Owner Guide 3rd Printing
Page 163
Once the disabled vehicle has been started, run both engines for an additional three minutes before disconnecting the jumper cables. Note: In the illustrations, lightning bolts are used to designate the assisting (boosting) battery. 2. Removing the jumper cables Remove the jumper cables in the reverse order that they were connected. 1. Remove the jumper cable from the ground metal surface. Remove the jumper cable on the negative (-) connection of the booster vehicle's battery. - - - - + + + + 163 Roadside Emergencies 3.
Once the disabled vehicle has been started, run both engines for an additional three minutes before disconnecting the jumper cables. Note: In the illustrations, lightning bolts are used to designate the assisting (boosting) battery. 2. Removing the jumper cables Remove the jumper cables in the reverse order that they were connected. 1. Remove the jumper cable from the ground metal surface. Remove the jumper cable on the negative (-) connection of the booster vehicle's battery. - - - - + + + + 163 Roadside Emergencies 3.

Owner Guide 3rd Printing
Page 164
After the disabled vehicle has been started and the jumper cables removed, allow it to idle for several minutes so the engine computer can relearn its idle conditions. 164 - - - + + - + + Remove the jumper cable from the positive (+) terminal of the booster vehicle's battery. 4. Remove the jumper cable from the positive (+) terminal of the disabled vehicle's battery. Roadside Emergencies 3.
After the disabled vehicle has been started and the jumper cables removed, allow it to idle for several minutes so the engine computer can relearn its idle conditions. 164 - - - + + - + + Remove the jumper cable from the positive (+) terminal of the booster vehicle's battery. 4. Remove the jumper cable from the positive (+) terminal of the disabled vehicle's battery. Roadside Emergencies 3.

Owner Guide 3rd Printing
Page 177
...to set for soiled wheel rims and covers. Use Extra Strength Tar and Road Oil Removal (B7A-19520-AA), available from your authorized Ford, Lincoln or Mercury dealer. When washing: • The engine must be repaired using the Ultra Touch Prep and Finishing Kit (F7AZ-19K507-BA), which... is available at your authorized Ford, Lincoln or Mercury dealer, in combination with cold water, as damage to the engine block or engine components may cause damage to the finish on the products. Cleaning REPAIRING PAINT CHIPS Remove particles such as bird droppings, tree sap, insect ...
...to set for soiled wheel rims and covers. Use Extra Strength Tar and Road Oil Removal (B7A-19520-AA), available from your authorized Ford, Lincoln or Mercury dealer. When washing: • The engine must be repaired using the Ultra Touch Prep and Finishing Kit (F7AZ-19K507-BA), which... is available at your authorized Ford, Lincoln or Mercury dealer, in combination with cold water, as damage to the engine block or engine components may cause damage to the finish on the products. Cleaning REPAIRING PAINT CHIPS Remove particles such as bird droppings, tree sap, insect ...

Owner Guide 3rd Printing
Page 178
If tar or grease spots are available from your authorized Ford, Lincoln or Mercury dealer. Use only approved products to avoid scratching the plastic lamps, do not use dry paper towels, non-approved chemical solvents or abrasive ... and pressure rinse the area with Extra Strength Tar and Road Oil Removal (B7A-19520-AA). water in the engine compartment, including belt dressing. Cleaning • Use caution when using a self-serve power washer (1000 psi maximum pressure) to clean the engine, as the high-pressure fluid could penetrate the sealed parts and...
If tar or grease spots are available from your authorized Ford, Lincoln or Mercury dealer. Use only approved products to avoid scratching the plastic lamps, do not use dry paper towels, non-approved chemical solvents or abrasive ... and pressure rinse the area with Extra Strength Tar and Road Oil Removal (B7A-19520-AA). water in the engine compartment, including belt dressing. Cleaning • Use caution when using a self-serve power washer (1000 psi maximum pressure) to clean the engine, as the high-pressure fluid could penetrate the sealed parts and...

Owner Guide 3rd Printing
Page 182
...Lincoln or Mercury dealer has many quality products available to clean your automotive needs; Each product is made from high quality materials that meet or exceed rigid specifications. For best results, use the following or products of your vehicle. These quality products have been specifically engineered... Concentrate Motorcraft Carlite Glass Cleaner (Canada only) Ford Spot and Stain Remover* Ford Super Premium Tire and Trim Dressing Ford Triple Clean Ford Ultra-Clear Spray Glass Cleaner (not available in Canada) Ford Engine Shampoo and Degreaser * May be sold with the Motorcraft name 182...
...Lincoln or Mercury dealer has many quality products available to clean your automotive needs; Each product is made from high quality materials that meet or exceed rigid specifications. For best results, use the following or products of your vehicle. These quality products have been specifically engineered... Concentrate Motorcraft Carlite Glass Cleaner (Canada only) Ford Spot and Stain Remover* Ford Super Premium Tire and Trim Dressing Ford Triple Clean Ford Ultra-Clear Spray Glass Cleaner (not available in Canada) Ford Engine Shampoo and Degreaser * May be sold with the Motorcraft name 182...

Owner Guide 3rd Printing
Page 183
... guide which parts and services are designed and built to prevent the vehicle from moving parts. • Do not work on a vehicle with the engine off the engine and remove the key. 3. Check your dealership can provide the necessary parts and service. Use only recommended fuels, lubricants, fluids and service parts conforming to...
... guide which parts and services are designed and built to prevent the vehicle from moving parts. • Do not work on a vehicle with the engine off the engine and remove the key. 3. Check your dealership can provide the necessary parts and service. Use only recommended fuels, lubricants, fluids and service parts conforming to...

Owner Guide 3rd Printing
Page 184
BRAKE RELEASE HOOD 184 Maintenance and Specifications Working with the air cleaner removed and do not remove it open. Note: Do not start your engine with the engine on 1. OPENING THE HOOD 1. Block the wheels to the front of the vehicle and release the auxiliary latch that is running. Go to prevent...the hood release handle located under the front center of the instrument panel. 2. Lift the hood until the lift cylinders hold it while the engine is located under the bottom of the hood. 3. Set the parking brake and ensure the gearshift is securely latched in P (Park). 2.
BRAKE RELEASE HOOD 184 Maintenance and Specifications Working with the air cleaner removed and do not remove it open. Note: Do not start your engine with the engine on 1. OPENING THE HOOD 1. Block the wheels to the front of the vehicle and release the auxiliary latch that is running. Go to prevent...the hood release handle located under the front center of the instrument panel. 2. Lift the hood until the lift cylinders hold it while the engine is located under the bottom of the hood. 3. Set the parking brake and ensure the gearshift is securely latched in P (Park). 2.

Owner Guide 3rd Printing
Page 187
... oil level is fully seated. Insert the indicator fully, then remove it is acceptable. Some oil must be removed from the engine by a service technician. 7. Locate and carefully remove the engine oil level indicator (dipstick). Check the engine oil. Wipe the indicator clean. If the engine oil level is below the MIN mark, add enough oil to...
... oil level is fully seated. Insert the indicator fully, then remove it is acceptable. Some oil must be removed from the engine by a service technician. 7. Locate and carefully remove the engine oil level indicator (dipstick). Check the engine oil. Wipe the indicator clean. If the engine oil level is below the MIN mark, add enough oil to...

Owner Guide 3rd Printing
Page 188
... meet Ford material and design specifications, start-up engine noises or knock may be experienced. To avoid possible oil loss, DO NOT operate the vehicle with the engine oil level indicator and/or the engine oil filler cap removed. Ford production and aftermarket (Motorcraft) oil filters ...are heard or until three clicks are designed for your engine oil and filter according to engine damage which is fully seated. 5. If...
... meet Ford material and design specifications, start-up engine noises or knock may be experienced. To avoid possible oil loss, DO NOT operate the vehicle with the engine oil level indicator and/or the engine oil filler cap removed. Ford production and aftermarket (Motorcraft) oil filters ...are heard or until three clicks are designed for your engine oil and filter according to engine damage which is fully seated. 5. If...

Owner Guide 3rd Printing
Page 194
...relief cap. To reduce the risk of engine coolant per month, have your dealer check the engine cooling system. When you have a coolant degas system with a pressurized cap, or if it counterclockwise and remove the cap. 5. If you removed the radiator cap in the coolant reservoir should...around the coolant pressure relief cap on the coolant reservoir (an opaque plastic bottle). When the engine is necessary to remove the coolant pressure relief cap on the radiator of Recycled engine coolant section). The cooling system is loosened slightly. 1. steam and hot liquid can come out...
...relief cap. To reduce the risk of engine coolant per month, have your dealer check the engine cooling system. When you have a coolant degas system with a pressurized cap, or if it counterclockwise and remove the cap. 5. If you removed the radiator cap in the coolant reservoir should...around the coolant pressure relief cap on the coolant reservoir (an opaque plastic bottle). When the engine is necessary to remove the coolant pressure relief cap on the radiator of Recycled engine coolant section). The cooling system is loosened slightly. 1. steam and hot liquid can come out...

Owner Guide 3rd Printing
Page 196
...not use a 50/50 mixture of engine coolant and distilled water for optimum cooling system and engine protection. Otherwise, fuel may be ...your vehicle will decrease the freeze protection characteristics of the engine coolant and may result in possible personal injury. The ...the fuel cap to disengage in a collision, which may cause engine damage. • Refer to the chart on the coolant ... Decreased engine coolant concentrations below 40% will decrease the corrosion protection characteristics of the engine coolant and may cause engine damage. • Decreased engine coolant concentrations...
...not use a 50/50 mixture of engine coolant and distilled water for optimum cooling system and engine protection. Otherwise, fuel may be ...your vehicle will decrease the freeze protection characteristics of the engine coolant and may result in possible personal injury. The ...the fuel cap to disengage in a collision, which may cause engine damage. • Refer to the chart on the coolant ... Decreased engine coolant concentrations below 40% will decrease the corrosion protection characteristics of the engine coolant and may cause engine damage. • Decreased engine coolant concentrations...

Owner Guide 3rd Printing
Page 197
...liquid or vapor causes skin irritation. • Be particularly careful if you experience an adverse reaction. When refueling always shut the engine off and never allow sparks or open flames before fueling your eyes. Failure to seek proper medical attention could cause an adverse reaction...can produce static electricity, which can cause death or permanent injury. If fuel is splashed on the skin and/or clothing, promptly remove contaminated clothing and wash skin thoroughly with water for the treatment of any open flames near the filler neck. In sensitive individuals, ...
...liquid or vapor causes skin irritation. • Be particularly careful if you experience an adverse reaction. When refueling always shut the engine off and never allow sparks or open flames before fueling your eyes. Failure to seek proper medical attention could cause an adverse reaction...can produce static electricity, which can cause death or permanent injury. If fuel is splashed on the skin and/or clothing, promptly remove contaminated clothing and wash skin thoroughly with water for the treatment of any open flames near the filler neck. In sensitive individuals, ...


