Owner's Manual
Page 95
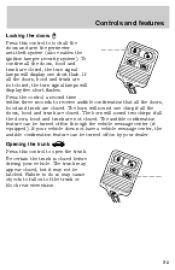
... trunk are closed . The horn will display five short flashes. Opening the trunk Press this control to lock all the doors, hood and trunk are not closed . Failure to do so may not be latched. Press the control a second time within three seconds to receive audible confirmation ... turned off /on by your vehicle. Be certain the trunk is closed . If all the doors, hood and trunk are not closed , the turn signal lamps will sound two chirps if all the doors, hood and trunk are closed before driving your dealer. The audible confirmation feature can be turned off /on...
... trunk are closed . The horn will display five short flashes. Opening the trunk Press this control to lock all the doors, hood and trunk are not closed . Failure to do so may not be latched. Press the control a second time within three seconds to receive audible confirmation ... turned off /on by your vehicle. Be certain the trunk is closed . If all the doors, hood and trunk are not closed , the turn signal lamps will sound two chirps if all the doors, hood and trunk are closed before driving your dealer. The audible confirmation feature can be turned off /on...
Owner's Manual
Page 99
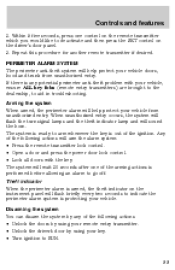
... perimeter alarm is armed, the theft indicator on the driver's door panel. 3. Disarming the system You can disarm the system by using your vehicle doors, hood and trunk from unauthorized entry. When unauthorized entry occurs, the system will flash the turn signal lamps and the theft indicator lamp and will arm...
... perimeter alarm is armed, the theft indicator on the driver's door panel. 3. Disarming the system You can disarm the system by using your vehicle doors, hood and trunk from unauthorized entry. When unauthorized entry occurs, the system will flash the turn signal lamps and the theft indicator lamp and will arm...

Owner's Manual
Page 193
... the auxiliary latch that is automatic and may come on • Automatic transmission: 1. Block the wheels to prevent the vehicle from moving unexpectedly. Lift the hood until the lift cylinders hold it while the engine is running . Working with the engine on at the bottom left of the... pushing upward on the handle. 3. Set the parking brake, depress the clutch and place the gearshift in P (Park). 2. OPENING THE HOOD 1. The cooling fan is located under the front center of the instrument panel. 2. Go to prevent the vehicle from moving unexpectedly. Do not start your...
... the auxiliary latch that is automatic and may come on • Automatic transmission: 1. Block the wheels to prevent the vehicle from moving unexpectedly. Lift the hood until the lift cylinders hold it while the engine is running . Working with the engine on at the bottom left of the... pushing upward on the handle. 3. Set the parking brake, depress the clutch and place the gearshift in P (Park). 2. OPENING THE HOOD 1. The cooling fan is located under the front center of the instrument panel. 2. Go to prevent the vehicle from moving unexpectedly. Do not start your...
Owner's Manual
Page 196
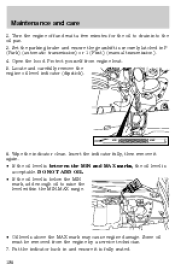
Open the hood. Locate and carefully remove the engine oil level indicator (dipstick). MIN MAX 6. Insert the indicator fully, then remove it is fully seated. 196 Put the ...
Open the hood. Locate and carefully remove the engine oil level indicator (dipstick). MIN MAX 6. Insert the indicator fully, then remove it is fully seated. 196 Put the ...

Owner's Manual
Page 215
Open the hood. 215 To replace the filter, perform the following benefits to customers: • Improves the customer's driving comfort by reducing particle concentration • Improves the interior ...
Open the hood. 215 To replace the filter, perform the following benefits to customers: • Improves the customer's driving comfort by reducing particle concentration • Improves the interior ...

Owner's Manual
Page 216
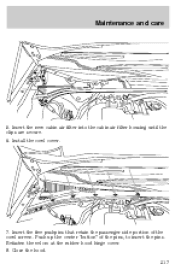
Note also that retain the passenger side portion of the pins using a key or similar object. Remove the five pushpins that the cowl screen is retained to the rubber hood hinge cover with Velcro. This must be released to remove the cabin air filter from the cabin air filter housing. (Please note that releasing the clips might require a slight downward force). 216 Maintenance and care 2. To release the pins, depress the center "button" of the cowl screen. Release the clips in order to remove the cowl screen. 3. Remove the cowl cover. 4.
Note also that retain the passenger side portion of the pins using a key or similar object. Remove the five pushpins that the cowl screen is retained to the rubber hood hinge cover with Velcro. This must be released to remove the cabin air filter from the cabin air filter housing. (Please note that releasing the clips might require a slight downward force). 216 Maintenance and care 2. To release the pins, depress the center "button" of the cowl screen. Release the clips in order to remove the cowl screen. 3. Remove the cowl cover. 4.
Owner's Manual
Page 217
Insert the five pushpins that retain the passenger side portion of the pins, to insert the pins. Push up the center "button" of the cowl screen. Refasten the velcro at the rubber hood hinge cover. 8. Insert the new cabin air filter into the cabin air filter housing until the clips are secure. 6. Close the hood. 217 Install the cowl cover. 7. Maintenance and care 5.
Insert the five pushpins that retain the passenger side portion of the pins, to insert the pins. Push up the center "button" of the cowl screen. Refasten the velcro at the rubber hood hinge cover. 8. Insert the new cabin air filter into the cabin air filter housing until the clips are secure. 6. Close the hood. 217 Install the cowl cover. 7. Maintenance and care 5.

Owner's Manual
Page 235
... cover and secure with the tabs in OFF position. 2. Replacing foglamp bulbs The halogen bulb contains gas under pressure. Handle the bulb carefully. Lift the hood, push and release four tabs and remove the protective cover from your hand could cause the bulb to unlock and pulling it again. Grasp the...
... cover and secure with the tabs in OFF position. 2. Replacing foglamp bulbs The halogen bulb contains gas under pressure. Handle the bulb carefully. Lift the hood, push and release four tabs and remove the protective cover from your hand could cause the bulb to unlock and pulling it again. Grasp the...

Owner's Manual
Page 238
Use a 4 mm wrench or socket to turn the horizontal adjusting screw until the end of the shaft within the clear tube lines up with the "0" reference mark on a level surface. 2. Park the vehicle on the indicator when viewed directly from above. 238 IN OUT With the hood open, remove the protective cover, then locate the horizontal indicator and the adjusting screw. 3. Horizontal aim adjustment 1. Maintenance and care If the vehicle has been in an accident, the vehicle's front structure should be properly aligned before aiming the headlamps.
Use a 4 mm wrench or socket to turn the horizontal adjusting screw until the end of the shaft within the clear tube lines up with the "0" reference mark on a level surface. 2. Park the vehicle on the indicator when viewed directly from above. 238 IN OUT With the hood open, remove the protective cover, then locate the horizontal indicator and the adjusting screw. 3. Horizontal aim adjustment 1. Maintenance and care If the vehicle has been in an accident, the vehicle's front structure should be properly aligned before aiming the headlamps.

Owner's Manual
Page 239
... use a clean sponge, washing glove or similar device and plenty of water for a list of the vertical aim. 4. To avoid spots, avoid washing when the hood is below the "0" mark position when viewed directly from above. 5. The numbers shown on a level surface. 2. D UP When the horizontal and vertical indicators are set...
... use a clean sponge, washing glove or similar device and plenty of water for a list of the vertical aim. 4. To avoid spots, avoid washing when the hood is below the "0" mark position when viewed directly from above. 5. The numbers shown on a level surface. 2. D UP When the horizontal and vertical indicators are set...

Owner's Manual
Page 248
... Performance DOT 3 Motor Vehicle Brake Fluid 1 Silicone Lubricant Ford part number C6AZ-19542-AB Ford specification ESA-M6C25-A and DOT 3 Door latch, hood Multi-Purpose latch, auxiliary Grease hood latch, door hinges, striker plates, seat tracks and fuel filler door hinge Engine coolant Ford Premium Engine Coolant (green colored) Engine oil 3.0L...
... Performance DOT 3 Motor Vehicle Brake Fluid 1 Silicone Lubricant Ford part number C6AZ-19542-AB Ford specification ESA-M6C25-A and DOT 3 Door latch, hood Multi-Purpose latch, auxiliary Grease hood latch, door hinges, striker plates, seat tracks and fuel filler door hinge Engine coolant Ford Premium Engine Coolant (green colored) Engine oil 3.0L...
Owner's Manual
Page 268
... high beam ...10 replacing bulbs ...235 turning on and off ...27 warning chime ...14 Heating ...31 HomeLink universal transceiver (see Garage door opener) ...86-89 Hood ...193 I Ignition ...72, 249-250 removing the key ...163 Infant seats (see Safety seats) ...130-131 Inspection/maintenance (I/M) testing ...234 Instrument panel cleaning ...243 cluster...
... high beam ...10 replacing bulbs ...235 turning on and off ...27 warning chime ...14 Heating ...31 HomeLink universal transceiver (see Garage door opener) ...86-89 Hood ...193 I Ignition ...72, 249-250 removing the key ...163 Infant seats (see Safety seats) ...130-131 Inspection/maintenance (I/M) testing ...234 Instrument panel cleaning ...243 cluster...
Owner's Manual
Page 272
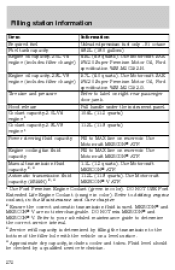
... Engine oil capacity-3.0L V6 engine (includes filter change ) 5W-30 Super Premium Motor Oil, Ford specification WSS-M2C153-G. Pull handle under the instrument panel. Hood release Coolant capacity-3.0L V6 10.6L (11.2 quarts) engine 1 Coolant capacity-3.9L V8 11.3L (11.9 quarts) engine 1 Power steering fluid capacity Fill to...
... Engine oil capacity-3.0L V6 engine (includes filter change ) 5W-30 Super Premium Motor Oil, Ford specification WSS-M2C153-G. Pull handle under the instrument panel. Hood release Coolant capacity-3.0L V6 10.6L (11.2 quarts) engine 1 Coolant capacity-3.9L V8 11.3L (11.9 quarts) engine 1 Power steering fluid capacity Fill to...