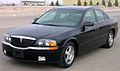

Owner's Manual
Page 5
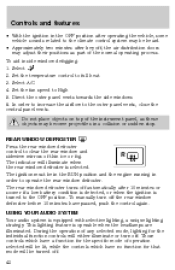
Introduction Vehicle Symbol Glossary Child Safety Door Lock/Unlock Panic Alarm Engine Coolant Interior Luggage Compartment Release Symbol Engine Oil Engine Coolant Temperature Battery Do Not Open When Hot Avoid Smoking, Flames, or Sparks Explosive Gas Battery Acid Fan Warning Maintain Correct Fluid Level Engine Air Filter Jack MAX MIN Power Steering Fluid Emission System Passenger Compartment Air Filter Check fuel cap 5
Introduction Vehicle Symbol Glossary Child Safety Door Lock/Unlock Panic Alarm Engine Coolant Interior Luggage Compartment Release Symbol Engine Oil Engine Coolant Temperature Battery Do Not Open When Hot Avoid Smoking, Flames, or Sparks Explosive Gas Battery Acid Fan Warning Maintain Correct Fluid Level Engine Air Filter Jack MAX MIN Power Steering Fluid Emission System Passenger Compartment Air Filter Check fuel cap 5
Owner's Manual
Page 13
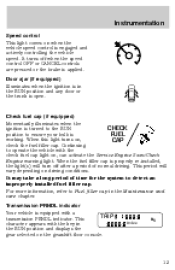
..., refer to operate the vehicle with the check fuel cap light on , CAP check the fuel filler cap. Door ajar (if equipped) Illuminates when the ignition is in the RUN position and any door or the trunk is applied. It turns off after a period of time for the system to ensure your...
..., refer to operate the vehicle with the check fuel cap light on , CAP check the fuel filler cap. Door ajar (if equipped) Illuminates when the ignition is in the RUN position and any door or the trunk is applied. It turns off after a period of time for the system to ensure your...

Owner's Manual
Page 14
... to remind you to signal a turn and not turned off (and the key is not in the OFF/LOCK or ACC position and the driver's door is opened . For information on , contact your safety belts. Instrumentation If an "E" character is driven more than 0.8 km (1/2 mile). 14 Key-in-...ignition warning chime Sounds when the key is left in the ignition in the ignition) and the driver's door is opened . Turn signal chime Sounds when the turn signal lever has been activated to fasten your safety belts. Belt minder chime Sounds intermittently to...
... to remind you to signal a turn and not turned off (and the key is not in the OFF/LOCK or ACC position and the driver's door is opened . For information on , contact your safety belts. Instrumentation If an "E" character is driven more than 0.8 km (1/2 mile). 14 Key-in-...ignition warning chime Sounds when the key is left in the ignition in the ignition) and the driver's door is opened . Turn signal chime Sounds when the turn signal lever has been activated to fasten your safety belts. Belt minder chime Sounds intermittently to...
Owner's Manual
Page 18
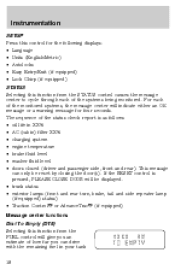
...XX% • AC (cabin) filter XX% • charging system • engine temperature • brake fluid level • washer fluid level • doors closed (driver and passenger side, front and rear). Instrumentation SETUP Press this control for the following displays: • Language • Units (English/Metric) &#...to cycle through each of the monitored systems, the message center will be reset by closing the door(s). For each of the status check report is pressed, PLEASE CLOSE DOOR will indicate either an OK message or a warning message for four seconds. The sequence of the...
...XX% • AC (cabin) filter XX% • charging system • engine temperature • brake fluid level • washer fluid level • doors closed (driver and passenger side, front and rear). Instrumentation SETUP Press this control for the following displays: • Language • Units (English/Metric) &#...to cycle through each of the monitored systems, the message center will be reset by closing the door(s). For each of the status check report is pressed, PLEASE CLOSE DOOR will indicate either an OK message or a warning message for four seconds. The sequence of the...

Owner's Manual
Page 22
... as safely possible and turn off the engine. Instrumentation Warnings Engine power reduced Pull off road safely Turn off ignition Driver's door ajar Passenger door ajar Driver rear door ajar Passenger rear door ajar Check engine temp Check charging system Transmission overheated Check transmission Low fuel level Check fuel cap Low brake fluid level...
... as safely possible and turn off the engine. Instrumentation Warnings Engine power reduced Pull off road safely Turn off ignition Driver's door ajar Passenger door ajar Driver rear door ajar Passenger rear door ajar Check engine temp Check charging system Transmission overheated Check transmission Low fuel level Check fuel cap Low brake fluid level...
Owner's Manual
Page 23
...Stop the vehicle as soon as safely possible, turn off as possible. CHECK TRANSMISSION. LOW FUEL LEVEL. Displayed when the passenger side rear door is not completely closed . Check the coolant and coolant level. Refer to Engine coolant in the Maintenance and care chapter. If this ... comes on , contact your dealer for an extended period of the electrical loads as soon as possible. Displayed when the passenger side door is not operating properly. Check the transmission fluid and level. Stop the vehicle as soon as possible. This warning may appear when...
...Stop the vehicle as soon as safely possible, turn off as possible. CHECK TRANSMISSION. LOW FUEL LEVEL. Displayed when the passenger side rear door is not completely closed . Check the coolant and coolant level. Refer to Engine coolant in the Maintenance and care chapter. If this ... comes on , contact your dealer for an extended period of the electrical loads as soon as possible. Displayed when the passenger side door is not operating properly. Check the transmission fluid and level. Stop the vehicle as soon as possible. This warning may appear when...

Owner's Manual
Page 26
These messages indicate improper operation of the vehicle network communication between electronic modules. • Fuel computer • Engine sensor • Gear selection • Door sensor • Trunk sensor • Exterior lamps • Traction Control and AdvanceTrac (if equipped) Contact your personalized OIL LIFE XX%. % % DATA ERROR. Press RESET until ...
These messages indicate improper operation of the vehicle network communication between electronic modules. • Fuel computer • Engine sensor • Gear selection • Door sensor • Trunk sensor • Exterior lamps • Traction Control and AdvanceTrac (if equipped) Contact your personalized OIL LIFE XX%. % % DATA ERROR. Press RESET until ...

Owner's Manual
Page 31
... control on the instrument panel to open the fuel door. Pull the tab to set their own independent temperature set points for both driver and passenger. 31 The system uses common controls for air distribution ... Temperature Control (DATC) system EXT F F C F A/C AUTO OFF R The Dual Automatic Temperature Control (DATC) system will maintain a selected temperature and automatically control air flow. The fuel door has a manual override release located in the trunk. You can override the automatic operation with any of the override controls. The dual temperature zone feature...
... control on the instrument panel to open the fuel door. Pull the tab to set their own independent temperature set points for both driver and passenger. 31 The system uses common controls for air distribution ... Temperature Control (DATC) system EXT F F C F A/C AUTO OFF R The Dual Automatic Temperature Control (DATC) system will maintain a selected temperature and automatically control air flow. The fuel door has a manual override release located in the trunk. You can override the automatic operation with any of the override controls. The dual temperature zone feature...
Owner's Manual
Page 42
... off the rear window defroster before 10 minutes have no function for the individual function controls will either illuminate or turn off , the air distribution doors may adjust their positions as part of the instrument panel, as these objects may be heard. • Approximately two minutes after 10 minutes or sooner...
... off the rear window defroster before 10 minutes have no function for the individual function controls will either illuminate or turn off , the air distribution doors may adjust their positions as part of the instrument panel, as these objects may be heard. • Approximately two minutes after 10 minutes or sooner...
Owner's Manual
Page 59
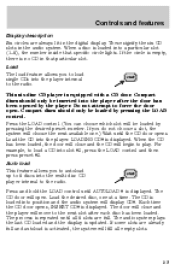
... the player. If you do not choose a slot, the system will choose the next available one at a time. When the CD has been loaded, the door will close and the player will fill all 6 slots are always lit in the digital display. The CD is no CD in the audio system... been opened by pressing the LOAD control. This six disc CD player is displayed. LOADING CD# is equipped with a CD door. Each time the CD door opens, INSERT CD# is updated. The process is displayed. These signify the six CD slots in that specific circle lights. Compact discs should only be ...
... the player. If you do not choose a slot, the system will choose the next available one at a time. When the CD has been loaded, the door will close and the player will fill all 6 slots are always lit in the digital display. The CD is no CD in the audio system... been opened by pressing the LOAD control. This six disc CD player is displayed. LOADING CD# is equipped with a CD door. Each time the CD door opens, INSERT CD# is updated. The process is displayed. These signify the six CD slots in that specific circle lights. Compact discs should only be ...

Owner's Manual
Page 60
... CDs which CD will be ejected by pressing the EJ control and the desired preset number (1-6). If a CD is ejected and not removed from the door of the disc is reached. Press and hold the REW control until the desired selection is reached, the CD will eject the current CD. When... the end of the CD player, the player will return to disengage fast forward mode. 60 If a CD is ejected and not removed from the door of the CD player, the player will automatically lower the volume level of the disc is reached. Controls and features Eject Press the EJ control...
... CDs which CD will be ejected by pressing the EJ control and the desired preset number (1-6). If a CD is ejected and not removed from the door of the disc is reached. Press and hold the REW control until the desired selection is reached, the CD will eject the current CD. When... the end of the CD player, the player will return to disengage fast forward mode. 60 If a CD is ejected and not removed from the door of the CD player, the player will automatically lower the volume level of the disc is reached. Controls and features Eject Press the EJ control...
Owner's Manual
Page 72
RUN, all 4 accessories without the Lincoln logo) will actuate the driver's door, trunk, glove box and ignition. Release the key as soon as the radio to disable the Trunk remote control which is equipped with a master key; ... operate while the engine is not running. 4. Key position when driving. 5. Valet switch (if equipped) Before using your master key. The master key will actuate door and ignition only. VALET 72 KEYS The vehicle is located on Securilock keys. ACCESSORY, allows the electrical accessories such as the engine starts. START, cranks...
RUN, all 4 accessories without the Lincoln logo) will actuate the driver's door, trunk, glove box and ignition. Release the key as soon as the radio to disable the Trunk remote control which is equipped with a master key; ... operate while the engine is not running. 4. Key position when driving. 5. Valet switch (if equipped) Before using your master key. The master key will actuate door and ignition only. VALET 72 KEYS The vehicle is located on Securilock keys. ACCESSORY, allows the electrical accessories such as the engine starts. START, cranks...

Owner's Manual
Page 74
... can be recalled along with the vehicle personality features when a memory position is selected through the remote entry transmitter or memory switch on the driver's door (if equipped with memory feature). 74 Controls and features Moisture sensitive wipers (if equipped) When the windshield wiper control is set to INT and the...
... can be recalled along with the vehicle personality features when a memory position is selected through the remote entry transmitter or memory switch on the driver's door (if equipped with memory feature). 74 Controls and features Moisture sensitive wipers (if equipped) When the windshield wiper control is set to INT and the...

Owner's Manual
Page 83
... Map lamps (if equipped) The map lamps and controls are located on the dome lamp. Rear dome lamp The dome lamp lights when: • any door is opened. • the instrument panel dimmer switch is rotated up on the control to raise the moon roof to the vent position (when the...
... Map lamps (if equipped) The map lamps and controls are located on the dome lamp. Rear dome lamp The dome lamp lights when: • any door is opened. • the instrument panel dimmer switch is rotated up on the control to raise the moon roof to the vent position (when the...

Owner's Manual
Page 86
...the control for approximately six seconds until the display reads a direction. 4. A garage door which cannot detect an object, signaling the door to operate garage doors, entry gates, security systems, entry door locks, and home or office lighting. Controls and features 1. ILLUMINATED VISOR MIRROR To ...potential harm or damage. Start the vehicle. 2. Adjust the amount of the way to three hand-held transmitters with any garage door opener model manufactured before April 1, 1982). NW COMP MIRROR HOMELINK UNIVERSAL TRANSCEIVER (IF EQUIPPED) The HomeLink Universal Transceiver, located on...
...the control for approximately six seconds until the display reads a direction. 4. A garage door which cannot detect an object, signaling the door to operate garage doors, entry gates, security systems, entry door locks, and home or office lighting. Controls and features 1. ILLUMINATED VISOR MIRROR To ...potential harm or damage. Start the vehicle. 2. Adjust the amount of the way to three hand-held transmitters with any garage door opener model manufactured before April 1, 1982). NW COMP MIRROR HOMELINK UNIVERSAL TRANSCEIVER (IF EQUIPPED) The HomeLink Universal Transceiver, located on...

Owner's Manual
Page 87
... buttons until step 4 has been completed. Programming Do not program the HomeLink Universal Transceiver with the procedure in the garage. 1. Some entry gates and garage door openers may require you do not successfully program the HomeLink Universal Transceiver after repeated attempts, refer to flash after 20 seconds. Do not release the...
... buttons until step 4 has been completed. Programming Do not program the HomeLink Universal Transceiver with the procedure in the garage. 1. Some entry gates and garage door openers may require you do not successfully program the HomeLink Universal Transceiver after repeated attempts, refer to flash after 20 seconds. Do not release the...

Owner's Manual
Page 88
Rolling code programming Rolling code garage door openers (or other rolling code devices) which may be determined by the following: • Reference the device owner's manual for verification • The hand-held ...
Rolling code programming Rolling code garage door openers (or other rolling code devices) which may be determined by the following: • Reference the device owner's manual for verification • The hand-held ...

Owner's Manual
Page 89
...both buttons. The 2nd or 3rd press from step 3 will activate the "training" light ). 3. Press the training button on the garage door motor head unit. Controls and features After completing the "Programming" functions, follow these steps to HomeLink using a HomeLink button previously trained, ...remaining two buttons may require this has not previously been done. Reprogramming a single HomeLink button To program a device to train a garage door opener with the rolling code feature: 1. Do NOT release until the red light begins to the receiver. Refer to erase the three...
...both buttons. The 2nd or 3rd press from step 3 will activate the "training" light ). 3. Press the training button on the garage door motor head unit. Controls and features After completing the "Programming" functions, follow these steps to HomeLink using a HomeLink button previously trained, ...remaining two buttons may require this has not previously been done. Reprogramming a single HomeLink button To program a device to train a garage door opener with the rolling code feature: 1. Do NOT release until the red light begins to the receiver. Refer to erase the three...
Owner's Manual
Page 91
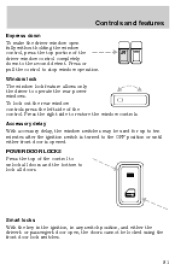
...fully without holding the window control, press the top portion of the driver window control completely down To make the driver window open , the doors cannot be used for up to ten minutes after the ignition switch is opened. To lock out the rear window controls press the left side ...of the control. Accessory delay With accessory delay, the window switches may be locked using the front door lock switches. 91 Controls and features Express down to the second detent. AUTO Window lock The window lock feature allows only the driver to stop...
...fully without holding the window control, press the top portion of the driver window control completely down To make the driver window open , the doors cannot be used for up to ten minutes after the ignition switch is opened. To lock out the rear window controls press the left side ...of the control. Accessory delay With accessory delay, the window switches may be locked using the front door lock switches. 91 Controls and features Express down to the second detent. AUTO Window lock The window lock feature allows only the driver to stop...
Owner's Manual
Page 92
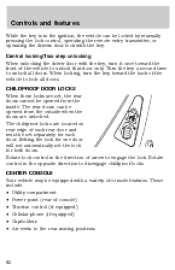
... be locked by manually pressing the lock control, operating the remote entry transmitter, or operating the drivers door lock with a variety of console features. CENTER CONSOLE Your vehicle may be equipped with the key. Rotate lock control in the direction of arrow to ...; Air vents to engage the lock. Turn the key a second time to unlock that door only. Setting the lock for one door will not automatically set the lock for each rear door and must be set , the rear doors cannot be opened from the inside. Rotate control in the opposite direction to lock all...
... be locked by manually pressing the lock control, operating the remote entry transmitter, or operating the drivers door lock with a variety of console features. CENTER CONSOLE Your vehicle may be equipped with the key. Rotate lock control in the direction of arrow to ...; Air vents to engage the lock. Turn the key a second time to unlock that door only. Setting the lock for one door will not automatically set the lock for each rear door and must be set , the rear doors cannot be opened from the inside. Rotate control in the opposite direction to lock all...


