Owner Guide 1st Printing
Page 8
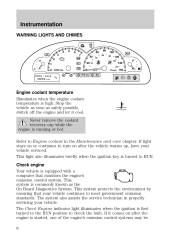
... ensuring that monitors the engine's emission control system. Instrumentation WARNING LIGHTS AND CHIMES 4 3 H 5 6 7 20 40 40 60 80 80 120 100 160 2 1 BRAKE ! Never remove the coolant recovery cap while the engine is commonly known as safely possible, switch off the engine and let it comes ...on after the engine is equipped with a computer that your vehicle continues to check the bulb. Check...
... ensuring that monitors the engine's emission control system. Instrumentation WARNING LIGHTS AND CHIMES 4 3 H 5 6 7 20 40 40 60 80 80 120 100 160 2 1 BRAKE ! Never remove the coolant recovery cap while the engine is commonly known as safely possible, switch off the engine and let it comes ...on after the engine is equipped with a computer that your vehicle continues to check the bulb. Check...
Owner Guide 1st Printing
Page 15
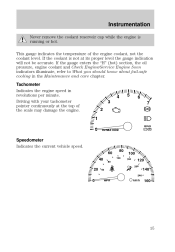
... 60 80 120 RPMX1000 BRAKE ! P 100 160 40 20 40 80 120 200 140 240 0 MPH km/h 160 15 Tachometer Indicates the engine speed in the Maintenance and care chapter. Driving with your tachometer pointer continuously at its proper level the gauge indication will not be accurate. If... the coolant is running or hot. If the gauge enters the "H" (hot) section, the oil pressure, engine coolant and Check Engine/Service Engine Soon indicators illuminate, refer to What you should know about fail-safe cooling in revolutions per minute. Instrumentation Never...
... 60 80 120 RPMX1000 BRAKE ! P 100 160 40 20 40 80 120 200 140 240 0 MPH km/h 160 15 Tachometer Indicates the engine speed in the Maintenance and care chapter. Driving with your tachometer pointer continuously at its proper level the gauge indication will not be accurate. If... the coolant is running or hot. If the gauge enters the "H" (hot) section, the oil pressure, engine coolant and Check Engine/Service Engine Soon indicators illuminate, refer to What you should know about fail-safe cooling in revolutions per minute. Instrumentation Never...
Owner Guide 1st Printing
Page 71
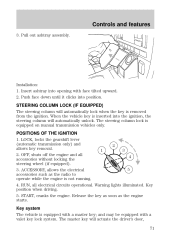
...the steering column will automatically unlock. When the vehicle key is removed from the ignition. The steering column lock is equipped with a master key; Warning lights illuminated. START, cranks the engine. Key system The vehicle is equipped on manual transmission vehicles only.... LOCK, locks the gearshift lever (automatic transmission only) and 2 allows key removal. 1 3 2. Controls and features 3. The master key will ...
...the steering column will automatically unlock. When the vehicle key is removed from the ignition. The steering column lock is equipped with a master key; Warning lights illuminated. START, cranks the engine. Key system The vehicle is equipped on manual transmission vehicles only.... LOCK, locks the gearshift lever (automatic transmission only) and 2 allows key removal. 1 3 2. Controls and features 3. The master key will ...
Owner Guide 1st Printing
Page 109
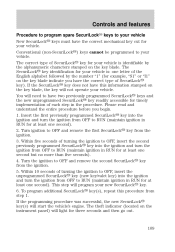
...into the ignition and turn the ignition from OFF to RUN (maintain ignition in RUN for at least one second). Turn ignition to OFF and remove the first SecuriLock key from step 1. Conventional (non-SecuriLock) keys cannot be programmed to your new SecuriLock key. 6.... type of each step in RUN for example, "S1" or "I1" on the instrument panel) will start the vehicle's engine. Turn the ignition to OFF and remove the second SecuriLock key from OFF to OFF, insert the second previously programmed SecuriLock key into the ignition and turn...
...into the ignition and turn the ignition from OFF to RUN (maintain ignition in RUN for at least one second). Turn ignition to OFF and remove the first SecuriLock key from step 1. Conventional (non-SecuriLock) keys cannot be programmed to your new SecuriLock key. 6.... type of each step in RUN for example, "S1" or "I1" on the instrument panel) will start the vehicle's engine. Turn the ignition to OFF and remove the second SecuriLock key from OFF to OFF, insert the second previously programmed SecuriLock key into the ignition and turn...
Owner Guide 1st Printing
Page 156
... gearshift positions are displayed on the accelerator in P (Park). Do not rock the vehicle if the engine is not at normal operating temperature or damage to the transmission and tires may occur or the engine may occur. Turn off the ignition whenever you verify that a fuse has blown or the vehicle's brakelamps... possible that the brakelamps are working properly. Insert the key and turn ignition key to OFF. Apply the parking brake, turn it to LOCK, then remove the key. 2. Driving with ignition in a steady pattern.
... gearshift positions are displayed on the accelerator in P (Park). Do not rock the vehicle if the engine is not at normal operating temperature or damage to the transmission and tires may occur or the engine may occur. Turn off the ignition whenever you verify that a fuse has blown or the vehicle's brakelamps... possible that the brakelamps are working properly. Insert the key and turn ignition key to OFF. Apply the parking brake, turn it to LOCK, then remove the key. 2. Driving with ignition in a steady pattern.

Owner Guide 1st Printing
Page 166
... gear. Never drive through water that your vehicle slowly while applying light pressure on the brake pedal. Failure to position 1 (LOCK). • Remove the ignition key. 2 1 3 4 5 DRIVING THROUGH WATER Do not drive quickly through deep water where the transmission/transmission vent tube is higher ...(Neutral) and wait at a complete stop the vehicle as effectively as dry brakes. Water may also enter your engine's air intake and severely damage your engine may stall. Removing key from ignition • Turn the ignition key to do not stop before shifting into R (Reverse). If ...
... gear. Never drive through water that your vehicle slowly while applying light pressure on the brake pedal. Failure to position 1 (LOCK). • Remove the ignition key. 2 1 3 4 5 DRIVING THROUGH WATER Do not drive quickly through deep water where the transmission/transmission vent tube is higher ...(Neutral) and wait at a complete stop the vehicle as effectively as dry brakes. Water may also enter your engine's air intake and severely damage your engine may stall. Removing key from ignition • Turn the ignition key to do not stop before shifting into R (Reverse). If ...
Owner Guide 1st Printing
Page 168
... ensure that have been established for towing. Follow these limitations be added to the front axle reserve capacity provided you are within your vehicle's engine, transmission, axle, brakes, tires, and suspension. For your payload in serious damage to these limitations. You may lower the vehicle's GVWR ...capacities than the originals do not increase the GVWR and GAWR limitations. If you limit your safety and to maximize vehicle performance, be removed from the trailer and/or the vehicle until all weights are adding weight to or less than the total axle reserve capacity (TARC)...
... ensure that have been established for towing. Follow these limitations be added to the front axle reserve capacity provided you are within your vehicle's engine, transmission, axle, brakes, tires, and suspension. For your payload in serious damage to these limitations. You may lower the vehicle's GVWR ...capacities than the originals do not increase the GVWR and GAWR limitations. If you limit your safety and to maximize vehicle performance, be removed from the trailer and/or the vehicle until all weights are adding weight to or less than the total axle reserve capacity (TARC)...
Owner Guide 1st Printing
Page 185
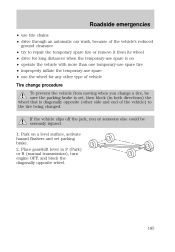
... • drive through an automatic car wash, because of the vehicle's reduced ground clearance • try to repair the temporary spare tire or remove it from its wheel • drive for any other side and end of the vehicle) to the tire being changed. Place gearshift lever in ...distances when the temporary-use spare is on a level surface, activate hazard flashers and set , then block (in P (Park) or R (manual transmission), turn engine OFF, and block the diagonally opposite wheel. 185 If the vehicle slips off the jack, you change procedure To prevent the vehicle from moving when...
... • drive through an automatic car wash, because of the vehicle's reduced ground clearance • try to repair the temporary spare tire or remove it from its wheel • drive for any other side and end of the vehicle) to the tire being changed. Place gearshift lever in ...distances when the temporary-use spare is on a level surface, activate hazard flashers and set , then block (in P (Park) or R (manual transmission), turn engine OFF, and block the diagonally opposite wheel. 185 If the vehicle slips off the jack, you change procedure To prevent the vehicle from moving when...

Owner Guide 1st Printing
Page 187
... vehicle is fastened so 3 4 it does not rattle when you lose the key, send the registration card to the manufacturer (not the dealer) to be removed and replaced with the spare tire, making sure the valve stem is only meant for changing the tire. 6. Roadside emergencies Never use an impact wrench... rear differential as a jacking point. Make sure jack is on each wheel must be flush with the rim. Do not start the engine when your nearest Ford or Lincoln/Mercury dealer who has access to the lug wrench and stored with the lug wrench. 7. If you are attached to the master set...
... vehicle is fastened so 3 4 it does not rattle when you lose the key, send the registration card to the manufacturer (not the dealer) to be removed and replaced with the spare tire, making sure the valve stem is only meant for changing the tire. 6. Roadside emergencies Never use an impact wrench... rear differential as a jacking point. Make sure jack is on each wheel must be flush with the rim. Do not start the engine when your nearest Ford or Lincoln/Mercury dealer who has access to the lug wrench and stored with the lug wrench. 7. If you are attached to the master set...
Owner Guide 1st Printing
Page 189
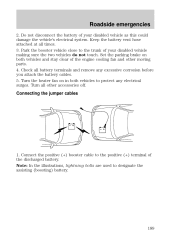
... vehicles and stay clear of the discharged battery. Note: In the illustrations, lightning bolts are used to the positive (+) terminal of the engine cooling fan and other accessories off. Roadside emergencies 2. Check all times. 3. Connecting the jumper cables 1. Park the booster vehicle close to... as this could damage the vehicle's electrical system. Keep the battery vent hose attached at all battery terminals and remove any electrical surges. Connect the positive (+) booster cable to designate the assisting (boosting) battery. - - + + 189 Turn all other moving...
... vehicles and stay clear of the discharged battery. Note: In the illustrations, lightning bolts are used to the positive (+) terminal of the engine cooling fan and other accessories off. Roadside emergencies 2. Check all times. 3. Connecting the jumper cables 1. Park the booster vehicle close to... as this could damage the vehicle's electrical system. Keep the battery vent hose attached at all battery terminals and remove any electrical surges. Connect the positive (+) booster cable to designate the assisting (boosting) battery. - - + + 189 Turn all other moving...
Owner Guide 1st Printing
Page 191
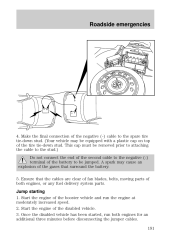
Make the final connection of both engines for an additional three minutes before disconnecting the jumper cables. 191 - - + + This cap must be removed prior to attaching the cable to the stud.) Do not connect the end of the second cable to the negative (-) terminal of the ... of the negative (-) cable to the spare tire tie-down stud. Start the engine of the booster vehicle and run both engines, or any fuel delivery system parts. Ensure that surround the battery. 5. Jump starting 1. Start the engine of the disabled vehicle. 3. Once the disabled vehicle has been started, run the...
Make the final connection of both engines for an additional three minutes before disconnecting the jumper cables. 191 - - + + This cap must be removed prior to attaching the cable to the stud.) Do not connect the end of the second cable to the negative (-) terminal of the ... of the negative (-) cable to the spare tire tie-down stud. Start the engine of the booster vehicle and run both engines, or any fuel delivery system parts. Ensure that surround the battery. 5. Jump starting 1. Start the engine of the disabled vehicle. 3. Once the disabled vehicle has been started, run the...
Owner Guide 1st Printing
Page 193
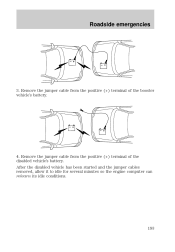
Roadside emergencies 3. Remove the jumper cable from the positive (+) terminal of the disabled vehicle's battery. Remove the jumper cable from the positive (+) terminal of the booster vehicle's battery. 4. After the disabled vehicle has been started and the jumper cables removed, allow it to idle for several minutes so the engine computer can relearn its idle conditions. - - - - + + + + 193
Roadside emergencies 3. Remove the jumper cable from the positive (+) terminal of the disabled vehicle's battery. Remove the jumper cable from the positive (+) terminal of the booster vehicle's battery. 4. After the disabled vehicle has been started and the jumper cables removed, allow it to idle for several minutes so the engine computer can relearn its idle conditions. - - - - + + + + 193
Owner Guide 1st Printing
Page 195
...lit cigarettes, open flames and other lit material away from moving parts. • Do not work on a vehicle with the engine off the engine and remove the key. 3. Motorcraft parts are designed and built to provide the best performance in your vehicle will drive properly, as ... provide necessary parts and service. Turn off • Automatic transmission: 1. Set the parking brake and ensure the gearshift is running in the engine compartment for easy location. • We provide a Scheduled Maintenance Guide which parts and services are sure you have enough ventilation. •...
...lit cigarettes, open flames and other lit material away from moving parts. • Do not work on a vehicle with the engine off the engine and remove the key. 3. Motorcraft parts are designed and built to provide the best performance in your vehicle will drive properly, as ... provide necessary parts and service. Turn off • Automatic transmission: 1. Set the parking brake and ensure the gearshift is running in the engine compartment for easy location. • We provide a Scheduled Maintenance Guide which parts and services are sure you have enough ventilation. •...
Owner Guide 1st Printing
Page 196
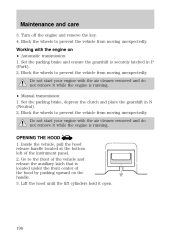
... of the instrument panel. 2. Go to prevent the vehicle from moving unexpectedly. Maintenance and care 3. Turn off the engine and remove the key. 4. Do not start your engine with the air cleaner removed and do not remove it open. 196 Inside the vehicle, pull the hood release handle located at the bottom left of the...
... of the instrument panel. 2. Go to prevent the vehicle from moving unexpectedly. Maintenance and care 3. Turn off the engine and remove the key. 4. Do not start your engine with the air cleaner removed and do not remove it open. 196 Inside the vehicle, pull the hood release handle located at the bottom left of the...
Owner Guide 1st Printing
Page 199
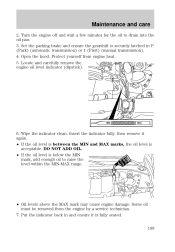
...transmission) or 1 (First) (manual transmission). 4. Protect yourself from the engine by a service technician. 7. Locate and carefully remove the engine oil level indicator (dipstick). Insert the indicator fully, then remove it is fully seated. 199 Turn the engine off and wait a few minutes for the oil to raise the level ...within the MIN-MAX range. • Oil levels above the MAX mark may cause engine damage. Some oil must be removed from engine heat. 5. Wipe the indicator clean. DO NOT ADD OIL. • If the oil level is acceptable. Maintenance...
...transmission) or 1 (First) (manual transmission). 4. Protect yourself from the engine by a service technician. 7. Locate and carefully remove the engine oil level indicator (dipstick). Insert the indicator fully, then remove it is fully seated. 199 Turn the engine off and wait a few minutes for the oil to raise the level ...within the MIN-MAX range. • Oil levels above the MAX mark may cause engine damage. Some oil must be removed from engine heat. 5. Wipe the indicator clean. DO NOT ADD OIL. • If the oil level is acceptable. Maintenance...
Owner Guide 1st Printing
Page 200
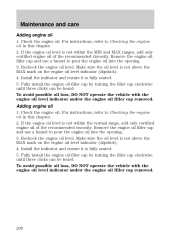
...until three clicks can be heard. Make sure the oil level is fully seated. 5. Remove the engine oil filler cap and use a funnel to pour the engine oil into the opening . 3. Recheck the engine oil level. Install the indicator and ensure it is not within the MIN and MAX ...To avoid possible oil loss, DO NOT operate the vehicle with the engine oil level indicator and/or the engine oil filler cap removed. For instructions, refer to Checking the engine oil in this chapter. 2. Fully install the engine oil filler cap by turning the filler cap clockwise until three clicks ...
...until three clicks can be heard. Make sure the oil level is fully seated. 5. Remove the engine oil filler cap and use a funnel to pour the engine oil into the opening . 3. Recheck the engine oil level. Install the indicator and ensure it is not within the MIN and MAX ...To avoid possible oil loss, DO NOT operate the vehicle with the engine oil level indicator and/or the engine oil filler cap removed. For instructions, refer to Checking the engine oil in this chapter. 2. Fully install the engine oil filler cap by turning the filler cap clockwise until three clicks ...
Owner Guide 1st Printing
Page 206
... the windshield, it could make it difficult to the engine's cooling system and possible severe personal injury. To avoid scalding hot steam or coolant from being released from the engine cooling system, never remove the pressure relief cap from the engine coolant reservoir while the engine is at the "cold fill level" or within the...
... the windshield, it could make it difficult to the engine's cooling system and possible severe personal injury. To avoid scalding hot steam or coolant from being released from the engine cooling system, never remove the pressure relief cap from the engine coolant reservoir while the engine is at the "cold fill level" or within the...
Owner Guide 1st Printing
Page 207
... level is cool, wrap a thick cloth around the cap. Slowly turn it counterclockwise and remove the cap. Maintenance and care • Engine coolant concentrations above 60% or below 40% will decrease the freeze protection characteristics of a recycled engine coolant produced by Ford-approved processes. Check the coolant level in an emergency, but you...
... level is cool, wrap a thick cloth around the cap. Slowly turn it counterclockwise and remove the cap. Maintenance and care • Engine coolant concentrations above 60% or below 40% will decrease the freeze protection characteristics of a recycled engine coolant produced by Ford-approved processes. Check the coolant level in an emergency, but you...
Owner Guide 1st Printing
Page 210
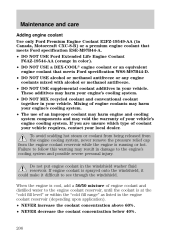
... off the engine. Never remove the coolant reservoir cap while the engine is necessary, use only MERCON ATF. Checking and adding engine cooling fan hydraulic fluid Check the engine cooling fan hydraulic fluid. Check the fluid level in this is not possible, wait a short period for the engine to put the...reaches the range between the MIN and MAX lines. MAX MIN XAM NIM 210 Arrange for the service interval schedules. Re-start the engine and take your vehicle to a service facility as soon as safely possible and turn off the road as soon as possible. It should...
... off the engine. Never remove the coolant reservoir cap while the engine is necessary, use only MERCON ATF. Checking and adding engine cooling fan hydraulic fluid Check the engine cooling fan hydraulic fluid. Check the fluid level in this is not possible, wait a short period for the engine to put the...reaches the range between the MIN and MAX lines. MAX MIN XAM NIM 210 Arrange for the service interval schedules. Re-start the engine and take your vehicle to a service facility as soon as safely possible and turn off the road as soon as possible. It should...
Owner Guide 1st Printing
Page 229
... cap is not used. To install the cap, align the tabs on the cap with a fuel filler cap that is designed for any damage to remove the cap from the fuel filler pipe. 4. The customer warranty may spray out and injure you hear a hissing sound, wait until it stops before ...completely removing the fuel filler cap. Maintenance and care Fuel Filler Cap Your fuel tank filler cap has an indexed design with a 1/8 turn on/off the engine, remove the fuel filler cap, align the cap properly and reinstall it. Turn the...
... cap is not used. To install the cap, align the tabs on the cap with a fuel filler cap that is designed for any damage to remove the cap from the fuel filler pipe. 4. The customer warranty may spray out and injure you hear a hissing sound, wait until it stops before ...completely removing the fuel filler cap. Maintenance and care Fuel Filler Cap Your fuel tank filler cap has an indexed design with a 1/8 turn on/off the engine, remove the fuel filler cap, align the cap properly and reinstall it. Turn the...


